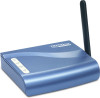
TRENDnet TEW-P1U1P Quick Installation Guide
TRENDnet TEW-P1U1P Manual
 |
View all TRENDnet TEW-P1U1P manuals
Add to My Manuals
Save this manual to your list of manuals |
TRENDnet TEW-P1U1P manual content summary:
- TRENDnet TEW-P1U1P | Quick Installation Guide - Page 1
P/N 9570960301 - TRENDnet TEW-P1U1P | Quick Installation Guide - Page 2
Physical Installation Connecting Print Server to the Network: 1. Make sure the Print Server and Printer are powered OFF. 2. Connect the printer to the Print Server's printer port. 3. For Wired Network: Use a standard RJ-45 LAN cable to connect the LAN port on the Print Server to a 10/100Base-TX - TRENDnet TEW-P1U1P | Quick Installation Guide - Page 3
is a hardware problem. L This Quick Installation Guide contains brief instructions for the following: • Print Server Installation & Setup • Windows 95/98/Me/NT/2000/XP client setup • Macintosh (AppleTalk) client setup For Unix or Netware environments, please refer to additional User Manuals in the - TRENDnet TEW-P1U1P | Quick Installation Guide - Page 4
Configuring Print Server Non-Windows Systems The "Manual" folder on the CD-ROM contains manuals for Unix and Netware. Windows Systems 1. Insert the supplied CD-ROM into your drive. If the setup program does not start automatically, run Autorun.exe in the root folder. 2. On the first screen, shown - TRENDnet TEW-P1U1P | Quick Installation Guide - Page 5
name (eg. Printer Model) for each Printer. 6. Click Next to configure the TCP/IP screen. • Select Obtain IP Address automatically if your LAN has a DHCP Server • Select Fixed IP Address(recommended), enter an unused address from the range used on your LAN, or click the Suggest New Values Button. Use - TRENDnet TEW-P1U1P | Quick Installation Guide - Page 6
additional software. For other versions of Windows, the supplied PTP (Peer-toPeer) Printer Port software must be installed on each PC. Windows 2000/XP Setup The recommended printing method is to use LPR, as follows: 1. Open your Printers folder, click on Add a Printer and click Next to start adding - TRENDnet TEW-P1U1P | Quick Installation Guide - Page 7
3. Choose Create a new port and select Standard TCP/IP Port, then click Next. Page 6 - TRENDnet TEW-P1U1P | Quick Installation Guide - Page 8
4. Enter Print Server's IP Address here. IP Address 5. On this screen, select Custom, and click the Settings button. Custom Page 7 - TRENDnet TEW-P1U1P | Quick Installation Guide - Page 9
6. Choose LPR in the Protocol section, then enter Queue name (L1 for Parallel Port, L2 for USB Port) and ensure the LPR Byte Counting Enabled setting is Enabled. 7. Follow the prompts to install printer driver and complete the Wizard. 8. Go back to Printer folder, click on the new created printer, - TRENDnet TEW-P1U1P | Quick Installation Guide - Page 10
9. Go to Ports tab, disable Bi-Directional Support and click on OK to complete the installation Page 9 - TRENDnet TEW-P1U1P | Quick Installation Guide - Page 11
1. Insert the supplied CD-ROM into your drive. If the setup program does not start, run Autorun.exe in the root folder. 2. Click the of the Peer-to-peer (PTP) Printer Port Driver. 4. The Printer Port Driver Setup will then run. In future, you can use Start-Programs-Print Server UtilityPrinter Driver - TRENDnet TEW-P1U1P | Quick Installation Guide - Page 12
PTP Printer Port Setup 1. The program will search for Print Servers on the network, and a screen like the following will be displayed. 2. Select the desired port on a Print Server, - TRENDnet TEW-P1U1P | Quick Installation Guide - Page 13
. 5. Installation is now complete. Note: If using the Epson Spooler Manager, this program must be disabled, as follows: 1. Run the Epson Spooler Manager 2. Select Queue Setup from the menu 3. Click Use Print Manager for this port 4. Click OK to exit Page 12 - TRENDnet TEW-P1U1P | Quick Installation Guide - Page 14
list. 8. Click Select. Configuration is now complete Macintosh OS X - LPR Printing If using LPR printing, you need to ensure the Print Server has a valid IP address before configuring your Mac as follows. 1. Select the Printer List icon. 2. Click the Add Printer button. 3. Choose LPR Printers Using - TRENDnet TEW-P1U1P | Quick Installation Guide - Page 15
4. Enter the Printer's Address and the Queue Name (eg. L1, L2). 5. Select the Printer Model from the drop-down list. 6. Click Add. Configuration is now complete. Page 14
-
 1
1 -
 2
2 -
 3
3 -
 4
4 -
 5
5 -
 6
6 -
 7
7 -
8
-
9
-
10
-
11
-
12
-
13
-
14
-
15
 |
 |

P/N 9570960301