TRENDnet TV-IP672WI User's Guide
TRENDnet TV-IP672WI Manual
 |
View all TRENDnet TV-IP672WI manuals
Add to My Manuals
Save this manual to your list of manuals |
TRENDnet TV-IP672WI manual content summary:
- TRENDnet TV-IP672WI | User's Guide - Page 1
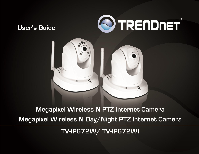
TRENDnet User's Guide Cover Page - TRENDnet TV-IP672WI | User's Guide - Page 2
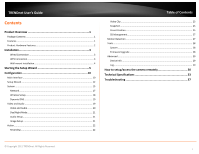
Setup Wizard 5 Configuration 10 Main Interface ...10 Setup Wizard ...12 System ...15 Network...17 Wireless Setup... Firmware Upgrade 28 Advanced ...29 Device Info ...29 Log...29 How to setup/access the camera remotely 30 Technical Specifications 33 Troubleshooting 37 © Copyright 2011 TRENDnet - TRENDnet TV-IP672WI | User's Guide - Page 3
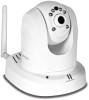
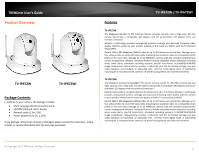
TRENDnet User's Guide Product Overview TV-IP672W TV-IP672WI Package Contents In addition to your camera, the package includes: Multi-Language Quick Installation Guide CD-ROM (Utility & User's Guide) Network cable (1.5m / 5ft) Power adapter (12V DC, 1.25A) If any package contents are - TRENDnet TV-IP672WI | User's Guide - Page 4
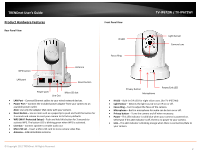
TRENDnet User's Guide Product Hardware Features Rear Panel View Front Panel View IR LED TV-IP672W / TV-IP672WI Light Sensor Camera Lens Focus Ring WPS button LAN port Antenna Reset 3 seconds and release to reset your camera to its factory defaults. WPS (Wi-Fi Protected Setup) - Push and hold - TRENDnet TV-IP672WI | User's Guide - Page 5
to an available port on your network. If you prefer to use the camera on a wireless network, see below for instructions on connecting the power adapter. TV-IP672W / TV-IP672WI WPS Connection An alternative method of connecting your camera to your network is by using WPS. WPS is a quick, simple and - TRENDnet TV-IP672WI | User's Guide - Page 6
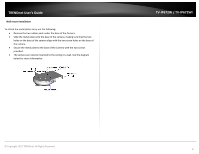
two screw holes on the base of the camera. Secure the metal plate to the base of the Camera with the two screws provided. The camera can now be mounted to the ceiling or a wall. See the diagram below for more information. TV-IP672W / TV-IP672WI © Copyright 2012 TRENDnet. All Rights Reserved. 4 - TRENDnet TV-IP672WI | User's Guide - Page 7
TRENDnet User's Guide Starting the Setup Wizard Insert the included CD-ROM into your CD/DVD selecting Setup Wizard and follow the on-screen steps to continue the installation. TV-IP672W / TV-IP672WI 2. Connect an RJ-45 cable from a switch/router to the Ethernet port on the back of the camera and - TRENDnet TV-IP672WI | User's Guide - Page 8
TRENDnet User's Guide 4. Login to your camera by entering the ID and Password. By default, both the ID and Password are set to admin. Click Next to continue. TV-IP672W / TV-IP672WI 6. It is strongly recommended that you change your password to secure the camera from being accessed by others. Check - TRENDnet TV-IP672WI | User's Guide - Page 9
TRENDnet User's Guide 8. Select whether you want to use the camera over an wireless connection or on a wired connection. Click No, I don't want to use wireless for the camera. Then click Next to continue. (skip to step 12 for wireless configuration) TV-IP672W / TV-IP672WI 10. After the Setup Wizard - TRENDnet TV-IP672WI | User's Guide - Page 10
TRENDnet User's Guide 12. When selecting the wireless setup choose "I want to use wireless for the camera, click Next to continue. TV-IP672W / TV-IP672WI 13. A summary screen of the settings you have chosen appears. Click Next to continue. Wireless Connection Find the access point (AP) you wish - TRENDnet TV-IP672WI | User's Guide - Page 11
TRENDnet User's Guide 15. Connecting over wireless Disconnect the Ethernet cable from the camera and wait for 1 minute for the camera to turn to wireless mode then click Next to continue. TV-IP672W / TV-IP672WI When the Setup Wizard has finished, the configuration is complete. If there is a - TRENDnet TV-IP672WI | User's Guide - Page 12
the IP address of your camera. To log in, use the User name admin and the password you created in the Setup Wizard. If you did not create a password, the default password is admin. After entering your password, click OK. Main Interface TV-IP672W / TV-IP672WI The home page for the TV-IP672W or TV - TRENDnet TV-IP672WI | User's Guide - Page 13
TRENDnet User's Guide 6. Pan 7. Patrol 8. Stop 9. Go to 10. Pan Speed 11. Tilt Speed 12. Live View 13. Control Navigational Menu This button pans the camera view from the camera It contains a list of functions. Record Storage Folder Audio Microphone Zoom TV-IP672W / TV-IP672WI Start recording the - TRENDnet TV-IP672WI | User's Guide - Page 14
option and click Next to continue. TV-IP672W / TV-IP672WI Step 2: Internet Settings This screen provides PPPoE settings and allows the camera to be connected directly to your ADSL modem. Click the Enable checkbox to setup PPPoE. Enter a username and password. If your internet connection doesn - TRENDnet TV-IP672WI | User's Guide - Page 15
settings uncheck the Enable checkbox and click Next. TV-IP672W / TV-IP672WI Step 4: Camera Name Settings This screen provides Camera Name settings. In the Camera Name field type the name you wish to assign to the camera and click Next to continue. © Copyright 2012 TRENDnet. All Rights Reserved. 13 - TRENDnet TV-IP672WI | User's Guide - Page 16
Auto Daylight Saving or Set date and time manually. Click Next to continue. TV-IP672W / TV-IP672WI Step 6: Setup Complete This screen provides Configuration Settings. The settings. © Copyright 2012 TRENDnet. All Rights Reserved. The camera will gather and reboot the camera to its new settings 14 - TRENDnet TV-IP672WI | User's Guide - Page 17
TRENDnet User's Guide System System is divided into two main sections - Admin and Time & Date. The Admin section is where all Device Management configurations are handled. TV-IP672W / TV-IP672WI Admin Password Settings: Here you can change the administrator password settings. Enter the Old Password - TRENDnet TV-IP672WI | User's Guide - Page 18
process or leave them blank. Click Save to continue. TV-IP672W / TV-IP672WI The next configurable section under System is Time and Date. If you didn't set the time and date settings in the Setup Wizard, you can change them here. The camera allows users to access the video directly For Internet - TRENDnet TV-IP672WI | User's Guide - Page 19
TRENDnet User's Guide Under Set Date and Time Manually, click the Setup Date and Time Manually checkbox if you wish to set the time by yourself. From the drop-down list on all settings, select your time and click Apply to continue or click Copy Your Computer's Time Settings. TV-IP672W / TV-IP672WI - TRENDnet TV-IP672WI | User's Guide - Page 20
TRENDnet User's Guide TV-IP672W / TV-IP672WI Wireless Setup This screen shows the Wireless Settings. Click the Wireless checkbox to enable wireless. Complete the details in the fields according to your router. Enter a Network Name, under Site Survey select the SSID from the drop-down list or - TRENDnet TV-IP672WI | User's Guide - Page 21
these fields: Host Name, User Name, Password, Confirm Password, and Timeout. Click Apply to set these changes and continue. TV-IP672W / TV-IP672WI Video and Audio This screen shows different video profiles where you can setup different functions for the camera. The audio settings also allow for - TRENDnet TV-IP672WI | User's Guide - Page 22
TRENDnet User's Guide Video and Audio Under each profile settings there are 4Mbps/3Mbps/2Mbps/1.5Mbps/1Mbps/768Kbps/512Kbps/384Kbps/256Kbps/12 8Kbps/64Kbps RTSP URL - play1.sdp TV-IP672W / TV-IP672WI Video Profile Two - Options: Encode Type - H.264 & MPEG4 Resolution -640x400/320x192/160x96 - TRENDnet TV-IP672WI | User's Guide - Page 23
. You can select it to run automatically, manually, in constant day mode or constant night mode. Audio Setup The TV-IP672W/TV-IP672WI allows users to record and broadcast audio. Click the Speaker checkbox to change the volume settings on the camera's speaker. Click the Microphone checkbox and select - TRENDnet TV-IP672WI | User's Guide - Page 24
Click the Recording checkbox to enable camera recording. All data is stored on the removable SD card. There are three main sections: Trigger By: Always, Motion, Schedule, Recording: Configure the recording options SD Card: Recording files size TV-IP672W / TV-IP672WI Trigger By - Always This option - TRENDnet TV-IP672WI | User's Guide - Page 25
TRENDnet User's Guide the camera will start recording before the allotted time schedule. These times can only be set in seconds. Click Apply to complete the configuration. TV-IP672W / TV-IP672WI Account radio button then enter a Username and Password. This will authenticate the user every time they - TRENDnet TV-IP672WI | User's Guide - Page 26
using to access the data or save the data to Interval - The default interval range is 60-86400. The time the server interacts with your camera Passive Mode - Server/client initiation access to bypass proxies. TV-IP672W / TV-IP672WI For Email Recipient E-mail Address - the email address you want to - TRENDnet TV-IP672WI | User's Guide - Page 27
. TV-IP672W / TV-IP672WI Preset Position Preset Position This screen shows the software Pan/Tilt functions. You can set preset positions for fast authentication. Most of the screen is taken up by the camera image. On the right of the main screen is the Pan & Tilt dial © Copyright 2012 TRENDnet - TRENDnet TV-IP672WI | User's Guide - Page 28
the Pan/Patrol Speed (1-3 with 1 being the slowest), and Dwelling Time (in seconds). This indicates the time needed to span an area covered by the camera. 5. Click Apply to continue and finish the process. © Copyright 2012 TRENDnet. All Rights Reserved. TV-IP672W / TV-IP672WI 26 - TRENDnet TV-IP672WI | User's Guide - Page 29
TRENDnet User's Guide SD Management These settings control the management of data on the SD card installed on the camera. Set TV-IP672W / TV-IP672WI Motion Detection These settings control the motion detection settings on the camera. Motion detection allows you to designate an area in the cameras - TRENDnet TV-IP672WI | User's Guide - Page 30
TRENDnet User's Guide TV-IP672W / TV-IP672WI Firmware Upgrade These settings display the Current Firmware Version and the Current Firmware Build Number. To do the Firmware the firmware. When you want to reset the camera to system default, click the Restore Factory Defaults button to reset the - TRENDnet TV-IP672WI | User's Guide - Page 31
is laid out in the picture below. TV-IP672W / TV-IP672WI Log These settings display the Current Log of the device. Click the Clear button to reset the log or click the Download file in txt format. button to download a © Copyright 2012 TRENDnet. All Rights Reserved. For more monitoring - TRENDnet TV-IP672WI | User's Guide - Page 32
the feature. Then select a DDNS provider from the list. TV-IP672W / TV-IP672WI 2. Enter your DDNS's the Host Name, User Name and Password. 3. In the Port Number section, assign an HTTP port of the camera. The default HTTP Port on the camera is 80. The example shows above is using port number 9000 - TRENDnet TV-IP672WI | User's Guide - Page 33
TRENDnet User's Guide Then click Add to add the application. * Please refer to your router's user's manual for detail Virtual Server setting. Some router might use Port Forwarding or Special applications for this function. The setup steps should be very similar. TV-IP672W / TV-IP672WI 2. Login to - TRENDnet TV-IP672WI | User's Guide - Page 34
side to access to your Camera. LAN Server: The local IP address of your Camera. TV-IP672W / TV-IP672WI http://yourDomainName:PortNumber 6. The camera login page will appear. Click Add to add the application. * Please refer to your router's user's manual for detail Virtual Server setting. Some - TRENDnet TV-IP672WI | User's Guide - Page 35
Reset Button Reset to factory default Privacy Button Privacy mode on/off © Copyright 2011 TRENDnet. All Rights Reserved. TV-IP672W / TV-IP672WI Power Consumption Power Dimension Weight Temperature Humidity Certifications Requirement Management Interface To Run software SecurView Pro Software - TRENDnet TV-IP672WI | User's Guide - Page 36
: 640 x 400, 320 x 192, 160 x 96 - Max frame rate: 30fps Profile 3: MJPEG © Copyright 2011 TRENDnet. All Rights Reserved. 3GPP Recording Event Action Port Settings Time TV-IP672WI Camera General TV-IP672W / TV-IP672WI - Resolution: 1280 x 800, 640 x 400, 320 x 192, 160 x 96 - Max frame rate: 1280 - TRENDnet TV-IP672WI | User's Guide - Page 37
(IR) supports up to 7.5 meters IEEE 802.3u 10/100Mbps Auto-MDIX Fast Ethernet Power, Link/Act Enable WPS connection Reset to factory default Privacy mode on TRENDnet. All Rights Reserved. TV-IP672W / TV-IP672WI Management Interface To Run software SecurView Pro Software Network Protocols Wireless - TRENDnet TV-IP672WI | User's Guide - Page 38
(minimum per profile) © Copyright 2011 TRENDnet. All Rights Reserved. Event Action Port Settings Time TV-IP672W / TV-IP672WI Recording type: event based (motion detection to FTP or email HTTP port: 80 (default) RTSP port: 554 (default) Synchronize with NTP server or set time / date manually 36 - TRENDnet TV-IP672WI | User's Guide - Page 39
the section of this guide on Configuration of System settings. 2. The camera can't be accessed or access is slow There might be a problem with the network © Copyright 2011 TRENDnet. All Rights Reserved. TV-IP672W / TV-IP672WI to sunlight or halogen lights. Reposition the Network Camera into a more - TRENDnet TV-IP672WI | User's Guide - Page 40
instructions, U.S.A. is firmware-limited to test methods have been applied in order to prove presumption of conformity with the essential requirements of the R&TTE Directive 1999/5/EC: © Copyright 2011 TRENDnet. All Rights Reserved. TV-IP672W / TV-IP672WI and/or network services. This device may - TRENDnet TV-IP672WI | User's Guide - Page 41
TRENDnet User's Guide Česky [Czech] Dansk [Danish] Deutsch [German] Eesti [Estonian] English Español [Spanish] Greek] Français [French] Italiano [Italian] Latviski [Latvian] TRENDnet tímto prohlašuje, že tento TV-IP672W / TV-IP672WI je ve shodě se základními požadavky a dalšími příslušnými - TRENDnet TV-IP672WI | User's Guide - Page 42
TRENDnet User's Guide Limited Warranty TRENDnet warrants its products against defects in material and workmanship, under normal use and service, for the following lengths of time from the date of purchase. TV-IP672W / TV-IP672WI - 3 Years Warranty AC/DC Power Adapter, Cooling Fan, and Power Supply - TRENDnet TV-IP672WI | User's Guide - Page 43
-
 1
1 -
 2
2 -
 3
3 -
 4
4 -
 5
5 -
 6
6 -
 7
7 -
8
-
9
-
10
-
11
-
12
-
13
-
14
-
15
-
16
-
17
-
18
-
19
-
20
-
21
-
22
-
23
-
24
-
25
-
26
-
27
-
28
-
29
-
30
-
31
-
32
-
33
-
34
-
35
-
36
-
37
-
38
-
39
-
40
-
41
-
42
-
43
 |
 |

TRENDnet User’s Guide
Cover Page