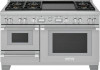
Thermador PRD606WESG Installation Instructions
Thermador PRD606WESG Manual
 |
View all Thermador PRD606WESG manuals
Add to My Manuals
Save this manual to your list of manuals |
Thermador PRD606WESG manual content summary:
- Thermador PRD606WESG | Installation Instructions - Page 1
Installation INSTRUCTIONS Professional Series Pro Grand® Ranges THERMADOR.COM - Thermador PRD606WESG | Installation Instructions - Page 2
Installation INSTRUCTIONS Professional Series Pro Grand® Ranges Table of contents (English 2 Table de mati /C PRD486WDGU/C PRD486WIGU/C PRD486WLGU/C PRD48WCSGU/C PRD48WDSGU/C PRD48WISGU/C PRD48WLSGU/C PRD606WCG PRD606WCSG PRD606WEG PRD606WESG PRG364WDG PRG364WLG PRG366WG PRG486WDG PRG486WLG - Thermador PRD606WESG | Installation Instructions - Page 3
Safety DEFINITIONS Safety 3 Important safety instructions 3 Installation instructions 6 Planning information 6 Ventilation requirements rating label 25 Burner test 25 Installer checklist 27 Final check 27 Support, accessories, and parts back page 9 WARNING This indicates that death or - Thermador PRD606WESG | Installation Instructions - Page 4
instructions for future reference. Before using your appliance, be sure to read this manual. WARNING If the information in this manual instructions. • If you cannot reach your gas supplier, call the fire department. -- Installation and service must be performed by a qualified installer, service - Thermador PRD606WESG | Installation Instructions - Page 5
INSTRUCTIONS of a power failure. Only the standard top burners can be manually lit. Always keep appliance area clear from combustible materials, gasoline purchased separately. An authorized servicer must do the LP conversion. See the back cover for information about service, parts, and accessories - Thermador PRD606WESG | Installation Instructions - Page 6
READ AND SAVE THESE INSTRUCTIONS Rear clearance requirements • To avoid staining on the back wall, high temperature, non-porous construction materials suitable for use in a cooking environment are recommended. • Models - Thermador PRD606WESG | Installation Instructions - Page 7
read this manual. Pay special attention to the "Important safety instructions" located at the beginning of the manual. Tools may cause ignition and combustion problems with the appliance resulting in personal not be used. The "Ventilation planning guide" indicates the ventilation hood options and - Thermador PRD606WESG | Installation Instructions - Page 8
wide enough to accept the island hood. • See the "Ventilation planning guide" for recommended hood options. Due to the high heat of the model other than the 30'' 5- burner. Refer to OTR manufacturer's installation manual for clearances. • The gas and electrical supply should be within the zones - Thermador PRD606WESG | Installation Instructions - Page 9
Cabinet clearance requirements with the included island trim 13" (330) 6" (152) 3360""(9(71642)) - 18" (457) (91346"oro1r 24189" ) 5" (127) 35 ⅞" (911) - 36 ¾" (933) inches (mm) as defined in the "National Fuel Gas Code" (ANSI Z223.1, Current Edition). Clearances from non-combustible - Thermador PRD606WESG | Installation Instructions - Page 10
Cabinet clearance requirements with a low backguard (purchased separately) 13" (330) 0" 3360""(9(71642)) - 18" (457) (91346"oro1r 24189" ) 5" (127) 35 ⅞" (911) - 36 ¾" (933) inches (mm) as defined in the "National Fuel Gas Code" (ANSI Z223.1, Current Edition). Clearances from non-combustible - Thermador PRD606WESG | Installation Instructions - Page 11
Cabinet clearance requirements for the 60'' range with the included island trim 13" (330) 0" 3360""(9(71642)) - 18" (457) 5" (127) 60" (1524) 35 ⅞" (911) - 36 ¾" (933) inches (mm) as defined in the "National Fuel Gas Code" (ANSI Z223.1, Current Edition). Clearances from non-combustible - Thermador PRD606WESG | Installation Instructions - Page 12
Side clearances 6" (152) 28" (711) 27¼" (692) 30" (762) - 36" (914) 25⅛" (638) 35⅞" (911) - 36¾" (933) 26⅞" (683) 48¾" (1238) inches (mm) • The model shown is with the included island trim. A low backguard option is available (purchased separately). • For an island trim install, counter - Thermador PRD606WESG | Installation Instructions - Page 13
to the pressure regulator supplied with the range. • The gas and electrical supplies must be within the zones as indicated in the image below. • A manual gas shut-off valve must be installed external to the appliance, in a location accessible from the front, for the purpose of shutting off the gas - Thermador PRD606WESG | Installation Instructions - Page 14
. Unit should not be dollied from the front. DO NOT slide the range across an unprotected floor. 4. The range can then be tipped back and supported on the rear legs while the dolly is carefully removed. THE FLOOR UNDER THE LEGS SHOULD BE PROTECTED BEFORE PUSHING THE UNIT INTO POSITION. Page - Thermador PRD606WESG | Installation Instructions - Page 15
Door removal and adjustment 9 CAUTION • USE CAUTION WHEN REMOVING THE DOOR. THE DOOR IS VERY HEAVY. • Make sure oven is cool and power to the oven has been turned off before removing the door. Failure to do so could result in electrical shock or burns. • The oven door is heavy and fragile. Use both - Thermador PRD606WESG | Installation Instructions - Page 16
4. Flip the hinge until seated on the bracket. A screwdriver may be required to carefully push the clip. 5. Close and open the door slowly to ensure it is correctly and securely in place. To remove the warming drawer 1. On the top of the warming drawer door, remove the three (3) T-20 torx screws. - Thermador PRD606WESG | Installation Instructions - Page 17
of tip-over may exist if the appliance is not installed in accordance with these instructions. For all ranges an anti-tip device MUST be installed. • A child or . • If the range is pulled away from the wall for cleaning, service or for any other reason, ensure that the anti-tip device is properly - Thermador PRD606WESG | Installation Instructions - Page 18
be isolated from the gas supply piping system by closing its individual manual shut-off valve during any pressure testing of the gas supply piping adjustments during installation. See the back cover for information about service, parts, and accessories. Gas requirements Natural gas requirements: - Thermador PRD606WESG | Installation Instructions - Page 19
the gas 1. Make sure the gas supply is turned off at the manual shut-off valve before connecting the appliance. 2. Use a ¾'' (19 breaker at the service panel before servicing the appliance. 9 WARNING This product must be properly grounded. 9 WARNING Electrical grounding instructions This appliance - Thermador PRD606WESG | Installation Instructions - Page 20
from wall receptacle. If appliance is hard-wired to power supply, disconnect power to unit by turning off the proper circuit breaker. Lock service panel to prevent power from being turned ON accidentally. • A neutral supply wire must be provided from the power source (breaker) because critical range - Thermador PRD606WESG | Installation Instructions - Page 21
this section for grounding method. • Electrical wiring diagrams and schematics have been placed in the kick panel area of the range for access by a qualified service technician. • The ranges are to be connected to a 240/208 VAC power supply. • Dual Fuel models must be connected to the power supply - Thermador PRD606WESG | Installation Instructions - Page 22
3-wire lead connection Where local codes and ordinances permit grounding through neutral, and conversion of supply to 4-wire is impractical, the unit may be connected to the power supply with a Listed (UL, CSA, ...) 3-POLE, 3CONDUCTOR cord kit rated 125/250 VOLTS, 50 AMPERES DEDICATED CIRCUIT, and - Thermador PRD606WESG | Installation Instructions - Page 23
, ensure all packaging has been removed from accessory devices before use. Installation methods will vary upon need. Before you begin read these instructions carefully. Observe all local codes and ordinances. To install the low backguard 1. Remove the T-20 torx stainless screws in the front face - Thermador PRD606WESG | Installation Instructions - Page 24
are made to the two front legs to ensure proper alignment to the counter top. 3. Lower the center leveling foot of the unit to help support the appliance weight. 4. Reinstall the oven doors (refer to "Door removal and adjustment"). Page. 23 - Thermador PRD606WESG | Installation Instructions - Page 25
cover assembly has been mounted to the unit. 4. Repeat for all visible legs. • If additional leg covers are required, they may be ordered from the service center by calling 1-800-735-4328 at no charge for up to one year after purchase date of the appliance. 4. Press the toe kick panel - Thermador PRD606WESG | Installation Instructions - Page 26
be removed except by a service technician, then replaced after service. Burner test 9 WARNING To connected to the electrical power supply. Turn the manual gas shut-off valve to the open position. not properly placed, one or more of the following problems may occur: 2. Place burner cap gently on top - Thermador PRD606WESG | Installation Instructions - Page 27
each burner port and there should be no air gap between the flame and the burner. If any burners do not carry over, call Thermador service. If the flame is completely or mostly yellow, verify that the regulator is set for the correct fuel. After adjustment, retest. Some orange-colored streaking - Thermador PRD606WESG | Installation Instructions - Page 28
Leave the Home Connect™ instruction leaflet with the owner of is provided for service cord connection. Proper and Care Guide. Leave the Use and Care Guide and Installation Manual with Guide for additional information. Troubleshooting See Use and Care Guide for troubleshooting information. Page. 27 - Thermador PRD606WESG | Installation Instructions - Page 29
Table des MATIÈRES Définitions de SÉCURITÉ Sécurit 29 Instructions importants de sécurit 29 Consignes d'installation 32 Renseignements de planification 32 Exigences en matière de ventilation 32 Espaces libres pour l'Installation 33 Alimentation de - Thermador PRD606WESG | Installation Instructions - Page 30
adulte pourrait faire basculer l'appareil et perdre la vie. • Ne faites pas fonctionner l'appareil si le support antibascule n'est pas installé et qu'il ne retient pas l'appareil. La non-observation de ces instructions peut entraîner la mort ou causer de graves brûlures à des enfants ou des adultes - Thermador PRD606WESG | Installation Instructions - Page 31
IMPORTANTS DE SÉCURITÉ LIRE TOUTES LES INSTRUCTIONS AVANT DE PROCÉDER L'installation de ces dispositifs conçus pour micro-maisons préfabriquées doit se faire conformément aux réglementations nationales ou - Thermador PRD606WESG | Installation Instructions - Page 32
IMPORTANTS DE SÉCURITÉ LIRE TOUTES LES INSTRUCTIONS AVANT DE PROCÉDER Avertissement issu de la proposition 65 : Ce produit pourrait contenir un produit chimique reconnu par l'État de la Californie comme cancé - Thermador PRD606WESG | Installation Instructions - Page 33
couches multiples. Les matériaux doivent être en mesure de supporter des températures pouvant atteindre 90 °C (194 °F). Utilisez des à ces exigences. Lisez toutes les instructions avant d'utiliser l'appareil. Faites tout par aspiration descendante. Le "Guide de planification de ventilation", indique - Thermador PRD606WESG | Installation Instructions - Page 34
sur îlot, sauf pour les armoires au-dessus qui doivent comporter un espace assez grand pour recevoir une hotte d'îlot. • Consultez le "Guide de planification de ventilation" pour connaître les combinaisons de ventilation approuvées. L'installation d'un micro-ondes à hotte intégrée au-dessus - Thermador PRD606WESG | Installation Instructions - Page 35
Arrière exigences de dégagement • Pour éviter de tacher le mur arrière, on recommande des matériaux de construction non-poreux, résistants à haute température qui conviennent à un environnement propre à la cuisson. • Le modèle PCG305xx, PRG305xx, PRG304xx, PRD305xx, PRD304, et PRD606xx convient pour - Thermador PRD606WESG | Installation Instructions - Page 36
Espace libre - armoires avec garniture d'ilot incluse 13" (330) 6" (152) 3360""(9(71642)) - 18" (457) (91346"oro1r 24189" ) 5" (127) 35 ⅞" (911) - 36 ¾" (933) pounces (mm) Les dégagements pour matériaux non-combustibles ne sont pas abordés dans la norme ANSI Z21.1 ni certifiés par la CSA. * - Thermador PRD606WESG | Installation Instructions - Page 37
Espace libre - armoires avec dosseret bas (acheter séparément) 13" (330) 0" 3360""(9(71642)) - 18" (457) (91346"oro1r 24189" ) 5" (127) 35 ⅞" (911) - 36 ¾" (933) pounces (mm) Les dégagements pour matériaux non-combustibles ne sont pas abordés dans la norme ANSI Z21.1 ni certifiés par la CSA. - Thermador PRD606WESG | Installation Instructions - Page 38
Espace libre - armoires avec garniture d'ilot incluse de la cuisinière (seulement 60'') 13" (330) 0" 3360""(9(71642)) - 18" (457) 5" (127) 60" (1524) 35 ⅞" (911) - 36 ¾" (933) pounces (mm) Les dégagements pour matériaux non-combustibles ne sont pas abordés dans la norme ANSI Z21.1 ni certifi - Thermador PRD606WESG | Installation Instructions - Page 39
Espaces libres latéraux requis pour l'installation 6" (152) 28" (711) 27¼" (692) 30" (762) - 36" (914) 25⅛" (638) 35⅞" (911) - 36¾" (933) 26⅞" (683) 48¾" (1238) • Il faudrait acheter séparément un dosseret bas Thermador. • Pour les installations avec garniture d'îlot, une saillie entre le - Thermador PRD606WESG | Installation Instructions - Page 40
Alimentation de gaz et électrique Exigences de gaz et d'électricité • IMPORTANT : S'il n'y en a pas déjà une en place, installez une vanne manuelle d'arrêt de gaz à un endroit facile d'accès. Assurez-vous d'indiquer à tous les utilisateurs où se trouve l'approvisionnement en gaz de la cuisinière et - Thermador PRD606WESG | Installation Instructions - Page 41
Déballage et manutention de la cuisinière 9 ATTENTION La cuisinière est lourde et devrait être manipulée en conséquence. Ne pas lever l'appareil par le panneau de commande. Pour éviter tout risque de blessure ou de dommages à l'appareil ou au plancher, la cuisinière devrait être déplacée par au - Thermador PRD606WESG | Installation Instructions - Page 42
Retrait et installation de la porte 9 MISE EN GARDE • FAITES ATTENTION LORSQUE VOUS ENLEVEZ LA PORTE. ELLE EST TRÈS LOURDE. • Pour éviter tout risque de brûlure ou de décharge électrique, assurez-vous que le four est froid et que l'alimentation électrique est coupée avant d'enlever la porte du four. - Thermador PRD606WESG | Installation Instructions - Page 43
4. Faites basculer les charnières vers l'avant et vers le bas jusque' à ce qu'elles reposent dans les fentes. Vous pourriez avoir besoin d'un tournevis pour remettre les griffes à charnière en place. 5. Fermez et ouvrez la porte pour vous assurer qu'elle est installée correctement. Pour retirer le - Thermador PRD606WESG | Installation Instructions - Page 44
adulte pourrait faire basculer l'appareil et perdre la vie. • Ne faites pas fonctionner l'appareil si le support antibascule n'est pas installé et qu'il ne retient pas l'appareil. La non-observation de ces instructions peut entraîner la mort ou causer de graves brûlures à des enfants ou des adultes - Thermador PRD606WESG | Installation Instructions - Page 45
antibasculement pour les modèles de 60 po 1. Localisez le support antibasculement dans le paquet de la documentation, à l'intérieur de la boîte qui était sur le dessus de l'appareil. 2. Placez la patte sur l'emplacement - Thermador PRD606WESG | Installation Instructions - Page 46
soit en débranchant le cordon d'alimentation ou en fermant le disjoncteur avant d'effectuer le service de l'appareil. 9 AVERTISSEMENT Cet appareil électroménager doit être mis à la terre. 9 AVERTISSEMENT INSTRUCTIONS DE MISE À LA TERRE L'électroménager est doté d'une fiche à trois broches mise à la - Thermador PRD606WESG | Installation Instructions - Page 47
Cet appareil électroménager doit être mis à la terre. • Avant l'installation, couper l'alimentation au panneau de service. Verrouiller le panneau de service pour empêcher que l'alimentation ne soit rétablie par accident. • Avant d'effectuer l'entretien de l'appareil, débranchez toujours - Thermador PRD606WESG | Installation Instructions - Page 48
• Si le circuit électrique n'est pas adéquat, il est de la responsabilité et de l'obligation de l'installateur et de l'utilisateur de s'assurer qu'une installation correcte et conforme à la réglementation locale en vigueur est réalisée par un électricien qualifié. Il est également de la - Thermador PRD606WESG | Installation Instructions - Page 49
Connexion à trois fils Cet appareil prêt-à-installer est fabriqué avec un cordon d'alimentation à quatre fils et une prise. Toutefois, lorsque les normes et codes locaux permettent une mise à la terre par fil neutre et qu'une conversion à un cordon de quatre fils est irréalisable, utilisez un cordon - Thermador PRD606WESG | Installation Instructions - Page 50
Installation du dosseret 9 AVERTISSEMENT Vous pourriez vous pincer les doigts ou les mains et vous blesser gravement lors de l'installation de cet accessoire. Soyez très prudent et portez des gants protecteurs épais pour éviter toute coupure ou lacération des doigts ou des mains lorsque vous faites - Thermador PRD606WESG | Installation Instructions - Page 51
Mise en place et nivelage de la cuisinière 9 MISE EN GARDE Les côtés supérieurs des panneaux latéraux de la cuisinière doivent être à la même hauteur ou plus haut que le comptoir adjacent. Si la cuisinière se trouve à une hauteur inférieure que l'armoire adjacente lorsqu'elle fonctionne, les tempé - Thermador PRD606WESG | Installation Instructions - Page 52
le processus avec toutes les pattes visibles. • Sides pièces de recouvrement supplémentaires sont requises, vous pouvez en commander sans frais au centre de service à la clientèle en appelant au 1-800-735-4328 jusqu'à un an après la date d'achat de l'appareil. 4. Enclenchez le panneau décoratif sur - Thermador PRD606WESG | Installation Instructions - Page 53
schémas de câblage électrique et les dessins placés dans la zone de la base ne doivent pas être enlevés sauf par un technicien de service. Remettez en place après l'entretien. Test de brûleurs 9 AVERTISSEMENT Pour prévenir toute brûlure, éviter de toucher les chapeaux et les grilles des - Thermador PRD606WESG | Installation Instructions - Page 54
• Lorsqu'ils sont bien placés, les chapeaux des brûleurs sont droits sur la base et couvrent complètement la base du brûleur en forme d'étoile lorsque vous les regardez d'en haut. Positionnement des grilles des brûleurs Pour installer les grilles des brûleurs 1. Positionnez-les avec le côté plat - Thermador PRD606WESG | Installation Instructions - Page 55
ériel d'emballage retiré. La garniture d'îlot ou le dosseret installé selon les instructions. Lorsque le sélecteur est réglé à la fonction XLO, la flamme renseignements supplémentaires, se reporter au Guide d'utilisation et d'entretien. Dépannage Voyez le Guide d'Utilisation et d'entretien pour les - Thermador PRD606WESG | Installation Instructions - Page 56
Índice de MATERIAS Definiciones de SEGURIDAD Seguridad 56 Instrucciones importantes de seguridad 56 Información de instalación 59 Información de planificación 59 Requerimientos de ventilación 59 Distancias de instalación 60 Ubicación de los eléctricos y de gas 66 Desempacar y mover la - Thermador PRD606WESG | Installation Instructions - Page 57
No utilice el aparato si el dispositivo antivuelco no está instalado y no retiene el aparato. • El hecho de no leer las instrucciones de este manual puede causar la muerte o graves quemaduras a niños y adultos. • Cuando jale la estufa de la pared por motivos de limpieza, servicio u otra razón, aseg - Thermador PRD606WESG | Installation Instructions - Page 58
9 INSTRUCCIONES IMPORTANTES DE SEGURIDAD LEA TODAS LAS INSTRUCCIONES ANTES DE CONTINUAR Los códigos locales pueden variar. La instalación, las conexiones eléctricas y la toma de tierra deben cumplir con todos los códigos aplicables. Si no se siguen los códigos y las reglamentaciones locales, es - Thermador PRD606WESG | Installation Instructions - Page 59
9 INSTRUCCIONES IMPORTANTES DE SEGURIDAD LEA TODAS LAS INSTRUCCIONES ANTES DE CONTINUAR En la ausencia de códigos locales el aparato debe ser instalado de acuerdo al National Fuel Gas Code (Código Nacional de Gas Combustible) ANSI Z223.1/NFPA 54 vigente y al National Electrical Code (Código - Thermador PRD606WESG | Installation Instructions - Page 60
de ventilación de corriente ascendiente. Antes de usar su aparato, asegúrese de leer este manual. Ponga especial atención a las Instrucciones importantes de seguridad al principio del manual. Herramientas requeridas • Llave poligonal o de carraca de 7/16 pulg. • Broca de 3/16 pulg. (4,76 mm - Thermador PRD606WESG | Installation Instructions - Page 61
con un sistema de ventilación sobre la placa de cocción ni tampoco nada que no sea la placa de 5 quemadores de 30". Consulte el manual de instalación del fabricante OTR para obtener información sobre los espacios que deben quedar libres. • El suministro de gas y la alimentación eléctrica deben - Thermador PRD606WESG | Installation Instructions - Page 62
Requisitos de espacio libre trasera • Para evitar manchas en la pared posterior, se recomienda el uso de materiales de construcción no porosos y de alta temperatura, adecuados para un ambiente de cocina. • El modelo PCG305xx, PRG305xx, PRG304xx, PRD305xx, PRD304, y PRD606xx es adecuado para espacios - Thermador PRD606WESG | Installation Instructions - Page 63
Espacios libres con la adorno tipo isla incluida 13" (330) 6" (152) 3360""(9(71642)) - 18" (457) (91346"oro1r 24189" ) 5" (127) 35 ⅞" (911) - 36 ¾" (933) pulg. (mm) Las separaciones de materiales no combustibles no son parte del alcance ANSI Z21.1 y no están certificadas por CSA. *Las - Thermador PRD606WESG | Installation Instructions - Page 64
Espacios libres con la consola trasera baja 13" (330) 0" 3360""(9(71642)) - 18" (457) (91346"oro1r 24189" ) 5" (127) 35 ⅞" (911) - 36 ¾" (933) pulg. (mm) Las separaciones de materiales no combustibles no son parte del alcance ANSI Z21.1 y no están certificadas por CSA. *Las separaciones de - Thermador PRD606WESG | Installation Instructions - Page 65
Espacios libres con la adorno tipo isla incluida solo 60'' 13" (330) 0" 3360""(9(71642)) - 18" (457) 5" (127) 60" (1524) 35 ⅞" (911) - 36 ¾" (933) pulg. (mm) Las separaciones de materiales no combustibles no son parte del alcance ANSI Z21.1 y no están certificadas por CSA. *Las separaciones - Thermador PRD606WESG | Installation Instructions - Page 66
Espacio libre en pared lateral 6" (152) 28" (711) 27¼" (692) 30" (762) - 36" (914) 25⅛" (638) 35⅞" (911) - 36¾" (933) 26⅞" (683) 48¾" (1238) • El modelo que se muestra es con adorno tipo isla incluido. Una opción de consola trasera baja está disponible (se compra por separado). • Para las - Thermador PRD606WESG | Installation Instructions - Page 67
debe quedar dentro de la zona indicada. • Se debe instalar una válvula manual externa de cierre de gas, en un lugar accesible desde el frente para cerrar Asegúrese de cerrar el suministro de gas en la válvula de cierre manual antes de conectar el aparato. • La estufa viene con su propio regulador - Thermador PRD606WESG | Installation Instructions - Page 68
ocultas del aparato pueden tener salientes cortantes. Tenga cuidado al sujetar el aparato por debajo o por atrás. No use una carretilla de manutención manual o un carro para electrodoméstico en las partes frontal o trasera del aparato. Úselos únicamente en los lados. Desempacar la estufa NOTA: • Una - Thermador PRD606WESG | Installation Instructions - Page 69
Quitar y reinstalar la puerta 9 PRECAUCIÓN • PRECAUCIÓN CUANDO ELIMINAR LA PUERTA. LA PUERTA ES PESADA. • Asegúrese de que la hornilla esté fría y que la corriente esté desconectada antes de quitar la puerta. De otro modo podría recibir una descarga eléctrica o quemarse. • La puerta de la hornilla - Thermador PRD606WESG | Installation Instructions - Page 70
4. Haga bascular las bisagras hacia delante y por abajo hasta apoyarlas en las ranuras. Puede ser que necesite un destornillador para volver a poner los soportes a su sitio. 5. Cerrar y abrir la puerta lentamente para asegurarse de que está bien colocada y de forma segura. Para retirar el cajón - Thermador PRD606WESG | Installation Instructions - Page 71
No utilice el aparato si el dispositivo antivuelco no está instalado y no retiene el aparato. • El hecho de no leer las instrucciones de este manual puede causar la muerte o graves quemaduras a niños y adultos. • Cuando jale la estufa de la pared por motivos de limpieza, servicio u otra razón, aseg - Thermador PRD606WESG | Installation Instructions - Page 72
de 1,5 pulg. (38 mm) proporcionados. CL 9 PRECAUCIÓN El aparato debe estar aislado del sistema de tubería de suministro de gas cerrando la válvula manual de cierre durante cualquier prueba de la línea de suministro de gas a presiones de prueba igual a o inferior a ½ psi (3,5kPa.). Verifique el tipo - Thermador PRD606WESG | Installation Instructions - Page 73
Conexión Para conectar el gas 1. Asegurarse de que la válvula de cierre del gas esté en posición OFF. 2. Utilice una línea flexible de ¾'' entre el suministro de gas y la línea de suministro del aparato. La línea de suministro de gas está ubicada en la parte inferior derecha de todas las estufas. La - Thermador PRD606WESG | Installation Instructions - Page 74
Conexión eléctrica de la unidad de gas Requisitos del circuito de alimentación eléctrica NEMA 5-15 N G NEMA 5-20 N G El cable suministrado junto con las gamas de gas que incluyen una plancha o grill eléctricos requiere un receptáculo NEMA 5-20. Las demás unidades de gas requieren un receptáculo - Thermador PRD606WESG | Installation Instructions - Page 75
• Cuando el circuito eléctrico correcto no es adecuado, es responsabilidad y obligación del instalador y del usuario hacer conectar una fuente de alimentación apropiada por un técnico cualificado. Incumbe al instalador asegurarse de la observación de los códigos locales. La instalación debe estar - Thermador PRD606WESG | Installation Instructions - Page 76
Conexión de 3 cables Este aparato está listo para su inmediata instalación gracias el cordón de cuatro cables y el tomacorriente con que se fabricó. Sin embargo, cuando las normas y los códigos locales permiten realizar la toma de tierra mediante un cable neutro y no se puede hacer una conversión - Thermador PRD606WESG | Installation Instructions - Page 77
Instalación de la consola trasera 9 ADVERTENCIA Tenga cuidado para no pellizcarse les dedos o las manos al instalar la consola trasera. Podría lesionarse gravemente. Lleve guantes de protección gruesos para evitar cortarse o lastimarse los dedos o las manos al deslizar la consola sobre la estufa. - Thermador PRD606WESG | Installation Instructions - Page 78
Colocar y nivelar la estufa 9 PRECAUCIÓN Los bordes superiores de los paneles laterales de la estufa deben estar a la misma altura o más altos que la encimera adyacente. Si se usa la estufa a una altura más baja que la encimera adyacente, los armarios podrían estar expuestos a temperaturas excesivas - Thermador PRD606WESG | Installation Instructions - Page 79
Instalación de las cubiertas de patas Montar de las cubiertas de patas 1. Quite el revestimiento de plástico de las cubiertas de acero inoxidable. 2. Retire las cubiertas plásticas protectoras de la zona del zoclo y el panel de ajuste deslizante. 3. Asegure el panel de ajuste deslizante a la base - Thermador PRD606WESG | Installation Instructions - Page 80
para saber si hay fugas y que la unidad haya sido conectada con la fuente de la corriente eléctrica. Dar vuelta a la válvula de cierre manual del gas a la posición abierta. Página. 79 2. Coloque la tapa de la hornilla suavemente sobre la base, de modo que los dientes de la base - Thermador PRD606WESG | Installation Instructions - Page 81
• Cuando es el caso, las tapas están rectas en la base y cubren completamente. la base del quemador en forma de estrella al mirarlas desde arriba. Colocación de las rejillas de los quemadores Para instalar las rejillas de los quemadores 1. Colóquelas con el lado plano hacia abajo y alinéelas en el - Thermador PRD606WESG | Installation Instructions - Page 82
mínimo de ¾ pulg. (19 mm). El aparato está conectado solamente al tipo de gas para el cual está certificado. Se instaló la válvula de cierre manual de gas en un lugar accesible (sin que se tenga que mover la estufa). El propietario sabe dónde está la válvula de cierre - Thermador PRD606WESG | Installation Instructions - Page 83
- Thermador PRD606WESG | Installation Instructions - Page 84
. We're happy to help you with cleaning and care instructions, cooking tips, accessories, troubleshooting, and more. USA: 1-800-735-4328 thermador.com/customer-care Canada: 1-800-735-4328 thermador.ca/support Accessories and parts Filters, Thermador cleaners, teppanyaki pans, griddles, replacement
-
 1
1 -
 2
2 -
 3
3 -
 4
4 -
 5
5 -
 6
6 -
 7
7 -
8
-
9
-
10
-
11
-
12
-
13
-
14
-
15
-
16
-
17
-
18
-
19
-
20
-
21
-
22
-
23
-
24
-
25
-
26
-
27
-
28
-
29
-
30
-
31
-
32
-
33
-
34
-
35
-
36
-
37
-
38
-
39
-
40
-
41
-
42
-
43
-
44
-
45
-
46
-
47
-
48
-
49
-
50
-
51
-
52
-
53
-
54
-
55
-
56
-
57
-
58
-
59
-
60
-
61
-
62
-
63
-
64
-
65
-
66
-
67
-
68
-
69
-
70
-
71
-
72
-
73
-
74
-
75
-
76
-
77
-
78
-
79
-
80
-
81
-
82
-
83
-
84
 |
 |

THERMADOR.COM
Installation
INSTRUCTIONS
Professional Series Pro Grand
®
Ranges