Toshiba 19C100UM Owners Manual
Toshiba 19C100UM Manual
 |
View all Toshiba 19C100UM manuals
Add to My Manuals
Save this manual to your list of manuals |
Toshiba 19C100UM manual content summary:
- Toshiba 19C100UM | Owners Manual - Page 1
program). For details, please contact your TV antenna installer, cable provider, or satellite provider. © 2010 TOSHIBA CORPORATION All Rights Reserved Downloaded from www.Manualslib.com manuals search engine Owner's Record The model number and serial number are on the back of your TV/DVD. Record - Toshiba 19C100UM | Owners Manual - Page 2
Toshiba LCD TV/DVD. This manual will help you use the many exciting features of your new LCD TV/DVD. Before operating your LCD TV/DVD, please read this manual important operating and maintenance (servicing) instructions in the literature accompanying displays are not always supported on the proper - Toshiba 19C100UM | Owners Manual - Page 3
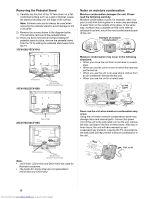
Install in accordance with the manufacturer's instructions. 8) Do not install near any from www.Manualslib.com manuals search engine • ALWAYS contact a service technician to inspect the TV product at all times. • Keep the product away from direct sunlight, fire or a heat source such as a heater. - Toshiba 19C100UM | Owners Manual - Page 4
the TV on the floor or a sturdy, level, stable surface that can support the weight of the TV. In order to maintain stability and prevent the frequent or continuous, unplug the power cord and contact a Toshiba Authorized Service Center. 4 Downloaded from www.Manualslib.com manuals search engine - Toshiba 19C100UM | Owners Manual - Page 5
to follow this WARNING may result in death or serious injury. Refer all servicing not specified in this manual to a Toshiba Authorized Service Center. 44) If you have the TV serviced: • Ask the service technician to use only replacement parts specified by the manufacturer. • Upon completion of - Toshiba 19C100UM | Owners Manual - Page 6
was just turned on. • When you use the unit in an area where cold air from an air conditioner directly hits the unit. • When you use the unit in a humid area. It's too warm! 26CV100U/32CV100U Never not applicable to 19CV100U and 22CV100U. 6 Downloaded from www.Manualslib.com manuals search engine - Toshiba 19C100UM | Owners Manual - Page 7
• Do not store discs in a place subject to direct sunlight or near heat sources. • Do not store discs . About this owner's manual This owner's manual explains the basic instructions of this TV/DVD not playable. On Video CDs This TV/DVD supports Video CDs equipped with the Playback Control (PBC) - Toshiba 19C100UM | Owners Manual - Page 8
minutes (single sided disc) The following discs are also supported. • DVD-R/RW discs containing files of DVD video may cause trouble with the operation of the TV/DVD. Because of problems and errors , please contact Toshiba Customer Service. is a trademark with the instructions, may manuals search engine - Toshiba 19C100UM | Owners Manual - Page 9
Display technology and are not an indication of malfunction; therefore, Toshiba is not responsible for perceived issues resulting from these symptoms. 1) THIS OWNER'S MANUAL CAREFULLY AND RETAIN FOR FUTURE REFERENCE. - SHALL THE UNIT REQUIRE MAINTENANCE, CONTACT AN AUTHORIZED SERVICE CENTER. - USE - Toshiba 19C100UM | Owners Manual - Page 10
Instructions 3 Installation, Care, and Service ColorStream® (component video 19 Connecting a satellite receiver 19 Connecting an HDMI or DVI audio system 22 Connecting a personal computer (PC) .........23 Chapter 3: automatically ...29 Programming channels manually ..........29 Labeling channels - Toshiba 19C100UM | Owners Manual - Page 11
57 Playback navigation 57 Playing in fast reverse or fast forward direction (DVD/VCD/CD 57 Playing frame by frame (DVD/VCD DVD 62 Downloaded from www.Manualslib.com manuals search engine DVD menu (DVD 62 71 Chapter 11: Troubleshooting 75 General troubleshooting 75 LED Indication 77 - Toshiba 19C100UM | Owners Manual - Page 12
the many exciting features of your new Toshiba integrated HD, LCD TV/DVD: interfaces with 1080p input support ( Page 20). • 51). • PC IN (Analog RGB) computer terminal ( Page 23). • Channel Labeling allows 11 For help, refer to the Troubleshooting Guide, see Chapter 11. 12 For technical - Toshiba 19C100UM | Owners Manual - Page 13
a 1/8inch (3.5 mm) mini plug. Note: Connecting a headphone to the TV/ DVD will mute the sound from the built-in speakers. Downloaded from www.Manualslib.com manuals search engine 8 POWER ─ Press to turn the TV on and off. If the TV stops responding to the controls on the remote control or TV - Toshiba 19C100UM | Owners Manual - Page 14
. See "Using the Auto Brightness Sensor" on Page 51 for additional information. Note: 22CV100U is used for illustration purposes. 14 Downloaded from www.Manualslib.com manuals search engine - Toshiba 19C100UM | Owners Manual - Page 15
TV screen 3° forward or 15° backward from a vertical angle. Hold the base of the TV while adjusting the screen. 3 15 Downloaded from www.Manualslib.com manuals search engine Some illustrations in this owner's manual are for explanation purposes and may differ from the actual unit. 15 - Toshiba 19C100UM | Owners Manual - Page 16
output, such as a Toshiba DVD player with ColorStream®. Note PC IN ─ For use when connecting a personal computer. 7 HDMI 1 ─ High-Definition Multimedia Interface ( 1080p signals. 8 TUNER (ANT/CABLE) ─ Input that supports analog (NTSC) and digital (ATSC) off-air antenna signals manuals search engine - Toshiba 19C100UM | Owners Manual - Page 17
15-pin) computer cable Coaxial (F-type) cable is used for connecting your antenna, cable TV service, and/or component video output. (ColorStream® is Toshiba's brand of component video.) These cables specific devices, refer to each device's owner's manual. Connecting TV to a power source To connect - Toshiba 19C100UM | Owners Manual - Page 18
you to civil and criminal liability. * To select the video input source, press remote control ( Page 33). on the 18 Downloaded from www.Manualslib.com manuals search engine - Toshiba 19C100UM | Owners Manual - Page 19
to display Progressive (480p, 720p) and Interlaced (480i, 1080i). Please check the Owner's Manual of the satellite receiver in order to determine the best output signal available. - If your satellite receiver does not have component video, connect a standard A/V cable to AUDIO/VIDEO terminal. To - Toshiba 19C100UM | Owners Manual - Page 20
30 Hz/60 Hz) signal formats. For detailed signal specifications, see Page 79. Supported Audio format: Linear PCM, sampling rate 32/44.1/ 48 kHz. Note: To HDMITM audio mode" ( Page 31). 20 Downloaded from www.Manualslib.com manuals search engine To view the HDMI device video: Select the HDMI 1 - Toshiba 19C100UM | Owners Manual - Page 21
as regulated by the HDMI standard. • This feature is limited to models incorporating Toshiba's REGZA-LINK®. However, Toshiba is not liable for those operations. Refer to the individual instruction manuals for compatibility information. Note: This feature may not work properly depending on the - Toshiba 19C100UM | Owners Manual - Page 22
trademarks of DTS, Inc. Product includes software. © DTS, Inc. All Rights Reserved. 4 Press or to select Optical Output Format. 22 Downloaded from www.Manualslib.com manuals search engine - Toshiba 19C100UM | Owners Manual - Page 23
cannot be connected to this TV. • An adapter is not needed for computers with a compatible mini D-sub15-pin terminal. • Depending on the DVD's be able to pause during multi-angle scenes. Downloaded from www.Manualslib.com manuals search engine The HDMI input can accept and display VGA, SVGA, XGA, - Toshiba 19C100UM | Owners Manual - Page 24
AAA size batteries. Match the + and - symbols on the batteries to the symbols on the battery compartment. 24 Downloaded from www.Manualslib.com manuals search engine 3 Close the battery cover on the remote control until the tab snaps. Caution: Batteries must not be exposed to excessive heat such - Toshiba 19C100UM | Owners Manual - Page 25
EJECT ejects the disc from the disc slot. 4 TV/DVD switches to TV or DVD mode. 5 Channel Numbers directly tune channels. 6 JUMP selects or locates a specific point with the disc playback ( Page 59); tunes to a loaded disc ( Page 56). 25 Downloaded from www.Manualslib.com manuals search engine - Toshiba 19C100UM | Owners Manual - Page 26
as display device for video game consoles ( Page 51). 34 PIC SIZE cycles through the picture sizes ( Page 35). 26 Downloaded from www.Manualslib.com manuals search engine - Toshiba 19C100UM | Owners Manual - Page 27
within 60 seconds, except the signal meter menu, which closes automatically after about 5 minutes. • To close a menu instantly, press . 27 Downloaded from www.Manualslib.com manuals search engine - Toshiba 19C100UM | Owners Manual - Page 28
digital channels, select Digital. To tune digital channels preferentially over analog when entering channel number directly, select Auto. For normal tuning, select Standard. Press to continue to Auto Tuning. 6 Cancel and then press . 28 Downloaded from www.Manualslib.com manuals search engine - Toshiba 19C100UM | Owners Manual - Page 29
its memory. After the channels are programmed automatically, you can manually add or skip individual channels in the channel memory. Note: not have to repeat the programming process again unless your Cable TV service lineup changes significantly. To program channels automatically: 1 Configure the - Toshiba 19C100UM | Owners Manual - Page 30
press . Enter your fourdigit PIN code. A tick will appear in the box. To remove the tick, press again. 3 To save the setting, press . To manually add digital subchannels on a physical channel: Use the Channel Numbers and the Dash ( ) on the remote control to enter the channel number (for example, 56 - Toshiba 19C100UM | Owners Manual - Page 31
is grayed out in the menu. ( "Connecting an HDMI or DVI device to the HDMI™ input" on Page 20.) 31 Downloaded from www.Manualslib.com manuals search engine - Toshiba 19C100UM | Owners Manual - Page 32
to select System Information and then press . 3 Press or to scroll through the menu bar to select Support Information and view the related information. Reset Factory Defaults 1 From the Setup menu, press or to select No and then press . 32 Downloaded from www.Manualslib.com manuals search engine - Toshiba 19C100UM | Owners Manual - Page 33
• Cable • Compact Disc • DTV • DVD • Game Console • HDMI Switch (HDMI inputs only) • Laser Disc • Satellite/DSS • VCR • Video Recorder • Hide (to hide an unused input in the Input Selection screen) Note: If you select and then press . 33 Downloaded from www.Manualslib.com manuals search engine - Toshiba 19C100UM | Owners Manual - Page 34
three options. Mode Description Standard Auto (Default) Both analog and digital channels can be tuned normally. Digital channels will have priority when manually entering a channel number using the Channel Number buttons (0-9) on the remote control, analog channels can still be tuned by or , if - Toshiba 19C100UM | Owners Manual - Page 35
are currently watching. Select the picture size that displays the current program the way that looks best to you. Downloaded from www.Manualslib.com manuals search engine You can save separate picture size preferences for each input on your TV. To select the picture size using the remote control - Toshiba 19C100UM | Owners Manual - Page 36
such as DVD, DVHS movies, or PC graphics. Note: • This mode is supported only for HDMI (1080p,1080i, 720p, 480p, and 480i), ColorStream (1080i and None of the picture is hidden. 36 Downloaded from www.Manualslib.com manuals search engine The "Dot by Dot" picture is non-scaling display. Depending - Toshiba 19C100UM | Owners Manual - Page 37
the new settings, highlight Done and then press . To revert to the factory defaults, highlight Reset and then press . 37 Downloaded from www.Manualslib.com manuals search engine - Toshiba 19C100UM | Owners Manual - Page 38
adjusted are automatically saved in the Preference mode ( "Selecting the picture mode" at left column) until Reset is selected. 38 Downloaded from www.Manualslib.com manuals search engine - Toshiba 19C100UM | Owners Manual - Page 39
and sound effects of TV programs and videos that are closed captioned (usually marked "CC" in program guides). • Text-An on-screen display of information not related to the current program, such as weather , highlight Reset and then press . 39 Downloaded from www.Manualslib.com manuals search engine - Toshiba 19C100UM | Owners Manual - Page 40
Selectors and then press . 2 Press or to select Closed Caption, and then press or to select the desired service. 3 Press . Adjusting the audio Muting the sound Press on the remote control to partially reduce (1/2 MUTE) or ANT/CABLE input. 40 Downloaded from www.Manualslib.com manuals search engine - Toshiba 19C100UM | Owners Manual - Page 41
the new settings, highlight Done and then press . To revert to the factory defaults, highlight Reset and then press . 41 Downloaded from www.Manualslib.com manuals search engine - Toshiba 19C100UM | Owners Manual - Page 42
a new four-digit code. Reenter the PIN code to confirm it. 5 Press . The new PIN code is now active. 42 Downloaded from www.Manualslib.com manuals search engine - Toshiba 19C100UM | Owners Manual - Page 43
is a function of the V-Chip feature in this TV, which supports the U.S. V-Chip system only. To block and unblock TV programs and Toshiba. • The additional rating system is an evolving technology; therefore, availability, content, and format may vary. 43 Downloaded from www.Manualslib.com manuals - Toshiba 19C100UM | Owners Manual - Page 44
TV-G General Audience (Most parents would find this program suitable for all ages.) TV-Y7, TV-Y7FV Directed to Older Children (This program is designed for children age 7 and above. Note: Programs in which the TV is turned on again. 44 Downloaded from www.Manualslib.com manuals search engine - Toshiba 19C100UM | Owners Manual - Page 45
, or press and hold VOLUME- on the TV control panel for about 10 seconds until the volume icon appears. 45 Downloaded from www.Manualslib.com manuals search engine - Toshiba 19C100UM | Owners Manual - Page 46
. ( "Setting the HDMITM audio mode" on Page 31.) * The default settings may vary depending on the input signal format. 46 Downloaded from www.Manualslib.com manuals search engine - Toshiba 19C100UM | Owners Manual - Page 47
minute. Using REGZA-LINK® This is a new feature that uses CEC technology and allows you to control Toshiba REGZA-LINK® compatible devices from the TV remote via HDMI connection ( Page 21). When the Enable REGZA- on the devices connected. 47 Downloaded from www.Manualslib.com manuals search engine - Toshiba 19C100UM | Owners Manual - Page 48
the volume of the audio receiver. This item will be grayed out unless a REGZALINK® compatible audio receiver is connected. 48 Downloaded from www.Manualslib.com manuals search engine - Toshiba 19C100UM | Owners Manual - Page 49
you will be away from the TV for an extended period of time, you should unplug the power cord. 49 Downloaded from www.Manualslib.com manuals search engine - Toshiba 19C100UM | Owners Manual - Page 50
center. • If the setting is moved in the minus direction, the detail of black colors will be decreased. • If the setting is moved in the plus direction, the detail of black colors will be increased. 4 To changes to Preference. 50 Downloaded from www.Manualslib.com manuals search engine - Toshiba 19C100UM | Owners Manual - Page 51
the new settings, highlight Done and then press . To revert to the factory defaults, highlight Reset and then press . 51 Downloaded from www.Manualslib.com manuals search engine - Toshiba 19C100UM | Owners Manual - Page 52
to the TV directly. •Do not use a USB hub. Supported file system FAT12, FAT16 and FAT32 Supported photo format: It may take some time to open a file of large size. Supported music format: MPEG-1 (MP3) • Sampling rate: 32, 44.1, Toshiba cannot and does not grant such permission. 52 Downloaded from - Toshiba 19C100UM | Owners Manual - Page 53
or music list will appear. Note: If Auto Start is set to Off, you can start the Media Player manually. To set manual Start: 1 Insert USB device into the USB terminal on the left side of the TV. 2 From the View mode or Slide Show mode. 53 Downloaded from www.Manualslib.com manuals search engine - Toshiba 19C100UM | Owners Manual - Page 54
playback, the TV will enter screen saver mode. Press any button but POWER to return to music list mode. 54 Downloaded from www.Manualslib.com manuals search engine - Toshiba 19C100UM | Owners Manual - Page 55
setting in the Media Player Quick Menu or TV Setup Menu will override the previous setting of each other. 55 Downloaded from www.Manualslib.com manuals search engine - Toshiba 19C100UM | Owners Manual - Page 56
disc menu, then press to implement the selected menu option. Playback resume function: Your TV/DVD supports playback resume function. If you stopped the disc playback before it is completed, the TV/DVD . To stop playback: Press . 56 Downloaded from www.Manualslib.com manuals search engine - Toshiba 19C100UM | Owners Manual - Page 57
Go to Page 8 for a list of supported disc formats, and to Page 76 for playback-related troubleshooting instructions. • In some instances the TV/DVD it activates. Playback navigation Playing in fast reverse or fast forward direction (DVD/VCD/CD) 1 Press REV or FF during playback. manuals search engine - Toshiba 19C100UM | Owners Manual - Page 58
. When you press SKIP twice in quick succession, playback starts from the beginning of the preceding chapter or track. 58 Downloaded from www.Manualslib.com manuals search engine - Toshiba 19C100UM | Owners Manual - Page 59
the PBC function first before using the Jump function ( Page 64). • Scene navigation may not apply to some discs. 59 Downloaded from www.Manualslib.com manuals search engine - Toshiba 19C100UM | Owners Manual - Page 60
mode is canceled when SKIP or SKIP is pressed. • The Repeat playback function may not apply to some discs. 60 Downloaded from www.Manualslib.com manuals search engine - Toshiba 19C100UM | Owners Manual - Page 61
other tracks, repeat this step. If you input a wrong number, press . Play Mode Mode : Program Repeat : Off Program Playback 1 9 61 Downloaded from www.Manualslib.com manuals search engine - Toshiba 19C100UM | Owners Manual - Page 62
apply to some DVDs. • The title menu may simply be referred to a "menu" or "title" in the instructions supplied with the DVD. DVD menu (DVD) Some DVDs have an encoded menu that allows users to select a specific playing when you pressed . 62 Downloaded from www.Manualslib.com manuals search engine - Toshiba 19C100UM | Owners Manual - Page 63
be displayed) To close the information display: Press . Note: Depending on the disc, this operation may not be available. 63 Downloaded from www.Manualslib.com manuals search engine - Toshiba 19C100UM | Owners Manual - Page 64
2 above, then press repeatedly until PBC appears. When enabled, PBC allows interactive Video CD playback using the remote control. 64 Downloaded from www.Manualslib.com manuals search engine - Toshiba 19C100UM | Owners Manual - Page 65
owner's manual are meant only as a guide. Use of CD-RW discs for recording MP3 files is not recommended. You must obtain any required permission from copyright owners to download or use copyrighted content. Toshiba . • This TV/DVD does not support data disc burned using the Apple Mac - Toshiba 19C100UM | Owners Manual - Page 66
. • The Repeat and Random/Programmed playback modes can be enabled during MP3 or WMA playback. Refer to Page 68. 66 Downloaded from www.Manualslib.com manuals search engine - Toshiba 19C100UM | Owners Manual - Page 67
If there are multiple JPEG files in the selected directory, you can view them in a slide show. For instructions on how to enable the slide show feature and set the interval period between pictures, go to Page 72. 1 , or slide show modes. 67 Downloaded from www.Manualslib.com manuals search engine - Toshiba 19C100UM | Owners Manual - Page 68
of an audio track is played. This is useful if you are simply looking for a particular track in a list. 68 Downloaded from www.Manualslib.com manuals search engine - Toshiba 19C100UM | Owners Manual - Page 69
remove from the list. 6. Press to go to the Option panel. 7. Press or to select Clear Program, then press . 69 Downloaded from www.Manualslib.com manuals search engine - Toshiba 19C100UM | Owners Manual - Page 70
or to select a setup tab. Repeat steps 3-5 to configure the preferred option. 7 To close the Setup screen, press or . 70 Downloaded from www.Manualslib.com manuals search engine - Toshiba 19C100UM | Owners Manual - Page 71
setup settings are retained in the TV/DVD's memory. It remains active even if the power is turned off. 71 Downloaded from www.Manualslib.com manuals search engine - Toshiba 19C100UM | Owners Manual - Page 72
option is disabled. 5, 10, or 15 Images will be displayed in a seconds slide show using the selected interval time. 72 Downloaded from www.Manualslib.com manuals search engine - Toshiba 19C100UM | Owners Manual - Page 73
the disc though it's indicated on the disc jacket. Playback restriction will not apply to these discs so make sure to restrict access to it manually. 73 Downloaded from www.Manualslib.com - Toshiba 19C100UM | Owners Manual - Page 74
to its default factory setting "0000". All DVD Setuprelated settings will also be reset to their default factory values. 74 Downloaded from www.Manualslib.com manuals search engine - Toshiba 19C100UM | Owners Manual - Page 75
Troubleshooting General troubleshooting Before calling a service technician, please check this chapter for a possible cause of the problem problems General picture problems highly directional satellite provider to inform them of this issue. Sound problems ). Remote control problems • Remove all - Toshiba 19C100UM | Owners Manual - Page 76
REGZA-LINK® feature is available for Toshiba REGZA-LINK® compatible devices. • instruction manual furnished with the connected REGZA-LINK® device. HDMI problems problems Playback does not start • No disc is loaded. • The disc may be dirty. Clean the disc. • The disc format is not supported - Toshiba 19C100UM | Owners Manual - Page 77
Chapter 11: Troubleshooting LED Indication The Power LED light on the TV front indicates the TV's status, as described below. LED Indication Power LED • Green is ON (solid) The TV is operating properly. • Red is ON (solid) The TV is in Standby mode. If, after trying the solutions, the problem still - Toshiba 19C100UM | Owners Manual - Page 78
47 k ohm or greater HDMI™ INPUT: HDMI compliant HDCP compliant Audio Lip Sync supported HDMI Audio: 2-channel Linear-PCM; 32/44.1/ 48 kHz sampling frequency; 16/ control with two size AAA batteries • AC power cord • Owner's manual (this book) • Cleaning cloth (to clean the cabinet and control - Toshiba 19C100UM | Owners Manual - Page 79
74.250MHz 79.500MHz 85.500MHz 27.000MHz 27.000MHz 74.250MHz 74.250MHz 74.250MHz 74.250MHz 148.500MHz • Some illustrations in this owner's manual are for explanation purposes and may differ from the actual unit. • Designs and specifications are subject to change without notice. • This model may not - Toshiba 19C100UM | Owners Manual - Page 80
Repair Warranty Toshiba America Consumer warranty. Reception problems caused by inadequate Services If, after following all of the operating instructions in this manual and checking the section "Troubleshooting," you find that service is needed: (1) For instructions on how to obtain warranty service - Toshiba 19C100UM | Owners Manual - Page 81
providing the source code. A copy of the LGPL source code in this product may be obtained by contacting Toshiba Consumer Solutions at (800) 631-3811. There will be a charge to cover the costs of providing the IIS and THOMSON multimedia. 81 Downloaded from www.Manualslib.com manuals search engine - Toshiba 19C100UM | Owners Manual - Page 82
the freedom to distribute copies of free software (and charge for this service if you wish), that you receive source code or can get know that what they have is not the original, so that any problems introduced by others will not reflect on the original authors' reputations. manuals search engine - Toshiba 19C100UM | Owners Manual - Page 83
free redistribution of the Program by all those who receive copies directly or indirectly through you, then the only way you could to the present version, but may differ in detail to address new problems or concerns. Each version is given a distinguishing version number. If manuals search engine - Toshiba 19C100UM | Owners Manual - Page 84
; we sometimes make exceptions for this. Our decision will be guided by the two goals of preserving the free status of all SHOULD THE PROGRAM PROVE DEFECTIVE, YOU ASSUME THE COST OF ALL NECESSARY SERVICING, REPAIR OR CORRECTION. 12. IN NO EVENT UNLESS REQUIRED BY APPLICABLE manuals search engine - Toshiba 19C100UM | Owners Manual - Page 85
Contributing Authors and Group 42, Inc. assume no liability for direct, indirect, incidental, special, exemplary, or consequential damages, which and encourage the use of this source code as a component to supporting the PNG file format in commercial products. If you use this manuals search engine - Toshiba 19C100UM | Owners Manual - Page 86
removed or altered from any source distribution. Jean-loup Gailly [email protected] Mark Adler [email protected] 86 Downloaded from www.Manualslib.com manuals search engine - Toshiba 19C100UM | Owners Manual - Page 87
Downloaded from www.Manualslib.com manuals search engine - Toshiba 19C100UM | Owners Manual - Page 88
, L.L.C. Corporate Headquarters: 82 TOTOWA ROAD, WAYNE, NJ 07470, U.S.A. NATIONAL SERVICE DIVISION:1420-B TOSHIBA DRIVE, LEBANON, TN 37087, U.S.A. CableClear, ColorStream, GameTimer, and TheaterWide are registered trademarks of Toshiba America Consumer Products, L.L.C. DynaLight is trademark of
-
 1
1 -
 2
2 -
 3
3 -
 4
4 -
 5
5 -
 6
6 -
 7
7 -
8
-
9
-
10
-
11
-
12
-
13
-
14
-
15
-
16
-
17
-
18
-
19
-
20
-
21
-
22
-
23
-
24
-
25
-
26
-
27
-
28
-
29
-
30
-
31
-
32
-
33
-
34
-
35
-
36
-
37
-
38
-
39
-
40
-
41
-
42
-
43
-
44
-
45
-
46
-
47
-
48
-
49
-
50
-
51
-
52
-
53
-
54
-
55
-
56
-
57
-
58
-
59
-
60
-
61
-
62
-
63
-
64
-
65
-
66
-
67
-
68
-
69
-
70
-
71
-
72
-
73
-
74
-
75
-
76
-
77
-
78
-
79
-
80
-
81
-
82
-
83
-
84
-
85
-
86
-
87
-
88
 |
 |
15CV100U
15CV101U
19CV100U
22CV100U
26CV100U
32CV100U
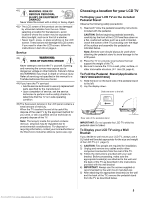
For an overview of steps for setting up your new TV, see page 12.
Note: To display a High Definition picture, the TV must be
receiving a High Definition signal (such as an over-the-air High
Definition TV broadcast, a High Definition digital cable program,
or a High Definition digital satellite program). For details, please
contact your TV antenna installer, cable provider, or satellite
provider.
© 2010 TOSHIBA CORPORATION
All Rights Reserved
Owner’s Record
The model number and serial number are on
the back of your TV/DVD. Record these
numbers in the spaces below. Refer to these
numbers whenever you communicate with
your Toshiba dealer about this TV/DVD.
Model number:
Serial number:
Downloaded from
www.Manualslib.com
manuals search engine