Toshiba 40E20U User Manual
Toshiba 40E20U Manual
 |
View all Toshiba 40E20U manuals
Add to My Manuals
Save this manual to your list of manuals |
Toshiba 40E20U manual content summary:
- Toshiba 40E20U | User Manual - Page 1
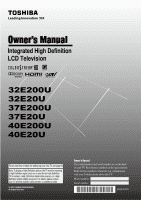
Owner's Manual Integrated High Definition LCD Television HIGH-DEFINITION TELEVISION 32E200U 32E20U 37E200U 37E20U 40E200U 40E20U For an overview of steps for setting up your new TV, see page10. Note: To display a High Definition picture, the TV must be receiving a High Definition signal (such as an - Toshiba 40E20U | User Manual - Page 2
Toshiba LCD TV. This manual will help you use the many exciting features of your new LCD TV. Before operating your LCD TV, please read this manual SERVICEABLE PARTS INSIDE. REFER SERVICING TO QUALIFIED SERVICE servicing) instructions Article 820-40 of the supported Follow all instructions supplied by - Toshiba 40E20U | User Manual - Page 3
during lightning storms or when unused for long periods of time. 14) Refer all servicing to qualified service personnel. Servicing is required when the apparatus has been damaged in any way, such as power-supply cord or plug is damaged, liquid has been spilled or objects have fallen into the - Toshiba 40E20U | User Manual - Page 4
Electric service equipment Ground clamps Grounding conductors (NEC Section 810-21) Power service grounding electrode system (NEC Art 250 Part-H) 4 performance and safer operation of your TOSHIBA TV, follow these recommendations and precautions: 34) If you use the TV in a room whose temperature - Toshiba 40E20U | User Manual - Page 5
40) During normal use, the TV may make occasional snapping or popping sounds. This is normal, especially when the unit is being turned on or off. If these sounds become frequent or continuous, unplug the power cord and contact a Toshiba Authorized Service Center. 41) DANGER: RISK OF SERIOUS - Toshiba 40E20U | User Manual - Page 6
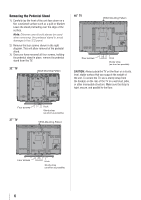
the pedestal stand to avoid damage to the LCD panel. 2) Remove the four screws shown TV. 32" TV VESA Mounting Pattern 40" TV VESA Mounting Pattern Four screws Hook Sturdy strap (as short as possible) CAUTION: Always place the TV on the floor or a sturdy, level, stable surface that can support - Toshiba 40E20U | User Manual - Page 7
Part 15): The Toshiba 32E200U, 32E20U, 37E200U, 37E20U, 40E200U, and 40E20U Televisions comply with Part accordance with the instructions, may cause determined by removing and applying power to the equipment, the period of time. 2) The LCD panel contained in this TV is manufactured using an extremely - Toshiba 40E20U | User Manual - Page 8
the QSound® sound feature 53 Chapter 8: Troubleshooting 54 General troubleshooting 54 Chapter 9: Appendix 56 Specifications 56 Acceptable signal formats for PC IN and HDMI terminals......57 Limited United States Warranty for LCD Televisions 58 Limited Canadian Warranty for Toshiba Brand Flat - Toshiba 40E20U | User Manual - Page 9
your new Toshiba widescreen, integrated HD, LCD TV: • Integrated digital tuning (8VSB ATSC and QAM) eliminates the need for a separate digital converter set-top box (in most cases). • 1080p output resolution. • Four HDMI® digital, high-definition multimedia interfaces 1080p input support ( page 16 - Toshiba 40E20U | User Manual - Page 10
, installation, care, and service information. Keep this manual for future reference. 2 Observe the following when choosing a location for the TV: • Read "Important notes about your LCD TV" ( page 7). • Place the TV on the floor or a sturdy, level, stable surface that can support the weight of the - Toshiba 40E20U | User Manual - Page 11
front and side panel controls and connections Model 32E200U is used in this manual for illustration purposes. Left side panel TV front 3 7 4 8 5 6 9 10 TV top 11 12 2 Control panel 1無 Green LED and TOSHIBA Logo LED Power LED(Green) = Power indicator TOSHIBA Logo LED= On or Off ( page - Toshiba 40E20U | User Manual - Page 12
types and connections, see pages 13-19. TV back 1 2 3 Power Cord 4 76 5 1無 PC IN Antenna input that supports analog (NTSC) and digital (ATSC) off-air antenna signals and analog and digital Cable TV (QAM) signals. component video output, such as a Toshiba DVD player with ColorStream®. Note: - Toshiba 40E20U | User Manual - Page 13
herein. For details on connecting and using your specific devices, refer to each device's owner's manual. Component video cables come in sets of three and are for use with video devices with component video output. (ColorStream® is Toshiba's brand of component video.) These cables are typically - Toshiba 40E20U | User Manual - Page 14
view basic and premium Cable channels: Turn OFF the VCR. Select the ANT/CABLE video input source on the TV.* Tune the TV to channel 3 or 4 (whichever channel the Cable box output is set to). Use the Cable box controls to change channels. To view the VCR: Turn ON the VCR. Select the - Toshiba 40E20U | User Manual - Page 15
. A 1080i signal will provide the best picture performance (1080p is not supported). −− If your DVD player or satellite receiver does not have component video want to watch. Select the VIDEO 1 video input source on the TV.* To record a TV program while watching a DVD: Turn ON the VCR. Tune the - Toshiba 40E20U | User Manual - Page 16
set-top box or DVD player with HDMI or DVI output). The HDMI input can accept and display VGA, SVGA, XGA, WXGA, SXGA, 480i (60Hz), 480p (60Hz), 720p (60Hz), 1080i (60Hz) and 1080p (24Hz/60Hz) signal formats. For detailed signal specifications, see page 57. Supported , turn on the TV first, and then - Toshiba 40E20U | User Manual - Page 17
device. For an explanation of setup and operations, see page 49. TV back panel Audio receiver Playback device (REGZA-LINK DVD player,etc.) Playback to models incorporating Toshiba's REGZA-LINK. However, Toshiba is not liable for those operations. Refer to the individual instruction manuals for - Toshiba 40E20U | User Manual - Page 18
Conversion adapter (if necessary) • To use a PC, set the monitor output resolution on the PC before connecting it to the TV. The PC IN terminal can accept and display VGA, SVGA, XGA, WXGA and SXGA signal formats. For detailed signal specifications ( page 57). Other formats or non-standard signals - Toshiba 40E20U | User Manual - Page 19
with the HDMI-1 analog audio input terminals ( page 44). •• Some PC models cannot be connected to this TV. •• An adapter is not needed for computers with a compatible mini D-sub15-pin terminal. •• Depending on the DVD's title and the specifications of the PC on which you are playing the DVD-Video - Toshiba 40E20U | User Manual - Page 20
control effective range For optimum performance, aim the remote control directly at the TV and make sure there is no obstruction between the remote control and the TV. Point remote control toward remote sensor on front of TV. 3無 Reinsert the battery cover in the remote control until the tab snaps - Toshiba 40E20U | User Manual - Page 21
that is not available. 1無 POWER turns the TV on and off. When the TV is on, the green LED indicator on the TV front will be illuminated. 2無 12無 MUTE reduces or turns off the sound ( page 38). 13無 VOL + - adjusts the volume level. 14無 INFO displays TV status information as well as program details, - Toshiba 40E20U | User Manual - Page 22
menus (illustrated below), press on the remote control or TV control panel. Icon Picture Sound Preferences Locks Setup Item Mode Picture Settings Noise Reduction Game Mode Theater Settings Digital Audio Selector Audio Settings Advanced Audio Settings Audio Setup CC Selector Base CC Mode Digital CC - Toshiba 40E20U | User Manual - Page 23
menu is open, use the up/down/left/right arrow buttons (pqtu) on the remote control or TV control panel to move in the corresponding direction in the menu. • Press to save your menu settings or select a highlighted item. (A highlighted menu item appears in a different color in the menu.) • All menus - Toshiba 40E20U | User Manual - Page 24
. 2無 Press t or u to select your preferred menu language. TOSHIBA Logo LED You can select TOSHIBA Logo LED either On or Off. 1無 Press and open the Setup ANT/CABLE input on the TV. 3無 Press to close the Preferences menu. 24 5無 To save your new settings, highlight Done and press . To revert - Toshiba 40E20U | User Manual - Page 25
TV's channel memory. Programming channels automatically Your TV can automatically detect all active channels in your area and store them in its memory. After the channels are programmed automatically, you can manually your Cable TV service lineup changes programmed channels. Setting channel skip To - Toshiba 40E20U | User Manual - Page 26
Chapter 5: Setting up your TV To add a channel to the channel memory: Highlight the checked box next to the channel number you want to add, and then press to remove the tick. To manually add digital subchannels on a physical channel: Use the Channel Numbers and the Dash ( ) on the remote control to - Toshiba 40E20U | User Manual - Page 27
Chapter 5: Setting up your TV 4無 Highlight Done and press to save changes, and go back to the Channel Labeling window. Setting the HDMI® audio mode To set the HDMI audio mode: 1無 Press and open the Sound menu. 2無 Highlight Audio Setup and press . 3無 Press p or q to select HDMI 1 Audio and then - Toshiba 40E20U | User Manual - Page 28
Yes and press . 6無 (If PIN code has been set, enter your PIN code. Press t or u to select Done and press .) A warning message will appear, select Yes and press , the TV will turn off automatically after a few seconds. After the TV turns off, unplug the TV power cord and then plug it in again to - Toshiba 40E20U | User Manual - Page 29
the top right corner of the Input Selection screen. Note: ••You can label the video input sources according to the specific devices you have connected to the TV ( "Labeling the video input sources" at right). ••Sources can be "hidden" ( "Labeling the video input sources" at right). ••"No Video - Toshiba 40E20U | User Manual - Page 30
(with none of the inputs labeled as a specific device). The screen below right is an example of how you could label the inputs if you connected a VCR to VIDEO 1, Cable TV to VIDEO 2, a video recorder to ColorStream HD, a DTV set-top box to HDMI 1, and a satellite/DSS set-top box to HDMI 2, and a DVD - Toshiba 40E20U | User Manual - Page 31
Elements of the ChannelBrowser™ 3無 Press to highlight History List, and then press or to select the setting you prefer: either On, or Off. Note: History List will be cleared every time the TV is powered off. 4無 Press to highlight ANT/CABLE List, and then press or to select On or Off - Toshiba 40E20U | User Manual - Page 32
Turning off the TV will clear the History List. Setting the Channel Tuning set to Antenna ( page 24 ). The channel tuning mode has three options. Mode Description Standard Both analog and digital channels can be tuned normally Auto (default) Digital channels will have priority when manually - Toshiba 40E20U | User Manual - Page 33
tune to the next programmed channel: Press or on the remote control or TV control panel. Note: This feature will not work unless you program channels into the TV's channel memory ( page 25). Tuning to a specific channel (programmed or unprogrammed) Tuning analog channels: Press the Channel Number - Toshiba 40E20U | User Manual - Page 34
Chapter 6: Using the TV's features To select the picture size using the menus: 1無 Select Picture Size in the Theater Settings menu. 2無 Press or to select the desired picture size setting. 3無 Highlight Done and press . Note: Some of the picture sizes may not be available depending on the - Toshiba 40E20U | User Manual - Page 35
sources such as DVHS movies, or PC graphics. Note: ••This mode is supported only for HDMI (1080p,1080i, 720p, 480p, and 480i), ColorStream (1080i and aspect ratio feature When the auto aspect ratio feature is set to On, the TV will automatically select the picture size when one of the following - Toshiba 40E20U | User Manual - Page 36
from a DVD player connected to the VIDEO 1, VIDEO 2, ColorStream HD (component video), or HDMI inputs on the TV, smoother motion can be obtained by setting the Cinema Mode to Film. To set the Cinema Mode to Film: (available for 480i and 1080i signals) 1無 Press and open the Picture menu. 2無 Highlight - Toshiba 40E20U | User Manual - Page 37
dialogue, narration, and sound effects of TV programs and videos that are closed captioned (usually marked "CC" in program guides). • Text-An not available in your area, a black rectangle may appear on screen. If this happens, set the Base CC Mode to Off. • To turn off the closed caption mode: Select - Toshiba 40E20U | User Manual - Page 38
the current Base CC Mode setting. You can also use the CC Selector to select digital closed caption services (if available). When such services are not available, the CC Selector presents a default list of services. If the selected service is not available, the next best service will be used instead - Toshiba 40E20U | User Manual - Page 39
desired service. 4無 Press . Selecting stereo/SAP broadcasts The multi-channel TV sound (MTS) feature allows you to output high-fidelity stereo sound. balance. To adjust the audio quality: 1無 Press and open the Sound menu. 2無 Highlight Audio Settings and press . 3無 Press or to highlight the item - Toshiba 40E20U | User Manual - Page 40
Range Control: 1無 Press and open the Sound menu. 2無 Highlight Audio Setup and press Channel Number buttons to enter a new four-digit code, 40 enter the code a second time to confirm, and press code cannot be set to "0000". Blocking TV programs and movies by rating (V-Chip) Some TV programs and - Toshiba 40E20U | User Manual - Page 41
available. ••The additional rating system is not designed, transmitted, or controlled by the TV or Toshiba, nor is the availability of an additional rating system determined or controlled by Toshiba. Similarly, the rating of programs in an additional rating system is not determined, transmitted - Toshiba 40E20U | User Manual - Page 42
Ratings Description and Content themes TV-MA Mature Audience Only (This program is specifically designed to be viewed by in the lock column. 4無 PIN code entry will be required to set a locked channel. Note: If the PIN code has not been set yet, a warning message will appear. 5無 A tick will appear - Toshiba 40E20U | User Manual - Page 43
lock feature You can lock the control panel to prevent your settings from being changed accidentally (by children, for example). When the control panel lock is On, none of the controls on the TV control panel will operate except POWER. To lock the control panel: 1無 Press and highlight the Locks menu - Toshiba 40E20U | User Manual - Page 44
POWER) is pressed, the message "NOT AVAILABLE" appears. To unlock the control panel: Select Off in step 5 above, or press and hold the VOLUME - button on the TV control panel for about 10 seconds until the volume icon appears. Using the PC settings To set the PC Audio: 1無 Press and open the Sound - Toshiba 40E20U | User Manual - Page 45
••Connectivity is not guaranteed for all devices. ••Connect the USB device to the TV directly. ••Do not use a USB Hub. ••You must obtain any required permission from copyright owners to use copyright content. Toshiba cannot and does not grant such permission. ••Depending on the file size and amount - Toshiba 40E20U | User Manual - Page 46
the TV's shall be displayed. This view allows you to change the photo content manually. When moving from Multi View to the Single View, the currently . 2無 Press / to view the previous/next photo. To set Interval Time and Repeat settings: 1無 Press to open the Quick Menu. 2無 Press or to - Toshiba 40E20U | User Manual - Page 47
Chapter 6: Using the TV's features During playback • Press to pause. • To resume normal playback, press . • To locate a specific file, press or repeatedly. • To adjust volume , press / Note: During playback, you can adjust the SOUND menu functions from the QUICK menu. To set the repeat mode - Toshiba 40E20U | User Manual - Page 48
SOUND Settings See page 39 Note: Sorting, Total Time display may not be available in all cases. Setting the sleep timer You can set the sleep timer to turn off the TV after a set length of time (maximum of 180 minutes). To set : When a power failure occurs, the sleep timer setting may be cleared - Toshiba 40E20U | User Manual - Page 49
on the Audio Receiver, change its input source, or adjust the sound volume, the sound will be output from the audio receiver's speakers even if TV Speakers has been selected. Turn the TV off and on again to output the sound from the TV speakers. To set the REGZA-LINK® Setup: 1無 From the Setup menu - Toshiba 40E20U | User Manual - Page 50
want to use, and press t or u to select On or desired mode. • TV Auto Input Switch: On/Off • TV Auto Power: On/Off • Device Auto Standby: On/Off • Speaker Preference: TV Speakers/Audio Receiver 5無 To save the new settings, highlight Done and press . To revert to the factory defaults, highlight Reset - Toshiba 40E20U | User Manual - Page 51
Chapter 7: Using the TV's advanced features Using the advanced picture settings features Using Dynamic Contrast Dynamic Contrast detects changes in picture quality that affect the appearance of your contrast settings and then automatically adjusts the video. To select Dynamic Contrast preference: - Toshiba 40E20U | User Manual - Page 52
or to select either Off, Low, Middle or High. 4無 To save the new settings, highlight Done and press . To revert to the factory defaults, highlight Reset and press PC Mode You can use this function to output clear word image on the TV screen, when a PC is connected to the HDMI terminal. Note: This - Toshiba 40E20U | User Manual - Page 53
for presentation over regular stereo speakers. To adjust the QSound® settings: 1無 Put the TV in STEREO mode ( "Selecting stereo/SAP broadcasts" on page 39). 2無 Press and open the Sound menu. 3無 Highlight Advanced Audio Settings and press . 4無 Press or to highlight the QSound feature, and - Toshiba 40E20U | User Manual - Page 54
Chapter 8: Troubleshooting General troubleshooting Before calling a service technician, please check this chapter for a possible cause of the problem and some solutions you can try. Black box on-screen •• The closed caption feature is set to one of the Text modes (T1, T2, T3, or T4). Set the - Toshiba 40E20U | User Manual - Page 55
changed settings of the device, turn off your TV and unplug the power cord, then plug and turn on again. •• If several devices are connected, REGZA-LINK feature may not operate properly. •• Read the instruction manual furnished with the connected REGZA-LINK device. HDMI problems For HDMI - Toshiba 40E20U | User Manual - Page 56
: 24.3 lbs (11.0 kg) 37E200U/37E20U: 29.8 lbs (13.5 kg) 40E200U/40E20U: 32.0 lbs (14.5 kg) Operating conditions Temperature: 32ºF - 95ºF (0ºC - 35ºC) Humidity: 20 - 80% (no moisture condensation) Supplied Accessories • Remote control with two size "AAA" batteries • Owner's manual (this book) 56 - Toshiba 40E20U | User Manual - Page 57
picture position failure, blur, or judder. But this is not a malfunction of your TV. Format VGA SVGA XGA WXGA SXGA Resolution 640 × 480 800 × 600 1024 × .363kHz 47.776kHz 47.712kHz 63.981kHz Pixel Clock Frequency 25.175MHz 40.000MHz 65.000MHz 79.500MHz 85.500MHz 108.000MHz HDMI signal formats - Toshiba 40E20U | User Manual - Page 58
If, after following all of the operating instructions in this manual, review the section entitled "Concierge" located on our Customer Support Web site "www.tacp.toshiba. com/customersupport". If you find that service is needed, follow the instructions provided on the web site or please contact - Toshiba 40E20U | User Manual - Page 59
. 59 Your Responsibility Read the owner's manual thoroughly before operating this LCD Television. Complete and mail the enclosed product registration card or register your LCD Television online at http://support.toshiba.ca/warranty/. Registration of your LCD Television will enable TCL to contact - Toshiba 40E20U | User Manual - Page 60
, ETC.). YOU MUST READ AND FOLLOW ALL SET-UP AND USAGE INSTRUCTIONS IN THE APPLICABLE USER GUIDES AND/OR MANUALS. IF YOU FAIL TO DO SO, THIS TELEVISION MAY NOT FUNCTION PROPERLY AND YOU MAY SUFFER DAMAGE. THIS WARRANTY WILL NOT COVER ANY SERVICE THAT IS REQUIRED, IN PART OR IN WHOLE, AS A RESULT OF - Toshiba 40E20U | User Manual - Page 61
If, after following all of the operating instructions in this manual, checked the "Troubleshooting" section, and have visited www.toshiba.ca/support for additional information, you find that service is needed, please contact TCL Customer Support toll free at 1 800 2683404. A copy of the GPL source - Toshiba 40E20U | User Manual - Page 62
: 82 TOTOWA ROAD, WAYNE, NJ 07470, U.S.A. NATIONAL SERVICE DIVISION: 1420-B TOSHIBA DRIVE, LEBANON, TN 37087, U.S.A. TOSHIBA OF CANADA LTD. HEAD OFFICE: 191 McNABB STREET, MARKHAM, ONTARIO, L3R 8H2, CANADA - TEL: (905) 470-5400 SERVICE CENTERS: TORONTO: 191 McNABB STREET, MARKHAM, ONTARIO L3R
-
 1
1 -
 2
2 -
 3
3 -
 4
4 -
 5
5 -
 6
6 -
 7
7 -
8
-
9
-
10
-
11
-
12
-
13
-
14
-
15
-
16
-
17
-
18
-
19
-
20
-
21
-
22
-
23
-
24
-
25
-
26
-
27
-
28
-
29
-
30
-
31
-
32
-
33
-
34
-
35
-
36
-
37
-
38
-
39
-
40
-
41
-
42
-
43
-
44
-
45
-
46
-
47
-
48
-
49
-
50
-
51
-
52
-
53
-
54
-
55
-
56
-
57
-
58
-
59
-
60
-
61
-
62
 |
 |
For an overview of steps for setting up your new TV, see page10.
Note: To display a High Definition picture, the TV must be receiving
a High Definition signal (such as an over-the-air High Definition
TV broadcast, a High Definition digital cable program, or a High
Definition digital satellite program). For details, please contact
your TV antenna installer, cable provider, or satellite provider.
© 2010 TOSHIBA CORPORATION
All Rights Reserved
Owner’s Record
The model number and serial number are on the back
of your TV. Record these numbers in the spaces below.
Refer to these numbers whenever you communicate
with your Toshiba dealer about this TV.
Model number:
Serial number:
HDA51C3701I
Owner’s Manual
Integrated High Definition
HIGH
-DEFINITION TELEVISION
LCD Television
32E200U
32E20U
37E200U
37E20U
40E200U
40E20U