Toshiba Portege Z30-BMZC002 Portege Z30-B Series TMZC Quickstart Guide
Toshiba Portege Z30-BMZC002 Manual
 |
View all Toshiba Portege Z30-BMZC002 manuals
Add to My Manuals
Save this manual to your list of manuals |
Toshiba Portege Z30-BMZC002 manual content summary:
- Toshiba Portege Z30-BMZC002 | Portege Z30-B Series TMZC Quickstart Guide - Page 1
Timer, On, and Off. This function is supported with some models. Visit Toshiba's Support Web site Technical support is available online at Toshiba's Web site at support.toshiba.com. At this Web site, you will find the User's Guide, answers for many commonly asked technical questions. Download
-
 1
1
 |
 |
© 2017 Toshiba Client Solutions Co., Ltd. All rights reserved. Toshiba reserves the right to make technical changes.
Toshiba assumes no liability for damages incurred directly or indirectly from errors, omissions or discrepancies between
the computer and the Quickstart.
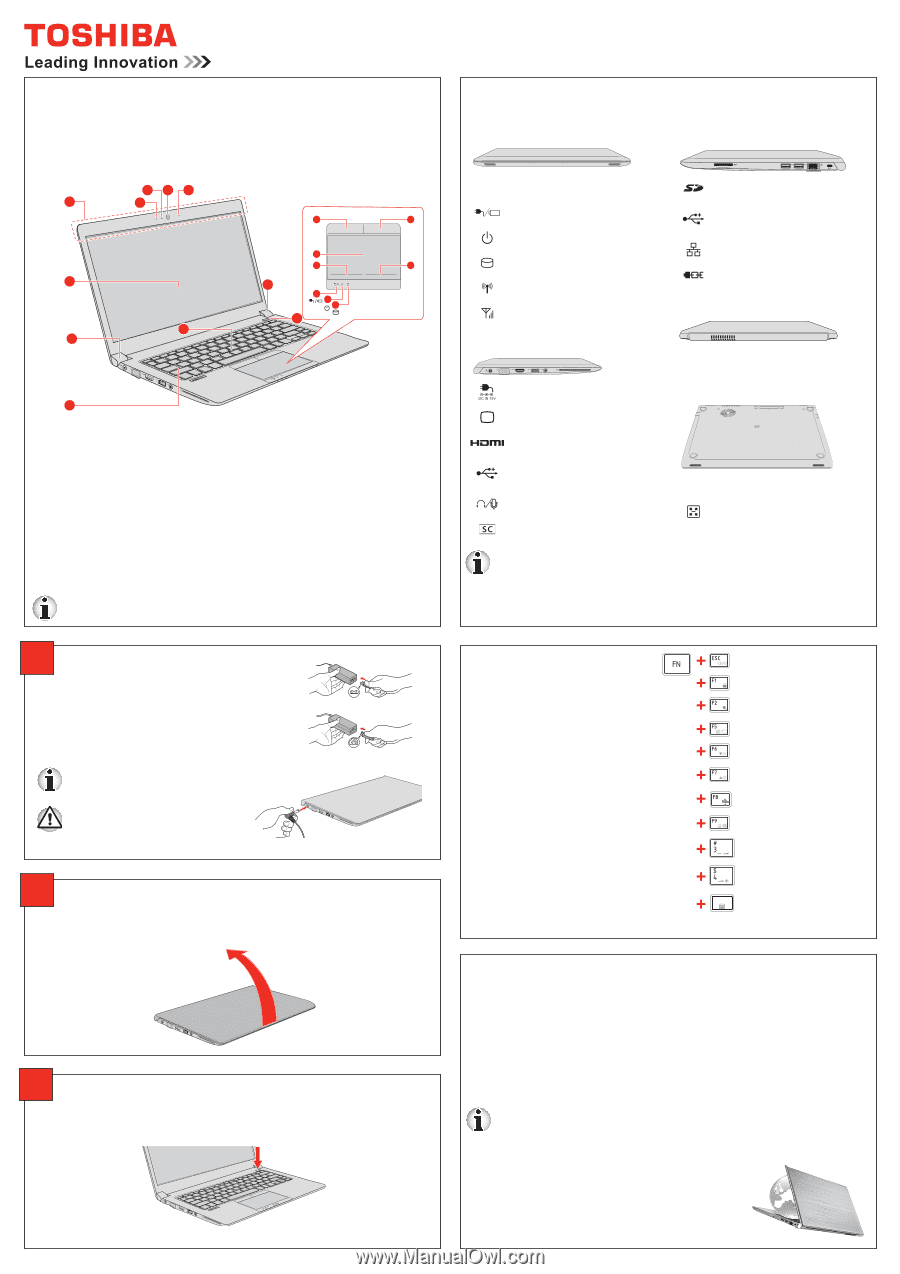
Features & Icons
The icons embossed on the computer indicate the following features:
Before moving the
computer:
±
Turn off (shut down) the computer.
±
Disconnect the AC adaptor and all
peripherals before moving the computer.
Close the display. Do not pick up the
computer by its display panel.
±
Do not carry your computer by holding
protruded portions.
* Indicates an optional part, dependent on the model purchased.
Quickstart
Toshiba Mobile Zero Client
PORTÉGÉ Z30-B
Turns the sound on or off.
Enters “Lock computer mode”.
Disable or Enable EULA
confirmation when boot time.
Changes the active display device.
Decreases the brightness of the
display panel in individual steps.
Increases the brightness of the
display panel in individual steps.
Turns the Airplane mode on or off.
Enables or disables the Touch Pad.
Decreases the playback volume of
the computer.
Increases the playback volume of
the computer.
Z
Toggles the mode of the keyboard
backlight between Timer, On, and
Off. This function is supported with
some models.
GMA501497010
*GMA501497010*
1
Connect the power
1.
Connect the power cord to the AC adaptor.
2.
Connect the AC adaptor’s DC output plug to
the DC IN 19V jack on your computer.
3.
Plug the power cord into a live wall outlet. The
DC IN/Battery
indicator should glow.
Either a 2-pin or 3-pin adaptor/cord
will be included with the computer
depending on the model.
Use of the wrong adaptor could
damage your computer. TOSHIBA
assumes no liability for any damage
in such case.
2
Open the display
While holding down the palm rest with one hand so that the main body of the
computer is not raised, slowly lift the display panel.
3
Turn on the power
1. Open the display panel.
2. Press the computer’s power button.
Visit Toshiba's Support Web site
Technical support is available online at Toshiba’s Web site at
support.toshiba.com
. At
this Web site, you will find the User’s Guide, answers for many commonly asked technical
questions.
Download the User’s Guide for your reference:
±
TOSHIBA Mobile Zero Client User’s Operation Guide
±
Should you need more information about the Legal/Safety/Regulatory, please refer to
the
Portégé Z30-B Series User’s Guide
. Note that not all components or functions
introduced in this guide will be provided with your product.
As a corporate citizen of planet earth, Toshiba strives to contribute to creating
a richer lifestyle for society that is in harmony with the Earth. We do our best
to ensure our products offer the highest consumer value with the lowest
possible environmental impact.
To minimize the amount of printed documentation
and thus help reduce consumption of natural
resources, we have created this convenient Quick
Start Guide.
Function keys
The function keys let you quickly modify
the system configuration directly from
the keyboard without running a system
configuration program.
1
5
6
9
7
2
3
4
2
6
8
13
14
12
12
10
10
11
15
Front side:
Stereo speakers
DC IN/Battery indicator
Power indicator
Internal storage drive indicator
Wireless communication indicator
Wireless WAN indicator**
Left side:
DC IN 19V jack
External RGB monitor port
HDMI out port
Universal Serial Bus (USB 3.0)
port
Headphone/Microphone jack
Smart Card slot**
Right side:
Memory media slot
Universal Serial Bus (USB 3.0)
ports
LAN jack
Security lock slot
Back Side:
Cooling vents
Underside:
Cooling vents
Docking port**
** Indicate an optional part, dependent on the model purchased.
The
functionality is limited depending on implementation for Toshiba Mobile Zero
Client.
1.
Wireless communication antennas
(not shown)*
2.
Microphones*
3.
Web Camera LED*
4.
Web Camera*
5.
Display screen
6.
Display hinges
7.
Keyboard
8.
Power button
9.
AccuPoint*
10.
AccuPoint control buttons*
11.
Touch Pad
12.
Touch Pad control buttons
13.
DC IN/Battery indicator
14.
Power indicator
15.
Internal storage drive indicator