Uniden EXS9600 English Owners Manual
Uniden EXS9600 Manual
 |
View all Uniden EXS9600 manuals
Add to My Manuals
Save this manual to your list of manuals |
Uniden EXS9600 manual content summary:
- Uniden EXS9600 | English Owners Manual - Page 1
Redial 25 • Using the Tone Feature 25 • Using the Page Feature 26 Troubleshooting 27 • Quick Reference Chart 27 Specifications 29 Fold out the back cover of this owner’s manual to use the handy “Controls and Functions” page for reference. C:\LaDonna\Exs9600\EXS9600.vp Tue Dec 01 11:27:58 1998 - Uniden EXS9600 | English Owners Manual - Page 2
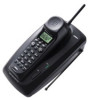
Uniden EXS9600 cordless telephone. This phone is Battery Capability • Back-up Power Supply with Optional Battery Pack • Redial, Flash, and Pause • Pulse/Tone Dialing • Page • 7 Day Standby Battery digital sound, extended range, and minimal interference from other cordless phones. Random CodeTM - Uniden EXS9600 | English Owners Manual - Page 3
reached on the web at www.uniden.com. Rechargeable Battery Short Telephone Cord Beltclip Long Telephone Cord Desktop/ Wall Mount Adapter Wall Mounting Screws • This Owner’s Manual • Precautions and Important Safety Instructions • Registration Card 2 C:\LaDonna\Exs9600\EXS9600.vp Tue Dec 01 11 - Uniden EXS9600 | English Owners Manual - Page 4
. 3) Plug the AC adapter into a standard 120 VAC wall outlet. ! Use only the Uniden AC adapter supplied with this phone and DO NOT use an outlet controlled by a wall switch. 4) Charge the battery (refer to “Charging the Battery Pack,” page 11). 5) Plug one end of the long telephone cord into the TEL - Uniden EXS9600 | English Owners Manual - Page 5
the desktop stand to the base. HINT Before using your phone, fully charge the NickelCadmium battery pack for 15-20 hours. 8) Set the base on a fire or electrical hazard. WALL INSTALLATION w Standard wall plate mounting This phone can be mounted on any standard AT&T or GTE wall plate. 1) Remove - Uniden EXS9600 | English Owners Manual - Page 6
of the telephone cord into the modular jack on the wall, charge the battery (refer to “Charging the Battery Pack,” page 11). 5) Plug one end of the short telephone cord in and down until the phone is firmly seated. INSTALLING AND ADJUSTING 5 C:\LaDonna\Exs9600\EXS9600.vp Tue Dec 01 11:28:20 1998 - Uniden EXS9600 | English Owners Manual - Page 7
the lip of the retainer faces up and the oval is at the bottom of the retainer. This will hold the handset in place. 6 C:\LaDonna\Exs9600\EXS9600.vp Tue Dec 01 11:28:23 1998 - Uniden EXS9600 | English Owners Manual - Page 8
mount your phone directly phone within 10 - 15 feet of a working phone jack in order to avoid excessive cord lengths. Remember, you are not mounting to a wall plate with a built in phone jack. • If the selected mounting area has no wooden support support your phone for mounting the phone. ! Be - Uniden EXS9600 | English Owners Manual - Page 9
the long telephone cord into the TEL LINE jack on the back of the base, then plug the other end into a standard telephone jack. 8 C:\LaDonna\Exs9600\EXS9600.vp Tue Dec 01 11:28:30 1998 - Uniden EXS9600 | English Owners Manual - Page 10
mounting slots on the base with the mounting screws on the wall, then push in and down until the phone is firmly seated. 8) On the base unit, pull the handset retainer out of the slot and rotate it retainer. This will hold the handset in place. 9 C:\LaDonna\Exs9600\EXS9600.vp Tue Dec 01 11:28:32 1998 - Uniden EXS9600 | English Owners Manual - Page 11
Disabled Composite Default screen ! Use only Uniden battery model (BT-990) supplied with your phone. INSTALLING THE HANDSET BATTERY PACK 1) Press in on the battery cover release and slide the cover down until it comes off. 2) Install the nickel-cadmium battery with the label facing down. 3) Slide - Uniden EXS9600 | English Owners Manual - Page 12
unit of your phone is equipped with a compartment for charging an extra battery pack for use in your handset. You can obtain an extra battery pack from your authorized Uniden dealer. Please visit your authorized Uniden dealer to obtain an extra battery pack or contact the Uniden parts department at - Uniden EXS9600 | English Owners Manual - Page 13
pack is very low and needs to be charged, the phone is Low Battery programmed to eliminate functions in order to save power. If the phone is not in use, Low Battery flashes. If the phone is in use, Low Battery flashes and the handset beeps. Complete your conversation as quickly as possible - Uniden EXS9600 | English Owners Manual - Page 14
Composite Default screen ADJUSTING THE HANDSET VOLUME CONTROLS w Handset ringer volume When the phone is in standby mode, pressing the vol v or w key on the handset , indicating the current volume setting. INSTALLING AND ADJUSTING 13 C:\LaDonna\Exs9600\EXS9600.vp Tue Dec 01 11:28:44 1998 - Uniden EXS9600 | English Owners Manual - Page 15
Remove the slot cover. Use only the Uniden HS910 headset specifically designed for Spread Spectrum phones. You will hear a buzz or hum you are using an optional headset, you must still use the handset keypad for phone operations. w To remove the beltclip 1) Pull back on the release tab and - Uniden EXS9600 | English Owners Manual - Page 16
Composite Default screen HEADSET INSTALLATION Your phone may be used with an optional headset, the Uniden HS910. To use this feature, simply other parties from making unauthorized calls on your phone line, a digital code was added to the EXS9600. Your phone’s handset and base share this code, which - Uniden EXS9600 | English Owners Manual - Page 17
RECEIVING CALLS Handset On Base Handset Off Base USING YOUR NEW PHONE To answer a call 1) Pick up the handset. 1) tone. 3) Press redial. 4) Press redial. FLASH AND CALL WAITING If you have “call waiting” service and a call waiting tone sounds while you are on a call, press flash to accept the - Uniden EXS9600 | English Owners Manual - Page 18
flashes indicating that the display is ready for the number. Store Number „ 7) Enter the phone number with the number keypad (direct entry) or the : and ; keys. Use the wait 20 seconds for the phone to return to standby. 17 C:\LaDonna\Exs9600\EXS9600.vp Tue Dec 01 11:28:58 1998 USING YOUR - Uniden EXS9600 | English Owners Manual - Page 19
press a key within 20 seconds or the phone will return to standby. You may also press any saved numbers. Memory Store 1> KAYSIE SCHLITZ 2 UNIDEN 3) Use the : and ; keys or number keypad to be edited. Store Number 8175551212 8) Enter the phone number with the number keypad (direct entry) or the - Uniden EXS9600 | English Owners Manual - Page 20
handset shows the Memory Store screen with any saved numbers displayed. Memory Store 1> KAYSIE SCHLITZ 2 UNIDEN NOTE 3) Use the : and ; keys or number keypad to select the memory location you the > cursor to the Yes command. 19 C:\LaDonna\Exs9600\EXS9600.vp Tue Dec 01 11:29:03 1998 USING YOUR - Uniden EXS9600 | English Owners Manual - Page 21
. The handset displays your programmed memory locations. 1 > KAYSIE SCHLITZ 2 Uniden 3 Grandma 2) Use the : and ; keys or the number keypad -range, the voice transmission will begin to break up. If you pass the range limits of the base unit, your call will terminate. 20 C:\LaDonna\Exs9600\EXS9600. - Uniden EXS9600 | English Owners Manual - Page 22
same as regular Caller ID on a call waiting number. You must subscribe to CIDCW from your phone company in order to use this feature. The Area Code feature is used when storing or directly your setup changes are now effective. 21 C:\LaDonna\Exs9600\EXS9600.vp Tue Dec 01 11:29:07 1998 USING YOUR - Uniden EXS9600 | English Owners Manual - Page 23
call count, name, 12/21 12:30PM 01 Schlitz Kaysie 817-555-1212 and phone number of the caller. If your Caller ID service is number only, then the name does not appear on the second line. If You must press : to view your previous messages. 22 C:\LaDonna\Exs9600\EXS9600.vp Tue Dec 01 11:29:09 1998 - Uniden EXS9600 | English Owners Manual - Page 24
; keys to select a blank 1> KAYSIE SCHLITZ memory location where you would like to 2 UNIDEN store the number. (If you want to replace an existing number with the Caller ID number, tone sounds, and the number is programmed. 23 C:\LaDonna\Exs9600\EXS9600.vp Tue Dec 01 11:29:11 1998 USING YOUR - Uniden EXS9600 | English Owners Manual - Page 25
, and the following screen appears. Delete All? Yes > No 3) Use the : key to move the cursor to Yes, then press select or delete. 24 C:\LaDonna\Exs9600\EXS9600.vp Tue Dec 01 11:29:13 1998 - Uniden EXS9600 | English Owners Manual - Page 26
, the tone mode is canceled and pulse dialing resumes. NOTE The tone feature applies only when the base unit is set to pulse. USING YOUR PHONE 25 C:\LaDonna\Exs9600\EXS9600.vp Tue Dec 01 11:29:17 1998 - Uniden EXS9600 | English Owners Manual - Page 27
beeps for 60 seconds and displays Paging. Paging Press talk on the handset to end paging. Press talk again to return to standby. 26 C:\LaDonna\Exs9600\EXS9600.vp Tue Dec 01 11:29:19 1998 - Uniden EXS9600 | English Owners Manual - Page 28
: Disabled Composite Default screen TROUBLESHOOTING YOUR NEW PHONE Troubleshooting QUICK REFERENCE CHART If your phone is not performing to your expectations, please try these simple steps before calling Uniden customer service. If you are still unable to resolve the problem, contact your place of - Uniden EXS9600 | English Owners Manual - Page 29
TROUBLESHOOTING Color profile: Disabled Composite Default screen PROBLEM The handset doesn’t ring or receive a page. SUGGESTION • The Nickel-Cadmium battery pack may be weak. Charge the battery indicating that the phone has been reset. 28 C:\LaDonna\Exs9600\EXS9600.vp Tue Dec 01 11:29:22 1998 - Uniden EXS9600 | English Owners Manual - Page 30
4in. (H) Weight: Approx. 9.3oz. (including battery) Battery: BT-990 Capacity Talk mode Standby mode 600 mAH, 3.6V 4 hours 7 days Specifications, features, and availability of optional accessories are all subject to change without prior notice. 29 C:\LaDonna\Exs9600\EXS9600.vp Tue Dec 01 11:29 - Uniden EXS9600 | English Owners Manual - Page 31
CONTROLS AND FUNCTIONS
-
 1
1 -
 2
2 -
 3
3 -
 4
4 -
 5
5 -
 6
6 -
 7
7 -
8
-
9
-
10
-
11
-
12
-
13
-
14
-
15
-
16
-
17
-
18
-
19
-
20
-
21
-
22
-
23
-
24
-
25
-
26
-
27
-
28
-
29
-
30
-
31
 |
 |

CONTENTS
OF YOUR OWNER±S MANUAL
CONTENTS
Introduction
...................................................
1
²
Welcome
............................................................
1
²
Features
............................................................
1
²
Included in Your Package
..............................................
2
Installing and Adjusting Your Phone
...............................
3
²
Desk/Tabletop Installation
..............................................
3
²
Wall Installation
......................................................
4
²
Installing the Handset Battery Pack
.....................................
10
²
Charging the Battery Pack
.............................................
11
²
Cleaning the Battery Contacts
..........................................
12
²
Setting the Pulse/Tone Switch
..........................................
12
²
Adjusting the Handset Volume Controls
..................................
13
²
Installing the Beltclip
.................................................
14
²
Headset Installation
..................................................
15
²
Automatic Digital Code Security
........................................
15
Using Your New Phone
.........................................
16
²
Making and Receiving Calls
............................................
16
²
Flash and Call Waiting
................................................
16
²
Storing a Phone Number in Memory
....................................
17
²
Editing a Phone Number in Memory
....................................
18
²
Erasing a Number from Memory
........................................
19
²
Using Memory Dialing
................................................
20
²
Traveling Out-of-Range
...............................................
20
²
Using Caller ID
......................................................
21
²
Using Redial
........................................................
25
²
Using the Tone Feature
...............................................
25
²
Using the Page Feature
...............................................
26
Troubleshooting
..............................................
27
²
Quick Reference Chart
................................................
27
Specifications
................................................
29
Fold out the back cover of this
owner±s manual to use the handy
³Controls and Functions´ page
for reference.
C:\LaDonna\Exs9600\EXS9600.vp
Tue Dec 01 11:27:58 1998
Color profile: Disabled
Composite
Default screen