Vizio E220VA E190VA User Manual
Vizio E220VA Manual
 |
View all Vizio E220VA manuals
Add to My Manuals
Save this manual to your list of manuals |
Vizio E220VA manual content summary:
- Vizio E220VA | E190VA User Manual - Page 1
RAZOR LED™ LCD HDTV E190VA / E220VA / E260VA - user manual - Vizio E220VA | E190VA User Manual - Page 2
for ENERGY STAR in the "factory default" setting and this is the setting in which power savings will be achieved. Changing the factory default picture settings or enabling other features will increase power consumption that could exceed the limits necessary to qualify for ENERGY STAR rating. ® HDMI - Vizio E220VA | E190VA User Manual - Page 3
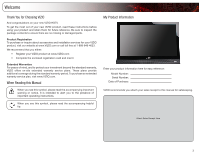
of your new VIZIO product, read these instructions before using your product and retain them for future reference. Be sure to inspect the package contents to ensure there are no missing or damaged parts. Product Registration To purchase or inquire about accessories and installation services for your - Vizio E220VA | E190VA User Manual - Page 4
of the type of power supplied to your home, consult your dealer or local power company. • Do not apply pressure or throw objects at your TV. This may compromise the integrity of the display. The manufacturer's warranty does not cover user abuse or improper installations. • The power cord must be - Vizio E220VA | E190VA User Manual - Page 5
E190VA / E220VA / E260VA • Do not overload power strips and extension cords. Overloading can result in fire or electric shock. • The wall socket should be installed near your TV and easily accessible. • Only power of the marked voltage can be used for your TV. Any other voltage than the specified - Vizio E220VA | E190VA User Manual - Page 6
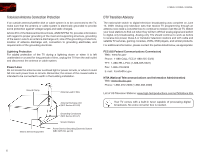
to find out when they will turn off their analog signal and switch to digital-only broadcasting. Analog-only TVs should continue to work as before to receive low power, Class A or translator television stations and with cable and satellite TV services, gaming consoles, VCRs, DVD players, and - Vizio E220VA | E190VA User Manual - Page 7
Table of Contents Installing the TV 1 Inspecting the Package Contents 1 Installing the TV 1 Installing the TV Stand 1 Installing the TV on a Wall 2 Controls and Connections 3 Front Panel 3 Left Side Panel 3 Right Side Panel 3 Rear Panel 4 Remote Control 4 Replacing the Batteries 5 - Vizio E220VA | E190VA User Manual - Page 8
Restarting the Setup App 28 Setting Up Closed Captioning 29 Changing the Appearance of Digital Closed Captions 29 Troubleshooting & Technical Support 30 The TV displays "No Signal 30 There is no power 30 The power is on, but there is no image on the screen 30 There is no sound 30 The colors - Vizio E220VA | E190VA User Manual - Page 9
not properly secured VIZIO Razor LED LCD HDTV with Stand User Manual and Quick Start Guide Remote Control with Batteries Your TV comes in the box with the base already attached. Use the following instructions if you need to reattach the base. To install the TV stand: 1. Place the TV screen-down - Vizio E220VA | E190VA User Manual - Page 10
that can scratch or damage the TV. Installing the TV on a Wall To mount your TV on a wall, you will need a wall mount. Consult the information below to find the appropriate mount for your TV model: Screw Size: Screw Length: Screw Pitch: Hole Pattern: E190VA M4 10mm 0.7mm 75mm x 75mm E220VA - Vizio E220VA | E190VA User Manual - Page 11
the on-screen menu. When activated, Sensor: the sensor adjusts the brightness of the TV based on the light level in the room. (On E220VA and E260VA, the sensor is on the front of the TV.) Power: Turn the TV on or off. Menu: Display on-screen menu. Channel Up/Down: Change the channel. Volume Up/Down - Vizio E220VA | E190VA User Manual - Page 12
component video/audio devices. Cable/Antenna: Connect coaxial cable for external antenna or cable TV. Input Wide Sleep Menu/OK Arrow Left Volume Up/Down Last Info 4 E190VA / E220VA / E260VA Power/Standby Input (Specific) Closed Caption (CC) Exit Arrow Up Arrow Right Arrow Down Channel Up/Down - Vizio E220VA | E190VA User Manual - Page 13
E190VA / E220VA / E260VA 2 Input: Change the input device. With each press of the button, the TV will display a different input. Input (Specific): Change the input device. Press the button that corresponds to the input device you wish to view. Power/Standby: Turn the TV on or off. Sleep: Activate - Vizio E220VA | E190VA User Manual - Page 14
are inserted. • Your devices should be connected. To complete the first-time setup: 1. Turn the TV on by pressing the Power/ Standby button on the remote. The Setup App is displayed. Initial Setup Allow the VIZIO setup Wizard to help you tune your channels. Welcome Press the Right Arrow button - Vizio E220VA | E190VA User Manual - Page 15
. 3. Turn the TV on by pressing the Power/Standby button on the remote. 4. Turn your device instructions: Cable TV (without cable box/directly from wall) Perform a channel scan. RGB Make sure the desktop resolution on the PC is set to match your TV's resolution. (See Appendix A - Specifications - Vizio E220VA | E190VA User Manual - Page 16
4 Select one of the connection types. Use the cable(s) shown to connect the TV to your device. BEST BETTER HDMI RF/ COAXIAL RGB COMPONENT GOOD COMPOSITE AV 8 E190VA / E220VA / E260VA Select One: OR OR OR OR DIGITAL DIGITAL / ANALOG ANALOG ANALOG ANALOG Device Connection Chart - Vizio E220VA | E190VA User Manual - Page 17
input source in the on-screen menu. To change the input device: 1. Press the MENU button on the remote. The on-screen menu is displayed. 2. Use the Arrow buttons on the remote to highlight the TV icon and press MENU/OK. 3. Use the Arrow buttons to highlight Input Source and press MENU/OK. 4. Use - Vizio E220VA | E190VA User Manual - Page 18
input. To change the signal source: 1. Press the MENU button on the remote. The on-screen menu is displayed. 2. Use the Arrow buttons on the remote to highlight the TV icon and press MENU/OK. The TV Settings menu is displayed. 3. Use the Arrow buttons to highlight Channels and press MENU/OK. 4. Use - Vizio E220VA | E190VA User Manual - Page 19
E190VA / E220VA / E260VA 5 Customizing the Master Channel List By customizing the master channel list, you can choose which channels can be displayed. 1. Press the MENU button on the remote. The on-screen menu is displayed. 2. Use the Arrow buttons on the remote to highlight the TV icon and press - Vizio E220VA | E190VA User Manual - Page 20
free-to-air broadcast television channels are available. To scan for channels: 1. Press the MENU button on the remote. The on-screen menu is displayed. 2. Use the Arrow buttons on the remote to highlight the TV icon and press MENU/OK. The TV Settings menu is displayed. 3. Use the Arrow buttons - Vizio E220VA | E190VA User Manual - Page 21
E190VA / E220VA / E260VA Changing the On-Screen Menu Language Your TV can display the on-screen menu in different languages. To change the on-screen menu language: 1. Press the MENU button on the remote. The on-screen menu is displayed. 2. Use the Arrow buttons on the remote to highlight the TV icon - Vizio E220VA | E190VA User Manual - Page 22
menu option, you can manually set the TV's date and time. To manually set the date and time: 1. Press the MENU button on the remote. The on-screen menu is displayed. 2. Use the Arrow buttons on the remote to highlight the TV icon and press MENU/OK. The TV Settings menu is displayed. 3. Use the Arrow - Vizio E220VA | E190VA User Manual - Page 23
E190VA / E220VA / E260VA 5 Adjusting the TV Settings for Use with A PC Your TV can be used to display output from a home computer using the RGB port. These settings are only available when viewing content from the RGB port. To adjust the PC settings: 1. Press the MENU button on the remote. The on- - Vizio E220VA | E190VA User Manual - Page 24
Menu Settings Setting the Sleep Timer When activated, the TV's sleep timer will turn the TV off after a set period of time. To use the sleep timer: 1. Press the MENU button on the remote. The on-screen menu is displayed. 2. Use the Arrow buttons on the remote to highlight the Timer icon and press OK - Vizio E220VA | E190VA User Manual - Page 25
on the left side of the TV. The photos on your USB thumb drive will be displayed automatically. If your thumb drive is already inserted, continue with step 3. 3. Press the MENU button on the remote. The on-screen menu is displayed. 4. Use the Arrow buttons on the remote to highlight the Photo icon - Vizio E220VA | E190VA User Manual - Page 26
6 E190VA / E220VA / E260VA Setting the Screen Aspect Ratio The TV can display images in five different modes: Normal, Wide, Zoom, Panoramic, and Stretch. Each mode displays content according to the content's original format. Use the table below to determine the best aspect ratio for your content - Vizio E220VA | E190VA User Manual - Page 27
widescreen (1.85:1 or 2.35:1) content, black bars will still appear on the top and bottom of the display image. This option is only available when the TV is displaying a 720p/1080i/1080p source. 6 Adjusting the Audio Settings Using the Audio Settings menu, you can adjust the following: • Enable - Vizio E220VA | E190VA User Manual - Page 28
6 E190VA / E220VA / E260VA Enabling or Disabling SRS TruVolume SRS TruVolume intelligently normalizes volume fluctuations due to television commercials or channel changes. To enable or disable SRS TruVolume: 1. Press the MENU/OK button on the remote. The on-screen menu is displayed. 2. Use the - Vizio E220VA | E190VA User Manual - Page 29
for your TV's built-in speakers can be adjusted to your liking. To adjust the bass and treble levels, you must disable SRS TruSurroundHD and change the Equalizer Settings to Off. To adjust the bass and treble levels: 1. Press the MENU/OK button on the remote. The on-screen menu is displayed. 2. Use - Vizio E220VA | E190VA User Manual - Page 30
Using this menu option, you can turn the built-in speakers on or off. This is often used when the TV is connected to a home audio system. To enable or disable the built-in speakers: 1. Press the MENU/OK button on the remote. The on-screen menu is displayed. 2. Use the Arrow buttons to - Vizio E220VA | E190VA User Manual - Page 31
E190VA / E220VA / E260VA 6 Changing the Audio Language Some digital free-to-air and cable channels broadcast programs in more than one language. The TV's MTS (Multichannel Television 1. Press the MENU/OK button on the remote. The on-screen menu is displayed. 2. Use the Arrow buttons to highlight - Vizio E220VA | E190VA User Manual - Page 32
light sensor • Reset the picture mode settings Changing the Picture Mode Your TV display can be adjusted to suit your preferences and viewing conditions. To change the picture mode: 1. Press the MENU/OK button on the remote. The on-screen menu is displayed 24 E190VA / to manually change - Vizio E220VA | E190VA User Manual - Page 33
the brightness of the TV's backlight. When the ambient light sensor is enabled, you will be unable to manually change the TV's brightness settings. To enable or disable the ambient light sensor: 1. Press the MENU/OK button on the remote. The on-screen menu is displayed. 2. Use the Arrow buttons - Vizio E220VA | E190VA User Manual - Page 34
Use the Arrow buttons to highlight OK and press MENU/OK. 5. Press EXIT. 26 E190VA / E220VA / E260VA Setting the Parental Controls The TV's parental controls allow you to prevent the TV from displaying certain channels or programs without a password. To access the Parental Control menu: 1. Press the - Vizio E220VA | E190VA User Manual - Page 35
save it in a secure location. 5. Press the EXIT button on the remote. Resetting the Content Locks To reset the content locks to the factory-default settings: 1. From the Parental Controls menu, highlight RESET LOCKS and press OK. The TV displays, "Are you sure you want to RESET ALL LOCKS SETTINGS to - Vizio E220VA | E190VA User Manual - Page 36
icon and press MENU/OK. The Help menu is displayed. 3. Highlight System Info and press MENU/OK. The system information is displayed. 4. When you are finished reviewing the system information, press the EXIT button on the remote. Restoring the TV to the Factory Default Settingss All of the on-screen - Vizio E220VA | E190VA User Manual - Page 37
you are viewing is not being broadcast with closed captions, the TV will not display them. To activate or deactivate closed captions: 1. Press the MENU button on the remote. The on-screen menu is displayed. 2. Use the Arrow buttons on the remote to highlight the CC icon and press OK. The Closed - Vizio E220VA | E190VA User Manual - Page 38
a problem when using your TV, try to fix the issue using this troubleshooting guide. If, after using this troubleshooting guide, you are still experiencing an issue with your TV, contact VIZIO's Support Department. Quality customer support and service are integral parts of VIZIO's commitment - Vizio E220VA | E190VA User Manual - Page 39
E190VA / E220VA / E260VA A The display image does not cover the entire screen. • If you are in RGB mode (computer), ensure that H-Size and V-Position in the on-screen menu are set correctly. • If you are using TV, AV1, or Component with 480i input, press the WIDE button on the remote to change the - Vizio E220VA | E190VA User Manual - Page 40
Maximum Resolution: Dynamic Contrast Ratio: Response Time: Brightness: HDMI Inputs: Component Video Inputs: Composite Inputs: RF Antenna Input: USB Ports: RGB Inputs: OSD Language: Audio Outputs: Number of Speakers Watts/Channel Simulated Surround: Sound Leveler: Ambient Light Sensor: 32 E190VA 19 - Vizio E220VA | E190VA User Manual - Page 41
Power Consumption: Voltage Range: E190VA 22W 100~240 VAC @ 50/60Hz E220VA 26W 100~240 VAC @ 50/60Hz B E260VA 40W 100~240 VAC @ 50/60Hz 33 - Vizio E220VA | E190VA User Manual - Page 42
operation, improper voltage supply or power surges, signal issues, damages from shipping, acts of God, any type of customer misuse, modifications or adjustments, as well as installation and set-up issues or any repairs attempted by anyone other than by a VIZIO authorized service center. Products - Vizio E220VA | E190VA User Manual - Page 43
with the instructions, may cause harmful interference to radio communications. However, there is no guarantee that interference will not occur in a particular installation. If this equipment does cause harmful interference to radio or television reception, which can be determined by turning the - Vizio E220VA | E190VA User Manual - Page 44
Notes 36 - Vizio E220VA | E190VA User Manual - Page 45
E190VA / E220VA / E260VA 37 - Vizio E220VA | E190VA User Manual - Page 46
E190VA / E220VA / E260VA 38 - Vizio E220VA | E190VA User Manual - Page 47
- Vizio E220VA | E190VA User Manual - Page 48
OWNERS. IMAGES USED ARE FOR ILLUSTRATION PURPOSES ONLY. VIZIO, THE V LOGO, WHERE VISION MEETS VALUE, AND OTHER VIZIO TRADEMARKS ARE THE INTELLECTUAL PROPERTY OF VIZIO INC. PRODUCT FEATURES AND SPECIFICATIONS ARE SUBJECT TO CHANGE WITHOUT NOTICE. © 2011 VIZIO INC. ALL RIGHTS RESERVED. 110127ST-A
-
 1
1 -
 2
2 -
 3
3 -
 4
4 -
 5
5 -
 6
6 -
 7
7 -
8
-
9
-
10
-
11
-
12
-
13
-
14
-
15
-
16
-
17
-
18
-
19
-
20
-
21
-
22
-
23
-
24
-
25
-
26
-
27
-
28
-
29
-
30
-
31
-
32
-
33
-
34
-
35
-
36
-
37
-
38
-
39
-
40
-
41
-
42
-
43
-
44
-
45
-
46
-
47
-
48
 |
 |

E190VA / E220VA / E260VA
–
USER MaNUaL
RAZOR LED
™
LCD HDTV