Vizio E320fi-B2 Download
Vizio E320fi-B2 Manual
 |
View all Vizio E320fi-B2 manuals
Add to My Manuals
Save this manual to your list of manuals |
Vizio E320fi-B2 manual content summary:
- Vizio E320fi-B2 | Download - Page 1
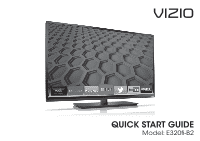
VIZIO QUICK START GUIDE Model: E320fi-B2 - Vizio E320fi-B2 | Download - Page 2
TV will not be used for an extended period of time, unplug the power cord. • To reduce risk of electric shock, do not touch the connector with wet hands. • Insert batteries in accordance with instructions. Incorrect polarities may cause the batteries to leak which can damage the remote control - Vizio E320fi-B2 | Download - Page 3
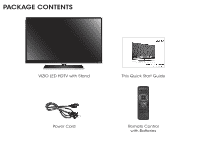
PACKAGE CONTENTS VIZIO LED HDTV with Stand This Quick Start Guide Power Cord Remote Control with Batteries - Vizio E320fi-B2 | Download - Page 4
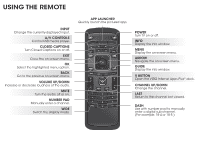
THE REMOTE INPUT Change the currently-displayed input. A/V APP LAUNCHER Quickly launch the pictured app. POWER Turn TV on or off. INFO Display the info window. MENU Display the on-screen menu. ARROW Navigate the on-screen menu. GUIDE Display the info window. V BUTTON Open the VIZIO Internet Apps - Vizio E320fi-B2 | Download - Page 5
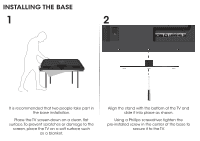
1 2 It is recommended that two people take part in the base installation. Place the TV screen-down on a clean, flat surface. To prevent scratches or damage to the screen, place the TV on a soft surface such as a blanket. Align the stand with the bottom of the TV and slide it into place as shown - Vizio E320fi-B2 | Download - Page 6
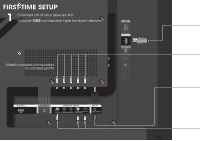
FIRST-TIME SETUP 1 Connect all of your devices first. Choose ONE connection type for each device. Match colored connectors to colored ports. - Vizio E320fi-B2 | Download - Page 7
HDMI CABLE* BEST • DIGITAL • HD VIDEO (1080p)** • HD AUDIO COMPONENT CABLE* • ANALOG BETTER • HD VIDEO (1080i)** • STEREO AUDIO Match colored connectors to colored ports. COAXIAL CABLE* BETTER • ANALOG • HD VIDEO (1080i)** • STEREO - Vizio E320fi-B2 | Download - Page 8
TIME SETUP 1 2 Remove the battery cover by pressing gently on the V logo and sliding away from the remote. Insert the included batteries. Gently slide the battery cover back into place. Connect the power cord to the back of the TV. The flat edge of the connector goes toward the outside of the TV - Vizio E320fi-B2 | Download - Page 9
as shown. For the best Smart TV experience, VIZIO recommends using an Ethernet cable. However, your TV also has built-in Wi-Fi. See the Connecting to the Internet with Wi-Fi section for more information. Turn the TV on by pressing the Power button on the remote. The Setup App is displayed. Use the - Vizio E320fi-B2 | Download - Page 10
MENU Button VIZIO TV SETTINGS Picture Audio Timers Network Tuner CC Closed Captions Devices System Guided Setup User Manual Wide Zoom Normal Panoramic Exit 2D 3D ABC User Input Wide CC Manual Sleep Timer Picture Audio Network Settings Help Press the MENU button on the Remote Control - Vizio E320fi-B2 | Download - Page 11
your Devices Completing the First-Time Setup Using the On-Screen Menu Using the USB Media Player Using VIZIO Internet Apps Troubleshooting & Technical Support Specifications Limited Warranty Legal & Compliance LED HDTV WITH VIZIO INTERNET APPS PLUS® E320fi-B2 Use the Up and Down - Vizio E320fi-B2 | Download - Page 12
first-time setup, you can skip this section. To connect to a wireless network you will need: Wireless Router High-speed Internet connection SSID (Wireless network name) Network Password VIZIO TV SETTINGS Picture Audio Timers Network Tuner CC Closed Captions Devices System Guided Setup User Manual - Vizio E320fi-B2 | Download - Page 13
User Manual. Using the on-screen keyboard, enter your network's password, then highlight Connect and press OK. If you are having trouble connecting to your network, check your router placement. It should be in a place with minimal structural interference like walls or large metal objects, and away - Vizio E320fi-B2 | Download - Page 14
a selection of Apps that allow you to watch movies and TV shows, listen to music, get weather and news information, and more-all on demand. A high-speed Internet connection is required to receive product updates and to access online content. INPUT CC EXIT BACK OK INFO MENU GUIDE VOL CH VOL - Vizio E320fi-B2 | Download - Page 15
can be moved to the Dock. Press the V Button twice to launch the fullscreen V.I.A. Apps window. My Apps Features the apps installed on your TV. Installed Apps The Apps displayed here are also available in the V.I.A. Plus App Dock. App Tabs Browse through apps on these tabs and add them to your My - Vizio E320fi-B2 | Download - Page 16
EASY UPGRADE SERIOUS SOUND 29" 2.0 HIGH DEFINITION SOUND BAR VIZIO's 29" 2.0 Sound Bar delivers powerful audio that is perfect for any small to medium sized HDTV just plug it in, connect the included audio cable to your TV and you've got powerful audio with minimal effort. Available at www - Vizio E320fi-B2 | Download - Page 17
QUESTIONS? LET US HELP! YOUR PRODUCT INCLUDES FREE LIFETIME TECH SUPPORT The VIZIO support team is highly trained and is based in the United States. We can help with: • New Product Setup • Connecting Your Devices • Technical Problems • And More Phone: (877) 878-4946 (TOLL-FREE) Email: techsupport - Vizio E320fi-B2 | Download - Page 18
the TV image mode so that the picture fills the screen. Press the WIDE button on the remote until the screen is filled, and then press OK. • Adjust the video settings of your external device. There is no power. • Be sure the power cord is securely connected to the AC socket on the TV and to - Vizio E320fi-B2 | Download - Page 19
and shipping material or packaging that affords an equal degree of protection.VIZIO Technical Support will provide instructions for packing and shipping the covered Product to the VIZIO service center. Limitations and Exclusions VIZIO's one-year limited warranty only covers defects in materials and - Vizio E320fi-B2 | Download - Page 20
© 2014 VIZIO INC. ALL RIGHTS RESERVED. 140102EM-NC
-
 1
1 -
 2
2 -
 3
3 -
 4
4 -
 5
5 -
 6
6 -
 7
7 -
8
-
9
-
10
-
11
-
12
-
13
-
14
-
15
-
16
-
17
-
18
-
19
-
20
 |
 |

VIZIO
QUICK START GUIDE
Model: E320fi-B2