Vizio E55-C1 User Manual (English)
Vizio E55-C1 Manual
 |
View all Vizio E55-C1 manuals
Add to My Manuals
Save this manual to your list of manuals |
Vizio E55-C1 manual content summary:
- Vizio E55-C1 | User Manual (English) - Page 1
VIZIO USER MANUAL Models E50-C1 & E55-C1 - Vizio E55-C1 | User Manual (English) - Page 2
in the "factory default" setting and this is the setting in which power savings will be achieved. Changing the factory default picture settings or enabling other features will increase power consumption that could exceed the limits necessary to qualify for ENERGY STAR rating. For more information on - Vizio E55-C1 | User Manual (English) - Page 3
service plan, visit www.vizio.com. This symbol alerts you to important warnings or notices as part of the operating instructions. WHEN READING THIS MANUAL This symbol identifies helpful tips. Your TV an electrician for replacement of the obsolete outlet. • Protect the power cord from being walked - Vizio E55-C1 | User Manual (English) - Page 4
shock, avoid handling the power cord during electrical storms. • Unplug your TV during a lightning storm or when it will not be used for long period of time. This will protect your TV from damage due to power surges. • Do not attempt to repair or service your TV yourself. Opening or removing - Vizio E55-C1 | User Manual (English) - Page 5
TV will not be used for an extended period of time, unplug the power cord. • To reduce risk of electric shock, do not touch the connector with wet hands. • Insert batteries in accordance with instructions. Incorrect polarities may cause the batteries to leak which can damage the remote control - Vizio E55-C1 | User Manual (English) - Page 6
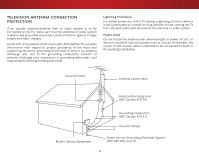
for long periods of time, unplug the TV from the wall outlet and disconnect the antenna or cable system. Power Lines Do not locate the antenna near overhead light or power circuits, or where it could fall into such power lines or circuits. Remember, the screen of the coaxial cable is intended to be - Vizio E55-C1 | User Manual (English) - Page 7
44 Skipping Channels 45 Changing the Audio Language 46 Setting Up Closed Captioning 47 Changing the Appearance of Digital Closed Captions........ 47 Renaming Inputs (Using the Devices Menu 49 Changing the TV Settings 50 Viewing System Information 50 Changing the On-Screen Menu Language 51 vii - Vizio E55-C1 | User Manual (English) - Page 8
DLNA Name 55 Controlling Other Devices with CEC 55 Turning the Power Indicator On or Off 56 Restoring the TV to Factory Default Settings 57 Enabling and Disabling Smart Interactivity 57 Using the Guided Setup Menu 58 Using the Info Window 59 Using the USB Media Player 60 Using the USB Media - Vizio E55-C1 | User Manual (English) - Page 9
installing your new TV, take a moment to inspect the package contents. Use the images below to ensure nothing is missing or damaged. VIZIO LED HDTV Remote Control with Batteries 2 x Quick Start Guides (1 x English, 1 x French/Spanish) TV Stands Power Cord 9 4 x Phillips Screws PACKAGE CONTENTS - Vizio E55-C1 | User Manual (English) - Page 10
in two ways: • On a flat surface, using the included stand • On a wall, using a VESA-standard wall mount (not included) Installing the TV Stands Your TV includes stands designed to support the weight of the TV and keep it from falling over. However, the TV can still fall over if: • It is placed on - Vizio E55-C1 | User Manual (English) - Page 11
the left and right stands into the base of the TV. (The stands are identical.) Secure each stand to the TV with two Phillips screws (included). Insert the screws into the back of the TV and tighten them using a Phillips screwdriver. When you are finished, place the TV on a stable, level surface - Vizio E55-C1 | User Manual (English) - Page 12
Installing the TV on a Wall To mount your TV on a wall, you will need a wall mount. Consult Installing a TV on a wall requires lifting. To prevent injury or damage to the TV, ask someone to help you. E50-C1 E55-C1 Screw Size: Hole Pattern: Weight w/o Stand: M6 200 mm (V) x 200 mm (H) 27.56 lbs - Vizio E55-C1 | User Manual (English) - Page 13
1 REMOTE SENSOR & POWER INDICATOR When using the remote, point it directly at this sensor. The power indicator flashes on when the TV turns on, then goes out after several seconds. To keep the power indicator on as long as the TV is on, see Turning the Power Indicator On or Off on page 56. 13 - Vizio E55-C1 | User Manual (English) - Page 14
RCA audio device, such as sound bar. HDMI - Connect an HDMI device. DTV/TV (Coaxial) - Connect a coaxial cable from a cable or satellite box, or from cable from a home network. POWER - Press to turn the TV on. Press and hold to turn the TV off. INPUT - Press to change the input source. REAR PANEL 14 - Vizio E55-C1 | User Manual (English) - Page 15
. (Also turns on the TV if it is off.) 1 POWER Turn TV on or off. MENU Display the on-screen menu. INFO Display the info window. ARROW Navigate the on-screen menu. GUIDE Display the info window. CHANNEL UP/DOWN Change the channel. V BUTTON Open the VIZIO Internet Apps Plus® (V.I.A. Plus) dock. LAST - Vizio E55-C1 | User Manual (English) - Page 16
1 Replacing the Batteries 1. To remove the battery cover, press on the logo and slide the cover out. 2. Insert two batteries into the remote control. Make sure that the (+) and (-) symbols on the batteries match the (+) and (-) symbols inside the battery compartment. 3. Replace the battery cover. 16 - Vizio E55-C1 | User Manual (English) - Page 17
video port that matches an available port on the TV (HDMI-1, HDMI-2, Comp, etc.). 2. Turn the TV and your device off. 3. Connect the appropriate cable (not included) to the TV and the device. 4. Turn the TV and your device on. Set the TV's input to match the connection you used (HDMI-1, HDMI-2, Comp - Vizio E55-C1 | User Manual (English) - Page 18
2 CONNECTING A DEVICE - AUDIO AND VIDEO CABLE TYPES AV CABLE AV cables (or Composite cables) are the traditional way of connecting your devices to your TV. Video signals are sent over the yellow connector while audio is sent over the red and white connectors. COAXIAL CABLE Coaxial cables are the - Vizio E55-C1 | User Manual (English) - Page 19
ability to automatically adjust themselves for optimal viewing. • HD video resolutions up to 1080p • HD audio • Digital connection • Audio and video signals HDMI BETTER 19 BEST - Vizio E55-C1 | User Manual (English) - Page 20
and your audio device off. 3. Connect the appropriate cable to the TV and the device. 4. Turn the TV and your device on. 2 Home Audio Receiver VIZIO Sound Bar HDMI CABLE* BEST • ARC 2-WAY COMMUNICATION • 2.0-5.1 DIGITAL AUDIO • PCM, DTS, DOLBY DIGITAL OPTICAL/SPDIF CABLE* BETTER • PCM STREAM - Vizio E55-C1 | User Manual (English) - Page 21
multi-channel surround audio through a single HDMI cable. Audio Return Channel-enabled (ARC) TVs allow audio to be sent over an already connected HDMI cable, eliminating the need for Audio Connection • Audio and Video Signals L R Optical/SPDIF DIGITAL OPTICAL AUDIO HDMI GOOD BETTER 21 BEST - Vizio E55-C1 | User Manual (English) - Page 22
RCA (Audio) HDMI Your Home Audio Receiver HDMI 2 With HDMI ARC Built-in Tuner Your TV HDMI VIZIO Internet Apps Plus® HDMI ARC transmits all-digital audio from your TV to your home audio receiver, with no need for an extra cable. The single HDMI cable also carries digital HD (high definition - Vizio E55-C1 | User Manual (English) - Page 23
a Wired or Wireless connection. Connecting to a Wired Network (Best) 1. Connect an Ethernet cable to your router and to the Ethernet port on the back of the TV. See below. 2. Use the Guided Network Setup to configure the TV. See Using the Guided Setup Menu on page 58. 2 Connecting to a Wireless - Vizio E55-C1 | User Manual (English) - Page 24
To complete the first-time setup: 1. Press the Power button on the remote. The TV powers on and the Setup App starts. 4. Use the Arrow buttons on the remote to highlight your country, and then press the OK button. 5. Use the Arrow buttons on the remote to highlight your wireless network in the list - Vizio E55-C1 | User Manual (English) - Page 25
, select whether you have a cable box or if you connect the TV directly to a cable from the wall. 9. If the TV Signal screen appears, the TV will need to scan for channels, which takes several minutes. Use the arrow buttons on the remote to highlight Begin Scan and press OK. 10. Use the Arrow and OK - Vizio E55-C1 | User Manual (English) - Page 26
: • Adjust the Picture settings • Adjust the Audio settings • Activate the Sleep Timer • Adjust the Network settings • Adjust the Channels • Set up Closed Captioning • Name the TV Inputs • Adjust the TV Settings • Access the Guided Setup • Access the User Manual VIZIO SETTINGS Picture Audio Timers - Vizio E55-C1 | User Manual (English) - Page 27
aspect ratio. Since the 4:3 aspect ratio is not large enough to fill the TV's screen, black bars are added to the left and right of the display image. Panoramic Stretch Wide Wide Zoom Zoom Note: Aspect ratio settings may vary by Input source. • Stretch expands the display image to fill the - Vizio E55-C1 | User Manual (English) - Page 28
the best picture, use Calibrated mode. To reduce video delay (lag) when gaming, use Game mode. 3D Sleep Timer Picture Audio Network Settings Help VIEWPORT ABC Input Sleep Timer VIZIO Wide CC PICTURE Picture Mode Standard Backlight - + 85 Brightness - + 50 Contrast - + 50 Color - Vizio E55-C1 | User Manual (English) - Page 29
ENERGY STAR® requirements. For the best picture, use Calibrated mode. To reduce video delay (lag) when gaming, use Game mode. • Calibrated Dark mode sets the picture settings to values perfect for watching TV in a dark room. • Vivid mode sets the picture settings to values that produce a brighter - Vizio E55-C1 | User Manual (English) - Page 30
4 Adjusting the More Picture Settings To adjust the More Picture settings: 1. From the PICTURE menu, use the Arrow buttons on the remote to highlight More Picture and press OK. The MORE PICTURE menu is VIZIO MORE PICTURE Color Temperature displayed. Black Detail Off Backlight Control On 2. - Vizio E55-C1 | User Manual (English) - Page 31
Mode Edit, and then press the OK button. The ExPitICTUR2DE MOD3ED EDIT menu is displayed. VIZIO PICTURE MODE EDIT - Calibrated Save Picture Mode Lock Picture Mode Reset Picture Mode - Calibrated* 3. Use the ArrowABbCuttons to highlight the setting you wish to Inapdutjust,Wtihdeen prCeCss the Left - Vizio E55-C1 | User Manual (English) - Page 32
to manually calibrate the TV. Calibration requires specialized training, an input with precisely set colors, and a specialized light meter. To adjust the color calibration picture settings: 1. From the PICTURE menu, use the Arrow buttons to highlight Color Calibration and press the OK button. The - Vizio E55-C1 | User Manual (English) - Page 33
Red Green 0 0 Blue 0 2. Use the Arrow buttons on the remote to highlight the Gain and Color values you wish to adjust. Press the OK button and use the Left/Right Arrow buttons to adjust the value. When you are finished press the OK button to save the setting. 3. When you are finished, press the - Vizio E55-C1 | User Manual (English) - Page 34
Bar Test Pattern, use the Left/Right Arrow buttons to highlight Off. 3. When you are finished, press the BACK button to adjust additional settings or EXIT. 2. Use the Arrow buttons on the remote to highlight Off. Use the Left/Right Arrow buttons to select the percentage brightness for the flat - Vizio E55-C1 | User Manual (English) - Page 35
settings. A custom picture mode only applies to the input (HDMI1, HDMI-2, COMP, AV, etc.) in use when it was created. Each input the Arrow buttons to enter a custom name using the on-screen keyboard. 5. Highlight Done and press OK. 6. Press the EXIT button to exit the menu screens. VIZIO SAVE - Vizio E55-C1 | User Manual (English) - Page 36
is displayed. VIZIO LOCK PICTURE MODE Create a picture control PIN to prevent change to all custom picture modes. 2. Use the Number Pad on your remote to enter a unique 4-digit Save PIN. 3. Highlight Save and then press the OK button. 4. Press the EXIT button to exit the menu screens. Create - Vizio E55-C1 | User Manual (English) - Page 37
menu is displayed. 3. Use the Arrow buttons to highlight the setting you wish to adjust, then press Left/Right Arrow buttons to change the setting: • TV Speakers - Turns the built-in speakers on or off. VIZIO AUDIO TV Speakers Surround Sound Volume Leveling Balance - Lip Sync - Digital - Vizio E55-C1 | User Manual (English) - Page 38
audio mode. The equalizer bars change to reflect the mode. 5. Press the EXIT button on the remote. To customize an equalizer setting: 1. Press the MENU button on the remote. The on-screen menu is displayed. 2. Use the Arrow buttons to highlight Audio and press OK. The AUDIO menu is displayed. 3. Use - Vizio E55-C1 | User Manual (English) - Page 39
will turn the TV off after a set period of time. 1. Press the MENU button on the remote. The on-screen menu is displayed. 2. Use the Arrow buttons on the remote to highlight Timers and press OK. The TIMERS menu is displayed. VIZIO TIMERS Sleep Timer Auto Power Off Screen Saver Blank Screen Off 10 - Vizio E55-C1 | User Manual (English) - Page 40
save energy and the life of the screen. To blank the screen: • From the TIMERS menu, use the Up/Down Arrow buttons on the remote to highlight Blank Screen, and then press OK. Exiting the Screen Saver Press any button other than the Volume and Mute buttons on the remote to exit the screen saver. 40 - Vizio E55-C1 | User Manual (English) - Page 41
the NETWORK menu, highlight Manual Setup and VIZIO press OK. The MANUAL SETUP MANUAL SETUP menu is displayed. DHCP Off 2. To change the settings manually, use the Arrow buttons on the remote to highlight DHCP and then use the Left/Right Arrow buttons to change the setting to Off. 3. Use the - Vizio E55-C1 | User Manual (English) - Page 42
press OK. VIZIO ENTER ACCESS POINT NAME Enter your access point name. This is used to connect to an access point with a hidden SSID. 3. Using the on-screen keyboard, enter your network's password, then highlight Connect and press OK. 4. Press the BACK button to adjust additional settings or EXIT - Vizio E55-C1 | User Manual (English) - Page 43
and digital channels. VIZIO CHANNELS Channel Source Find Channels Partial Channel Search Add Analog Channel Skip Channel Analog Audio Digital Language Cable Stereo English Selecting a Channel Source 1. On the remote control, press Input and use the Arrow button to highlight TV (antenna icon - Vizio E55-C1 | User Manual (English) - Page 44
# and use the Number Pad on the remote to enter the number of the channel you are adding. 3. Highlight Add Channel and press OK. The TV scans for the channel. 4. When the TV is done scanning for the channel, press the EXIT button on the remote. VIZIO ADD ANALOG CHANNEL Enter Channel # Add Channel - Vizio E55-C1 | User Manual (English) - Page 45
remove these channels from the TV's memory with the Skip Channel button on the remote. VIZIO SKIP CHANNEL 1 Test 0 1 Test 1 P 1-2 Test 2 P 2 Test 3 2-2 Test 4 P 2-3 Test 5 Wide Zoom Normal Panoramic Exit 2D 3D ABC Input Wide CC Sleep Timer Picture Audio Network Settings - Vizio E55-C1 | User Manual (English) - Page 46
Audio Programming), or Mono. Press OK. 3. Press the EXIT button on the remote. VIZIO ANALOG AUDIO Stereo SAP Mono To use the Digital Language feature: . 3. Press the EXIT button on the remote. Wide Zoom Normal Panoramic Exit 2D 3D ABC Input Wide CC VIZIO DIGITAL LANGUAGE English Español - Vizio E55-C1 | User Manual (English) - Page 47
-the-Air signals, cable TV directly from the wall (no cable box), or a device with a composite video connection. To activate or deactivate closed captions: 1. Press the MENU button on the remote. The on-screen menu is displayed. 2. Use the Arrow buttons on the remote to highlight Closed Captions - Vizio E55-C1 | User Manual (English) - Page 48
you are satisfied with the appearance of the closed captions, press the EXIT button on the remote. Text 4 Typical choices include: • Opaque background, transparent window-Only green, the background is black, and the window is red. Background CLOSED CAPTION TEXT SAMPLE Window 48 CLOSED CAPTIONS - Vizio E55-C1 | User Manual (English) - Page 49
Enter your custom name using the on-screen keyboard. b. Highlight OK and press OK. c. The Input Name changes to show the custom name that you created. 5. When you have finished naming your input, press the EXIT button on the remote. 4 Input Port VIZIO NAME INPUT HDMI-1 DVD DVD_ abc def ghi - Vizio E55-C1 | User Manual (English) - Page 50
-screen menu language • Set the time zone and local setting • Set up parental controls • Open the WIDE menu • Give the TV a name for it to work with DLNA-enabled devices • Set up CEC devices to control them with your VIZIO TV remote • Control when the power indicator light is on • Reset TV settings - Vizio E55-C1 | User Manual (English) - Page 51
Zone To ensure the correct time is displayed when you press the GUIDE button, set the TV's time zone: 1. Press the MENU button on the remote. The on-screen menu is displayed. 2. WiUdese tZhoeomArroNwormbaul ttPoannosraomnic the remote to highlight System and press OK. The SYSTEM menu is displayed - Vizio E55-C1 | User Manual (English) - Page 52
Over-the-Air signals or when connected to cable TV directly from the wall (no cable box). • You have a settings. Accessing the Parental Controls Menu To access the Parental Controls menu: 1. Press the MENU button on the remote. The on-screen menu is displayed. 2. Use the Arrow buttons on the remote - Vizio E55-C1 | User Manual (English) - Page 53
use the TV's Rating Block feature to block content based on its rating. For a list of content ratings and their button on the remote. Resetting the Content Locks To reset the content locks to the factory-default settings: 1. From the PARENTAL CONTROLS menu, highlight RESET LOCKS and press OK. The TV - Vizio E55-C1 | User Manual (English) - Page 54
Settings You can resize the video content to fit while the menu is open. To change the on-screen menu language: 1. Press the MENU button on the remote. The on-screen menu is displayed. 2. Use the Arrow buttons on the remote to highlight System and press OK. The SYSTEM menu is displayed. VIZIO - Vizio E55-C1 | User Manual (English) - Page 55
, your VIZIO TV remote can control: • Power on/off • Volume • Wide MZuotoem Normal Panoramic Not all HDMI devices support CEC. See your device's user manual for details. Exit 2D 3D To enable, disable, or adjust CEC settings: ABC 1. Press the MENU button on the remote. The on-screen menu - Vizio E55-C1 | User Manual (English) - Page 56
normally does not glow when the TV is on. You can change this setting if you prefer the light to be on. To turn the Power Indicator Light on or off: 1. Press the MENU button on the remote. The on-screen menu is displayed. 2. Use the Arrow buttons on the remote to highlight System and press OK. The - Vizio E55-C1 | User Manual (English) - Page 57
and the Setup App will begin. Enabling and Disabling Smart Interactivity Your TV can display program-related information as part of a broadcast. To enable or disable Smart Interactivity: 1. Press the MENU button. The on-screen menu is displayed. 2. Use the Arrow buttons on the remote to highlight - Vizio E55-C1 | User Manual (English) - Page 58
the guided setup you want to use and press OK: • Tuner Setup - Set up the TV tuner. • Network Setup - Connect the TV to the Internet using your network. 4. Follow the on-screen instructions. When finished, press the EXIT button on the remote. Wide Zoom Normal Panoramic Exit 2D 3D ABC Input - Vizio E55-C1 | User Manual (English) - Page 59
Info Window can be displayed by pressing the GUIDE or INFO buttons on the remote: • Press the GUIDE or INFO button once to display channel, input, and display information. • Press the GUIDE or INFO button twice to display the program title, program rating, audio information, and the start and end - Vizio E55-C1 | User Manual (English) - Page 60
TV. 2. Use the Arrow buttons to highlight Yes and press the OK. If the dialog box disappears, press the V button on the remote to go the next step. 3. Use the Arrow buttons as FAT32. • Files on the USB thumb drive must end in a supported file extension (.jpg or .jpeg.). • The USB media player is not - Vizio E55-C1 | User Manual (English) - Page 61
files and folders using the Arrow and OK buttons on the remote. Current Folder Start Fullscreen Slideshow Sort by Name or Date View Thumbnails or Folders Adjust Slideshow Settings root Start Slideshow Sort: Name A-Z View: Thumbnails Settings File Name: D 1920x1080 Resolution: 1920x1080 Size - Vizio E55-C1 | User Manual (English) - Page 62
song title, album title, and artist name. Highlight this button and press OK to return to the previous screen. Progress Bar Displays the duration of the currently-playing song. The blue bar will lengthen as the song progresses. VIZIO Music USB1: MyFlashDrive Fab Apple Dream On January Mix Comp - Vizio E55-C1 | User Manual (English) - Page 63
USB thumb drive has more files than can be displayed on a single screen, the page information is displayed here. 63 Folder Contents/ Playlist This area displays the contents of the currently selected folder. You can browse files and folders using the Arrow and OK buttons on the remote. VIDEO PLAYER - Vizio E55-C1 | User Manual (English) - Page 64
required to receive product updates and to access online content. Using the App Launcher Keys Use the App Launcher keys on the remote to launch the apps pictured on the buttons. Pressing a App Launcher key will also turn the TV on (if it is off). The specific apps on the App Launcher keys vary from - Vizio E55-C1 | User Manual (English) - Page 65
Highlight an App by using the Arrow buttons on the remote. 3. Press the OK button on the remote to launch the App. 4. To exit from an open App or to close the App Dock, press the Exit button on the remote. My Apps Features the Apps installed on your TV. Installed Apps The Apps displayed here are - Vizio E55-C1 | User Manual (English) - Page 66
, Fun and Games, Shopping, and Local TV. • App Info ( ): Displays App software information and development settings. You can preview Apps without installing them. Simply highlight the App you wish to preview and press OK to open it. Note: App location, appearance, and availability subject to change - Vizio E55-C1 | User Manual (English) - Page 67
custom look and feel. Adding an App to the My Apps Tab To add an App to your TV: 1. Use the Arrow buttons on the remote to highlight the App you wish to add. 2. Press and hold the OK button until [App Name] has been added to your My Apps list appears. Once the App has been installed, a star appears - Vizio E55-C1 | User Manual (English) - Page 68
Moving an App in My Apps You can organize your Apps on your My Apps tab by moving them where you want. To move the Apps on your My Apps tab: 1. Use the Arrow buttons on the remote to highlight the App you wish to move. 2. Press and hold the OK button. The following options appear: Note: App location - Vizio E55-C1 | User Manual (English) - Page 69
Troubleshooting & Technical Support A Do you have questions? Find answers at SUPPORT.VIZIO.COM Find help with: • New product setup • Connecting your devices • Technical problems • Product updates and more Live chat support available You can also contact our award-winning support team at: Phone: ( - Vizio E55-C1 | User Manual (English) - Page 70
Picture Settings on page 29. VIZIO recommends selecting the Calibrated mode. • Check all cables to ensure they are securely attached. The buttons on the remote aren't working. • Ensure you are only pressing one button at a time. • Point the remote directly at the TV when pressing a button. • Replace - Vizio E55-C1 | User Manual (English) - Page 71
from, the difference may be noticeable. • Use the Volume Up/Down buttons on the remote to adjust the volume. When I change input source, the display image changes size. • The TV remembers the viewing mode on each input source. If the viewing mode on the new input source differs from the one on the - Vizio E55-C1 | User Manual (English) - Page 72
w/ Stand: w/o Stand: TV Type: Refresh Rate: Clear Action: Maximum Resolution: Dynamic Contrast Ratio: Pixel Pitch: Viewing Angle: HDMI Inputs: Component Video Inputs: Composite Inputs: RF Antenna Input: USB 2.0 Ports: Ethernet: Built-In Wi-Fi: Audio Outputs: OSD Language: E50-C1 50" Class 49.50" 44 - Vizio E55-C1 | User Manual (English) - Page 73
Remote Control Model: Certifications: Compliance: Voltage Range: Power Consumption: Standby Power: Zero Bright Pixel Guarantee: E50-C1 E55-C1 XRT122 XRT122 UL, cUL, NOM, FCC Class B, BET7/ICES-003 Class B, IC, IFETEL, HDMI (CEC, ARC), Dolby Digital Energy Star 6.1, NRCan, CONUEE, NOM-032 120V - Vizio E55-C1 | User Manual (English) - Page 74
the original carton box and shipping material or packaging that affords an equal degree of protection. VIZIO Technical Support will provide instructions for packing and shipping the covered Product to the VIZIO service center. and set-up issues or any repairs attempted by anyone other than by - Vizio E55-C1 | User Manual (English) - Page 75
limits set forth for an uncontrolled environment. This equipment should be installed and operated with minimum distance 20cm between the radiator and your body. Caution Always use an AC/DC power adapter that is properly grounded. Use the AC cords listed below for each area. USA: UL Canada: CSA - Vizio E55-C1 | User Manual (English) - Page 76
VIZIO INTERNET APPLICATIONS ("VIA") TO ACCESS THIRD PARTY INTERNET PRODUCT OFFERINGS AND SERVICES ("VIA SERVICES") AND THE VIZIO SOFTWARE INSTALLED ON YOUR VIZIO HD TV. BY USING THE VIZIO available by or through VIZIO that replace and/or supplement the original VIZIO Software, unless such upgrade - Vizio E55-C1 | User Manual (English) - Page 77
gathered periodically to facilitate the provision of software updates, product support and other services to you, including additional or different VIA Services related to the VIZIO Software and to verify compliance with the terms of this License Agreement. VIZIO and its third party providers of VIA - Vizio E55-C1 | User Manual (English) - Page 78
FOR THE PURPOSES OF SECTIONS 10 AND 11) HEREBY DISCLAIM ALL WARRANTIES AND CONDITIONS WITH RESPECT TO THE VIZIO SOFTWARE AND SERVICES, EITHER EXPRESS, IMPLIED OR STATUTORY, INCLUDING, BUT NOT LIMITED TO, THE IMPLIED WARRANTIES AND/OR CONDITIONS OF MERCHANTABILITY, OF SATISFACTORY QUALITY, OF FITNESS - Vizio E55-C1 | User Manual (English) - Page 79
© 2015 VIZIO INC. ALL RIGHTS RESERVED. 141208OC-US-NC
-
 1
1 -
 2
2 -
 3
3 -
 4
4 -
 5
5 -
 6
6 -
 7
7 -
8
-
9
-
10
-
11
-
12
-
13
-
14
-
15
-
16
-
17
-
18
-
19
-
20
-
21
-
22
-
23
-
24
-
25
-
26
-
27
-
28
-
29
-
30
-
31
-
32
-
33
-
34
-
35
-
36
-
37
-
38
-
39
-
40
-
41
-
42
-
43
-
44
-
45
-
46
-
47
-
48
-
49
-
50
-
51
-
52
-
53
-
54
-
55
-
56
-
57
-
58
-
59
-
60
-
61
-
62
-
63
-
64
-
65
-
66
-
67
-
68
-
69
-
70
-
71
-
72
-
73
-
74
-
75
-
76
-
77
-
78
-
79
 |
 |
VIZIO
USER
MANUAL
Models E50-C1 & E55-C1