Vizio E55-E1 Quickstart Guide English
Vizio E55-E1 Manual
 |
View all Vizio E55-E1 manuals
Add to My Manuals
Save this manual to your list of manuals |
Vizio E55-E1 manual content summary:
- Vizio E55-E1 | Quickstart Guide English - Page 1
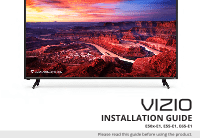
VIZIO INSTALLATION GUIDE E50x-E1, E55-E1, E65-E1 Please read this guide before using the product. - Vizio E55-E1 | Quickstart Guide English - Page 2
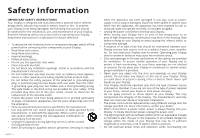
of power supplied to your home, consult your dealer or local power company. • Do not apply pressure or throw objects at your Display. This may compromise the integrity of the Display. The manufacturer's warranty does not cover user abuse or improper installations. • The power cord must be replaced - Vizio E55-E1 | Quickstart Guide English - Page 3
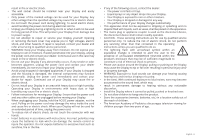
as vases, shall be placed on the apparatus. • The mains plug or appliance coupler is used as the disconnect device, the disconnect device shall remain readily operable. • CAUTION - These servicing instructions are for use by qualified service personnel only. To reduce the risk of electric shock - Vizio E55-E1 | Quickstart Guide English - Page 4
Table of Contents Package Contents...5 This is your basic remote 6 Inserting and replacing batteries 7 Using your smartphone or tablet as a remote 8 Minimum Recommended Requirements 9 Installing the Display Stands 10 First-Time Setup...12 Pairing your mobile device 16 Pairing Via Wi-Fi...17 - Vizio E55-E1 | Quickstart Guide English - Page 5
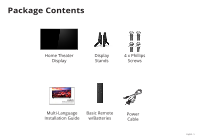
Package Contents Home Theater Display Display Stands 4 x Phillips Screws VIZIO INSTALLATION GUIDE Please read this guide before using the product. Multi-Language Basic Remote Installation Guide w/Batteries Power Cable English - 5 - Vizio E55-E1 | Quickstart Guide English - Page 6
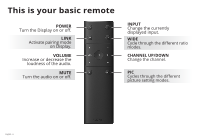
This is your basic remote POWER Turn the Display on or off. LINK Activate pairing mode on Display. VOLUME Increase or decrease the loudness of the audio. MUTE Turn the audio - Vizio E55-E1 | Quickstart Guide English - Page 7
control. 1 To insert/replace the batteries: 1. Find the notch on the back of the remote. Insert a coin and pry open the back cover. 2. Remove the back cover and insert two AAA batteries (included). Be sure to align the + and signs on the batteries and remote. 2 Visit http://support.vizio.com/ if you - Vizio E55-E1 | Quickstart Guide English - Page 8
a virtually limitless library of casting content. To use your smartphone or tablet as your SmartCast Remote: • Download the VIZIO SmartCast on your compatible mobile device and follow the on-screen instructions to pair your device with a VIZIO Home Theater Display. English - 8 *Device NOT included - Vizio E55-E1 | Quickstart Guide English - Page 9
. iOS* • iOS 8.0 or later • Countries: US, Canada & Mexico • Devices supported: iPhone, iPad The VIZIO SmartCast app is available for download from the Google Play Store and Apple App Store. *Subject to change **To use the Bluetooth LE functionality you must have Android 5.1 or later English - 9 - Vizio E55-E1 | Quickstart Guide English - Page 10
Display Stands 1 It is recommended that two people take part in the stand installation. Remove any plastic film from the Home Theater Display and stands. Place the Display screen-down on a clean, flat surface. To prevent scratches or damage to the screen, place the Display on a soft surface such as - Vizio E55-E1 | Quickstart Guide English - Page 11
2 Insert the stands into the base of the Display. (The stands are identical.) Secure each stand to the Display with two (2) Phillips screws (included). Insert the screws into the back of the Display and tighten them using a Phillips screwdriver. When you are finished, place the Display on a stable, - Vizio E55-E1 | Quickstart Guide English - Page 12
First-Time Setup 1 Connect all of your devices to the Display first. Choose ONE connection type for each device. English - 12 Note: The image shown here is for illustrative purposes only and may be subject to change. The actual number of ports and their locations may vary, depending on the model. - Vizio E55-E1 | Quickstart Guide English - Page 13
DIGITAL • HD VIDEO • HD AUDIO Blu-Ray Player Gaming Console INTERNET • HIGH-SPEED INTERNET CONNECTION CONNECTION • LATEST CONTENT * For the best experience, VIZIO recommends using an Ethernet cable. However, your Display also has built-in Wi-Fi. See connecting to the internet with Wi-Fi section - Vizio E55-E1 | Quickstart Guide English - Page 14
2 Connect one end of the power cable to the back of the Display. The flat edge of the connector faces the outer edge of the Display. Plug the other end of the power cord into an electrical outlet. The Display powers on automatically. English - 14 - Vizio E55-E1 | Quickstart Guide English - Page 15
multiple apps at once, then just tap to cast to the big screen! VIZIO SmartCast app also allows you to access and edit Display Settings from your device. Install the VIZIO SmartCast app on your mobile device prior to powering your Display for the first time. *Device NOT included. English - 15 - Vizio E55-E1 | Quickstart Guide English - Page 16
Pairing your mobile device To pair your mobile device: 1. Launch the VIZIO SmartCast app on your mobile device and press the Power button on the basic remote or on the back of the Display to power on the Display. 2. From the VIZIO SmartCast app, tap on the button in the top left corner. The side - Vizio E55-E1 | Quickstart Guide English - Page 17
2. Look for your Home Theater Display name on the list of discovered devices and tap to select. Follow the on screen instructions to finish the setup wizard. Your VIZIO Home Theater Display name is displayed on the screen during the setup process. Look for a name such as Cast1234. English - 17 - Vizio E55-E1 | Quickstart Guide English - Page 18
mobile apps you already know and love. By simply tapping the Cast button on your favorite mobile apps, easily watch content go from your mobile screen to the big screen. English - 18 Jurassic World now available on VUDU. © 2015 Universal Studios. Rated PG-13. - Vizio E55-E1 | Quickstart Guide English - Page 19
: 1. Open any cast compatible app. 2. Select the content you'd like to cast and tap the icon on the upper left hand side of the app screen. 3. Select the device you'd like to cast to and press play. 1 2 3 Jurassic World now available on VUDU. © 2015 Universal Studios. Rated PG-13. English - 19 - Vizio E55-E1 | Quickstart Guide English - Page 20
and more to your E-Series Home Theater Display The app allows you to search for content and control cast playback across your favorite apps. The VIZIO SmartCast app is available for download from the Google Play Store and Apple App Store. 2a 2b Account Setup You will need to log into - Vizio E55-E1 | Quickstart Guide English - Page 21
a Cast device 1 Your device remote can be paired with multiple cast-enabled devices, allowing you to seamlessly access your content where ever you are. To select a different cast device: 1. On the Home category page, tap This Device. The device selection screen Displays. 2. Tap the device you - Vizio E55-E1 | Quickstart Guide English - Page 22
the input, mute, and adjust the volume of your Display right from the VIZIO SmartCast app. To access the basic functions, make sure your Home Theater Display is selected. If it is not, see Selecting a Cast device. Power Turn Display on or off. Wide Cycles through the different aspect ratio modes - Vizio E55-E1 | Quickstart Guide English - Page 23
Category Pages 1 The VIZIO app categorizes video content into different pages in the app. The pages are organized as: • Display Shows - Popular, recently added, recommended, and highly rated Display - Vizio E55-E1 | Quickstart Guide English - Page 24
someone to help you. Be sure the mount you choose is capable of supporting the weight of the Display. After you have determined that you have the correct mount for mount to the wall, carefully following the instructions that came with your mount. Use only with a UL-listed wall mount bracket rated - Vizio E55-E1 | Quickstart Guide English - Page 25
Screw Size: Hole Pattern: E50x-E1 M6 200 mm (V) x 200 mm (H) E55-E1 M6 200 mm (V) x 200 mm (H) E65-E1 M6 400 mm (V) x 400 mm (H) Weight w/o Stand: 26.68 lb (12.10 kg) 34.06 lb (15.45 kg) 50.04 lb (22.70 kg) Wall-mount screw locations. Note: The - Vizio E55-E1 | Quickstart Guide English - Page 26
Additional connections Connecting an audio device Your Display can output sound to an audio device, such as a receiver or sound bar. Note: The image shown here is for illustrative purposes only and may be subject to change. The actual number of ports and their locations may vary, depending on the - Vizio E55-E1 | Quickstart Guide English - Page 27
To connect your Display to an audio device: 1. Verify that your device has a video port that matches an available port on the Display (HDMI, 3.5mm, etc.) 2. Turn the Display and your audio device off. 3. Connect the appropriate cable (not included) to the Display and the device. 4. Turn the Display - Vizio E55-E1 | Quickstart Guide English - Page 28
Customer Care At Your Convenience. NEED HELP? Go to: support.vizio.com Find help with: • New product setup • Connecting your devices • Technical problems • Product updates and more Live chat support available You can also contact our popular support team at: Phone: (877) 698-4946 (toll-free) Hours - Vizio E55-E1 | Quickstart Guide English - Page 29
and used in accordance with the instructions, may cause harmful interference to radio radio/Display technician for help. This device complies with Part 15 of the FCC Rules. Operation is subject to operate the equipment. Shielded interface cables and AC power cord, if any, must be used in order - Vizio E55-E1 | Quickstart Guide English - Page 30
basis. Should the user seek to obtain protection from other radio services operating in the same Display bands, a radio license is required. Please consult Industry Canada's document CPC-2-1-28, Optional Licensing for Low-Power Radio Apparatus in the Display Bands, for details. Cet appareil est - Vizio E55-E1 | Quickstart Guide English - Page 31
the product before it is serviced, regardless of the servicer. VIZIO's Responsibilities If VIZIO determines that a product is covered by this warranty, VIZIO will (at its option) repair or replace it, or refund the purchase price to you. There will be no charge for parts or labor during the warranty - Vizio E55-E1 | Quickstart Guide English - Page 32
for transportation costs to the service center, but VIZIO will cover return shipping to the customer. What This Warranty Does Not Cover This warranty does not cover: (a) cosmetic damage; (b) normal wear and tear; (c) improper operation; (d) improper voltage supply or power surges; (e) signal issues - Vizio E55-E1 | Quickstart Guide English - Page 33
DAMAGE, OR DEFECTIVE GOODS, NO MATTER WHETHER SUCH DEFECTS ARE DISCOVERABLE OR LATENT), VIZIO MAY, AT ITS SOLE AND EXCLUSIVE OPTION AND IN ITS DISCRETION, REPAIR OR REPLACE YOUR PRODUCT, OR REFUND ITS PURCHASE PRICE. AS NOTED, SOME STATES AND PROVINCES DO NOT ALLOW THE EXCLUSION OR LIMITATION OF - Vizio E55-E1 | Quickstart Guide English - Page 34
without notice. To review the most updated version of this Quick Start Guide and the associated User Manual, go to http://www.vizio.com. © 2016 VIZIO, Inc. All Right Reserved. This Quick Start Guide may not be copied in whole or in part without the written permission of VIZIO, Inc. VIZIO, Inc. has - Vizio E55-E1 | Quickstart Guide English - Page 35
Guide may be trademarks, trade names or service marks of others and VIZIO, Inc. dis- claims any interest in trademarks, trade names or service marks other than its own. Mention of non-VIZIO , do not attempt to power the device with a voltage Replace the battery only with the same or equivalent - Vizio E55-E1 | Quickstart Guide English - Page 36
© 2016 VIZIO INC. ALL RIGHTS RESERVED. 160713AD-US-NC
-
 1
1 -
 2
2 -
 3
3 -
 4
4 -
 5
5 -
 6
6 -
 7
7 -
8
-
9
-
10
-
11
-
12
-
13
-
14
-
15
-
16
-
17
-
18
-
19
-
20
-
21
-
22
-
23
-
24
-
25
-
26
-
27
-
28
-
29
-
30
-
31
-
32
-
33
-
34
-
35
-
36
 |
 |

INSTALLATION GUIDE
VIZIO
Please read this guide before using the product.
E50x-E1, E55-E1, E65-E1