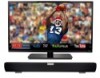
Vizio VSB207E320iA0 E320i-A0 User Manual
Vizio VSB207E320iA0 Manual
 |
View all Vizio VSB207E320iA0 manuals
Add to My Manuals
Save this manual to your list of manuals |
Vizio VSB207E320iA0 manual content summary:
- Vizio VSB207E320iA0 | E320i-A0 User Manual - Page 1
USER GUIDE MMODDEELLS // E3D320VX // E3ED34220V0Xi-A0 // E3D470VX INSTALLING YOUR new TV CONTROLS & CONNECTIONS CONNECTING YOUR DEVICES USING THE ON-SCREEN MENU USING THE USB MEDIA PLAYER USING VIZIO INTERNET APPS TROUBLESHOOTING & SUPPORT Help, SPECs, warranty & LEGAL - Vizio VSB207E320iA0 | E320i-A0 User Manual - Page 2
This product qualifies for ENERGY STAR in the "factory default" setting and this is the setting in which power savings will be achieved. Changing the factory default picture settings or enabling other features will increase power consumption that could exceed the limits necessary to qualify for - Vizio VSB207E320iA0 | E320i-A0 User Manual - Page 3
period. To purchase an extended warranty service plan, visit www.VIZIO.com. When Reading this Manual When you see this symbol, please read the accompanying important warning or notice. It is intended to alert you to the presence of important operating instructions. When you see this symbol, please - Vizio VSB207E320iA0 | E320i-A0 User Manual - Page 4
when unused for long periods of time. • Refer all servicing to qualified service personnel. Servicing is required when the apparatus has been damaged in any has been dropped. • Unplug the power cord before cleaning your TV. • When moving your TV from an area of low temperature to an area of high - Vizio VSB207E320iA0 | E320i-A0 User Manual - Page 5
your TV will not be used for an extended period of time, unplug the power cord. • To reduce risk of electric shock, do not touch the connector with wet hands. • Insert batteries in accordance with instructions. Incorrect polarities may cause the batteries to leak which can damage the remote control - Vizio VSB207E320iA0 | E320i-A0 User Manual - Page 6
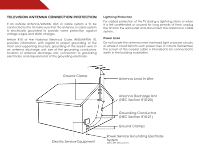
system is to be connected to the TV, make sure that the antenna or cable Electrical Code, ANSI/NFPSA 70, provides information with regard to proper grounding of the mast and supporting structure Clamp Antenna Lead In Wire Electric Service Equipment Antenna Discharge Unit (NEC Section 810-20) - Vizio VSB207E320iA0 | E320i-A0 User Manual - Page 7
Table of Contents Installing the TV 3 Inspecting the Package Contents 3 Installing the TV 3 Installing the TV Stand 3 Installing the TV on a Wall 5 Controls and Connections 6 Rear Panel 6 Side Panel 7 Front Panel 8 Remote Control 9 Replacing the Batteries 10 Connecting Your Devices 11 - Vizio VSB207E320iA0 | E320i-A0 User Manual - Page 8
34 Resetting the TV Settings 34 Restoring the TV to Factory Default Settings 34 Using Guided Setup 35 Using the Info Window 36 Using the USB Media Player 37 Using the USB Media Player 37 Connecting a USB Thumb Drive to the TV 37 Playing USB Media 37 Using VIZIO Internet Apps 39 Using the - Vizio VSB207E320iA0 | E320i-A0 User Manual - Page 9
included) Installing the TV Stand Your TV includes a stand designed to support the weight of the TV and keep it from falling over. However, the TV can still fall over the TV is not properly secured Quick Start Guide Hex Wrench Power Cord Remote Control with Batteries Hex Screw Package - Vizio VSB207E320iA0 | E320i-A0 User Manual - Page 10
a soft surface, such as carpet, rug, or blanket. 2. Align the base with the TV. 3. Insert and tighten the hex screw into the base with the included hex wrench. 4. Move the TV with attached stand into an upright position and place on a flat, level, and stable surface. 5. To ensure proper ventilation - Vizio VSB207E320iA0 | E320i-A0 User Manual - Page 11
model: Installing a TV on a wall requires lifting. To prevent injury or damage to the TV, ask someone to help you. Screw Size: Screw Pitch: Screw Length: Hole Pattern: E320i-A0 M4 0.70mm 12mm 100mm (V) x 100mm (H) Be sure the mount you choose is capable of supporting the weight of the TV. After - Vizio VSB207E320iA0 | E320i-A0 User Manual - Page 12
Controls and Connections 2 Rear Panel SIDE 6 USB - Connect USB thumb drive to play photo, music, or video. HDMI - Connect HDMI device. Stereo Audio Out - Connect 3.5mm - Vizio VSB207E320iA0 | E320i-A0 User Manual - Page 13
2 Side Panel INPUT MENU CH ^ CH VOL ^ VOL ^ ^ POWER - Turn TV off or on. INPUT - Change input source. MENU - Open the on-screen menu. CHANNEL UP/DOWN - Change the channel. VOLUME UP/DOWN - Increase or decrease volume level. Side Panel 7 - Vizio VSB207E320iA0 | E320i-A0 User Manual - Page 14
2 Front Panel REMOTE SENSOR When using the remote, aim it directly at this sensor. 8 Front Panel - Vizio VSB207E320iA0 | E320i-A0 User Manual - Page 15
on-screen menu. Arrow Navigate the on-screen menu. Guide Display the info window. V Button Open the VIA dock. Channel Up/Down Change the channel. Last Return to the channel last viewed. Dash Use with number pad to manually enter a digital sub-channel. (For example, 18-4 or 18-5.) Remote Control 9 - Vizio VSB207E320iA0 | E320i-A0 User Manual - Page 16
2 Replacing the Batteries 1. Remove the battery cover. 2. Insert two batteries into the remote control. Make sure that the (+) and (-) symbols on the batteries match the (+) and (-) symbols inside the battery compartment. 3. Replace the battery cover. 10 - Vizio VSB207E320iA0 | E320i-A0 User Manual - Page 17
off. 3. Connect the appropriate cable (not included) to the TV and the device. 4. Turn the TV and your device on. Set the TV's input to match the connection you used (HDMI-1, HDMI-2, etc). SIDE 3 Cable/Satellite Box DVD/Blu-ray Player Game Console HDMI CABLE BEST • DIGITAL • HD VIDEO (1080p - Vizio VSB207E320iA0 | E320i-A0 User Manual - Page 18
a video port that matches an available port on the TV (Optical, 3.5mm, etc). 2. Turn the TV and your audio device off. 3. Connect the appropriate cable (not included) to the TV and the device. 4. Turn the TV and your device on. 3 Home Audio Receiver VIZIO Sound Bar SIDE 12 GOOD 3.5mm Cable BETTER - Vizio VSB207E320iA0 | E320i-A0 User Manual - Page 19
to your network Your TV is internet-ready. It can be connected to your home network with a Wired or Wireless connection. Connecting to a Wired Network (Best) 1. Connect an ethernet cable to your router and to the ethernet port on the back of the TV. See below. 2. Use the Guided Network Setup to - Vizio VSB207E320iA0 | E320i-A0 User Manual - Page 20
remote. The TV powers on and the Setup App starts. 2. Use the Up/Down Arrow buttons on the remote to highlight Home Mode Setup and press OK. 3. Use the OK and Arrow Up/ Down buttons on the remote to read and accept the Terms of Service , Last Name, Phone Number, ZIP Code, and E-mail Address using - Vizio VSB207E320iA0 | E320i-A0 User Manual - Page 21
On-Screen Menu 5 Your TV features an easy-to-use on-screen menu. To open the on-screen menu, press the MENU button on the remote. You can also open the Menu To open the on-screen menu, press the MENU/OK button on the remote. Use the Arrow buttons to highlight a menu option, and press the MENU/OK - Vizio VSB207E320iA0 | E320i-A0 User Manual - Page 22
External devices such as DVD players, Blu-Ray Players, and video game consoles can be connected to your TV.To use one of these devices with your TV, you must first change the input source in the on-screen menu. To change the input device: 1. Press the MENU button on the remote. The on-screen menu - Vizio VSB207E320iA0 | E320i-A0 User Manual - Page 23
menu appears. 3. Use the Up/Down Arrow buttons on the remote to highlight the setting you wish to change, then use the Left/ Right Arrow buttons to change the setting: • Caption Style - Choose Auto to keep default settings or Custom to manually change each setting. • Text Size - Adjust the size of - Vizio VSB207E320iA0 | E320i-A0 User Manual - Page 24
- Change the edge type. 4. When you are satisfied with the appearance of the closed captions, press the EXIT button on the remote. Activating the Sleep Timer When activated, the TV's sleep timer will turn the TV off after a set period of time. To use the sleep timer: 1. Press the MENU button on the - Vizio VSB207E320iA0 | E320i-A0 User Manual - Page 25
Custom picture mode allows you to manually change each of the picture remote to highlight More, then press OK. 2. Use the Arrow buttons on the remote Normal, Rich Color, Green/Flesh, or Green/Blue. • Adaptive Luma - Adjusts the average Control - Select Off, DCR (Dynamic Contrast Ratio), or OPC. - Vizio VSB207E320iA0 | E320i-A0 User Manual - Page 26
the Advanced Picture Settings, press the EXIT button on the remote. Adjusting the Color Temperature Adjusting the color temperature will change to manually change each of the color temperature settings: Red/Green/Blue Gain - Adjusts the amount of each color in the display. Red/Green/Blue Offset - Vizio VSB207E320iA0 | E320i-A0 User Manual - Page 27
Picture Settings menu, use the Arrow buttons to highlight More, then press OK. 2. Use the Arrow buttons on the remote to highlight Reset Picture Mode, then press OK. The TV displays, "Are you sure you want to RESET Picture Settings to the factory defaults?" 3. Highlight Yes and press OK. 4. Press - Vizio VSB207E320iA0 | E320i-A0 User Manual - Page 28
1. Press the MENU button on the remote. The on-screen menu is displayed. 2. Use the Arrow buttons on the remote to highlight Audio and press OK. Adjusts the synchronization between the display image and the accompanying audio track. • TV Speakers - Turns the built-in speakers on or off. • SRS - Vizio VSB207E320iA0 | E320i-A0 User Manual - Page 29
the external speakers' volume from the TV's volume controls, or select Fixed to control the external speakers' volume from your home theater system controls. 3. When you have finished adjusting the advanced audio settings, press the EXIT button on the remote. 5 Resetting the Audio Settings To reset - Vizio VSB207E320iA0 | E320i-A0 User Manual - Page 30
TV is internet-ready, featuring both an ethernet port and built-in high-speed wireless-N. Connecting to a Wireless Network To connect to a wireless network whose network name (SSID) is being broadcast: If your TV OK. 6. Press the EXIT button on the remote. 4. Using the on-screen keyboard, enter your - Vizio VSB207E320iA0 | E320i-A0 User Manual - Page 31
Manual Setup and press OK. The Change Settings menu is displayed. 2. Use the Arrow and OK buttons to adjust each setting: • DHCP - (Dynamic Host Configuration Protocol) This setting must be turned Off to change any of the other settings. • IP Address - The IP address assigned to the TV the remote. - Vizio VSB207E320iA0 | E320i-A0 User Manual - Page 32
Name the TV inputs • Set up parental controls • Change the on-screen menu language • Set the time • Adjust the CEC settings • Adjust the VIZIO logo press OK. 5. Press the EXIT button on the remote. Scanning for Channels Before the TV can detect and display channels and their associated information, - Vizio VSB207E320iA0 | E320i-A0 User Manual - Page 33
Analog Channel menu is displayed. 2. Highlight Enter Channel # and use the Number Pad on the remote to enter the number of the channel you are adding. 3. Highlight Add Channel and press OK. The TV scans for the channel. 4. When the TV is done scanning for the channel, press the EXIT button on the - Vizio VSB207E320iA0 | E320i-A0 User Manual - Page 34
You can remove these channels from the TV's memory with the Skip Channel feature Number Pad. If you wish to completely block a channel from being viewed, use the parental controls. See Using the Parental Controls Press OK. 3. Press the EXIT button on the remote. To use the Digital MTS feature: 1. From - Vizio VSB207E320iA0 | E320i-A0 User Manual - Page 35
The on-screen menu is displayed. 2. Use the Arrow buttons on the remote to highlight the Settings icon and press OK. The TV Settings menu is displayed. 3. Use the Arrow buttons on the remote to highlight Parental Controls and press OK. 4. Enter your parental passcode. If you have not set a passcode - Vizio VSB207E320iA0 | E320i-A0 User Manual - Page 36
case, you can use the TV's Rating Block feature to block content Number Pad on the remote to enter your new 4-digit parental control passcode. 3. In the Confirm Pin field, use the Number Pad on the remote to re-enter your new 4-digit parental control passcode. 4. Write down your new parental control - Vizio VSB207E320iA0 | E320i-A0 User Manual - Page 37
devices attached to the inputs on your TV, you can rename the inputs. For example, if you have a DVD player connected to the Component input, you can rename that input to display "DVD Player". To change the name of an input: 1. Press the MENU button on the remote. The on-screen menu is displayed - Vizio VSB207E320iA0 | E320i-A0 User Manual - Page 38
to the internet via an Ethernet cable or a wireless network. Adjusting the CEC Settings The CEC function on your TV enables you to control HDMI-connected devices with the included remote without any additional programming. Not all HDMI devices support CEC. See your device's user manual for details - Vizio VSB207E320iA0 | E320i-A0 User Manual - Page 39
the VIZIO light on or off: 1. Press the MENU button on the remote. The on-screen menu is displayed. 2. Use the Arrow buttons on the remote TV's Help menu to: • Display the User Manual • Display system information • Reset the TV settings • Restore the TV to its factory default settings • Get guided - Vizio VSB207E320iA0 | E320i-A0 User Manual - Page 40
reviewing the system information, press the EXIT button on the remote. Resetting the TV Settings To reset the TV's picture and audio settings: 1. Press the MENU button on the remote parental control passcode. If you have not yet set up a parental passcode, enter the default, 0000. The TV displays, - Vizio VSB207E320iA0 | E320i-A0 User Manual - Page 41
is displayed. 3. Highlight Guided Setup and press OK. 4. Highlight the guided setup you want to access and press OK: • Tuner Setup - Set up the TV tuner. • Network Setup - Connect the TV to your network. 5. Follow the on-screen instructions. When finished, press the EXIT button on the remote. 35 - Vizio VSB207E320iA0 | E320i-A0 User Manual - Page 42
the Info Window The Info Window can be displayed by pressing the INFO or GUIDE button on the remote: • Press the INFO or GUIDE button one time to display channel and input information. • Press the INFO or GUIDE button two times to display the program title and closed captioning information. • Press - Vizio VSB207E320iA0 | E320i-A0 User Manual - Page 43
on the side of the TV. 2. Press the Power/Standby button on the remote or touch the Power control on the side of the TV to turn it on. drive must end in a supported file extension (.mp3, .jpg, etc). • The player is not designed to play media from external hard drives or mp3 players. To play your USB - Vizio VSB207E320iA0 | E320i-A0 User Manual - Page 44
This area displays the contents of the currently selected folder. You can browse between files using the Arrow and OK buttons on the remote. Current Folder Start Fullscreen Slideshow Sort by Name View Thumbnails/List View Folder Settings Photo Infomation Displays name, resolution, and file size - Vizio VSB207E320iA0 | E320i-A0 User Manual - Page 45
Using VIZIO Internet Apps 7 VIZIO Internet Apps (VIA) delivers popular online content to your TV.VIA features a selection of Apps that allow you to watch movies and TV shows, listen to music, get weather and news information, and more-all on demand! A high-speed internet connection is required to - Vizio VSB207E320iA0 | E320i-A0 User Manual - Page 46
Controls menu in the Profile App. You can also restrict other profiles from installing new Apps. To create an owner PIN: 1. Press the V Button on the remote. 2. Highlight the Profile App Enter a 4-digit passcode using the Number Pad on the remote or the on-screen number pad. Write down your passcode - Vizio VSB207E320iA0 | E320i-A0 User Manual - Page 47
remote. (The highlighted App is in the lower left corner of the screen.) 3. Select the App by pressing the OK button. The Profile App is displayed. 4. Highlight Administrative Controls Enter a 4-digit passcode using the Number Pad on the remote or the on-screen number pad. Write down your passcode - Vizio VSB207E320iA0 | E320i-A0 User Manual - Page 48
left and right using the Left/Right Arrow buttons on the remote. (The highlighted App is in the lower left corner of the screen.) 3. Select the App by pressing the OK button. The Profile App is displayed. 4. Highlight Administrative Controls and press OK. (If you have an Owner PIN, you must - Vizio VSB207E320iA0 | E320i-A0 User Manual - Page 49
Troubleshooting & Technical Support A do you have questions? LET US HELP! YOUR PRODUCT INCLUDES FREE LIFETIME TECH SUPPORT The VIZIO support team is highly trained and is based in the United States. We can help with: • New Product Setup • Connecting Your Devices • Technical Problems • And More - Vizio VSB207E320iA0 | E320i-A0 User Manual - Page 50
remote control. • Press the MUTE button on the remote to ensure mute is off. • Check the audio settings. See Adjusting the Audio Settings on page 22 Ensure the speakers are set to On. • Ensure no headphones are connected to the TV. • Check the audio connections of external devices (Blu-ray player - Vizio VSB207E320iA0 | E320i-A0 User Manual - Page 51
the source you switch from, the difference may be noticable. • Use the Volume Up/Down buttons on the remote to adjust the volume. When I change input source, the display image changes size. • The TV remembers the viewing mode on each input source. If the viewing mode on the new input source differs - Vizio VSB207E320iA0 | E320i-A0 User Manual - Page 52
Specifications Screen Size: Viewable Area: Dimensions w/ Stand: w/o Stand: Weight w/ Stand: w/o Stand: TV Type: Refresh Rate: Maximum Resolution: Pixel Pitch: Dynamic Contrast Ratio: Response Time: Brightness: Viewing Angle: HDMI Inputs: Component Video Inputs: Composite Inputs: RF Antenna Input: - Vizio VSB207E320iA0 | E320i-A0 User Manual - Page 53
Audio Outputs: OSD Language: Ambient Light Sensor: Remote Control Model: Certifications: Compliance: Voltage Range: Power Consumption: Standby Power: Zero Bright Pixel Guarantee: B E320i-A0 3.5mm Stereo, Optical Digital English, Spanish, French Yes XRT112 CSA, CSA- - Vizio VSB207E320iA0 | E320i-A0 User Manual - Page 54
VIZIO Technical Support will provide instructions for packing and shipping the covered Product to the VIZIO service center. Limitations and Exclusions VIZIO service center.Products with unreadable or removed serial numbers, model's product information page (www.VIZIO.com) or look for the "zero - Vizio VSB207E320iA0 | E320i-A0 User Manual - Page 55
accordance with the instructions, may cause harmful not responsible for any radio or TV interference caused by unauthorized modification to UK: BASE/BS Japan: Electric Appliance Control Act Open Source Software Notice Your LGPL2.1 License Agreements. VIZIO offers to provide source code to you on CD- - Vizio VSB207E320iA0 | E320i-A0 User Manual - Page 56
party providers of any VIA Services. Furthermore, we do not review, control, or endorse the content, products or services of VIA Services or their data servers. Your rights to use the widget links to access VIA Services is governed by the VIZIO Internet Applications Software License Agreement ("VIA - Vizio VSB207E320iA0 | E320i-A0 User Manual - Page 57
or through devices that access the Internet and pay any service fees associated with such access. In addition, you must provide all equipment necessary to make such connection to the Internet including a modem or other Internet access device. 8. Upgrades, Support.VIZIO or its third party providers - Vizio VSB207E320iA0 | E320i-A0 User Manual - Page 58
of Warranties. YOU EXPRESSLY ACKNOWLEDGE AND AGREE THAT USE OF THE VIZIO SOFTWARE AND VIA SERVICES (AS DEFINED ABOVE) IS AT YOUR SOLE RISK AND THAT production of missiles, or nuclear, chemical or biological weapons. 14. Controlling Law and Severability. This License Agreement will be governed by and - Vizio VSB207E320iA0 | E320i-A0 User Manual - Page 59
MODELS // E3D320VX // E3D420VX // E3D470VX © 2012 VIZIO INC. All rights reserved. 120620OC-NC
-
 1
1 -
 2
2 -
 3
3 -
 4
4 -
 5
5 -
 6
6 -
 7
7 -
8
-
9
-
10
-
11
-
12
-
13
-
14
-
15
-
16
-
17
-
18
-
19
-
20
-
21
-
22
-
23
-
24
-
25
-
26
-
27
-
28
-
29
-
30
-
31
-
32
-
33
-
34
-
35
-
36
-
37
-
38
-
39
-
40
-
41
-
42
-
43
-
44
-
45
-
46
-
47
-
48
-
49
-
50
-
51
-
52
-
53
-
54
-
55
-
56
-
57
-
58
-
59
 |
 |
USER
GUIDE
INSTALLING YOUR NEW TV
CONTROLS & CONNECTIONS
CONNECTING YOUR DEVICES
USING THE ON-SCREEN MENU
USING THE USB MEDIA PLAYER
USING VIZIO INTERNET APPS
TROUBLESHOOTING & SUPPORT
HELP, SPECS, WARRANTY & LEGAL
MODELS
//
E3D320VX
//
E3D420VX
//
E3D470VX
MODEL
E320i-A0