Weider Pro 260 Bench English Manual
Weider Pro 260 Bench Manual
 |
View all Weider Pro 260 Bench manuals
Add to My Manuals
Save this manual to your list of manuals |
Weider Pro 260 Bench manual content summary:
- Weider Pro 260 Bench | English Manual - Page 1
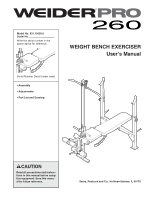
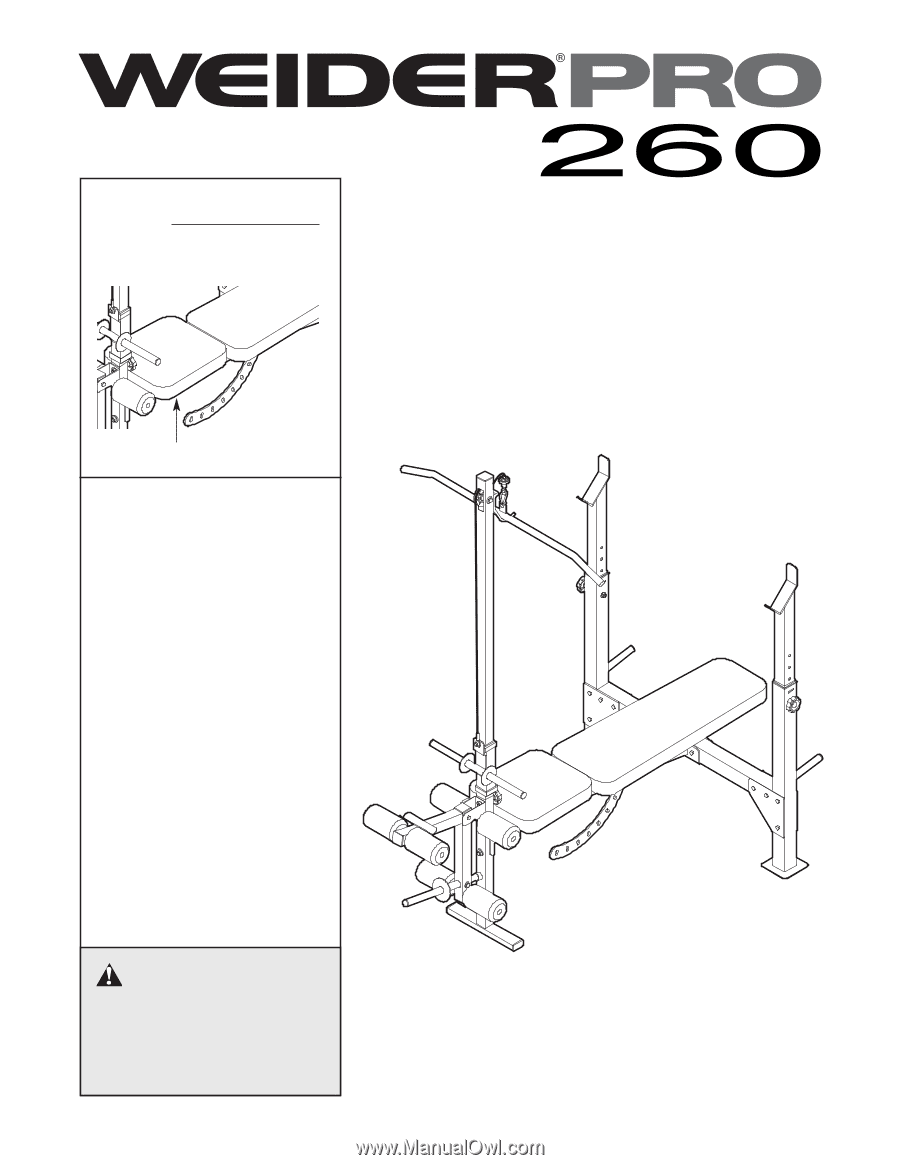
space above for reference. WEIGHT BENCH EXERCISER User's Manual Serial Number Decal (under seat) • Assembly • Adjustments • Part List and Drawing CAUTION Read all precautions and instructions in this manual before using this equipment. Save this manual for future reference. Sears, Roebuck and Co - Weider Pro 260 Bench | English Manual - Page 2
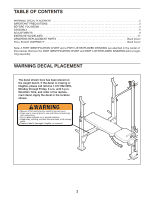
LIST/EXPLODED DRAWING are attached in the center of this manual. Remove the PART IDENTIFICATION CHART and PART LIST/EXPLODED DRAWING before beginning assembly. WARNING DECAL PLACEMENT The decal shown here has been placed on the weight bench. If the decal is missing or illegible, please call toll - Weider Pro 260 Bench | English Manual - Page 3
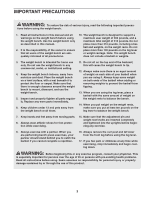
parts. 8. Always wear athletic shoes for foot protection while exercising. 15. Make sure that the adjustment pin and weight rest knobs are inserted completely and tightened into the uprights before beginning any exercise. 9. Always exercise with a partner. When you are performing bench press - Weider Pro 260 Bench | English Manual - Page 4
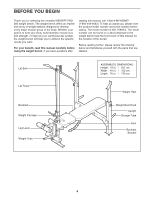
can be found on a decal attached to the weight bench (see the front cover of this manual for the location of the decal). Before reading further, please review the drawing below and familiarize yourself with the parts that are labeled. Lat Bar Lat Tower ASSEMBLED DIMENSIONS: Height: 79 in. / 201 cm - Weider Pro 260 Bench | English Manual - Page 5
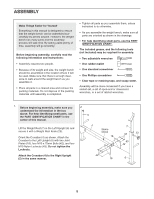
materials until assembly is completed. • Tighten all parts as you assemble them, unless instructed to do otherwise. • As you assemble the weight bench, make sure all parts are oriented as shown in the drawings. • For help identifying small parts, use the PART IDENTIFICATION CHART. The included - Weider Pro 260 Bench | English Manual - Page 6
(43). Do not tighten the Locknuts. 40 1 44 43 40 2 3. Attach the Bench Frame (1) to the Crossbar (4) 3 with two M10 x 81mm Bolts (41) and 10mm Spacer (32), and an M8 Nylon Locknut (55). Press the 25mm Round Angled Cap (28) onto the Weight Tube (16). Grease an M10 x 68mm Bolt (54). Attach - Weider Pro 260 Bench | English Manual - Page 7
overtighten the Locknut; the Backrest Frames must be able to pivot easily. Attach the Adjustment Pin (25) to the Bench Frame (1) with an M4 x 16mm Screw (45). Engage the Pin into the Bench Frame and the Backrest Bracket (10). Tighten the M6 x 40mm Bolts (49) and M6 Nylon Locknuts (51) used in - Weider Pro 260 Bench | English Manual - Page 8
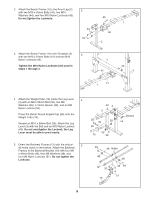
Pulley (38). Make sure that the Cable is under the lat rest bar. Attach the Pulley inside the Lat Tower with an M10 x 60mm Bolt 43). 13. Make sure that all parts are properly tightened before the weight bench is used. The use of all remaining parts will be explained in ADJUSTMENTS, beginning on - Weider Pro 260 Bench | English Manual - Page 9
to get the most benefit from your exercise program. Also, refer to the accompanying exercise guide to see the correct form for each exercise. Make sure all parts are properly tightened each time the weight bench is used. Replace any worn parts immediately. The weight bench can be cleaned with a damp - Weider Pro 260 Bench | English Manual - Page 10
THE CURL PAD For some exercises, the Curl Pad (15) must be attached to the weight bench. Remove the 45mm Thick Square Front Leg (2). ATTACHING THE LAT BAR Attach the Lat Bar (17) to the Lat Cable (35) with a Cable Clip (37). Remove the Lat Bar when performing an exercise that does not require it. - Weider Pro 260 Bench | English Manual - Page 11
only the appropriate parts of the body. Exercising in an uncontrolled manner will leave you feeling exhausted. On the exercise guide accompanying this manual you will find photographs showing the correct form for several exercises, and a list of the muscles affected. Refer to the muscle chart on the - Weider Pro 260 Bench | English Manual - Page 12
keep a record of each workout. The chart on pages 13 and 14 of this manual can be photocopied and used to schedule and record your workouts. List the date, the exercises performed, the resistance used, and the numbers of sets and repetitions completed. Record your weight and key body measurements at - Weider Pro 260 Bench | English Manual - Page 13
MONDAY Date: // EXERCISE WEIGHT SETS REPS TUESDAY Date: // WEDNESDAY Date: // AEROBIC EXERCISE EXERCISE WEIGHT SETS REPS THURSDAY Date: // FRIDAY Date: // AEROBIC EXERCISE EXERCISE WEIGHT SETS REPS Make photocopies of this page for scheduling and recording your workouts. 13 - Weider Pro 260 Bench | English Manual - Page 14
MONDAY Date: // EXERCISE WEIGHT SETS REPS TUESDAY Date: // WEDNESDAY Date: // AEROBIC EXERCISE EXERCISE WEIGHT SETS REPS THURSDAY Date: // FRIDAY Date: // AEROBIC EXERCISE EXERCISE WEIGHT SETS REPS Make photocopies of this page for scheduling and recording your workouts. 14 - Weider Pro 260 Bench | English Manual - Page 15
PART IDENTIFICATION CHART Refer to the drawings below to identify small parts used in assembly. The number in parentheses by each drawing is the key number of the part, from the PART LIST in the center of this manual. Note: Some small parts may have been pre-attached. If a part is not in the parts - Weider Pro 260 Bench | English Manual - Page 16
Round Inner Cap # 1 User's Manual # 1 Exercise Guide # 1 Grease Pack Note: "#" Indicates a non-illustrated part. Specifications are subject to change without notice. See the back cover of this manual for information about ordering replacement parts. If a part is missing, call toll-free - Weider Pro 260 Bench | English Manual - Page 17
EXPLODED DRAWING-Model No. 831.15609.0 R0805A 30 17 7 57 31 43 44 30 45 35 38 47 31 21 44 22 23 37 5 8 13 29 49 12 45 43 48 48 48 29 48 48 49 48 50 49 33 51 51 10 7 45 45 43 21 36 18 4 35 43 24 53 42 18 33 14 9 33 24 40 57 34 43 42 43 41 1 45 41 25 26 3 26 - Weider Pro 260 Bench | English Manual - Page 18
in material or workmanship in this WEIGHT BENCH EXERCISER, contact the nearest Sears Service Center throughout the United States and Sears will repair or replace the WEIGHT BENCH EXERCISER, free of charge. This warranty does not apply when the WEIGHT BENCH EXERCISER is used commercially or for
-
 1
1 -
 2
2 -
 3
3 -
 4
4 -
 5
5 -
 6
6 -
 7
7 -
8
-
9
-
10
-
11
-
12
-
13
-
14
-
15
-
16
-
17
-
18
 |
 |
CAUTION
Read all precautions and instruc-
tions in this manual before using
this equipment. Save this manu-
al for future reference.
Model No. 831.15609.0
Serial No.
Write the serial number in the
space above for reference.
Serial Number Decal (under seat)
Sears, Roebuck and Co., Hoffman Estates, IL 60179
• Assembly
• Adjustments
• Part List and Drawing
WEIGHT BENCH EXERCISER
User’s Manual