Weslo Cadence 78e Treadmill English Manual
Weslo Cadence 78e Treadmill Manual
 |
View all Weslo Cadence 78e Treadmill manuals
Add to My Manuals
Save this manual to your list of manuals |
Weslo Cadence 78e Treadmill manual content summary:
- Weslo Cadence 78e Treadmill | English Manual - Page 1
, or if parts are damaged or missing, PLEASE DO NOT CONTACT THE STORE. For assistance, contact our Customer Service Department. CALL manual before using this equipment. Save this manuVailsit our website at for future reference. www.proform.com Visit our website at Visit our website at www.weslo - Weslo Cadence 78e Treadmill | English Manual - Page 2
BEGIN 5 ASSEMBLY 6 OPERATION AND ADJUSTMENT 11 HOW TO FOLD AND MOVE THE TREADMILL 15 TROUBLESHOOTING 17 EXERCISE GUIDELINES 19 PART LIST 20 EXPLODED DRAWING 21 ORDERING REPLACEMENT PARTS Back Cover LIMITED WARRANTY Back Cover WARNING DECAL PLACEMENT The decals shown here have been placed - Weslo Cadence 78e Treadmill | English Manual - Page 3
1. Before beginning any exercise program, consult your physician. This is especially important for persons over the age of 35 or persons with pre-existing health problems. 2. It is the responsibility of the owner to ensure that all users of this treadmill are adequately informed of all warnings and - Weslo Cadence 78e Treadmill | English Manual - Page 4
cord immediately after use, before cleaning the treadmill, and before performing the maintenance and adjustment procedures de- scribed in this manual. Never remove the motor hood unless instructed to do so by an authorized service representative. Servicing other than the procedures in this - Weslo Cadence 78e Treadmill | English Manual - Page 5
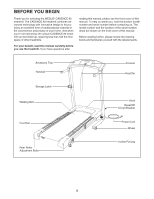
the serial number decal are shown on the front cover of this manual. Before reading further, please review the drawing below and familiarize yourself with the labeled parts. Accessory Tray Handrail Storage Latch Console Key/Clip Walking Belt Hood Reset/Off Circuit Breaker Foot Rail Power Cord - Weslo Cadence 78e Treadmill | English Manual - Page 6
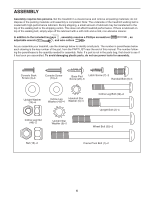
wrench , and wire cutters . As you assemble your treadmill, use the drawings below to identify small parts. The number in parentheses below each drawing is the key number of the part, from the PART LIST near the end of this manual. The number following the parentheses is the quantity needed for - Weslo Cadence 78e Treadmill | English Manual - Page 7
should turn freely. Attach the other Wheel (70) to the outerside of the Base (52) in the same way. Position the front end of the treadmill Frame (51) between the Uprights (53, 54) as shown. Next, locate the long wire inside the lower end of the Right Upright (see the inset - Weslo Cadence 78e Treadmill | English Manual - Page 8
this step on the left side of the treadmill. 4. Set the Console Assembly (91) face down on a soft surface to avoid scratching the Console 4 Assembly. Set the Left Handrail (22) on the Console as shown. Attach the Left Handrail with two Console Screws (10). Attach the Right Handrail (not shown - Weslo Cadence 78e Treadmill | English Manual - Page 9
the Left and Right Handrails (22, 33). Start all four Handrail Bolts before tightening any of them. 6 22 85 53 8 5 91 33 8 5 5 8 54 7. Attach the Console Back (73) to the Console Assembly (91) with four Console Back Screws 7 91 73 (4). Make sure that no wires are pinched. 4 4 9 - Weslo Cadence 78e Treadmill | English Manual - Page 10
the desired level (see HOW TO CHANGE THE INCLINE OF THE TREADMILL on page 14). 10 51 46 43 69 32 43 11. Make sure that all parts are properly tightened before you use the treadmill. Keep the included hex key in a secure place. The hex key is used to adjust the walking belt (see page - Weslo Cadence 78e Treadmill | English Manual - Page 11
damaged, always use a surge suppressor with your treadmill (see drawing 1 at the right). Use only a single-outlet surge suppressor that is UL 1449 listed as a transient voltage surge suppressor (TVSS). The surge suppressor must have a UL suppressed voltage rating of 400 volts or less and a minimum - Weslo Cadence 78e Treadmill | English Manual - Page 12
reset position. Reset Position Next, stand on the foot rails of the treadmill. Find the clip attached to the key (see the drawing above) and slide the clip onto the waistband of your clothes. Then, insert the key into the console. After a moment, the displays will light. IMPORTANT: In an emergency - Weslo Cadence 78e Treadmill | English Manual - Page 13
and then reinsert it into the console. 4. When you are finished exercising, remove the key from the console. Step onto the foot rails, press the Stop button, remove the key from the console and put it in a secure place. When you are finished using the treadmill, switch the reset/off circuit breaker - Weslo Cadence 78e Treadmill | English Manual - Page 14
HOW TO CHANGE THE INCLINE OF THE TREADMILL To vary the intensity of your exercise, you can change the incline of the treadmill. There are three incline levels. Before changing the incline, remove the key and unplug the power cord. Next, fold the treadmill to the storage position (see page 15). To - Weslo Cadence 78e Treadmill | English Manual - Page 15
to safely lift 45 lbs. (20 kg) to raise, lower, or move the treadmill. 1. Hold the metal frame firmly in the location shown by the arrow at the position. Frame 2. Move your right hand to the position shown and hold the treadmill firmly. Using your left hand, pull the latch knob to the left and hold - Weslo Cadence 78e Treadmill | English Manual - Page 16
USE 1. Hold the upper end of the treadmill with your right hand as shown. Using your left hand, pull the latch knob to the left and hold it. Next, lower the frame until - Weslo Cadence 78e Treadmill | English Manual - Page 17
in. c. Remove the key from the console. Reinsert the key fully into the console. d. If the treadmill still will not run, please see the front cover of this manual. PROBLEM: The displays of the console do not function properly SOLUTION: a. Remove the key from the console and UNPLUG THE a POWER - Weslo Cadence 78e Treadmill | English Manual - Page 18
Then, plug in the power cord, insert the key, and run the treadmill for a few minutes. Repeat until the walking belt is properly tightened. b 2-3 in. Rear Roller Bolts c. If the walking belt still slows when walked on, see the front cover of this manual. PROBLEM: The walking belt is off-center or - Weslo Cadence 78e Treadmill | English Manual - Page 19
post-exercise problems. EXERCISE FREQUENCY To maintain or improve your condition, complete three workouts each week, with at least one day of rest between workouts. After a few months of regular exercise, you may complete up to five workouts each week, if desired. Remember, the key to success - Weslo Cadence 78e Treadmill | English Manual - Page 20
Cord Strain Relief 86 1 Walking Platform 87 1 Controller 88 1 Choke 89 1 Reed Switch 90 1 Power Cord 91 1 Console Assembly 92 1 Ground Wire 93 2 Belt Guide 94 1 5 mm Hex Key 95 5 Electronics Screw/ Bracket Screw 96 2 Isolator Screw 97 3 Choke Screw/ Power Cord Screw * - 6" Red Wire, M/F * - 4" Black - Weslo Cadence 78e Treadmill | English Manual - Page 21
EXPLODED DRAWING A - Model No. 30551.0 25 21 25 19 95 42 60 36 29 74 46 32 43 13 69 25 67 25 96 50 78 93 64 58 89 21 46 83 41 62 19 45 56 28 71 25 68 41 31 25 19 45 41 6 25 76 27 25 86 19 27 95 43 42 46 55 74 46 36 61 43 29 46 43 32 51 81 93 96 28 50 78 17 18 69 13 72 41 - Weslo Cadence 78e Treadmill | English Manual - Page 22
EXPLODED DRAWING B - Model No. 30551.0 R0607A 47 20 20 30 34 38 44 38 59 34 79 23 40 95 42 92 42 95 47 47 65 95 42 21 88 20 57 87 97 66 20 37 20 90 97 85 84 22 - Weslo Cadence 78e Treadmill | English Manual - Page 23
EXPLODED DRAWING C - Model No. 30551.0 R0607A 73 4 77 4 4 4 22 12 77 8 15 5 48 7 91 77 10 12 10 33 8 5 39 77 8 24 5 10 12 10 8 5 53 54 80 1 82 3 XX XX 35 70 75 14 21 9 82 63 16 26 63 26 11 14 63 2 26 11 52 49 39 63 26 16 75 63 23 70 35 26 9 14 1 14 2 63 26 - Weslo Cadence 78e Treadmill | English Manual - Page 24
• the key number and description of the replacement parts(s) (see the PART LIST and the EXPLODED DRAWING near the end of this manual) LIMITED WARRANTY ICON OF CANADA, INC. (ICON) warrants this product to be free from defects in workmanship and material, under normal use and service conditions. The
-
 1
1 -
 2
2 -
 3
3 -
 4
4 -
 5
5 -
 6
6 -
 7
7 -
8
-
9
-
10
-
11
-
12
-
13
-
14
-
15
-
16
-
17
-
18
-
19
-
20
-
21
-
22
-
23
-
24
 |
 |
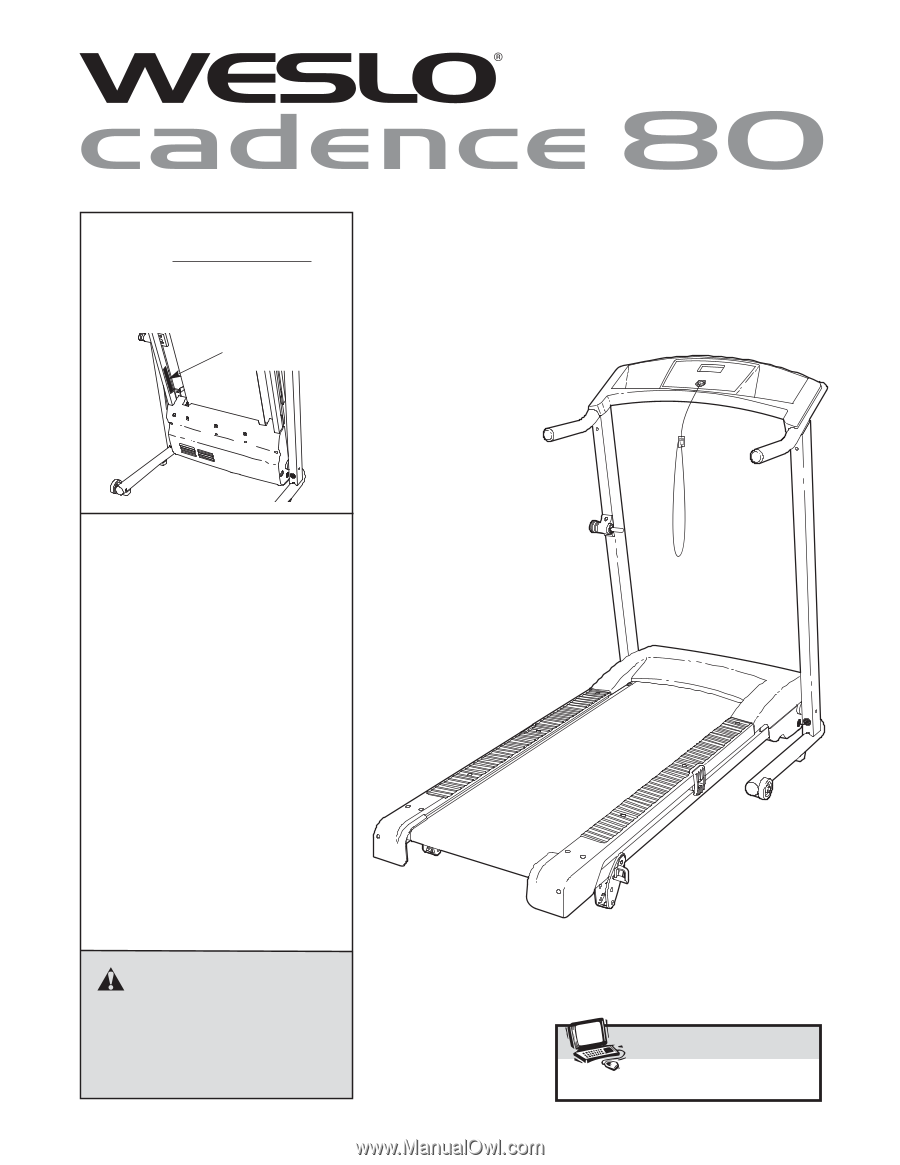
USER'S MANUAL
Serial Number
Decal
Model No. 30551.1
Serial No.
Write the serial number in the space
above for future reference.
CAUTION
Read all precautions and instruc-
tions in this manual before using
this equipment. Save this manual
for future reference.
QUESTIONS?
As a manufacturer, we are com-
mitted to providing complete cus-
tomer satisfaction. If you have
questions, or if parts are damaged
or missing, PLEASE DO NOT
CONTACT THE STORE. For assis-
tance, contact our Customer
Service Department.
CALL TOLL-FREE:
1-888-936-4266
Mon.–Fri., 8:00 until 17:00 EST
(excluding holidays)
OR E-MAIL US:
www.weslo.com
Visit our website at