Weslo Cadence G-40 Treadmill English Manual
Weslo Cadence G-40 Treadmill Manual
 |
View all Weslo Cadence G-40 Treadmill manuals
Add to My Manuals
Save this manual to your list of manuals |
Weslo Cadence G-40 Treadmill manual content summary:
- Weslo Cadence G-40 Treadmill | English Manual - Page 1
manual) before contacting Customer Care. CALL TOLL-FREE: 1-866-699-3756 Mon.-Fri. 6 a.m.-6 p.m. MT Sat. 8 a.m.-4 p.m. MT ON THE WEB: www.wesloservice.com CAUTION Read all precautions and instructions in this manual before using this equipment. Save this manual for future reference. USER'S MANUAL - Weslo Cadence G-40 Treadmill | English Manual - Page 2
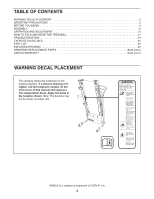
THE TREADMILL 17 TROUBLESHOOTING 19 EXERCISE GUIDELINES 21 PART LIST 22 EXPLODED DRAWING 24 ORDERING REPLACEMENT PARTS Back of this manual and request a free replacement decal. Apply the decal in the location shown. Note: The decal(s) may not be shown at actual size. WESLO is a registered - Weslo Cadence G-40 Treadmill | English Manual - Page 3
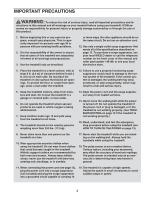
away from heated surfaces. 15. Never move the walking belt while the power is turned off. Do not operate the treadmill if the power cord or plug is damaged, or if the treadmill is not working properly. (See TROUBLESHOOTING on page 19 if the treadmill is not working properly.) 16. Read, understand - Weslo Cadence G-40 Treadmill | English Manual - Page 4
Always unplug the power cord immediately after use, before cleaning the treadmill, and before performing the main- tenance and adjustment procedures de- scribed in this manual. Never remove the motor hood unless instructed to do so by an authorized service representative. Servicing other than - Weslo Cadence G-40 Treadmill | English Manual - Page 5
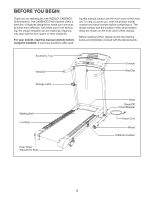
cover of this manual. Before reading further, please review the drawing below and familiarize yourself with the labeled parts. Accessory Tray Handrail Console Key/Clip Storage Latch Walking Belt Foot Rail Rear Roller Adjustment Bolts Hood Reset/Off Circuit Breaker Power Cord Wheel Platform - Weslo Cadence G-40 Treadmill | English Manual - Page 6
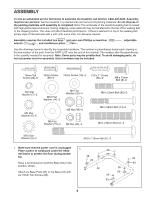
in parentheses below each drawing is the key number of the part, from the PART LIST near the end of this manual. The number after the parentheses is the quantity needed for assembly. Note: Some parts may be preattached. To avoid damaging parts, do not use power tools for assembly. Extra hardware may - Weslo Cadence G-40 Treadmill | English Manual - Page 7
the bolts and the card- 4 board packaging from both sides of the Hood (65). Position the Base (52) as close to the front of the treadmill as possible. See the inset drawing. Locate the wire tie in the Right Upright (54). Tie the wire tie securely to the connector on the - Weslo Cadence G-40 Treadmill | English Manual - Page 8
5. See the left inset drawing and identify a Frame Spacer (11). Hold the Frame Spacer between 5 the Right Upright (54) and the Frame (51). Attach the Right Upright to the Frame with an M10 x 110mm Bolt (1), an M10 Flat Washer (14), and an M10 Star Washer (9); do not tighten the Bolt yet. 54 - Weslo Cadence G-40 Treadmill | English Manual - Page 9
hole in the location shown. Hold the Right Handrail near the Console. Next, insert the console wire into the large hole in the side of the Right Handrail (33). Using needlenose pliers, carefully grasp the connector and pull the console wire out of the hole near the bracket on the Right Handrail - Weslo Cadence G-40 Treadmill | English Manual - Page 10
and snap into place. If they do not, turn one connector and try again. IF THE CONNECTORS ARE NOT CONNECTED PROPERLY, THE CONSOLE MAY BE DAMAGED WHEN THE POWER IS TURNED ON. Remove the wire tie from the Wire Harness. Insert the connectors and the excess wire downward into the Right Upright - Weslo Cadence G-40 Treadmill | English Manual - Page 11
82 72 95 51 72 72 46 46 95 72 82 15. Make sure that all parts are properly tightened before you use the treadmill. Keep the included hex keys in a secure place. One of the hex keys is used to adjust the walking belt (see page 20). To protect the floor or carpet, place a mat under the - Weslo Cadence G-40 Treadmill | English Manual - Page 12
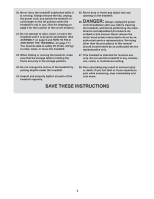
surge suppressor to indicate whether it is functioning properly. Failure to use a properly functioning surge suppressor could result in damage to the control system of the treadmill. If the control system is damaged, the walking belt may slow, accelerate, or stop unexpectedly, which may result in - Weslo Cadence G-40 Treadmill | English Manual - Page 13
of the walking belt, and center the walking belt if necessary (see page 20). IMPORTANT: If the treadmill has been exposed to cold temperatures, allow it to warm to room temperature before turning on the power. If you do not do this, you may damage the console displays or other electrical components - Weslo Cadence G-40 Treadmill | English Manual - Page 14
HOW TO USE THE MANUAL MODE 1. Insert the key into the console. See HOW TO TURN ON THE POWER on page 13. 2. Select the manual mode. When the key is inserted, the manual mode will be selected. If you have selected a speed program, reselect the manual mode by pressing the Program Select button - Weslo Cadence G-40 Treadmill | English Manual - Page 15
, the treadmillʼs electrical components may wear prematurely. HOW TO USE A SPEED PROGRAM 1. Insert the key into the console. See HOW TO TURN ON THE POWER on page 13. 2. Select one of the four speed programs. If the speed setting is too high or too low during the program, you can manually override - Weslo Cadence G-40 Treadmill | English Manual - Page 16
of the treadmill. There are three incline levels. Before changing the incline, remove the key and unplug the power cord. Next, fold the treadmill to the . Adjust the other incline leg in the same way. CAUTION: Before using the treadmill, make sure that both incline legs are at the same height and - Weslo Cadence G-40 Treadmill | English Manual - Page 17
TREADMILL HOW TO FOLD THE TREADMILL FOR STORAGE Before folding the treadmill, remove the key and unplug the power cord. CAUTION: You must be able to safely lift 45 lbs. (20 kg) to raise, lower, or move the treadmill the position shown and hold the treadmill firmly. Using your left hand, pull the - Weslo Cadence G-40 Treadmill | English Manual - Page 18
HOW TO LOWER THE TREADMILL FOR USE 1. Hold the upper end of the treadmill with your right hand as shown. Using your left hand, pull the latch knob to the left and hold it. Next, lower the frame until it is past the latch pin. Then, - Weslo Cadence G-40 Treadmill | English Manual - Page 19
Remove the key from the console. Reinsert the key into the console. d. If the treadmill still will not run, please see the front cover of this manual. PROBLEM: The displays of the console do not function properly SOLUTION: a. Remove the key from the console and UNPLUG THE a POWER CORD. Remove - Weslo Cadence G-40 Treadmill | English Manual - Page 20
Then, plug in the power cord, insert the key, and run the treadmill for a few minutes. Repeat until the walking belt is properly tightened. b 2-3 in. Rear Roller Bolts c. If the walking belt still slows when walked on, see the front cover of this manual. PROBLEM: The walking belt is off-center or - Weslo Cadence G-40 Treadmill | English Manual - Page 21
over age 35 or persons with pre-existing health problems. The pulse sensor is not a medical device. proper intensity is the key to achieving results. You can use your heart rate as a guide to find the proper key to success is to make exercise a regular and enjoyable part of your everyday life. 21 - Weslo Cadence G-40 Treadmill | English Manual - Page 22
Endcap Long Foot Rail Screw Walking Belt Handrail Endcap Platform Cushion Drive Motor Wire Tie 8" Tie M8 x 52mm Bolt Reed Switch Clip Controller Screw 16mm Screw Walking Platform Controller Console Crossbar Reed Switch Power Cord Console Releasable Tie Belt Guide 5mm Hex Key Incline Leg U-nut Front - Weslo Cadence G-40 Treadmill | English Manual - Page 23
No. Qty. Description Key No. Qty. Description 101 2 * - * - Rear Roller Flat Washer 4" White Wire, M/F 4" Blue Wire, 2F * - 4" Red Wire, M/F * - Userʼs Manual Note: Specifications are subject to change without notice. For information about ordering replacement parts, see the back cover - Weslo Cadence G-40 Treadmill | English Manual - Page 24
A-Model No. WLTL29606.9 R0710A 24 25 25 89 100 3 67 41 83 96 31 25 41 62 97 75 93 44 19 56 21 64 25 10 28 71 50 19 97 41 25 96 4 78 4 68 41 98 6 25 19 21 42 60 101 36 29 74 44 82 72 40 95 - Weslo Cadence G-40 Treadmill | English Manual - Page 25
EXPLODED DRAWING B-Model No. WLTL29606.9 20 47 20 20 47 47 R0710A 65 30 34 38 44 38 59 34 79 21 42 42 21 21 84 57 87 66 37 90 99 81 49 92 25 - Weslo Cadence G-40 Treadmill | English Manual - Page 26
EXPLODED DRAWING C-Model No. WLTL29606.9 77 77 88 R0710A 10 10 10 33 10 7 85 10 10 10 5 8 22 5 77 5 8 77 48 24 58 53 10 7 85 39 8 5 3 8 4 80 54 1 9 - Weslo Cadence G-40 Treadmill | English Manual - Page 27
EXPLODED DRAWING D-Model No. WLTL29606.9 R0710A 91 15 12 4 4 4 4 4 4 4 73 4 4 4 27 - Weslo Cadence G-40 Treadmill | English Manual - Page 28
Inc. (ICON) warrants this product to be free from defects in workmanship and material, under normal use and service conditions. The drive motor is warranted for one (1) year from the date of purchase. Parts and labor are warranted for ninety (90) days from the date of purchase. This warranty extends
-
 1
1 -
 2
2 -
 3
3 -
 4
4 -
 5
5 -
 6
6 -
 7
7 -
8
-
9
-
10
-
11
-
12
-
13
-
14
-
15
-
16
-
17
-
18
-
19
-
20
-
21
-
22
-
23
-
24
-
25
-
26
-
27
-
28
 |
 |
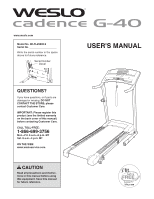
USER'S MANUAL
Model No. WLTL29606.9
Serial No.
Write the serial number in the space
above for future reference.
CAUTION
Read all precautions and instruc-
tions in this manual before using
this equipment. Save this manual
for future reference.
QUESTIONS?
If you have questions, or if parts are
damaged or missing,
DO NOT
CONTACT THE STORE; please
contact Customer Care.
IMPORTANT: Please register this
product (see the limited warranty
on the back cover of this manual)
before contacting Customer Care.
CALL TOLL-FREE:
1-866-699-3756
Mon.–Fri. 6 a.m.–6 p.m. MT
Sat. 8 a.m.–4 p.m. MT
ON THE WEB:
www.wesloservice.com
Serial Number
Decal
www.weslo.com