Whirlpool GW397LXUQ Owners Manual
Whirlpool GW397LXUQ - 30" Slide-In Gas Range Manual
 |
UPC - 883049127811
View all Whirlpool GW397LXUQ manuals
Add to My Manuals
Save this manual to your list of manuals |
Whirlpool GW397LXUQ manual content summary:
- Whirlpool GW397LXUQ | Owners Manual - Page 1
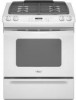
® GAS RANGE Use & Care Guide For questions about features, operation/performance, parts, accessories or service, call: 1-800-253-1301 or visit our website at...www.whirlpool.com In Canada, call for assistance, installation or service, call: 1-800-807-6777 or visit our website at... www.whirlpool.ca - Whirlpool GW397LXUQ | Owners Manual - Page 2
Hold 13 Favorite 14 Warm 14 Automatic Shut-Off/Sabbath Mode 14 RANGE CARE 15 Self-Cleaning Cycle 15 General Cleaning 16 Oven Light 17 Storage Drawer 18 Oven Door 18 TROUBLESHOOTING 18 ASSISTANCE OR SERVICE 20 In the U.S.A 20 In Canada 20 WARRANTY 21 TABLE DES MATIÈRES SÉCURITÉ DE LA - Whirlpool GW397LXUQ | Owners Manual - Page 3
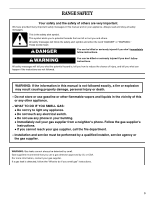
from a neighbor's phone. Follow the gas supplier's instructions. • If you cannot reach your gas supplier, call the fire department. - Installation and service must be performed by a qualified installer, service agency or the gas supplier. WARNING: Gas leaks cannot always be detected by smell - Whirlpool GW397LXUQ | Owners Manual - Page 4
This appliance can cause low-level exposure to range is moved. See the installation instructions for details. Failure to follow these instructions can result in death or serious burns to children and adults. Range Foot Anti-Tip Bracket Making sure the anti-tip bracket is installed: • Slide range - Whirlpool GW397LXUQ | Owners Manual - Page 5
utensil. For self-cleaning ranges - ■ Before Self-Cleaning the Oven - Remove broiler pan and other utensils. Wipe off all excessive spillage before initiating the cleaning cycle. SAVE THESE INSTRUCTIONS COOKTOP USE A D B C A. Surface burner locator B. Left front control knob C. Left rear - Whirlpool GW397LXUQ | Owners Manual - Page 6
. If you wish to use LP gas, an LP Gas Conversion Kit is included with your new range. See the "Gas Conversions" section of the Installation Instructions for details on making this conversion. Electric igniters automatically light the surface burners when control knobs are turned to LITE. The large - Whirlpool GW397LXUQ | Owners Manual - Page 7
IMPORTANT: Before cleaning, make sure all controls are off and the oven and cooktop are cool. Do not use oven cleaners, bleach or rust removers. 1. 's instructions. ■ Use on low heat settings. Porcelain enamel-onsteel or cast iron ■ See stainless steel or cast iron. Stainless steel ■ - Whirlpool GW397LXUQ | Owners Manual - Page 8
ELECTRONIC OVEN CONTROL A B C A. Oven functions B. Oven display C. Number pad D. Cancel A KJ I HG F E E. Presets keypad F. Delay keypad G. Oven light H. Timer D I. Clock J. Cook and hold K. Self-clean B C A. Oven functions B. Oven display C. Number pad D. Cancel KJ I H G F E E. Presets - Whirlpool GW397LXUQ | Owners Manual - Page 9
locking. Once the oven door is locked "LOCK" is displayed. To Unlock Control Panel and Oven Door: Press and means the oven will be warmer by the displayed amount. Use the following chart as a guide. ADJUSTMENT change is made, the range will return to the existing setting after 30 seconds. 2. Press - Whirlpool GW397LXUQ | Owners Manual - Page 10
in the bottom third of oven. ■ May need to increase baking time. ■ Little or no bottom browning Stainless steel ■ Light, golden crusts ■ Uneven browning ■ May need to increase baking time. Stoneware/Baking stone ■ Crisp crusts ■ Follow manufacturer's instructions. FOOD Large roasts, turkeys - Whirlpool GW397LXUQ | Owners Manual - Page 11
temperatures. ■ For best results, use a broiler pan and grid (provided on some models). They are designed to drain juices and help avoid spatter and smoke. If you would like to purchase a broiler pan, one may be ordered. See "Assistance or Service" section to order. Ask for Part Number 12500100 - Whirlpool GW397LXUQ | Owners Manual - Page 12
best 6-10 Chicken bone-in pieces well-done 3 or 4 LO Broil 30-45 Fish Fillets flaky 4 Fish Steaks 1" (2.5 cm) thick flaky models) Use Convect for single or multiple rack baking. When convection baking, enter your normal baking temperature. The control will automatically reduce the set oven - Whirlpool GW397LXUQ | Owners Manual - Page 13
Convect Roast (on some models) When convection roasting, enter your normal roasting time and temperature. The control will automatically prompt you to check the food for doneness at 75% of the set time. The convection fan will come on immediately after the oven has turned on. NOTE: When convection - Whirlpool GW397LXUQ | Owners Manual - Page 14
be displayed.) 2. Press BAKE, CONVECT BAKE (on some models) or CONVECT ROAST (on some models). The Favorite cycle will begin immediately. The selected cycle will cancel a Bake cycle, however the control will stay in the Sabbath Mode. ■ If power fails, the oven will power up in Sabbath Mode with 72 - Whirlpool GW397LXUQ | Owners Manual - Page 15
The time of day will return to the display. RANGE CARE Self-Cleaning Cycle WARNING Prepare Cooktop and Storage models, the temperature probe from the oven. ■ Remove any foil from the oven because it may burn or melt, damaging the oven. ■ Remove oven racks to keep them shiny and easy to slide - Whirlpool GW397LXUQ | Owners Manual - Page 16
cleaning, make sure all controls are off and the oven and cooktop are cool. Always follow label instructions on cleaning products. Soap, water and a soft cloth or sponge are suggested first unless otherwise noted. Cleaning Method: ■ Stainless Steel Cleaner and Polish Part Number 31462 (not included - Whirlpool GW397LXUQ | Owners Manual - Page 17
Appliance Cleaner Part Number 31682 (not included): See "Assistance or Service" section to order. Oven Light The oven light is a standard 40-watt appliance bulb. Before replacing, make sure the oven and cooktop are cool and the control knobs are in the off position. To Replace: 1. Unplug range or - Whirlpool GW397LXUQ | Owners Manual - Page 18
appear crooked. TROUBLESHOOTING Try the solutions suggested here first in order to avoid the cost of an unnecessary service call. Nothing will operate ■ Is the main or regulator gas shutoff valve in the off position? See Installation Instructions. WARNING ■ Is the range properly connected to - Whirlpool GW397LXUQ | Owners Manual - Page 19
the range. See the Installation Instructions. Oven will not operate ■ Is this the first time the oven has been used? Turn on any one of the surface burner knobs to release air from the gas lines. ■ Is the electronic oven control set correctly? See "Electronic Oven Control" section. ■ On some models - Whirlpool GW397LXUQ | Owners Manual - Page 20
our full line of appliances. ■ Use and maintenance procedures. ■ Accessory and repair parts sales. ■ Referrals to local dealers, repair parts distributors, and service companies. Whirlpool Canada LP designated service technicians are trained to fulfill the product warranty and provide after-warranty - Whirlpool GW397LXUQ | Owners Manual - Page 21
to instructions attached to or furnished with the product, Whirlpool Corporation or Whirlpool Canada LP (hereafter "Whirlpool") will pay for Factory Specified Parts and repair labor to correct defects in materials or workmanship. Service must be provided by a Whirlpool designated service company - Whirlpool GW397LXUQ | Owners Manual - Page 22
• Appeler immédiatement le fournisseur de gaz d'un téléphone voisin. Suivre ses instructions. • À défaut de joindre votre fournisseur de gaz, appeler les pompiers. - L'installation et l'entretien doivent être effectués par un installateur qualifié, une agence de service ou le fournisseur de gaz. 22 - Whirlpool GW397LXUQ | Owners Manual - Page 23
La bride antibasculement Dans des conditions de service normales, la cuisinière ne bascule pas. bride antibasculement si la cuisinière est déplacée. Voir détails dans les instructions d'installation. Le non-respect de ces instructions peut causer un décès ou des brûlures graves aux enfants et aux - Whirlpool GW397LXUQ | Owners Manual - Page 24
le bouton n'importe où entre HI et LO. Utiliser le tableau suivant comme guide lors du réglage des niveaux de chaleur. RÉGLAGE UTILISATION RECOMMANDÉE IMPORTANT la section "Conversions pour changement de gaz" des Instructions d'installation pour des détails sur la réalisation de cette conversion - Whirlpool GW397LXUQ | Owners Manual - Page 25
déformer les orifices. Ne pas utiliser un cure-dent en bois. Si le brûleur a besoin d'être ajusté, faire venir un technicien d'entretien qualifié. 4. Réinstaller le chapeau de brûleur et s'assurer que les tiges d'alignement sont bien alignées avec le chapeau de brûleur. A B A. Incorrect B. Correct - Whirlpool GW397LXUQ | Owners Manual - Page 26
■ Pour plus de renseignements, communiquez avec votre service local d'agriculture. Les compagnies qui fabriquent des gril. Utiliser le tableau suivant comme guide pour les caractéristiques du mat de façon uniforme. Terre cuite ■ Suivre les instructions du fabricant. ■ Utiliser des réglages de tempé - Whirlpool GW397LXUQ | Owners Manual - Page 27
A B C KJ I H G F E D A. Fonctions du four B. Afficheur du four C. Bloc numérique D. Cancel (annulation) E. Touche Presets (préréglages) F. Touche Delay (mise en marche différée) G. Lampe du four H. Minuterie I. Horloge J. Cook & Hold (cuisson et maintien au chaud) K. Autonettoyage Afficheur - Whirlpool GW397LXUQ | Owners Manual - Page 28
four sera plus chaud du nombre de degrés affiché. Utiliser le tableau suivant comme guide. AJUSTEMENT EN °F (AJUSTEMENT EN °C) CUIT LES ALIMENTS 5° à 10°F (3° faut de modification, la cuisinière revient au réglage existant après 30 secondes. 2. Appuyer sur la touche numérique PRESETS 0 pour - Whirlpool GW397LXUQ | Owners Manual - Page 29
pour la sortir du four. Se servir de l'illustration et du tableau suivants comme guide. 5 4 3 2 1 ALIMENTS POSITION(S) DE LA GRILLE Gros rôtis, dindes, en grès/Pierre de cuisson ■ Croûtes croustillantes ■ Suivre les instructions du fabricant. Plats en verre, vitrocéramique ou céramique allant - Whirlpool GW397LXUQ | Owners Manual - Page 30
les éclaboussures et la fumée. Il est possible de commander une lèchefrite. Voir la section "Assistance ou service" pour commander. Demander la pièce n° 12500100. ■ Pour un écoulement approprié, ne pas couvrir la 4 22-26 Tranche de jambon, précuite ¹ ₂" (1,25 cm) d'épaisseur 4 tiède 8-12 30 - Whirlpool GW397LXUQ | Owners Manual - Page 31
POSITION DE LA GRILLE DURÉE APPROXIMATIVE (minutes) Bacon bien cuit 4 6-10 Poulet morceaux avec os bien cuit 3 ou 4 LO Broil 30-45 Filets de poisson floconneux 4 Darnes de poisson 1" (2,5 cm) d'épaisseur floconneuses 4 8-12 10-15 *Placer jusqu'à 9 galettes, à distance égale, sur - Whirlpool GW397LXUQ | Owners Manual - Page 32
Risque d'empoisonnement alimentaire Ne pas laisser des aliments dans un four plus d'une heure avant ou après la cuisson. Le non-respect de cette instruction peut causer un empoisonnement alimentaire ou une maladie. Le programme Cook & Hold (cuisson et maintien au chaud) permet de faire cuire au four - Whirlpool GW397LXUQ | Owners Manual - Page 33
un four plus d'une heure avant ou après la cuisson. Le non-respect de cette instruction peut causer un empoisonnement alimentaire ou une maladie. IMPORTANT : Les aliments doivent être à la température de service avant d'être placés dans le four chaud. Les aliments peuvent être gardés au four jusqu - Whirlpool GW397LXUQ | Owners Manual - Page 34
toucher le four au cours du programme d'autonettoyage. Garder les enfants loin du four au cours du programme d'autonettoyage. Le non-respect de ces instructions peut causer des brûlures. ■ Essuyer toute saleté décollée afin de réduire la fumée et d'éviter les dommages. À des températures élevées - Whirlpool GW397LXUQ | Owners Manual - Page 35
Si la porte n'est pas fermée dans les 30 secondes, le programme d'autonettoyage est annulé et l' cuisson sont refroidis. Toujours suivre les instructions sur les étiquettes des produits nettoyants. non incluse) : Voir la section "Assistance ou service" pour passer une commande. ■ Détergent liquide - Whirlpool GW397LXUQ | Owners Manual - Page 36
de cuisson. Ne pas faire tremper les boutons. Lors de la réinstallation des boutons, s'assurer que chaque bouton est à la position d'arrêt ( cuisinière à gaz Pièce n° 31617B : Voir la section "Assistance ou service" pour placer une commande. BRÛLEURS DE SURFACE Voir la section "Brûleurs de - Whirlpool GW397LXUQ | Owners Manual - Page 37
solutions suggérées ici d'abord afin d'éviter le coût d'une visite de service non nécessaire. Rien ne fonctionne ■ Un fusible est-il grillé ou un ou de réglage du gaz est-il à la position fermée? Voir les Instructions d'installation. ■ La cuisinière est-elle bien raccordée à la canalisation de - Whirlpool GW397LXUQ | Owners Manual - Page 38
service". Le brûleur de surface fait des bruits d'éclatement ■ Le brûleur est-il mouillé? Le laisser sécher. Chaleur excessive autour des ustensiles de cuisson sur la table de cuisson ■ La dimension l'aplomb de la cuisinière. Voir les Instructions d'installation. Le four ne fonctionne pas ■ Est-ce - Whirlpool GW397LXUQ | Owners Manual - Page 39
conformément aux instructions jointes à ou fournies avec le produit, Whirlpool Corporation ou Whirlpool Canada LP (ci-après désignées "Whirlpool") paiera pour les limitée ne couvre pas : 1. Les visites de service pour rectifier l'installation du gros appareil ménager, montrer à l'utilisateur comment - Whirlpool GW397LXUQ | Owners Manual - Page 40
une région éloignée où un service d'entretien Whirlpool autorisé n'est pas disponible. 10. La dépose et la réinstallation de votre gros appareil si celui-ci est installé dans un endroit inaccessible ou n'est pas installé conformément aux instructions d'installation fournies. 11. Les gros appareils
-
 1
1 -
 2
2 -
 3
3 -
 4
4 -
 5
5 -
 6
6 -
 7
7 -
8
-
9
-
10
-
11
-
12
-
13
-
14
-
15
-
16
-
17
-
18
-
19
-
20
-
21
-
22
-
23
-
24
-
25
-
26
-
27
-
28
-
29
-
30
-
31
-
32
-
33
-
34
-
35
-
36
-
37
-
38
-
39
-
40
 |
 |
GAS RANGE
Use & Care Guide
For questions about features, operation/performance, parts,
accessories or service, call:
1-800-253-1301
or visit our website
at...
www.whirlpool.com
In Canada, call for assistance, installation or service, call:
1-800-807-6777
or visit our website at...
www.whirlpool.ca
CUISINIÈRE À GAZ
Guide d’utilisation
et d’entretien
Au Canada, pour assistance, installation ou service, composez le
1-800-807-6777
ou visitez notre site web à
www.whirlpool.ca
Table of Contents/Table des matières
..................
2
8113P679-60
®