Yamaha 501 Internet Connection Guide (version 1.10)
Yamaha 501 Manual
 |
View all Yamaha 501 manuals
Add to My Manuals
Save this manual to your list of manuals |
Yamaha 501 manual content summary:
- Yamaha 501 | Internet Connection Guide (version 1.10) - Page 1
the various contents. This guide provides detailed instructions on connecting. You can also refer to the Internet-related terms at the end of this guide. For the latest services of the Internet Direct Connection function, refer to the Yamaha website: http://services.music.yamaha.com/ NOTE • Only the - Yamaha 501 | Internet Connection Guide (version 1.10) - Page 2
. • Since this instrument does not support PPPoE communication, it is not possible to subscribe to an Internet service or provider. Wireless LAN has been confirmed by Yamaha, refer to the website: http://music.yamaha.com/download/ * A rmed by Yamaha, refer to the website: http://music.yamaha.com/ - Yamaha 501 | Internet Connection Guide (version 1.10) - Page 3
terminal, refer to the Owner's Manual. LAN terminal LAN cable Router Manual. NOTE • The special website screen above is taken from the CVP-509. • The contents of the service as appearing here are current as of March, 2010. The available contents of the service - Yamaha 501 | Internet Connection Guide (version 1.10) - Page 4
that the devices are connected as shown in the illustration of the display, then press the [G] button to proceed to "NEXT." NEXT PAGE Internet Connection Guide 4 - Yamaha 501 | Internet Connection Guide (version 1.10) - Page 5
website does not appear, refer to "Connection Help" on page 19. For more details on the operations in the special website, refer to the Owner's Manual. Internet Connection Guide 5 - Yamaha 501 | Internet Connection Guide (version 1.10) - Page 6
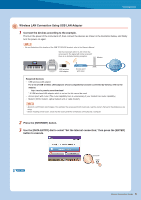
the location of the USB TO DEVICE terminal, refer to the Owner's Manual. USB TO DEVICE terminal Set the instrument within 10-20 m from adaptors whose compatibility has been confirmed by Yamaha, refer to the website: http://music.yamaha.com/download/ * A USB wireless LAN adaptor Connection Guide 6 - Yamaha 501 | Internet Connection Guide (version 1.10) - Page 7
that the devices are connected as shown in the illustration of the display, then press the [G] button to proceed to "NEXT." NEXT PAGE Internet Connection Guide 7 - Yamaha 501 | Internet Connection Guide (version 1.10) - Page 8
need to make sure that your USB wireless LAN adaptor and access point with router support WPS. Check whether your USB wireless LAN adaptor supports WPS by accessing the URL of "Required Devices" on page 6. Press the [B] proceed to "NEXT." Proceed to step 9. NEXT PAGE Internet Connection Guide 8 - Yamaha 501 | Internet Connection Guide (version 1.10) - Page 9
firmation and changes in the setting of the access point on the router side, refer to the owner's manual for the product you are using. Signal strength The signal strength may not be displayed depending on the particular settings of your access point with router. NEXT PAGE Internet Connection Guide 9 - Yamaha 501 | Internet Connection Guide (version 1.10) - Page 10
to call up the character-entry display to input the key. 11 Input the key. Refer to the Owner's Manual for character-entry details. To cancel the key input, press the [8t](CANCEL) button. 12 Press the [G](NEXT Security format Key SSID Channel YES NEXT PAGE NO - - Internet Connection Guide 10 - Yamaha 501 | Internet Connection Guide (version 1.10) - Page 11
the special website does not appear, refer to "Connection Help" on page 19. For details on operations in the special website, refer to the Owner's Manual. Internet Connection Guide 11 - Yamaha 501 | Internet Connection Guide (version 1.10) - Page 12
the LAN terminal, refer to the Owner's Manual. LAN terminal Set the instrument within 10 by Yamaha, refer to the website: http://music.yamaha.com/ wireless game adaptor, read the owner's manual for the product you are using. the router side, read the owner's manual for the product you are using. - Yamaha 501 | Internet Connection Guide (version 1.10) - Page 13
, you do not need to make Internet settings. For details on operations in the special website, refer to the Owner's Manual. NOTE • The special website screen above is taken from the CVP-509. • The contents of the service as appearing here are current as of March, 2010. The available contents of the - Yamaha 501 | Internet Connection Guide (version 1.10) - Page 14
the special website does not appear, refer to "Connection Help" on page 19. For details on operations in the special website, refer to the Owner's Manual. Internet Connection Guide 14 - Yamaha 501 | Internet Connection Guide (version 1.10) - Page 15
[ENTER] button to execute. 3 Press the [C] button to select "ADVANCED SETTINGS." 4 Use the TAB [] buttons to call up the desired page. NEXT PAGE Internet Connection Guide 15 - Yamaha 501 | Internet Connection Guide (version 1.10) - Page 16
, then use the [4 st](OK) button to execute. Changing the value Enter the value, then press the [8 s](OK) button to execute. Refer to the Owner's Manual for character-entry details. NEXT PAGE Internet Connection - Yamaha 501 | Internet Connection Guide (version 1.10) - Page 17
the special website does not appear, refer to "Connection Help" on page 19. For details on operations in the special website, refer to the Owner's Manual. Internet Connection Guide 17 - Yamaha 501 | Internet Connection Guide (version 1.10) - Page 18
is set to "OFF." These settings must be made when DHCP above is set to "ON (SET DNS MANUALLY)" or "OFF." PROXY SERVER PROXY SERVER/PROXY PORT Determines the proxy server name and port number. WIRELESS LAN SSID OFF. Used when inputting the PIN code for the setup. Internet Connection Guide 18 - Yamaha 501 | Internet Connection Guide (version 1.10) - Page 19
, refer to the following URL: http://services.music. yamaha.com/idc/faq.html 2 Use the problem with the displayed solutions. Use the [DATA ENTRY] dial to select the link, then press the [ENTER] button to see the comments. Check the part where the Check mark is displayed. Internet Connection Guide - Yamaha 501 | Internet Connection Guide (version 1.10) - Page 20
," then press the [ENTER] but- ton to execute. 3 Press the [E] button to select "INITIALIZE SETUP." 4 Press the [G](YES) button to initialize the settings. Internet Connection Guide 20 - Yamaha 501 | Internet Connection Guide (version 1.10) - Page 21
or computer used as a central point for a network, providing access to files and services. Short for "website," this refers to the group of web pages that are opened access point and the wireless LAN device. U.R.G., Digital Musical Instruments Division © 2010 Yamaha Corporation 003POXXX.X-XXA0 - Yamaha 501 | Internet Connection Guide (version 1.10) - Page 22
LIABLE FOR ANY DIRECT, INDIRECT, INCIDENTAL, SPECIAL, EXEMPLARY, OR CONSEQUENTIAL DAMAGES (INCLUDING, BUT NOT LIMITED TO, PROCUREMENT OF SUBSTITUTE GOODS OR SERVICES; LOSS OF USE, DATA, OR PROFITS; OR BUSINESS INTERRUPTION) HOWEVER CAUSED AND ON ANY THEORY OF LIABILITY, WHETHER IN CONTRACT, STRICT
-
 1
1 -
 2
2 -
 3
3 -
 4
4 -
 5
5 -
 6
6 -
 7
7 -
8
-
9
-
10
-
11
-
12
-
13
-
14
-
15
-
16
-
17
-
18
-
19
-
20
-
21
-
22
 |
 |

Internet Connection Guide
1
Internet Connection Guide
CVP-509/505/503/501
PSR-S910/S710
Internet Connection Guide
Enjoy your instrument with Internet Direct Connection
This instrument can be directly connected to the Internet, conveniently letting you
display and access the special website from the instrument’s display and enjoy the
various contents.
This guide provides detailed instructions on connecting. You can also refer to the
Internet-related terms at the end of this guide.
For the latest services of the Internet Direct Connection function, refer to the
Yamaha website:
•
Only the special website can be opened when the instrument is directly connected to the Internet.
v1.10
v1.10
NOTE
* The illustrations and screens as shown in this guide are for instructional purposes only, and may appear somewhat different from
those on your instrument.
* Clicking on the Internet-related terms (blue characters) in this guide jumps to the “Glossary of Terms” at the end.
* The LCD screens shown in this guide are taken from the CVP-509.
Contents
Selection of the Connection Environment
................................................
2
Connection
........................................................................................................
3
LAN Cable Connection
....................................................................................
3
Wireless LAN Connection Using USB LAN Adaptor
.......................................
6
Wireless LAN Connection Using Wireless Game Adaptor
............................
12
Using Static IP Address or Proxy Server
.......................................................
15
Connection Help
.............................................................................................
19
Initialization of the Setup
.............................................................................
20
Glossary of Terms
..........................................................................................
21