Yamaha CLP930 Owner's Manual
Yamaha CLP930 Manual
 |
View all Yamaha CLP930 manuals
Add to My Manuals
Save this manual to your list of manuals |
Yamaha CLP930 manual content summary:
- Yamaha CLP930 | Owner's Manual - Page 1
a voltage selector may be provided on the bottom panel of the main keyboard unit near the power cord. Make sure that the voltage selector is set de votre région. Le sélecteur de tension est réglé sur 240 V au départ d'usine. Pour modifier ce réglage, utilisez un tournevis à lame plate pour tourner le - Yamaha CLP930 | Owner's Manual - Page 2
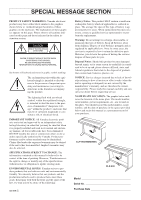
indicated in the safety instruction section. CAUTION RISK OF ELECTRIC SHOCK DO NOT OPEN CAUTION: TO REDUCE THE RISK OF ELECTRIC SHOCK. DO NOT REMOVE COVER (OR BACK). NO USER-SERVICEABLE PARTS INSIDE. REFER SERVICING TO QUALIFIED SERVICE PERSONNEL. See bottom of Keyboard enclosure for graphic symbol - Yamaha CLP930 | Owner's Manual - Page 3
Always follow the basic precautions listed below to avoid the possibility of keyboard. If this happens, immediately turn off the power and remove the electric plug from the outlet and have the instrument inspected by qualified Yamaha service as the Yamaha MIDI Data Filer MDF3, in order to - Yamaha CLP930 | Owner's Manual - Page 4
Thank you for choosing a Yamaha Clavinova. Your Clavinova is a fine musical instrument that employs advanced Yamaha music technology. With the proper care, your Clavinova will give you many years of musical pleasure. G The Clavinova CLP-950/930 digital piano offers unmatched sonic realism and - Yamaha CLP930 | Owner's Manual - Page 5
as the Yamaha UX256) .... 39 Factory Preset Recall 40 Troubleshooting 40 Options & Expander Modules 40 Voice Descriptions 41 Demo Song List 42 Factory Setting List 42 MIDI Data Format 43 MIDI Implementation Chart 47 CLP-950: Keyboard Stand Assembly 48 CLP-930: Keyboard Stand Assembly 54 - Yamaha CLP930 | Owner's Manual - Page 6
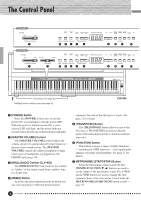
The Control Panel CLP-930 CLP-930 MIN MAX ON ON START/ TEMPO/FUNCTION TEMPO/FUNCTION/SONG -/NO +/YES PRESET TRACK TRACK START/ REC STOP SONG 1 2 STOP MASTER VOLUME 2 CLP-950 CLP-950 MIN MAX MELLOW DEMO TRANSPOSE FUNCTION METRONOME 4 56 7 8 SONG 9 0! @ BRIGHT ON ON START/ - Yamaha CLP930 | Owner's Manual - Page 7
are also used to adjust a range of other parameters. 0 [PRESET SONG] Button This button enters the preset song mode. While in this mode you can use the [-/NO] and [+/YES] buttons to select from 50 songs. ! TRACK [1] and [2] Buttons The Clavinova has a 2-track recorder, and these buttons are used to - Yamaha CLP930 | Owner's Manual - Page 8
OUT THRU PC-2 PC-1 MIDI Mac MIDI 4 HOST SELECT TO HOST 3 L/L+R R L/L+R R AUX IN 2 AUX OUT 1 Stereo System R L/L+R AUX OUT CLP-930 DOU-10 CLP-930 R L/L+R AUX IN 1 AUX OUT L/L+R and R Jacks The AUX OUT L/L+R and R jacks deliver the output of the Clavinova for connection to an - Yamaha CLP930 | Owner's Manual - Page 9
"chaining" of several MIDI instruments or other devices. The MIDI OUT connector transmits MIDI data generated by the Clavinova (e.g. note and velocity data produced by playing the Clavinova keyboard). More details on MIDI are given in "MIDI Functions" on page 33. 5 PEDAL Jack (CLP-930) This terminal - Yamaha CLP930 | Owner's Manual - Page 10
and may not be able to be removed. This could cause electric shock, short circuit, fire or other serious damage to the instrument. CLP-930 Music Stand The Clavinova is supplied with a music stand that can be attached to the instrument by inserting it into the holes at the top of panel. NOTE - Yamaha CLP930 | Owner's Manual - Page 11
HARPSI- VIBRA- CHURCH JAZZ STRINGS CHOIR WOOD E. BASS PIANO 1 PIANO 2 1 2 CHORD PHONE ORGAN ORGAN BASS VOICE ROOM HALL 1 HALL 2 STAGE CHORUS PHASER TREMOLO DELAY REVERB EFFECT MELLOW BRIGHT BRILLIANCE Play ...The Clavinova also offers keyboard touch response, so the volume and timbre of - Yamaha CLP930 | Owner's Manual - Page 12
demo/preset song data is not transmitted via the MIDI connectors. * See page 42 for a complete listing of the demo tunes. Voice Demo Engage the Demo Mode Press the [DEMO] button to engage the demo mode - the voice DEMO selector indicators will flash in sequence. CLP-930 GRAND E. PIANO E. PIANO - Yamaha CLP930 | Owner's Manual - Page 13
" playback. • You can play the keyboard along with the preset song playback. The voice playing on the keyboard can be changed. • You can change the Brilliance control (CLP-950) and Reverb type that is applied to the voice you play on the keyboard and for the preset song playback. You can change the - Yamaha CLP930 | Owner's Manual - Page 14
Preset Song A-B Repeat ON TEMPO/FUNCTION/SONG FUNCTION ON TEMPO/FUNCTION/SONG FUNCTION -/NO +/YES PRESET TRACK TRACK START/ REC SONG 1 2 STOP SONG The A-B Repeat function can be used to continuously repeat a specified phrase within a preset song. Combined with the Part if the SONG [START - Yamaha CLP930 | Owner's Manual - Page 15
the Demonstration Tunes Preset Song Part Cancel The 50 preset songs have separate left- and right-hand parts that can be turned on and off as required so you can practice the corresponding part on the keyboard. The right-hand part is played by TRACK [1] track, and the left-hand part is played by - Yamaha CLP930 | Owner's Manual - Page 16
range of the keyboard. AND E. PIANO E. PIANO HARPSI- VIBRA- CHU NO 2 1 2 CHORD PHONE ORG Voice numbering priority 1 2 3 4 5 6 7 8 9 10 11 12 GRAND GRAND E. PIANO E. PIANO HARPSI- VIBRA- CHURCH JAZZ STRINGS CHOIR WOOD E. BASS PIANO 1 PIANO 2 1 2 CHORD PHONE ORGAN ORGAN BASS VOICE CLP-950 To - Yamaha CLP930 | Owner's Manual - Page 17
of other split-mode functions, listed below. See the corresponding pages for details. • Split Point 30 • Split Balance 30 • Right Voice Octave Shift 31 • Left Voice Octave Shift 31 • Right Voice Effect Depth 31 • Left Voice Effect Depth 31 • Damper Range 31 • Reset 31 CLP-950/930 17 - Yamaha CLP930 | Owner's Manual - Page 18
digital reverb effects that you can use for extra depth and expressive power. ROOM HALL 1 HALL 2 STAGE REVERB -/NO +/YES ROOM HALL 1 HALL 2 STAGE REVERB TEMPO/FUNCTION/SONG reverb" effect will be applied when the CLP-950 GRAND PIANO 1 voice is selected. Adjusting Reverb Depth CLP-950/930 - Yamaha CLP930 | Owner's Manual - Page 19
animation. CHORUS PHASER TREMOLO DELAY EFFECT -/NO +/YES CHORUS PHASER TREMOLO DELAY EFFECT TEMPO/FUNCTION/SONG To select an effect type press the [EFFECT] button a few times until the indicator corresponding sound may become distorted. If so, lower the MASTER VOLUME level. CLP-950/930 19 - Yamaha CLP930 | Owner's Manual - Page 20
is not pressed, make sure that the pedal cord is properly plugged into the main unit (page 58: CLP-930, page 50: CLP-950). Sostenuto (Center) Pedal If you play a note or chord on the keyboard and press the sostenuto pedal while the note(s) are held, those notes will be sustained as long as the - Yamaha CLP930 | Owner's Manual - Page 21
can easily match the pitch of the keyboard to the range of a singer or other instrumentalist. ON -/NO +/YES TRANSPOSE TEMPO/FUNCTION/SONG Use the [-/NO] or [+/YES] . • Notes below and above the A-1 ... C7 range of the Clavinova sound one octave higher and lower, respectively. CLP-950/930 21 - Yamaha CLP930 | Owner's Manual - Page 22
in approximately 0.2 Hertz intervals. Pitch control is useful for tuning the Clavinova to match other instruments or recorded music. A-1 B-1 C3 B3 any key between C3 and B3. (Pressing once will restore the keyboard to standard pitch, regardless of the amount of pitch adjustment.) CLP-950/930 - Yamaha CLP930 | Owner's Manual - Page 23
& Tempo Control The Clavinova built-in metronome is a convenient feature for practice, and it can also provide a solid rhythmic guide when recording using the User Song Recorder feature, described in the next section. The Metronome START/ TEMPO/FUNCTION STOP TEMPO/FUNCTION/SONG METRONOME Beat - Yamaha CLP930 | Owner's Manual - Page 24
Song Recorder The ability to record and play back what you've played on the Clavinova keyboard can be an effective practice aid. You can, for example, record just the left-hand part, and then practice the right-hand part while playing back the recorded left-hand part while the demo/preset song mode - Yamaha CLP930 | Owner's Manual - Page 25
as you play a note on the keyboard or press the SONG [START/STOP] button. The current measure number will appear on the display while recording. • The left pedal can be assigned to start and stop recording via the "Left Pedal Mode" function described on pages 31 (CLP-930) and 32 (CLP950). • If the - Yamaha CLP930 | Owner's Manual - Page 26
is turned off will always be "0" (i.e. the "Preset Song Part Cancel Volume" function - page 32 - only affects preset song playback. • The playback data is not transmitted via the MIDI OUT connector. • Playback cannot be started when the demo/preset song mode is engaged. • Playback cannot be started - Yamaha CLP930 | Owner's Manual - Page 27
Clavinova extraordinary versatility. The functions are categorized in groups as follows: CLP-930 CLP-950 F1 F1 Tuning 28 F2 F2 Scale 28 F3 F3 Dual Mode Functions 29 - F4 Split Mode Functions 30 F4 - Left Pedal Mode 31 - F5 Pedal Functions 32 F5 F6 Metronome Volume 32 F6 F7 Preset Song Part - Yamaha CLP930 | Owner's Manual - Page 28
t, s] buttons to select the desired scale function, as listed below. F2.1: Scale ...In addition to the standard Equal Temperament tuning, the Clavinova includes 6 classic tunings that you can select and use setting is effective for tunings other than the Equal Temperament tuning. 28 CLP-950/930 - Yamaha CLP930 | Owner's Manual - Page 29
submode, then use the [TEMPO/FUNCTION t, s] buttons to select the desired dual mode function, as listed below. If the Dual mode is not engaged "F3.-" will appear instead of "F3.Y" and the Dual simultaneously to recall the default setting (different for each voice combination). CLP-950/930 29 - Yamaha CLP930 | Owner's Manual - Page 30
TEMPO/FUNCTION t, s] buttons to select the desired split mode function, as listed below. If the Split mode is not engaged "F4.-" will appear instead the split point as required, or simply press the appropriate key on the keyboard: from "A-1" to "C7". Press the [-/NO] and [+/YES] buttons CLP-950/930 - Yamaha CLP930 | Owner's Manual - Page 31
to reset the values. "End" will appear on the display when all functions have been reset. F4 CLP-930 Left Pedal Mode This function sets the left pedal for normal soft-pedal operation or for song start/stop operation. Use the [-/NO] and [+/YES] buttons to select the desired left-pedal mode. "1" is - Yamaha CLP930 | Owner's Manual - Page 32
to recall the default setting "10". F6 CLP-930 Preset Song Part Cancel Volume F7 CLP-950 Preset Song Part Cancel Volume This function sets the volume at which a "canceled" part is played during preset song playback (see page 15 for information on the "part-cancel" function). Use the [-/NO] and - Yamaha CLP930 | Owner's Manual - Page 33
The Function Mode F7 CLP-930 MIDI Functions F8 CLP-950 MIDI Functions G A Brief Introduction to MIDI MIDI, the Musical Instrument Digital Interface, is a world- MIDI OUT MIDI Cable standard communication interface that allows MIDI-compatible MIDI IN musical instruments and equipment to share - Yamaha CLP930 | Owner's Manual - Page 34
playback data are not transmitted via MIDI. • No MIDI reception occurs when the demo/preset song mode is engaged. • Program change and other like channel messages received will not affect the Clavinova's panel settings or what is being played on the keyboard. F7.3/F8.3: Local Control ON/OFF - Yamaha CLP930 | Owner's Manual - Page 35
(the keyboard voice is not affected). The Clavinova also transmits MIDI control demo/preset song mode or user song recorder is in operation, or when the Function mode is engaged. • No MIDI note/panel data transmission or data reception occurs during a bulk data dump transmit operation. CLP-950/930 - Yamaha CLP930 | Owner's Manual - Page 36
combination : CLP-950) • Reverb (ON/OFF, Type, and Depth for each voice) • Effect (ON/OFF, Type, and Depth for each voice) • Touch Sensitivity (including the FIXED volume) • Metronome (Beat, Volume) • Preset Song Part Cancel Volume F8.2/F9.2: MIDI ...Turns backup of the MIDI functions listed below - Yamaha CLP930 | Owner's Manual - Page 37
interface, set the HOST SELECT switch to "MIDI". Apple Macintosh Series Computer Set to the "Mac" position. TO HOST Mac MIDI PC-1 PC-2 HOST SELECT CLP-930 Connecting to an Apple Macintosh Series Computer ...Connect the TO HOST connector of the Clavinova to the modem or printer port on your - Yamaha CLP930 | Owner's Manual - Page 38
SELECT CLP-930 Connecting to an IBM-PC/AT Series Computer Connect the TO HOST connector of the Clavinova to the RS-232C port on your IBM computer, using a standard 8-pin MINI DIN → 9-pin D-SUB cross cable. Set the HOST SELECT switch to the "PC-2" position. Refer to your software owner's manual - Yamaha CLP930 | Owner's Manual - Page 39
HOST SELECT Standard Macintosh 8-pin system peripheral cable Mini-DIN 8-pin Computer UX256 or equivalent Clavinova G Connecting the USB Interface and Instrument via MIDI Cables USB cable MIDI OUT IN MIDI HOST SELECT MIDI cables Computer UX256 or equivalent Clavinova CLP-950/930 39 - Yamaha CLP930 | Owner's Manual - Page 40
factory preset values by holding the C7 key (rightmost key on the keyboard) while turning the [POWER] switch ON. This also erases all recorder data, and sets all Backup on/off settings (F8: CLP-930, F9: CLP-950) to "OFF". NOTE • The factory setting list is found on page 42. Troubleshooting If - Yamaha CLP930 | Owner's Manual - Page 41
PIANO GRAND PIANO 1 GRAND PIANO 2 E.PIANO 1 E.PIANO 2 HARPSICHORD VIBRAPHONE CHURCH ORGAN JAZZ ORGAN STRINGS CHOIR WOOD BASS E.BASS CLP- CLP- Stereo/ Touch Dynamic 950 930 electronic piano sound created by FM synthesis. Extremely "musical" response with varying timbre according to keyboard dynamics. - Yamaha CLP930 | Owner's Manual - Page 42
Depth Metronome Volume Preset Song Part Cancel Volume MIDI Transmit Channel MIDI Receive Channel Local Control Program Change Send & Receive Control Change Send & Receive MIDI Transmit Transpose Backup CLP-930 GRAND PIANO OFF - - Preset for each voice Preset for each voice Preset for each voice - Yamaha CLP930 | Owner's Manual - Page 43
Clavinova. SI usted está ya familiarizado con MIDI, o si emplea una computadora para controlar sus aparatos musicales con mensajes MIDI ~ 7FH = C-2 ~ G8 vv = Velocity * If received value exceeds the supported range for the selected voice, the note is adjusted by the necessary number of CLP-950/930 43 - Yamaha CLP930 | Owner's Manual - Page 44
16 0 112 48 0 112 52 0 112 32 0 112 33 * Indicated as GRAND PIANO on the CLP-930 CLP-930 MSB LSB P.C.# 0 112 0 0 112 5 0 112 4 0 112 6 0 112 off and an All Note Off occurs. 6. SYSTEM EXCLUSIVE MESSAGES (Yamaha MIDI Format) Panel Data Transmit Data format: [F0H] -> [43H] - Yamaha CLP930 | Owner's Manual - Page 45
time for processing to execute (about 50 msec) before sending the Clavinova another message. • XG Native status 43H = Yamaha ID 73H = Clavinova ID xxH = Product ID (CLP-950/930 common ID: 67H or CLP common ID: 01H) nnH = Substatus nn Control 02H Internal MIDI clock 03H External MIDI clock 06H Bulk - Yamaha CLP930 | Owner's Manual - Page 46
Data (H) 08 nn 11 1 00 - 7F Parameter DRY LEVEL nn = Part Number Description 0 - 127 Default value (H) 7F G Effect MIDI Map REVERB ROOM HALL 1 HALL 2 STAGE Sound board MSB 02H 01H 01H 03H 03H LSB 10H 10H 11H 10H 12H (CLP-950) EFFECT MSB LSB CHORUS 42H 10H PHASER 48H 10H TREMOLO 42H - Yamaha CLP930 | Owner's Manual - Page 47
YAMAHA [Clavinova] Model: CLP-950/930 Function MIDI Implementation Chart Transmitted Recognized O O O O O O O Program O O Change : True # System Exclusive O O System : Song Position X X : Song Select X X Common : Tune X X System : Clock O O Real Time : Commands O O Aux - Yamaha CLP930 | Owner's Manual - Page 48
CLP-950: Keyboard Stand Assembly CLP-950: Zusammenbau und Aufstellung CAUTION • Be careful not to confuse parts, and be sure to install all parts . The parts shown in the "Assembly Parts" illustration will be used. Follow the assembly instructions and select the parts as needed . 48 CLP-950/930 - Yamaha CLP930 | Owner's Manual - Page 49
de 4 x 12 mm 2 CLP-950: Assemblage du support de clavier CLP-950: Conjunto del soporte del teclado monter le Clavinova, inverser conformer aux instructions d'assemblage partes mostradas en la ilustración de "Partes del conjunto". Siga las instrucciones de montaje y seleccione las partes CLP-950/930 49 - Yamaha CLP930 | Owner's Manual - Page 50
du côté du panneau avant de la ferrure. GLa ménsula de la parte frontal tiene 2 orificios. Inserte los tornillos en los orificios del lado del can be attached from the rear. CAUTION • Do not hold the keyboard in any position other than the position shown in the above illustration. 50 CLP-950/930 - Yamaha CLP930 | Owner's Manual - Page 51
inferior (hacia la parte posterior de la unidad principal) justo detrás de las ranuras de la ménsula ubicada en la parte superior de los procedente de la caja de pedales debe enchufarse al conector PEDAL situado en la parte posterior del lado inferior de la unidad principal. Una vez se ha conectado, - Yamaha CLP930 | Owner's Manual - Page 52
please check the following. • Are there any parts left over? ➔ Review the assembly procedure and correct any errors. • Is the Clavinova clear of doors and other movable fixtures? ➔ Move the Clavinova to an appropriate location. • Does the Clavinova make a rattling noise when you shake it? ➔ Tighten - Yamaha CLP930 | Owner's Manual - Page 53
top portion or keyboard cover. Improper glé sur 240 V au départ d'usine. Après avoir choisi haut du panneau arrière sur les supports des panneaux latéraux à l'aide de . En ce qui concerne les instructions pour retirer cette corde, veuillez daños serios a la Clavinova o ser motivo de mal CLP-950/930 53 - Yamaha CLP930 | Owner's Manual - Page 54
caja. CLP-930: Keyboard Stand Assembly CLP-930: Zusammenbau und Aufstellung CAUTION • Be careful not to confuse parts, and be sure to install all parts in the ready. The parts shown in the "Assembly Parts" illustration will be used. Follow the assembly instructions and select the parts as needed. - Yamaha CLP930 | Owner's Manual - Page 55
de 6 x 25 mm 1 CLP-930: Assemblage du support de clavier CLP-930: Conjunto del soporte del teclado PRECAUTION Pour démonter le Clavinova, inverser l'ordre vous conformer aux instructions d'assemblage et sélectionner enderezca el cable plegado unido a la parte inferior de la caja de pedales. No - Yamaha CLP930 | Owner's Manual - Page 56
the main unit. The four screws can be attached from the front. CAUTION • Do not hold the keyboard in any position other than the position shown in the above illustration. • Fingers can become pinched between the ckwand einklemmen - die Tastatureinheit könnte dadurch zu Fall kommen! 56 CLP-950/930 - Yamaha CLP930 | Owner's Manual - Page 57
panneaux arrière et latéraux, fixez le haut du panneau arrière sur les supports des panneaux latéraux à l'aide de deux vis à tête ronde 4 x de cabeza redonda de 4 x 12 mm 2. Finalmente, fije la parte inferior del panel trasero a la caja de pedales usando cuatro tornillos de CLP-950/930 57 - Yamaha CLP930 | Owner's Manual - Page 58
please check the following. • Are there any parts left over? ➔ Review the assembly procedure and correct any errors. • Is the Clavinova clear of doors and other movable fixtures? ➔ Move the Clavinova to an appropriate location. • Does the Clavinova make a rattling noise when you shake it? ➔ Tighten - Yamaha CLP930 | Owner's Manual - Page 59
top portion or keyboard cover. Improper handling Tourner le stabilisateur de sorte que le Clavinova repose fermement sur le sol. • Les conector PEDAL situado en la parte posterior del lado inferior de à nouveau. En ce qui concerne les instructions pour retirer cette corde, veuillez vous CLP-950/930 59 - Yamaha CLP930 | Owner's Manual - Page 60
], REC SOFT, SOSTENUTO, DAMPER MASTER VOLUME, BRILLIANCE (CLP-950), DEMO, TRANSPOSE, FUNCTION, METRONOME [START/STOP], TEMPO/FUNCTION [t]/[s], [-/NO]/[[+/YES], PRESET SONG, SPLIT (CLP-950), LED Display PHONES x 2, AUX OUT R & L/L+R, AUX IN R & L/L+R, MIDI IN/OUT/THRU, HOST SELECT, TO HOST, PEDAL - Yamaha CLP930 | Owner's Manual - Page 61
○ ○ ○ ○ ○ ○ ○ ○ ○ ○ ○ ○ ○ ○ ○ ○ ○ ○ ○ ○ ○ ○ ○ ○ ○ ○ ○ ○ ○ ○ ○ ○ ○ ○ ○ ○ ○ ○ ○ ○ ○ ○ ○ ○ ○ ○ ○ ○ ○ ○ ○ ○ ○ ○ ○ ○ ○ ○ ○ ○ ○ ○ ○ ○ ○ ○ ○ ○ ○ ○ ○ ○ ○ ○ ○ ○ ○ ○ ○ ○ ○ ○ ○ ○ ○ ○ ○ ○ ○ ○ ○ CLP-950/930 ○ ○ ○ 61 - Yamaha CLP930 | Owner's Manual - Page 62
MEMO NOTIZEN NOTES MEMORANDUM ... ○ ○ ○ ○ ○ ○ ○ ○ ○ ○ ○ ○ ○ ○ ○ ○ ○ ○ ○ ○ ○ ○ ○ ○ ○ ○ ○ ○ ○ ○ ○ ○ ○ ○ ○ ○ ○ ○ ○ ○ ○ ○ ○ ○ ○ ○ ○ ○ ○ ○ ○ ○ ○ ○ ○ ○ ○ ○ ○ ○ ○ ○ ○ ○ ○ ○ ○ ○ ○ ○ ○ ○ ○ ○ ○ ○ ○ ○ ○ ○ ○ ○ ○ ○ ○ ○ ○ ○ ○ - Yamaha CLP930 | Owner's Manual - Page 63
or adapter other than one described in the owners manual, on the name plate, or specifically recommended by Yamaha. 5. WARNING: Do not place this service this product beyond that de- scribed in the user-maintenance instructions. All other servicing should be referred to qualified service personnel - Yamaha CLP930 | Owner's Manual - Page 64
instructions. Failure to follow instructions could void your FCC authorization to use this product in the USA. 3. NOTE: This product has been tested and found to comply with the requirements listed in FCC Regulations, Part 15 for Class "B" digital Yamaha Corporation of America, Electronic Service - Yamaha CLP930 | Owner's Manual - Page 65
BP 70-77312 Marne-la-Vallée Cedex 2, France Tel: 01-64-61-4000 ITALY Yamaha Musica Italia S.P.A., Home Keyboard Division Viale Italia 88, 20020 Lainate (Milano), Italy Tel: 02-935-771 SPAIN/PORTUGAL Yamaha-Hazen Electronica Musical, S.A. Ctra. de la Coruna km. 17, 200, 28230 Las Rozas (Madrid - Yamaha CLP930 | Owner's Manual - Page 66
Clavinova Web site (English only) http://www.yamaha.co.jp/english/product/cl/ Yamaha Manual Library (English versions only) http://www2.yamaha.co.jp/manual/english/ M.D.G., Pro Audio & Digital Musical Instrument Division, Yamaha Corporation © 2000 Yamaha Corporation V495600 0??POZC??.?-??B0 Printed
-
 1
1 -
 2
2 -
 3
3 -
 4
4 -
 5
5 -
 6
6 -
 7
7 -
8
-
9
-
10
-
11
-
12
-
13
-
14
-
15
-
16
-
17
-
18
-
19
-
20
-
21
-
22
-
23
-
24
-
25
-
26
-
27
-
28
-
29
-
30
-
31
-
32
-
33
-
34
-
35
-
36
-
37
-
38
-
39
-
40
-
41
-
42
-
43
-
44
-
45
-
46
-
47
-
48
-
49
-
50
-
51
-
52
-
53
-
54
-
55
-
56
-
57
-
58
-
59
-
60
-
61
-
62
-
63
-
64
-
65
-
66
 |
 |

IMPORTANT
Check your power supply
Make sure that your local AC
mains voltage matches the volt-
age specified on the name plate
on the bottom panel. In some ar-
eas a voltage selector may be
provided on the bottom panel of
the main keyboard unit near the
power cord. Make sure that the
voltage selector is set for the volt-
age in your area. The voltage se-
lector is set at 240V when the unit
is initially shipped. To change the
setting use a “minus” screwdriver
to rotate the selector dial so that
the correct voltage appears next
to the pointer on the panel.
WICHTIG
Überprüfung der Stromversorgung
Vergewissern Sie sich vor dem An-
schließen an das Stromnetz, daß die
örtliche Netzspannung den
Betriebsspannungswerten auf dem
Typenschild an der Unterseite des In-
struments entspricht. In bestimmten
Verkaufsgebieten ist das Instrument
mit einem Spannungswähler an der
Unterseite neben der Netzkabel-
durchführung ausgestattet. Falls vor-
handen, muß der Spannungswähler
auf die örtliche Netzspannung einge-
stellt werden. Der Spannungswähler
wurde werkseitig auf 240 V voreinge-
stellt. Zum Verstellen drehen Sie den
Spannungsregler mit einem Schlitz-
schraubendreher, bis der Zeiger auf
den korrekten Spannungswert weist.
IMPORTANT
Contrôler la source d’alimentation
Vérifiez que la tension spécifiée sur
le panneau inférieur correspond à
la tension du secteur.
Dans certai-
nes régions, l’instrument peut être
équipé d’un sélecteur de tension si-
tué sur le panneau inférieur du cla-
vier à proximité du cordon d’alimen-
tation.
Vérifiez que ce sélecteur est
bien réglé en fonction de la tension
secteur de votre région. Le sélec-
teur de tension est réglé sur 240 V
au départ d’usine.
Pour modifier ce
réglage, utilisez un tournevis à lame
plate pour tourner le sélecteur afin
de mettre l’indication correspondant
à la tension de votre région vis à vis
du repère triangulaire situé sur le
panneau.
IMPORTANTE
Verifique la alimentación de
corriente
Asegúrese de que tensión de ali-
mentación de CA de su área corres-
ponde con la tensión especificada en
la placa de características del panel
inferior. En algunas zonas puede
haberse incorporado un selector de
tensión en el panel inferior de la
unidad del teclado principal, cerca del
cable de alimentación.
Asegúrese de
que el selector de tensión esté
ajustado a la tensión de su área.
El
selector de tensión se ajusta a 240V
cuando la unidad sale de fábrica.
Para
cambiar el ajuste, emplee un destorni-
llador de cabeza “recta” para girar el
selector de modo que aparezca la
tensión correcta al lado del indicador
del panel.
ENGLISH
DEUTSCH
FRANÇAIS
ESPAÑOL