Yamaha DGX-500 Owner's Manual
Yamaha DGX-500 Manual
 |
View all Yamaha DGX-500 manuals
Add to My Manuals
Save this manual to your list of manuals |
Yamaha DGX-500 manual content summary:
- Yamaha DGX-500 | Owner's Manual - Page 1
- Yamaha DGX-500 | Owner's Manual - Page 2
components supplied or; a cart, rack, or stand that is recommended by Yamaha. If a cart, etc., is used, please observe all safety markings and instructions that accompany the accessory product. SPECIFICATIONS SUBJECT TO CHANGE: The information contained in this manual is believed to be correct at - Yamaha DGX-500 | Owner's Manual - Page 3
instructions contained in this manual, meets FCC requirements. Modifications not expressly approved by Yamaha may void your authority, granted by the FCC, to use the product. 2. IMPORTANT: When connecting this product to accessories the problem by Yamaha Corporation of America, Electronic Service - Yamaha DGX-500 | Owner's Manual - Page 4
manual in a safe place for future reference. WARNING Always follow the basic precautions listed below to avoid the possibility of serious injury or even death from electrical by qualified Yamaha service personnel. CAUTION Always the stand specified for the instrument. When attaching the stand or - Yamaha DGX-500 | Owner's Manual - Page 5
screens as shown in this owner's manual are for instructional purposes only, and may be different from the ones on your instrument. • Unless otherwise indicated, the example panel control illustrations, Keyboard illustrations and LCD screenshots are taken from the DGX-500. G Three of the demo-songs - Yamaha DGX-500 | Owner's Manual - Page 6
the Yamaha DGX-500/300 Portable Grand™ ! You now own a portable keyboard that combines advanced functions, great sound and exceptional ease-of-use in a highly compact package. Its outstanding features also make it a remarkably expressive and versatile instrument. Read this Owner's Manual carefully - Yamaha DGX-500 | Owner's Manual - Page 7
Send with a Sequencer...... 87 • External Clock 88 Troubleshooting 89 Data Backup & Initialization 90 Voice List 91 Style List 98 Music Database List 99 Drum Kit List 100 MIDI Implementation Chart 102 Effect map 104 Keyboard Stand Assembly (DGX-500 only 105 Specifications 108 Index 109 7 - Yamaha DGX-500 | Owner's Manual - Page 8
call up various functions, settings, and operations of the DGX-500/ 300, including effects, transpose, tuning, and MIDI. (See page 20.) i [DEMO] button This allows you to set the Time Signature. !2 [PORTABLE GRAND] button This instantly calls up the Grand Piano voice. (See page 12.) !3 [SONG] button - Yamaha DGX-500 | Owner's Manual - Page 9
IN, OUT terminals These are for connection to other MIDI instruments and devices. (See page 84.) #1 FOOTSWITCH jack This is for connection to Footswitch for control over sustain, just like the damper pedal on a piano. (See page 11.) #2 PHONES/OUTPUT jack This is for connection to a set of stereo - Yamaha DGX-500 | Owner's Manual - Page 10
specifically recommended by Yamaha) to power your instrument from the AC mains. The use of other adaptors may result in irreparable damage to both the adaptor and the DGX-500/300. • Unplug the AC Power Adaptor when not using the DGX-500/ 300, or during electrical storms. I Using Batteries For - Yamaha DGX-500 | Owner's Manual - Page 11
you use a footswitch (Yamaha FC4 or FC5) to sustain the sound of the voices. The footswitch functions the same way as a damper pedal on an acoustic piano - press and hold down the footswitch as you play the keyboard to sustain the sound. I Using the MIDI Terminals The DGX-500/300 also features - Yamaha DGX-500 | Owner's Manual - Page 12
zz q w Playing the Piano Simply by pressing the [PORTABLE GRAND] button, you can automatically reset the entire DGX-500/300 for piano play. z Press the [PORTABLE GRAND] button. 001 Live!Gnd Playing along with the Metronome z Press the [METRONOME] button. x Play the keyboard. Want to find out - Yamaha DGX-500 | Owner's Manual - Page 13
DGX-500/300 has a huge total of 619 dynamic and realistic instrument voices. Let's try a few of them out now... q Press the [VOICE] button. w Select a voice. 001 Live!Gnd 002 GrandPno e Play the keyboard. G Panel Voice List No. Voice Name PIANO 001 Live! Grand 002 Grand Piano 003 Bright Piano - Yamaha DGX-500 | Owner's Manual - Page 14
Quick Guide Step 2 Songs zx z 001 Live!Gnd 001 xw q xce Playing the Songs The DGX-500/300 is packed with a total of 100 songs, including three Demo songs that have been specially created to showcase the rich and dynamic sounds of - Yamaha DGX-500 | Owner's Manual - Page 15
Look Of Love (DGX-500) Ribbon In The Sky (DGX-300) 002 Just The Way You Are 003 Ribbon In The Sky (DGX-500) The Look Of Love (DGX-300) FAVORITES 060 Menuett 061 Canon 062 The Danube Waves 063 From "The Magic Flute" 064 Piano Sonate Op.27-2 "Mondschein" 065 "The Surprise" Symphony 066 To A Wild Rose - Yamaha DGX-500 | Owner's Manual - Page 16
DGX-500/300 for playing in different music styles. If you want to perform in a certain genre but don't know what settings to make, simply select the genre from the Music Database - and the DGX500 hand. The style starts as soon as you play the keyboard. For more on chords, see "Looking up Chords in - Yamaha DGX-500 | Owner's Manual - Page 17
500 : A-1 - B2) (DGX-300 : E0 - B2) Keys for entering the chord type (C3 - B4) Keys for entering the chord root (C5 - B5) Learning how to play a specific chord Example: G M7 Root note Chord type z Press the [DICTIONARY] button. Dict. v Play the notes of the chord as indicated in the keyboard - Yamaha DGX-500 | Owner's Manual - Page 18
Guide the timing of the notes. Lesson 2 - Waiting In this lesson step, the DGX-500/300 waits for you to play the correct notes before continu- ing playback of and master both hands. z Select one of the Lesson songs. For instructions on selecting songs, see page 67. c Start the Lesson. x Select - Yamaha DGX-500 | Owner's Manual - Page 19
on the timing of the notes. In Lesson 1, the particular note you play on the keyboard is unimportant. The DGX-500/300 checks your timing and how rhythmically "tight" your playing is. r1 Timing Grade The DGX-500/300 has a built-in evaluation function that monitors your practicing and - like a real - Yamaha DGX-500 | Owner's Manual - Page 20
o Notation !0 Keyboard i Song track operations and settings of the DGX-500/300. The currently selected setting is indicated by a dark bar that appears next to its name (printed on the panel). e Indicators These indicate the operating condition of the DGX500 - Yamaha DGX-500 | Owner's Manual - Page 21
chords played in the accompaniment area of the keyboard when the Style mode and auto accompaniment are on. u Track Octave indicator When a disk song is playing and the note data exceeds the range limit of A-1 - C7 (DGX-500) and E0 - G6 (DGX-300), an "OVER" indication flashes and Q or W appears - Yamaha DGX-500 | Owner's Manual - Page 22
convenient function lets you instantly call up the Grand Piano voice. Playing the Portable Grand Press the [PORTABLE GRAND] button. Doing this automatically calls up the special "Stereo Sampled Piano" Live! Grand voice. Using the Metronome 1 Call up the Tempo setting. Press the [TEMPO/TAP] button - Yamaha DGX-500 | Owner's Manual - Page 23
Portable Grand 3 Turn on the Metronome. Press the [METRONOME] button. 1 Indicates the beat SIG Adjusting the Metronome Volume You can adjust the volume of the Metronome sound independently of the other DGX-500/300 sounds. The volume range is 000 - 127. 1 Call up the Metronome Volume setting. Press - Yamaha DGX-500 | Owner's Manual - Page 24
control (page 32), which determines how the voices respond to your playing technique. The DGX-500/300 also includes special Drum Kit voices - #123 - #134 - that let you play various drum and percussion sounds from the keyboard. (Refer to the Drum Kit Voice list on page 100.) When a voice is selected - Yamaha DGX-500 | Owner's Manual - Page 25
up and down through the voice numbers. I Using the numeric keypad Enter the digits of the voice number as indicated on the panel. For example, to select voice with one voice may sound higher or lower than another voice at the same key. 3 Play the selected voice. Since either the Style or Song mode - Yamaha DGX-500 | Owner's Manual - Page 26
123 - 134) No. When one of the 12 Drum Kit voices are selected you 123 can play different drums and percussion instruments on 124 the keyboard. 125 126 127 123 Std.Kit1 128 129 130 131 132 133 134 Name Standard Kit 1 Standard Kit 2 Room Kit Rock Kit Electronic Kit Analog - Yamaha DGX-500 | Owner's Manual - Page 27
2 Select one of the parameters for the Main and Dual voices. Press the [SETTING L] or [SETTING M] button, repeatedly if necessary, until the desired parameter's name appears in the display. 104 M.Volume 001 Playing Voices 3 Set the parameter's value. Use the numeric keypad or the [+]/[-] buttons. - Yamaha DGX-500 | Owner's Manual - Page 28
Playing Voices Split Voice Split Voices let you play two different instrument sounds from separate areas of the keyboard. For example, you can play a bass voice with your left hand and a piano voice with your right. Split Point Split Voice 1 Call up a Split Voice. Press the [SPLIT] button. Main - Yamaha DGX-500 | Owner's Manual - Page 29
style. It also determines the pitch of the songs. This allows you to easily match the pitch of the DGX-500/300 to other instruments or singers, or play in a different key without changing your fingering. The Transpose settings can be adjusted over a range of ± 12 semitones (± 1 octave). 1 Select the - Yamaha DGX-500 | Owner's Manual - Page 30
Playing Voices I Tuning Tuning determines the fine pitch setting of both the main voice and the bass/chord accompaniment of the selected style. It also determines the pitch of the songs. This allows you to accurately match the tuning with that of other instruments. The Tuning settings can be - Yamaha DGX-500 | Owner's Manual - Page 31
Playing Voices Pitch Bend Range The DGX-500/300 has a [PITCH BEND] wheel that lets you change (12 semitones). The [PITCH BEND] wheel affects the voices played in the right-hand section of the keyboard. (It has no effect on the auto accompaniment.) 1 Select the Pitch Bend Range parameter. Press the - Yamaha DGX-500 | Owner's Manual - Page 32
Touch function is on 001 Touch Sensitivity lets you set how the DGX-500/300 responds to your playing strength, allowing you to customize this a relatively narrow dynamic range, no matter how lightly or strongly you play the keys. This lets you play over a normal dynamic range (soft to loud). This - Yamaha DGX-500 | Owner's Manual - Page 33
1 Select the Reverb function. Current Reverb Type name and number. 1 Hall1 001 • Twelve additional Reverb Types are available when controlling the DGX-500/300 from a MIDI device. (For details, See page 104.) Indicates Reverb is selected 2 Set the Reverb Type, if desired. Use the numeric keypad or - Yamaha DGX-500 | Owner's Manual - Page 34
36.) To turn the DSP effect off, select DSP Type #39. • Each voice of the DGX-500/300 has its own independent DSP setting. • Fifty-one additional DSP Types are available when controlling the DGX-500/300 from a MIDI device. (For details, see page 104.) • You can also determine the DSP level. (See - Yamaha DGX-500 | Owner's Manual - Page 35
must be played in the Accompaniment area of the keyboard. • The speed of the Trill, Tremolo, and Echo effects depends on the Tempo setting (page 37). Indicates that Harmony is on Indicates Harmony is selected • Each voice of the DGX-500/300 has its own independent Harmony setting. 3 Set the - Yamaha DGX-500 | Owner's Manual - Page 36
, metallic modulation with periodic phase change. Rotary speaker simulation. Rich Tremolo effect with both volume and pitch modulation. Simulated electric guitar tremolo. Several panning effects that automatically shift the sound position (left, right, front, back). Repeating filter sweep "wah - Yamaha DGX-500 | Owner's Manual - Page 37
to the single-note melody played in the right hand. These types only sound when chords are played in the auto accompaniment area of the keyboard. Types 6 - 26 are rhythm-based effects and add embellishments or delayed repeats in time with the auto accompaniment. These types sound whether the auto - Yamaha DGX-500 | Owner's Manual - Page 38
the chords you play. Auto accompaniment effectively splits the keyboard into two areas: The upper is used for playing a melody line, and the lower (set by default to keys F#2 and lower) is for the auto accompaniment function. The DGX-500/300 also features the convenient Dictionary function (page 50 - Yamaha DGX-500 | Owner's Manual - Page 39
Selecting and Playing Styles Playing the styles The panel buttons below function as style controls. Pressing this button alternately enables and cancels the bass and chord accompaniment. (See below.) Pressing this button alternately enables and cancels the Sync Start function. (See page 40.) - Yamaha DGX-500 | Owner's Manual - Page 40
Using Sync Start The DGX-500/300 also has a Sync Start function that allows you to start the style by simply pressing a key on the keyboard. To use Sync Start, first press the [SYNC START] button (the beat marks all flash to indicate Sync Start stand-by), then press any key on the keyboard. (When auto - Yamaha DGX-500 | Owner's Manual - Page 41
the [INTRO ENDING] button. Indicates Intro standby. INTRO≥A 3) Press the [SYNC START] button to enable Sync Start, and start the Intro section by playing any key on the keyboard. (When auto accompaniment is on, play a key or chord in the auto accompaniment area of the - Yamaha DGX-500 | Owner's Manual - Page 42
This immediately stops style and automatically enables Sync Start, letting you re-start the style by simply playing a chord or key in the auto accompaniment area of the keyboard. • To have the Ending section gradually slow down (ritardando) as it is playing, press the [INTRO ENDING] button twice - Yamaha DGX-500 | Owner's Manual - Page 43
Styles Sync Stop This convenient feature lets you stop (or pause) the style by releasing your fingers from the auto accompaniment area of the keyboard. Playing the chord again restarts the style. This is ideal for putting dynamic breaks in your performance - for example, stopping the rhythm and - Yamaha DGX-500 | Owner's Manual - Page 44
Selecting and Playing Styles Changing the Tempo The tempo of style playback can be adjusted over a range of 32 - 280 bpm (beats per minute). 1 Call up the Tempo setting. Press the [TEMPO/TAP] button. Current Tempo value 120 TEMPO 001 • When style playback is stopped and a different style is - Yamaha DGX-500 | Owner's Manual - Page 45
Selecting and Playing Styles MAIN/AUTO FILL (Main A/B and Fill-ins) While the style is playing, you can add variation in the rhythm/accompaniment by pressing the [MAIN/AUTO FILL] button. This switches between the Main A and Main B sections, automatically playing a fill-in pattern to smoothly lead - Yamaha DGX-500 | Owner's Manual - Page 46
Selecting and Playing Styles Adjusting the Accompaniment Volume The playback volume of the style can be adjusted. This volume control affects only the accompaniment volume. The volume range is 000 - 127. 1 Select the Accompaniment Volume function. Press the left Overall button, repeatedly if - Yamaha DGX-500 | Owner's Manual - Page 47
You can change the chords of the accompaniment by playing keys in the auto accompaniment area of the keyboard using either the "Single Finger" or "Fingered" method. the notes of the chord. Whichever method you use, the DGX-500/300 "understands" what chord you indicate and then automatically generates - Yamaha DGX-500 | Owner's Manual - Page 48
C7(13) C7(#9) C7b5 C7aug C7sus4 C1+2+5 C7(13) C7(#9) C7b5 C7aug C7sus4 C • Notes in parentheses can be omitted. • Playing two same root keys in the adjacent octaves produces accompaniment based only on the root. • A perfect fifth (1 + 5) produces accompaniment based only on the root and fifth which - Yamaha DGX-500 | Owner's Manual - Page 49
and Playing Styles Setting the Split Point The Split Point determines the highest key for the auto accompaniment area. The accompaniment can be played with the keys up to and including the Accompaniment Split Point key. Split Point • This setting also affects the split point for the special Split - Yamaha DGX-500 | Owner's Manual - Page 50
that corresponds to the desired chord root (as printed on the panel). Dict. 001 Pressing this key selects the root G. 3 Specify the type of the chord (major, minor, seventh, etc.). Press the key on the keyboard that corresponds to the desired chord type (as printed on the panel). Dict. 001 • For - Yamaha DGX-500 | Owner's Manual - Page 51
the chord (as indicated in the display) in the auto accompaniment area of the keyboard. The chord name flashes in the display (and a "congratula- tions" note in the chord, because it anchors the sound harmonically by determining its "key" and forms the basis for how we hear the other notes of the - Yamaha DGX-500 | Owner's Manual - Page 52
The chord type should be indicated to the right as well. Examples for the key of C are shown below. Major chord C Minor chord Cm Augmented chord Caug the number being the distance of the note from the root. (See the keyboard diagram below.) For example, the minor 6th chord includes the 6th note of - Yamaha DGX-500 | Owner's Manual - Page 53
, simply select the desired genre from the Music Database. The DGX-500/ 300 automatically makes all appropriate panel settings to let you play [+]/[-] buttons to increase or decrease the value. 002 Croco RK 001 The DGX-500/300 has 208 panel setups in the Music Database and they are divided - Yamaha DGX-500 | Owner's Manual - Page 54
Using the Music Database 82 4 When you reach the point in the music indicated by the arrow above, press the [ENDING] button. The style plays an ending phrase in ritardando. When the ending is finished, the style automatically stops. You can also stop the style by using the [STOP] button. Auto - Yamaha DGX-500 | Owner's Manual - Page 55
Accompaniment On/Off and Split Point • Pitch Bend Range Recording a Registration Memory Preset 1 Make all desired settings for the DGX-500/300. Virtually all of the DGX-500/300's settings can be saved to a Registration Memory button. 2 Select the desired bank. Press the [BANK] button, then press - Yamaha DGX-500 | Owner's Manual - Page 56
Registration Memory Recalling a Registration Memory Preset 1 Select the appropriate Registration Memory bank. 1 BANK 001 2 Press the desired Registration Memory preset button ([1] or [2]). 1 REGIST1 001 56 - Yamaha DGX-500 | Owner's Manual - Page 57
Selecting and Playing Songs The DGX-500/300 features a total of 105 songs. These include 100 . The User songs are "empty" and cannot be played until something has been recorded to them. (For instructions on recording your own songs, see page 62.) You can also play back songs from floppy disks; for - Yamaha DGX-500 | Owner's Manual - Page 58
Selecting and Playing Songs 3 Start the selected song. Press the [START/STOP] button. As the song plays back, the measure num- ber and chords are shown in the display. • You can play along with the song using the currently selected voice, or even select a different voice for playing along. Simply - Yamaha DGX-500 | Owner's Manual - Page 59
Press the [A-B REPEAT] button. Melody Voice Change The DGX-500/300 lets you play a melody on the keyboard along with each of the songs, either with the flute voice, using Melody Voice Change will change the flute melody voice to piano. 1 Select the desired song. Press the [SONG] button, then use the - Yamaha DGX-500 | Owner's Manual - Page 60
Selecting and Playing Songs 3 Press and hold down the [VOICE] button for at least one second. "MELODY VOICE CHANGE" appears in the display, indicating that the selected panel voice has replaced the song's original melody voice. MELODY V -01 Changing the Tempo The tempo of song playback can be - Yamaha DGX-500 | Owner's Manual - Page 61
Selecting and Playing Songs Adjusting the Song Volume The playback volume of the song can be adjusted. This volume control affects only the song volume. The volume range is 000 - 127. 1 Select the Song Volume function. Press the left Overall button, repeatedly if necessary, until "SONG VOL" appears - Yamaha DGX-500 | Owner's Manual - Page 62
orchestrated compositions. You can record and save up to five User songs. rEC User 1 001 Song recording on the DGX-500/300 is similar to using a tape recorder; whatever you play on the keyboard is recorded in real time as you play it. Also, when you record subsequent parts to other tracks, you - Yamaha DGX-500 | Owner's Manual - Page 63
Song Recording 2 Select a User song number for recording. Use the numeric keypad to select the desired song: 201 - 205. If no song is manually selected, the DGX-500/300 automatically selects the first available empty song number. 202 User 2 001 • User song numbers can be selected in the same way as - Yamaha DGX-500 | Owner's Manual - Page 64
Melody tracks simultaneously. 4 Start recording. When the beat marks and track number start flashing, you can start recording simply by playing the keyboard (or by pressing the [START/STOP] button). rEC User 2 001 Indicates the current measure If you want to rehearse your part before recording - Yamaha DGX-500 | Owner's Manual - Page 65
Song Recording Song Clear The Song Clear operation completely erases all recorded data on all tracks of a selected User song. Use this operation only when you're sure you want to erase a song and record a new one. To erase an individual track of a song while leaving the other tracks intact, use the - Yamaha DGX-500 | Owner's Manual - Page 66
Song Recording Track Clear The Track Clear operation completely erases all recorded data on a selected track of a selected User song, leaving the other tracks intact. Use this operation only when you're sure you want to erase a track and record a new one. To erase the data of an entire song, use the - Yamaha DGX-500 | Owner's Manual - Page 67
easy-to-use way to learn how to read music and play the keyboard. There are a total of 100 songs (Songs 001 to 100), specially long as you play in rhythm. I Lesson 2 - Waiting In this lesson step, the DGX-500/300 waits for you to play the correct notes before continuing playback of the song. I Lesson - Yamaha DGX-500 | Owner's Manual - Page 68
an alternating asterisk and sharp sign. (for songs having a "free" tempo, no such indications appear.) 4 Press the [START/STOP] button to stop the Lesson. The DGX-500/300 exits from the Lesson feature automatically when the [START/STOP] button is pressed. 68 - Yamaha DGX-500 | Owner's Manual - Page 69
play one note repeatedly in time with the music. Regarding chords and the use of the left hand, the DGX-500/300 actually has two different types of songs: 1) songs with normal left-hand chords, and 2) songs in your left hand in the auto accompaniment area of the keyboard. Auto accompaniment area 69 - Yamaha DGX-500 | Owner's Manual - Page 70
Lesson 2 - Waiting In this lesson step, the DGX-500/300 waits for you to play the correct notes before This lesson step lets you practice one part of the song in rhythm at the proper tempo. The DGX-500/300 plays back the song accompaniment with one part muted (either the left part or the right)- - Yamaha DGX-500 | Owner's Manual - Page 71
3 Play the appropriate part with the song. After the lead-in, the song starts automatically, and the appropriate notes appear in the display. In Lesson 3, listen carefully to the un-muted part, and play the muted part yourself. Lesson 4 - Both Hands Lesson 4 is a "Minus One" practice essentially the - Yamaha DGX-500 | Owner's Manual - Page 72
Song Lesson Grade The Lesson feature has a built-in evaluation function that monitors your practicing of the Lesson songs, and just like a real teacher, it tells you how well you did each exercise. Four grades are assigned, depending on your performance: "OK," "Good," "Very Good!," and "Excellent - Yamaha DGX-500 | Owner's Manual - Page 73
manufacturer. The GM mark is affixed to all software and hardware products that support GM System Level 1. The DGX-500/300 supports GM System Level 1. As its name implies, "XGlite" is a simplified version of Yamaha's highquality XG tone generation format. Naturally, you can play back any XG song data - Yamaha DGX-500 | Owner's Manual - Page 74
in until it clicks into place and the eject button pops out. • When the DGX-500/300 is turned on, the LED below the floppy disk slot will be lit cleaning disk to clean the head about once a month. Ask your Yamaha dealer about the availability of proper head-cleaning disks. G Never insert anything - Yamaha DGX-500 | Owner's Manual - Page 75
MIDI), Yamaha DOC (Disk Orchestra Collection), or Clavinova Disklavier Piano Soft disks. It also allows you to play back Standard MIDI File (SMF) format 0 data. 1 Insert the disk into the disk drive. Once the disk is inserted, the DGX-500 -tempo song data on the DGX-500/300, the measure display shows - Yamaha DGX-500 | Owner's Manual - Page 76
Operations Change the Track Octave Setting for a Disk Song Track When a disk song is playing and the note data exceeds the limit of A-1 - C7 (DGX-500), E0 - G6 (DGX-300), an "OVER" indication flashes and Q or W appears in the display. If this happens, you can adjust the track octave setting of the - Yamaha DGX-500 | Owner's Manual - Page 77
[UTILITY] button repeatedly. 3 If necessary change the file name. The DGX-500/300 automatically creates a file name ( for example "UF_00nnn" ) for consist of up to 8 characters. Each key on the keyboard enters a different character, printed directly under the key (you cannot write over the file - Yamaha DGX-500 | Owner's Manual - Page 78
IN USE lamp is lit), never eject the floppy disk or turn the power off. Saving files in SMF Format 0 The DGX-500/300 can also save song data in SMF (Standard MIDI File) Format 0. To do this: 2-1 In step #2 of the above Save operation, after pressing the [SAVE] button, press the [SAVE - Yamaha DGX-500 | Owner's Manual - Page 79
Once you've saved your User data onto a floppy disk, you can reload that data back to the DGX-500/300. You can also load style data from the included disk or commercially available Yamaha Style File disks. 1 Insert the floppy disk into the disk drive. 2 Press the [LOAD] button. Press the [LOAD - Yamaha DGX-500 | Owner's Manual - Page 80
not possible. • SMF files are indicated by "d-s". • Only files that were created on the DGX-500/300 and were saved as files (User song, etc.) can be deleted. When there are no files on disk that the DGX500/300 can delete, the FORMAT display appears instead of DELETE, when the [UTILITY] button is - Yamaha DGX-500 | Owner's Manual - Page 81
. Eject the disk, move the protect tab to the OFF position, and reinsert it in the drive. • If a disk that cannot be read by the DGX-500/300 is inserted into the disk drive, it will be treated the same as an unformatted floppy disk. Take care not to erase important data - Yamaha DGX-500 | Owner's Manual - Page 82
up the Delete operation (page 80). The filename will appear at the top of the display. When there are no files on disk that the DGX-500/300 can delete, the FORMAT display appears instead of DELETE, when the [UTILITY] button is pressed. In this situation, step #2 is unnecessary. L-U Filename This case - Yamaha DGX-500 | Owner's Manual - Page 83
you play a "C" quarter note using the grand piano sound on the DGX-500/300 keyboard. Unlike an acoustic instrument that puts out a resonated note, the electronic instrument puts out information from the keyboard such as "with what voice," "with which key," "about how strong," "when was it pressed - Yamaha DGX-500 | Owner's Manual - Page 84
MIDI Functions MIDI is an acronym that stands for Musical Instrument Digital Interface, which allows electronic musical instruments to communicate with each other, by sending and receiving compatible Note, Control Change, Program Change and various other types of MIDI data, or messages. The DGX-500 - Yamaha DGX-500 | Owner's Manual - Page 85
) MIDI Interface MIDI IN MIDI OUT DGX-500/300 G When connecting to a computer with a USB interface, use the Yamaha UX16 USB/MIDI Interface MIDI interface you are using. For details, refer to the owner's manual for the software you are using. Viewing the Notation for MIDI Channel 1 • The DGX-500 - Yamaha DGX-500 | Owner's Manual - Page 86
Local Control This function lets you enable or disable keyboard control over the DGX-500/ 300's voices. This would come in handy, for example, when recording notes to MIDI sequencer. If you are using the sequencer to play back the voices of the DGX-500/300, you would want to set this to "off - Yamaha DGX-500 | Owner's Manual - Page 87
DGX500/300. Provided there is a pause in the song, you could also do this in the middle of a song - for example, completely changing the DGX-500/ space in the song. 2 Select the MIDI operations. Press the left Overall button, repeatedly if necessary, until MIDI is selected. 3 Select the Initial - Yamaha DGX-500 | Owner's Manual - Page 88
Initial Setup Send operation is completed, the DGX500/300 automatically returns to the previous panel condition. External Clock This determines whether the style and song playback functions are controlled by the DGX-500/300's internal clock (off) or by MIDI clock data from an external sequencer or - Yamaha DGX-500 | Owner's Manual - Page 89
or bass - only piano accompaniment. The accompaniment of the style can only be heard when accompaniment is set to ON and keys are played in the auto accompaniment area of the keyboard. Not all of the voices seem to sound, or the sound seems to be cut off. The DGX-500/300 is polyphonic up - Yamaha DGX-500 | Owner's Manual - Page 90
and restored to the factory preset condition by turning on the power while holding the highest (rightmost) white key on the keyboard. "CLr Backup" will appear briefly on the display. DGX-500 DGX-300 • All Registration Memory and User song data, plus the other settings listed above, will be erased - Yamaha DGX-500 | Owner's Manual - Page 91
notes for playing on the keyboard is correspondingly reduced. The same applies to the Split Voice and Song functions. • The Voice List includes MIDI program change numbers for each voice. Use these program change numbers when playing the DGX-500/300 via MIDI from an external device. • Some - Yamaha DGX-500 | Owner's Manual - Page 92
LSB MIDI Program Voice Name Change# PIANO 000 000 000 Grand Piano 000 001 000 Grand Piano KSP 000 018 000 Mellow Grand Piano 000 040 000 Piano Strings 000 041 000 Dream 000 000 001 Bright Piano 000 001 001 Bright Piano KSP 000 000 002 Electric Grand Piano 000 001 002 Electric Grand Piano - Yamaha DGX-500 | Owner's Manual - Page 93
040 000 041 000 096 000 000 000 018 000 032 000 000 MIDI Program Voice Name Change# 014 Carillon 015 Dulcimer 015 Dulcimer 2 015 Cimbalom 264 000 027 033 Flange Bass 265 000 040 033 Bass & Distorted Electric Guitar 266 000 043 033 Finger Slap Bass 267 000 045 033 - Yamaha DGX-500 | Owner's Manual - Page 94
397 398 399 400 401 402 403 404 405 406 407 408 409 410 411 412 Bank Select MSB LSB MIDI Program Voice Name Change# 000 006 060 French Horn Solo 000 032 060 French Horn 2 000 037 060 Horn Lead 2 000 008 081 Thick Sawtooth 000 018 081 Dynamic Sawtooth 000 019 081 Digital Sawtooth - Yamaha DGX-500 | Owner's Manual - Page 95
Bank Select MSB LSB 000 027 MIDI Program Voice Name Change# 097 Prologue Vibraphone Bells 486 000 069 098 Digital Bells 487 000 070 098 Air Release 493 000 040 099 Nylon Electric Piano 494 000 064 099 Nylon Harp 499 000 064 100 Fantasy Bells 500 000 096 100 Smokey 501 000 - Yamaha DGX-500 | Owner's Manual - Page 96
000 001 Cutting Noise 2 064 000 003 String Slap 064 000 016 Flute Key Click 064 000 032 Shower 064 000 033 Thunder 064 000 034 Wind 064 064 000 064 000 064 000 064 000 064 000 064 000 064 000 MIDI Program Voice Name Change# 055 Maou 064 Phone Call 065 Door Squeak 066 - Yamaha DGX-500 | Owner's Manual - Page 97
Voice List G DJ Voice List Voice No. MSB/LSB/PC Note No. Note 036 C 1 037 C# 1 038 D 1 039 D# 1 040 E 1 041 F 1 042 F# 1 043 G 1 044 G# 1 045 A 1 046 A# 1 047 B 1 048 C 2 049 C# 2 050 D 2 051 D# 2 052 E 2 053 F 2 054 F# 2 055 G 2 056 G# 2 057 A 2 058 A# 2 059 B 2 060 C 3 061 C# 3 062 D 3 063 D# 3 - Yamaha DGX-500 | Owner's Manual - Page 98
Style List Serial No. Style Name 8 BEAT 001 8BeatModern 002 60'sGtrPop 003 8BeatAdria 004 60's8Beat 005 8Beat 006 OffBeat 007 60'sRock 008 HardRock 009 RockShuffle 010 8BeatRock 16 BEAT 011 16Beat 012 PopShuffle1 013 PopShuffle2 014 GuitarPop 015 16BtUptempo 016 - Yamaha DGX-500 | Owner's Manual - Page 99
Music Database List MDB No. MDB Name POP HITS 001 AlvFever 002 Croco Rk 003 DayPdise 004 EasySday 005 GoMyWay 006 HowDeep! 007 HurryLuv 008 I'm Torn 009 Imagine 010 ISurvive 011 JustCall 012 JustWay 013 NikitTrp 014 ProudGtr 015 SailngSx 016 Sept.Pop 017 SultanSw - Yamaha DGX-500 | Owner's Manual - Page 100
G5 G#5 A5 A#5 B5 C6 C#6 D6 D#6 E6 F6 F#6 G6 Voice No. MSB/LSB/PC Keyboard MIDI Key Note# Note Note# Note Off 25 C# 0 13 C# -1 26 D 0 14 D -1 27 6 84 C 5 97 C# 6 85 C# 5 98 D 6 86 D 5 99 D# 6 87 D# 5 100 E 6 88 E 5 101 F 6 89 F 5 102 F# 6 90 F# 5 103 G 6 91 G 5 Alternate assign 3 3 4 - Yamaha DGX-500 | Owner's Manual - Page 101
G5 G#5 A5 A#5 B5 C6 C#6 D6 D#6 E6 F6 F#6 G6 Voice No. MSB/LSB/PC Keyboard MIDI Key Note# Note Note# Note Off 25 C# 0 13 C# -1 26 D 0 14 D -1 27 6 84 C 5 97 C# 6 85 C# 5 98 D 6 86 D 5 99 D# 6 87 D# 5 100 E 6 88 E 5 101 F 6 89 F 5 102 F# 6 90 F# 5 103 G 6 91 G 5 Alternate assign 3 3 4 - Yamaha DGX-500 | Owner's Manual - Page 102
Implementation Chart YAMAHA [ Portable Grand™ ] Model DGX-500,DGX-300 MIDI Implementation Chart Date:12-MAR-2002 - 127 Velocity Note ON Note OFF o 9nH,v=1-127 o 9nH,v=0 o 9nH,v=1-127 o 9nH,v=0 or 8nH After Key's x x Touch Ch's x x Pitch Bend x o Control Change 0,32 o 1x 6o 38 x 7o - Yamaha DGX-500 | Owner's Manual - Page 103
do affect the panel voices, auto accompaniment, and songs. • MIDI Master Tuning • System exclusive messages for changing the Reverb Type, Chorus Type, and DSP Type. *2 Messages for these control change numbers cannot be transmitted from the DGX-500/300 itself. However, they may be transmitted when - Yamaha DGX-500 | Owner's Manual - Page 104
MIDI Implementation Chart IEffect map * If the received value does not contain an param- eter changes, you can select the Reverb, Chorus and DSP effect types which are not accessible from the DGX-500/300 panel itself. When one of the effects is selected by the external sequencer, " - " will be - Yamaha DGX-500 | Owner's Manual - Page 105
Keyboard Stand Assembly (DGX-500 only) • Be careful not to confuse parts, and be will be used. Follow the assembly instructions and select the parts as needed. I Assembly Parts (DGX-500 only) Side boards Back board q 6 x 70 mm round head screws (4 pcs.) Stand bases r 6 x 30 mm round - Yamaha DGX-500 | Owner's Manual - Page 106
2 y Angle brackets X Attach the angle brackets. Attach the angle brackets y to the side boards using the 3.5 x 16 mm tapping screws e. e 3.5 x 16 mm tapping screws 3 r 6 x 30 mm round head screws C Attach the back board. Attach the back board, using the 6 x 30 mm round head screws r. • Be - Yamaha DGX-500 | Owner's Manual - Page 107
B Install the keyboard to the stand. Fix the keyboard to the angle brackets, using the 5 x 16 mm round head screws t. I Post-assembly checklist Once you've assembled the stand, check the following points: • Are there any parts left over? ➔ If so, read the assembly instructions again and correct - Yamaha DGX-500 | Owner's Manual - Page 108
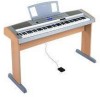
x 410 x 168 mm (46-3/8" x 16-1/8" x 6-5/8") Weight • DGX-500 14 kg (30 lbs., 14 oz.) DGX-500 Stand..... 7.6 kg (16 lbs., 12.) • DGX-300 10 kg (22 lbs., 1 oz.) Supplied Accessories • DGX-500 Keyboard stand Footswitch Music Rest Data Disk Owner's Manual Song Book • DGX-300 Music Rest Data Disk - Yamaha DGX-500 | Owner's Manual - Page 109
90 Intro 41 K Keyboard stand assembly (DGX-500 only 105 L Lesson 67 M M.D.B. (music database 53 Main Voice DSP 27 Main Voice Reverb 27 Main Voice Volume 27 Metronome 22 MIDI 83 MIDI channels 84 MIDI Implementation Chart ......... 102 MIDI LSB Receive cancel 88 MIDI terminals 84 Multi - Yamaha DGX-500 | Owner's Manual - Page 110
the address provided below. 2. Deliver the unit to be serviced under warranty to: the retailer selling the product, an authorized service center, or to Yamaha with an explanation of the problem. Please be prepared to provide proof purchase date (sales receipt, credit card copy, etc.) when requesting - Yamaha DGX-500 | Owner's Manual - Page 111
Yamaha Yamaha Yamaha Musica Italia S.P.A. Viale Italia 88, 20020 Lainate (Milano), Italy Tel: 02-935-771 SPAIN/PORTUGAL Yamaha Yamaha Yamaha Europa GmbH. Siemensstraße 22-34, 25462 Rellingen, F.R. of Germany Tel: 04101-3030 OTHER COUNTRIES Yamaha Yamaha Yamaha Yamaha Corporation, Asia Yamaha Yamaha - Yamaha DGX-500 | Owner's Manual - Page 112
???P0???.?-03C0
-
 1
1 -
 2
2 -
 3
3 -
 4
4 -
 5
5 -
 6
6 -
 7
7 -
8
-
9
-
10
-
11
-
12
-
13
-
14
-
15
-
16
-
17
-
18
-
19
-
20
-
21
-
22
-
23
-
24
-
25
-
26
-
27
-
28
-
29
-
30
-
31
-
32
-
33
-
34
-
35
-
36
-
37
-
38
-
39
-
40
-
41
-
42
-
43
-
44
-
45
-
46
-
47
-
48
-
49
-
50
-
51
-
52
-
53
-
54
-
55
-
56
-
57
-
58
-
59
-
60
-
61
-
62
-
63
-
64
-
65
-
66
-
67
-
68
-
69
-
70
-
71
-
72
-
73
-
74
-
75
-
76
-
77
-
78
-
79
-
80
-
81
-
82
-
83
-
84
-
85
-
86
-
87
-
88
-
89
-
90
-
91
-
92
-
93
-
94
-
95
-
96
-
97
-
98
-
99
-
100
-
101
-
102
-
103
-
104
-
105
-
106
-
107
-
108
-
109
-
110
-
111
-
112
 |
 |