Yamaha PSR-330 Owner's Manual
Yamaha PSR-330 Manual
 |
View all Yamaha PSR-330 manuals
Add to My Manuals
Save this manual to your list of manuals |
Yamaha PSR-330 manual content summary:
- Yamaha PSR-330 | Owner's Manual - Page 1
- Yamaha PSR-330 | Owner's Manual - Page 2
power supply (adapter). DO NOT connect this product to any power supply or adapter other than one described in the manual, on the name plate, or specifically recommended by Yamaha. This product should be used only with the components supplied or; a cart, rack, or stand that is recommended by Yamaha - Yamaha PSR-330 | Owner's Manual - Page 3
power switch, disconnect the adaptor plug from the outlet, and have the instrument inspected by qualified Yamaha service electronic components, turn off the power for all components. Before turning the power panel or keyboard. • Do not rest your weight Yamaha MIDI Data Filer MDF2, in - Yamaha PSR-330 | Owner's Manual - Page 4
Congratulations! You are the proud owner of a fine electronic keyboard. The Yamaha PSR-330 PortaTone combines the most advanced tone generation technology with state-of-the-art digital electronics and features to give you stunning sound quality with maximum musical enjoyment. A large graphic display - Yamaha PSR-330 | Owner's Manual - Page 5
4 Included Accessories 5 The Music Stand 5 Basic Display Operation 6 The Display Icons 6 The Menus 8 Shortcuts 9 Setting Up 10 Power Supply 10 Using An Optional AC Power Adaptor 10 Using Batteries 10 Connections 11 The PHONES Jack 11 SUSTAIN Jack 11 MIDI IN and OUT Connectors 11 - Yamaha PSR-330 | Owner's Manual - Page 6
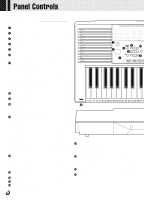
POWER Switch page 12 w MASTER VOLUME Control page 12 e DEMO and - Buttons page 13 !6 MUSIC CARTRIDGE Slot page 55 8BEAT 6/8 BALLAD 29 HIP HOP 11 PIANO BALLAD 30 SYNTH BOOGIE 42 FUNK 2 61 BANDA 43 SOUL 62 50 51 H 52 L 53 54 H !7 KEYBOARD SECTION • DUAL VOICE Button page 17 • SPLIT - Yamaha PSR-330 | Owner's Manual - Page 7
DC IN 10-12V @3 s Rear Panel Controls @1 MIDI IN and OUT Connectors pages 11, 66 @2 SUSTAIN Jack page 11 @3 DC IN 10-12V Jack page 11 x The Music Stand x Included Accessories • Music Stand • Music Cartridge The PSR-330 is supplied with a music stand that can be attached to the instrument by - Yamaha PSR-330 | Owner's Manual - Page 8
the icons which appear in the display, are summarized briefly below. The Display Icons CART (Cartridge) Appears when a Music Cartridge song or style is selected (page 56). GM (General MIDI) Appears when one of the PSR-330's GM voices is selected (pages 14, 83). 46 51 VOICE L VOICE R2 VOICE R1 - Yamaha PSR-330 | Owner's Manual - Page 9
(page 49). ONE TOUCH SETTING Appears when the ONE TOUCH SETTING feature is engaged (page 32). REGISTRATION 1 ... 4 (Registration Memory) 52). They are also used to specify tracks when using the REVOICE function (page 61). VOICE L, VOICE R2, VOICE R1 These icons indicate the on/off status of - Yamaha PSR-330 | Owner's Manual - Page 10
the display directly select one of the PSR-330's four main function menus: VOICE, STYLE, SONG, and CARTRIDGE. The currently selected menu is indicated are used to select the menu: REGISTRATION MEMORY, MULTI PAD, MIDI, DIGITAL EFFECT, or OVERALL. The currently selected MENU category is manual. 8 - Yamaha PSR-330 | Owner's Manual - Page 11
QQ Shortcuts To make operation as easy and as efficient as possible, the PSR-330 features a number of "shortcuts" which allow you to jump directly to certain the functions they access are listed on the PSR-330 panel, near the upper left corner of the display. The shorcuts will - Yamaha PSR-330 | Owner's Manual - Page 12
this section carefully before using your PSR-330. Power Supply Although the PSR-330 will run either from an optional AC adaptor or batteries, Yamaha recommends use of the more enviromentally safe AC adaptor. Follow the instructions below according to the power source you intend to use. s Using - Yamaha PSR-330 | Owner's Manual - Page 13
The MIDI IN connector receives MIDI data from an external MIDI device (such as a MIDI sequencer) which can be used to control the PSR-330. The MIDI OUT connector transmits MIDI data generated by the PSR-330 (e.g. note and velocity data produced by playing the keyboard). More details on MIDI are - Yamaha PSR-330 | Owner's Manual - Page 14
song will appear on the top line of the display. The demo will begin playing automatically. The demo songs will play in sequence, and the sequence will repeat until stopped. 01 DancePop • You can play along on the PSR-330 keyboard while the demonstration is playing. • The volume icons will move in - Yamaha PSR-330 | Owner's Manual - Page 15
it has been stopped by pressing the [START/STOP] button. In this case the selected demo song will play through to the end and then playback will stop automatically. • When a demo which uses the PSR-330's internal accompaniment styles is playing, the names of the chords being played will appear on - Yamaha PSR-330 | Owner's Manual - Page 16
PSR-330 Voices The PSR-330 actually includes two voice sets: the "panel" voices and drum kits (listed on the PSR-330 panel), and the GM (General MIDI used when you're playing a single voice over the entire range of the keyboard. When you're using the DUAL VOICE and/or SPLIT VOICE modes (decribed on - Yamaha PSR-330 | Owner's Manual - Page 17
voice appears on the top line of the display panel when the VOICE menu is selected. 001 GrandPno VOICE R1 1 VOICE 2 Select a Panel Voice The PSR-330 voices can be selected by using the [-] and [+] buttons, the number buttons, or the [VOICE] button. The panel voices are listed in the VOICE list - Yamaha PSR-330 | Owner's Manual - Page 18
briefly to increment by one, or hold for continuous incrementing. VOICE 3 Play & Adjust Volume You can now play the selected voice on the PSR-330 keyboard. Use the [MASTER VOLUME] control to adjust the overall volume level. If theVoice Set function (page 65) is turned "on", whenever a panel voice - Yamaha PSR-330 | Owner's Manual - Page 19
136) you can play different drums and percussion instruments on the keyboard. The drums and percussion instruments played by the various keys are Standard Kit1 128 Standard Kit2 129 Room Kit 130 Rock Kit 131 Electronic Kit 132 Analog Kit 133 Dance Kit 134 Jazz Kit 135 Brush - Yamaha PSR-330 | Owner's Manual - Page 20
piano with the right (the R1 or R1 and R2 voices). The "split point" is initially set at B2 (note number 59), but it can be set at any key on the keyboard SPLIT VOICE split point can be set to any key on the PSR-330 keyboard to match your individual playing requirements. 1 Select the SPLIT VOICE - Yamaha PSR-330 | Owner's Manual - Page 21
. The split point can be set at any key number from 0 through 127, allowing the split point to be set outside the range of the PSR-330 keyboard for MIDI applications. 1 2 3 4 5 6 7 8 9 0 NO YES • The split point key becomes the highest key in the lefthand section of the - Yamaha PSR-330 | Owner's Manual - Page 22
-only accompaniment. The PSR-330's sophisticated AUTO ACCOMPANIMENT system can provide automated bass and chord backing that is perfectly matched to the selected accompaniment style. When Auto-Accompaniment is turned on, the specified left-hand section of the keyboard becomes the "auto accompaniment - Yamaha PSR-330 | Owner's Manual - Page 23
QQ,,QQ,,QQAut,,QQoAcc,,QQompa,,QQnimen,,QQt ,,QQ 2 Select a Style The PSR-330 has 100 styles that can be selected by using the [-] and [+] at the top of the instrument's control panel. • See page 57 for details on selecting cartridge styles. 1 2 3 4 5 6 7 8 9 STYLE 0 NO YES 3 Turn - Yamaha PSR-330 | Owner's Manual - Page 24
A B q Synchronized start Any of the above start types can be synchronized to the first note or chord played on the left-hand section of the keyboard (i.e. keys to the left of and including the split-point key - normally 54) by first pressing the [SYNC START] button. SYNC SYNC STOP START INTRO - Yamaha PSR-330 | Owner's Manual - Page 25
while AUTO ACCOMPANIMENT is not playing. 6 Play On the Auto-accompaniment Section Of the Keyboard As soon as you play any chord that the PSR-330 can "recognize" on the lefthand section of the keyboard, the PSR-330 will automatically begin to play the chord along with the selected rhythm and an - Yamaha PSR-330 | Owner's Manual - Page 26
A B ENDING • The MAIN A section is automatically selected whenever the PSR-330 power is initially turned on. • The indicator of the destination section (MAIN completely when all keys in the auto-accompaniment section of the keyboard are released. Accompaniment playback will start again as soon as - Yamaha PSR-330 | Owner's Manual - Page 27
,,QQnimen,,QQt ,,QQ Accompaniment Track Muting The PSR-330 has eight accompaniment tracks - RHYTHM 1, RHYTHM piano, and other chordal instruments here. This track plays long chords where necessary, using sustained instruments such as strings, organ, choir. PHRASE 1 & 2 This is where the musical - Yamaha PSR-330 | Owner's Manual - Page 28
When the STYLE menu is selected (i.e. the accompaniment track and volume icons are framed) the volume of the accompaniment in relation to the keyboard can be adjusted for the best overall balance by using the ACCOMPANIMENT/SONG VOLUME [w] and [v] buttons. When either button is pressed the current - Yamaha PSR-330 | Owner's Manual - Page 29
. The split point can be set at any key number from 0 through 127, allowing the split point to be set outside the range of the PSR-330 keyboard for MIDI applications. 1 2 3 4 5 6 7 8 9 0 NO YES • The split point key becomes the highest key in the Auto Accompaniment section of the - Yamaha PSR-330 | Owner's Manual - Page 30
R Voice AUTO ACCOMPANIMENT split point/ SPLIT VOICE split point Accompaniment/ L Voice R Voice The Auto Accompaniment Fingering Modes The PSR-330 AUTO ACCOMPANIMENT feature has five different fingering modes which can be selected as follows. 1 Select the Fingering Mode Function Use the MENU - Yamaha PSR-330 | Owner's Manual - Page 31
Mode Use the [-] and [+] buttons to select the desired fingering mode: SF F1 F2 FuL MuL Single Finger Fingered 1 Fingered 2 Full Keyboard Multi-finger q SF: The SINGLE FINGER Mode SF FngrngMd Single-finger accompaniment makes it simple to produce beautifully orchestrated accompaniment using major - Yamaha PSR-330 | Owner's Manual - Page 32
mode lets you finger your own chords on the AUTO ACCOMPANIMENT section of the keyboard (i.e. all keys to the left of and including the splitpoint key - normally 54) while the PSR-330 supplies appropriately orchestrated rhythm, bass, and chord accompaniment in the selected style. The FINGERED 1 mode - Yamaha PSR-330 | Owner's Manual - Page 33
will be based on the left-hand bass line you play. This means you can play in just about any style anywhere on the keyboard, and the PSR-330 will automatically produce appropriate accompaniment. • A single note one octave lower than the lowest note of the chord is recognized as a bass note, and - Yamaha PSR-330 | Owner's Manual - Page 34
-FINGER mode is selected chords played in the AUTO ACCOMPNIMENT section of the keyboard are also detected and played by the PSR-330 Auto Accompaniment system when the accompaniment is stopped (except when the FULL KEYBOARD mode is engaged). In this case the bass note and chord voices are selected - Yamaha PSR-330 | Owner's Manual - Page 35
When Done Press the [ONE TOUCH SETTING] button so that the ONE TOUCH SETTING icon in the display disappears to turn the ONE TOUCH SETTING feature off. • "No OTS" will appear on the display if an optional cartridge style which has no ONE TOUCH SETTING data is selected. 33 - Yamaha PSR-330 | Owner's Manual - Page 36
116 HARMONY TEMPO The [REVERB] buttons affect the reverb applied to all PSR-330 sound: i.e. the R1, R2, and L voices, accompaniment playback, song move the triangular indicator in the display next to "DIGITAL EFFECT". MIDI DIGITAL EFFECT OVERALL • You can also jump directly to the DIGITAL - Yamaha PSR-330 | Owner's Manual - Page 37
want no REVERB effect on any part of the PSR-330 sound. 1 2 3 4 5 6 7 8 9 0 NO YES Harmony When HARMONY is on and HARMONY type 1 through 4 is selected (see list below), playing single notes or chords on the right-hand section of the keyboard produces automatic harmony matched to the - Yamaha PSR-330 | Owner's Manual - Page 38
19 Echo 1/4 3 20 Echo 1/6 Two notes played on the 21 Echo 1/8 3 keyboard are played alter- nately at the currently set 22 Echo 1/12 tempo. 23 Echo 1/ move the triangular indicator in the display next to "DIGITAL EFFECT". MIDI DIGITAL EFFECT OVERALL • HARMONY can not be turned on when a - Yamaha PSR-330 | Owner's Manual - Page 39
type will appear on the top line of the display). Adjusting the Harmony Volume The volume of the harmony sound in relation to the keyboard sound can be adjusted for HARMONY types 1 through 4 as follows (HARMONY types 5 through 25 are not affected): 1 Select the Digital Effect "HarmVol" Function Use - Yamaha PSR-330 | Owner's Manual - Page 40
,,QQ,,QQT,,QQran,,QQsp,,QQose,,QQ,,QQ,,QQ,,QQ,,QQ,,QQ,,QQ,,QQ,,QQ,,QQ,,QQ This functions allow the overall pitch of the PSR-330 to be transposed up or down by a maximum of one octave in semitone increments. Setting Transposition Use the TRANSPOSE [w] and [v] buttons to set the desired - Yamaha PSR-330 | Owner's Manual - Page 41
,,QQon ,,QQMem,,QQor,,QQy ,,QQ,,QQ,,QQ,,QQ,,QQ,,QQ,,QQ The PSR-330 Registration Memory feature can be used to memorize 32 complete controlpanel setups (8 banks, 4 setups to the REGISTRATION BANK display. REGIST MEMORY MULTI PAD MIDI 1 Bank1 1 2 3 4 5 6 7 8 9 0 DIGITAL EFFECT OVERALL 39 - Yamaha PSR-330 | Owner's Manual - Page 42
contents will be retained even after turning the power off. See page 80 for the details. TOUCH SETTING feature is on. • No REGISTRATION MEMORY indicator will be showing when the PSR-330 is . • FREEZE will automatically be turned on when a demo, cartridge, or user song is played, and when a user - Yamaha PSR-330 | Owner's Manual - Page 43
keyboard performances. Percussion type pad phrases simply play back as programmed, while the "pitched" phrases are "chord match" types which, if the CHORD MATCH function is turned on, are automatically transposed to match chords played using the PSR-330 Auto Accompaniment feature PAD MIDI DIGITAL - Yamaha PSR-330 | Owner's Manual - Page 44
the MULTI PAD function so that the triangular indicator in the display appears next to "MULTI PAD" to the left of the display. MULTI PAD MIDI DIGITAL EFFECT OVERALL • The chord match function has no effect with pads that contain percussion phrases. 2 Select a CHORD MATCH Function Use the SUB MENU - Yamaha PSR-330 | Owner's Manual - Page 45
could, for example, play piano on the keyboard while a MULTI PAD plays a brass chord stab. When the CHORD MATCH function for a pad is turned on, the corresponding phrase will be automatically transposed to match chords played using the PSR-330 Auto-accompaniment feature. MULTI PAD playback can be - Yamaha PSR-330 | Owner's Manual - Page 46
,,QQ,,QQS,,QQon,,QQg P,,QQlayb,,QQac,,QQk ,,QQ,,QQ,,QQ,,QQ,,QQ,,QQ,,QQ,,QQ,,QQ Use the following procedure to play back the PSR-330's internal demonstration songs as well as songs you record yourself (see "Song Recording", page 50). Song Playback Procedure 1 Select the Song Menu Press the [SONG] - Yamaha PSR-330 | Owner's Manual - Page 47
is selected (i.e. the song track and volume icons near the bottom of the display are framed) the volume of SONG playback in relation to the keyboard can be adjusted for the best overall balance by using the ACCOMPANIMENT/SONG VOLUME [w] and [v] buttons. When either button is pressed the current song - Yamaha PSR-330 | Owner's Manual - Page 48
,,QQ,,QQSon,,QQg Pla,,QQyback,,QQ,,QQ,,QQ,,QQ,,QQ,,QQ,,QQ,,QQ,,QQ,,QQ,,QQ,,QQ Play from a Specified Measure You can start SONG playback from any specified measure, as long as the specified measure is within the range of measures that has already been recorded: 1 Select the Measure Parameter While - Yamaha PSR-330 | Owner's Manual - Page 49
specific parts of a song so you can practice them on the PSR-330 keyboard while the other parts play automatically. Any of the PSR-330's Minus-one Track Assignment Many of the PSR-330 demonstration songs, and songs provided on Music Cartridges (see "Using Music Cartridges", page 55) have more than - Yamaha PSR-330 | Owner's Manual - Page 50
,,QQ,,QQSon,,QQg Pla,,QQyback,,QQ,,QQ,,QQ,,QQ,,QQ,,QQ,,QQ,,QQ,,QQ,,QQ,,QQ,,QQ 2 Select a MELODY Track Use the TRACK buttons to select the song MELODY track (1...4) to which a minus-one channel is to be assigned. A frame will appear around the selected track icon. MELODY MELODY MELODY MELODY ACCOM- - Yamaha PSR-330 | Owner's Manual - Page 51
QQ,,QQ,,QQ,,QQ,,QQ,,QQSo,,QQngPla,,QQybac,,QQk ,,QQ Repeat Play This function allows you to specify any section of a song - internal or cartridge - for continuous repeat playback. 1 Select the A-b Repeat Parameter While the SONG menu is selected, but no recording is in progress, use the SUB MENU - Yamaha PSR-330 | Owner's Manual - Page 52
feature and a melody lines you play on the keyboard. The SONG tracks include one ACCOMPANIMENT track and four MELODY tracks. The PSR-330 power off. See page 80 for the details. • The recorded data will be lost if the power off. • Harmony on/off, type.** • Sustain pedal on/off. • Scale Tuning.*** • Up - Yamaha PSR-330 | Owner's Manual - Page 53
Recording Procedure 1 Set Up to Record Before recording set up the PSR-330 as required: e.g. select the required voice(s), effects, accompaniment style If the [RECORD] button is pressed while a demonstration song or cartridge song is selected, the lowestnumbered user song which does not contain any - Yamaha PSR-330 | Owner's Manual - Page 54
ONE 5 Record Recording will begin as soon as you play a note on the keyboard or press the [START/STOP] button, and the BEAT indicator dots will begin during recording. • Before actually starting to record you can try playing the PSR-330 the way it is set up by using the "Rehearsal Mode": press the - Yamaha PSR-330 | Owner's Manual - Page 55
1-measure increments. If you stop recording in the middle of a measure, rests will automatically be recorded until the end of that measure. • If you until you play a chord in the auto accompaniment section of the keyboard. • During recording you can use the TRACK buttons to turn on page 61. 53 - Yamaha PSR-330 | Owner's Manual - Page 56
makes it possible to clear unneeded data from the PSR-330 SONG memory. Clearing an Entire Song While the SONG neither can tracks in demonstration or cartridge songs). Use the TRACK buttons to abort the clear operation. REGIST MEMORY MULTI PAD MIDI YEs TrkClr? 46 51 VOICE L VOICE R2 VOICE - Yamaha PSR-330 | Owner's Manual - Page 57
The PSR-330 features a catridge slot which accepts pre-programmed Yamaha Music Cartridges containing style and/or song data. One sample Music Cartridge containing song data is supplied with the PSR-330. Others are available from your Yamaha dealer. x Inserting a Music Cartridge With the power OFF - Yamaha PSR-330 | Owner's Manual - Page 58
Songs Using Yamaha Music Cartridges (the one supplied with the PSR-330 includes 7 songs, others are available from yourYamaha dealer), the PSR-330 will let you enjoy listening to automated performances, or function as your "private music tutor," allowing you to practice various parts of a piece - Yamaha PSR-330 | Owner's Manual - Page 59
be started from any measure - page 46. • The playback tempo can be changed freely as required. • Cartridge song data cannot be revoiced. Cartridge Accompaniment Styles Optional Style Music Cartridges provides extra accompaniment styles that can be used in the same way as the internal accompaniment - Yamaha PSR-330 | Owner's Manual - Page 60
Pan -7 ... 7 Reverb Send Level RevSndLv 0 ... 127 Comments Assigns a voice number to the specified PSR330 voice or track. Sets the volume of the specified PSR-330 voice or track. Shifts the pitch of the specified voice or track up or down by one or two octaves. A setting of "0" produces normal - Yamaha PSR-330 | Owner's Manual - Page 61
the menus to the left of the display, or if the [CARTRIDGE] button is pressed. • Save any revoice settings you want to keep to the PSR-330 REGISTRATION MEMORY (page 39). The revoice setting are temporary and will be lost if the power is turned off, a different R1 panel voice is selected while the - Yamaha PSR-330 | Owner's Manual - Page 62
. • Any voice can be selected for the RHYTHM 2 track, but please note that the RHYTHM 2 track is not affected by the AUTO ACCOMPANIMENT feature. • The OCTAVE parameter cannot be edited in the STYLE REVOICE mode. • Style revoicing affects all sections of the selected style. • "- - -" will appear on - Yamaha PSR-330 | Owner's Manual - Page 63
display, or if the [CARTRIDGE] button is pressed. • Save any revoice settings you want to keep to the PSR-330 REGISTRATION MEMORY (page 39). The revoice setting are temporary and will be lost if the power is turned off, a different is turned on if you want to monitor the sound while revoicing. 61 - Yamaha PSR-330 | Owner's Manual - Page 64
select any of the menus to the left of the display, or if the [CARTRIDGE] button is pressed. • Since revoicing a user song actually rewrites the song data, the revoiced song will remain in memory as long as a working set of batteries is installed in the PSR-330, or the AC adapter is connected. 62 - Yamaha PSR-330 | Owner's Manual - Page 65
OVERALL function group have already been described in appropriate sections of this manual. Others will be introduced for the first time in this section to move the triangular indicator in the display next to "OVERALL". MIDI DIGITAL EFFECT OVERALL Then use the SUB MENU [v] and [w] buttons to select - Yamaha PSR-330 | Owner's Manual - Page 66
QQ,,QQ,,QQ,,QQ,,QQ,,QQ s Touch Sensitivity This function sets the keyboard touch sensitivity. The range is from "0" to "127". The higher the . 100 TouchSns s Master Tuning The Tuning function sets the overall pitch of the PSR-330 over a ±50 cent range (from -50 to +50) in 1-cent increments - Yamaha PSR-330 | Owner's Manual - Page 67
PSR-330 metronome will sound during AUTO ACCOMPANIMENT playback as well as SONG playback and recording. on Metronom s Split Voice Split Point See page 18. s Accompaniment Split Point See page 27. s Fingering Mode See page 28. s Voice Set The VOICE SET feature default when the power is initially - Yamaha PSR-330 | Owner's Manual - Page 68
PSR-330. PSR-330 MIDI OUT MIDI IN Tone Generator The PSR-330 is capable of receiving the same MIDI data, so a second MIDI keyboard connected to the PSR-330 MIDI IN connector can be used to remotely play the PSR-330 and select voices as required. PSR-330 MIDI IN MIDI OUT MIDI Keyboard 66 - Yamaha PSR-330 | Owner's Manual - Page 69
the PSR-330 features a built-in "sequencer" (the SONG recorder is a type of sequencer), the same type of musical information transfer described above can be used for more sophisticated MIDI sequence recording using an external sequencer or music computer. A MIDI sequence recorder or music computer - Yamaha PSR-330 | Owner's Manual - Page 70
PH2 oFF R1 keyboard voice. R2 keyboard voice L keyboard voice. Auto MIDI loops which can cause operational errors, check the PSR-330 Local Control setting (page 70), and the MIDI THRU settings of any external MIDI devices. • MIDI transmit track settings will be retained even after turning the power - Yamaha PSR-330 | Owner's Manual - Page 71
the PSR-330 functions as a 16channel multi-timbral tone generator. No MIDI data is received on channels set to "oFF". "Remote". Received MIDI data is handled in the same way as data generated by the PSR-330's own keyboard. In other words, a remote keyboard could be used to control the PSR-330 AUTO - Yamaha PSR-330 | Owner's Manual - Page 72
MIDI IN connector. This means that while an external MIDI sequencer, for example, plays the PSR-330 internal voices, an external tone generator can be played from the PSR-330 keyboard 7 8 9 0 • Clock is "off" be default when the power is initially turnd on. • When Clock is turned "on", AUTO - Yamaha PSR-330 | Owner's Manual - Page 73
• When a bulk dump is received, the received data replaces any data that was previously in the PSR-330 memory. s Initial Data Send Transmits all current panel settings to a second PSR-330 or a MIDI data storage device. To send the initial data select the "InitSnd?" function, then press the [+] (YES - Yamaha PSR-330 | Owner's Manual - Page 74
,Q,Q,Q,Q,Q,Q,Q,Q,Q,Q,Q,Q,Q Appendix PSR-330 Display MENU/SUB MENU Structure MENU VOICE STYLE SONG CARTRIDGE REGISTRATION MEMORY MULTI PAD MIDI DIGITAL EFFECT OVERALL SUB MENU FUNCTION PAGE ex GrandPno (R1 voice name R1 voice selection 15, 58 ex 8BtPop1 (Style name Accompaniment style - Yamaha PSR-330 | Owner's Manual - Page 75
sure that an appropriate Yamaha Music Cartridge is properly plugged into the cartridge slot (page 55), or the cartridge contacts are dirty. Try re-inserting the cartridge. If the contacts are dirty removing and inserting the cartridge several times will sometimes solve the problem. If this doesn - Yamaha PSR-330 | Owner's Manual - Page 76
PSR-330's GM voice set is selected. Panel Voice List Voice Number Bank Select MSB LSB MIDI Program Number Voice Name PIANO 001 0 112 0 Grand Piano 002 0 112 3 Honky-tonk Piano 003 0 112 4 Funky Electric Piano 004 0 112 5 DX Electric Piano 005 0 112 2 MIDI Grand Piano 112 10 Music Box 020 - Yamaha PSR-330 | Owner's Manual - Page 77
61 Brass Section 078 0 113 61 Brass+Sax 079 0 114 61 Brass+Trombone 080 0 115 61 2 1 1 1 1 1 1 2 Voice Number Bank Select MSB LSB MIDI Program Number Voice Name PERCUSSIVE 115 0 112 113 Agogo 116 0 112 115 127 0 16 Rock Kit 131 127 0 24 Electronic Kit 132 127 0 25 Analog Kit 133 127 - Yamaha PSR-330 | Owner's Manual - Page 78
Number Bank Select MSB LSB MIDI Program Number Voice Name Piano 137 0 0 0 Acoustic Grand Piano 138 0 0 1 Bright Acoustic Piano 139 0 0 2 Electric Grand Piano 140 0 0 3 Honky-tonk Piano 141 0 0 4 Electric Piano 1 142 0 0 5 Electric Piano 2 143 0 0 6 Harpsichord 144 - Yamaha PSR-330 | Owner's Manual - Page 79
,Q,Q,Q,Q,Q,Q,Q,Q,Q,Q,Q,Q,QVoic,Qe List Voice Number Bank Select MSB LSB MIDI Program Number Voice Name Synth Effects 233 0 0 96 FX 1 (rain) 234 0 0 97 FX 2 (soundtrack) 235 0 0 98 FX 3 (crystal) 236 0 0 99 FX 4 (atmosphere) 237 0 0 100 FX 5 ( - Yamaha PSR-330 | Owner's Manual - Page 80
one note. • The MIDI Note # and Note actually # Bank LSB# Program# Keyboard Note# Note 36 C1 37 A2 58 A#2 *1 59 B2 60 C3 61 C#3 62 D3 63 D#3 64 E3 - Yamaha PSR-330 | Owner's Manual - Page 81
K,Qit List Voice# Bank MSB# Bank LSB# Program# Keyboard Note# Note 36 C1 37 C#1 38 D1 39 D#1 40 D#2 52 E2 53 F2 54 F#2 *1 55 G2 56 G#2 *1 57 A2 58 A#2 *1 59 B2 60 C3 61 C#3 62 D3 63 D#3 64 E3 65 F3 66 F#3 67 G3 68 G#3 69 A3 70 A#3 71 B3 72 - Yamaha PSR-330 | Owner's Manual - Page 82
power OFF by pressing the [STAND BY/ON] switch. x Unplug the DC output cable of the PA-5, PA-5B, or PA-5C from the DC IN 10-12V jack on the rear panel of the PSR-330 the power while holding the highest (rightmost) white key on the keyboard. "CLr BackUp" will appear briefly on the display. POWER ON - Yamaha PSR-330 | Owner's Manual - Page 83
,Qatio,Qn Ch,Qart ,Q,Q,Q,Q,Q,Q [Portable Keyboard] Model: PSR-330 MIDI Implementation Chart Function Transmitted Recognized Basic MSB, LSB Modulation depth Data entry MSB, LSB Volume Pan Expression Sustain Sostenuto Portamento control Reverb depth RPN Data increment RPN Data decrement RPN LSB - Yamaha PSR-330 | Owner's Manual - Page 84
PSR-330's keyboard ON/ OFF control. The following messages can be received by the designated channel in this mode. All other messages will be ignored. • Note ON • Note OFF • Control change : Bank select MSB, LSB Volume Pan Sustain "mm, ll" is used as the MIDI Master Tuning Value. The tuning value is - Yamaha PSR-330 | Owner's Manual - Page 85
Address (H) 00 00 7E 02 01 00 Size (H) 1 2 MULTI PART 08 nn 41 1 08 nn 42 1 08 nn 43 1 08 the right voices. The General MIDI protocol was developed to minimize MIDI channels. The current standard recognized by the International MIDI Association is known as "GM System Level 1." The PSR-330 - Yamaha PSR-330 | Owner's Manual - Page 86
lbs.) excluding batteries Supplied Accessories • Music Cartridge • Music Stand • Owner's Manual Optional Accessories • Headphones : HPE-150 • AC Power Adaptor : PA-5, PA-5B, PA-5C • Foot Switch : FC4, FC5 • Keyboard Stand : L-6 • Music Cartridge * Specifications subject to change without - Yamaha PSR-330 | Owner's Manual - Page 87
81 MIDI sequence recording 67 Minus-one practice 47 Multi pad set selection 41 Multi Pads, playing 43 Multi-finger fingering mode 32 Music cartridges, handling 55 Music stand 5 O One touch setting 32 Overall functions 63 P Panel controls 4 Phones jack 11 Polyphony 74 Power supply 10 - Yamaha PSR-330 | Owner's Manual - Page 88
This warranty is applicable to all models included in the following series of products: PSR SERIES OF PORTATONE ELECTRONIC KEYBOARDS If during the first 90 days that immediately follows the purchase date, your new Yamaha product covered by this warranty is found to have a defect in material and/or - Yamaha PSR-330 | Owner's Manual - Page 89
Tel: 030-2828411 BELGIUM Yamaha Music Belgium Keiberg Imperiastraat 8, 1930 Zaventem, Belgium Tel: 02-7258220 FRANCE Yamaha Musique France, Division Claviers BP 70-77312 Marne-la-Vallée Cedex 2, France Tel: 01-64-61-4000 ITALY Yamaha Musica Italia S.P.A., Home Keyboard Division Viale Italia 88 - Yamaha PSR-330 | Owner's Manual - Page 90
M.D.G., EMI Division © 1997 Yamaha Corporation VV67430 704PO?????-01A0 Printed in China
-
 1
1 -
 2
2 -
 3
3 -
 4
4 -
 5
5 -
 6
6 -
 7
7 -
8
-
9
-
10
-
11
-
12
-
13
-
14
-
15
-
16
-
17
-
18
-
19
-
20
-
21
-
22
-
23
-
24
-
25
-
26
-
27
-
28
-
29
-
30
-
31
-
32
-
33
-
34
-
35
-
36
-
37
-
38
-
39
-
40
-
41
-
42
-
43
-
44
-
45
-
46
-
47
-
48
-
49
-
50
-
51
-
52
-
53
-
54
-
55
-
56
-
57
-
58
-
59
-
60
-
61
-
62
-
63
-
64
-
65
-
66
-
67
-
68
-
69
-
70
-
71
-
72
-
73
-
74
-
75
-
76
-
77
-
78
-
79
-
80
-
81
-
82
-
83
-
84
-
85
-
86
-
87
-
88
-
89
-
90
 |
 |