Yamaha RX-V373BL User Manual
Yamaha RX-V373BL Manual
 |
View all Yamaha RX-V373BL manuals
Add to My Manuals
Save this manual to your list of manuals |
Yamaha RX-V373BL manual content summary:
- Yamaha RX-V373BL | User Manual - Page 1
AV Receiver Owner's Manual English Read the supplied booklet "Safety Brochure" before using the unit. - Yamaha RX-V373BL | User Manual - Page 2
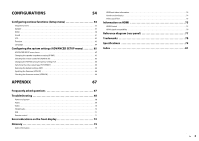
cables 17 3 Connecting a TV 18 4 Connecting playback devices 23 Connecting video devices (such as BD/DVD players 23 Connecting audio devices (such 40 Setting the frequency steps 40 Selecting a frequency for reception 40 Registering favorite radio stations (presets 41 Radio Data System tuning - Yamaha RX-V373BL | User Manual - Page 3
HDMI and video information 74 Yamaha technologies 74 Video signal flow 75 Information on HDMI 75 HDMI Control 75 HDMI signal compatibility 76 Reference diagram (rear panel 77 Trademarks 78 Specifications 79 Index 81 Frequently asked questions 67 Troubleshooting 68 Power and system 68 - Yamaha RX-V373BL | User Manual - Page 4
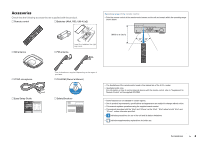
) 30° 30° YPAO microphone Easy Setup Guide *One of the above is supplied depending on the region of purchase. CD-ROM (Owner's Manual) Safety Brochure • The illustrations of the remote control used in this manual are of the U.S.A. model. • (Australia model only) For information on how to - Yamaha RX-V373BL | User Manual - Page 5
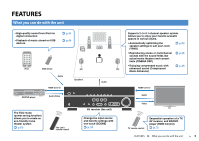
Audio/Video Speakers Audio The ECO mode (power saving function) allows you to create an eco-friendly home theater system . p.63 The unit's remote control AV receiver (the unit) Change the input source and favorite settings with one touch (SCENE) . p.34 Supports 2- to 5.1-channel speaker system - Yamaha RX-V373BL | User Manual - Page 6
HDMI jacks supports 3D and 4K video transmission (through settings are available that let you to customize the unit. For details, see the following pages. • Scene settings (p.34) • Sound/video settings and signal information for each source (p.51) • Various function settings (p.55) • System settings - Yamaha RX-V373BL | User Manual - Page 7
AUX USB AUDIO VIDEO iPod/iPhone 5V 1A VOLUME : 1 z (power) key Turns on/off (standby) the unit. 2 YPAO MIC jack For connecting the supplied YPAO microphone (p.29). 3 Remote control sensor Receives remote control signals (p.4). 4 INFO key Selects the information displayed on the front display - Yamaha RX-V373BL | User Manual - Page 8
is working. 5 STEREO Lights up when the unit is receiving a stereo FM radio signal. TUNED Lights up when the unit is receiving an FM/AM radio station signal. 6 iPod CHARGE Lights (R) D Center speaker F Surround speaker (L) G Surround speaker (R) L Subwoofer FEATURES ➤ Part names and functions En 8 - Yamaha RX-V373BL | User Manual - Page 9
jack For connecting to a TV that supports composite video and outputting video signals (p.22). 0 SUBWOOFER jack For connecting to a subwoofer (with built-in amplifier) (p.15). A SPEAKERS terminals For connecting to speakers (p.15). B VOLTAGE SELECTOR (General model only) Selects the switch position - Yamaha RX-V373BL | User Manual - Page 10
sleep timer). Press repeatedly to set the time (120 min, 90 AV 1-5 AV 1-5 jacks AUDIO 1-2 AUDIO 1-2 jacks USB USB jack (on the front panel) V-AUX VIDEO USB storage device (p.48). C RECEIVER z key Turns on/off (standby Mutes the audio output. • (Australia model only) For information on the keys - Yamaha RX-V373BL | User Manual - Page 11
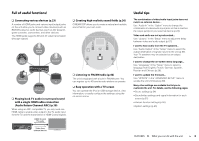
(p.18) Connect a TV to the unit. 4 Connecting playback devices (p.23) Connect video devices (such as BD/DVD players) and audio devices (such as CD players) to English). 9 Optimizing the speaker settings automatically (YPAO) (p.29) Optimize the speaker settings, such as volume balance and - Yamaha RX-V373BL | User Manual - Page 12
. For details, see "Setting the speaker impedance" (p.14). • (Except for U.S.A. and Canada models) Use speakers with an impedance of at least 6 . Speaker type Front (L) Front (R) Center Surround (L) Surround (R) Subwoofer Abbr. Function 1 Produce front right/left channel sounds (stereo sounds - Yamaha RX-V373BL | User Manual - Page 13
1 Speaker placement 2 3 4 5 6 7 8 9 5.1-channel system 1 2 9 3 4 10° to 30° 5 10° to 30° 4.1-channel system 1 9 4 10° to 30° 2 5 10° to 30° 3.1-channel system 1 2 9 3 2.1-channel system 1 9 2 PREPARATIONS ➤ Placing speakers En 13 - Yamaha RX-V373BL | User Manual - Page 14
and Canada models only) Under its default settings, the unit is configured for 8-ohm speakers. When connecting 6-ohm speakers, set the speaker IMP. 8 MIN 4 Press STRAIGHT to select "6 MIN". 5 Press z (power) to set the unit to standby mode and remove the power cable from the AC wall outlet. You are - Yamaha RX-V373BL | User Manual - Page 15
pin cable (x1: for connecting a subwoofer) 5.1-channel system The unit (rear) SPEAKERS SURROUND CENTER FRONT SUBWOOFER 1 2 9 3 4 5 FRONT - (black) da Using a banana plug (U.S.A., Canada, Australia and General models only) a Tighten the speaker terminal. b Insert a banana plug into the - Yamaha RX-V373BL | User Manual - Page 16
down the tab. c Insert the bare wires of the cable into the hole in the terminal. d Release the tab. a ROUND CENTER d b + (red) c - (black) ■ Connecting the subwoofer Use an audio pin cable to connect the subwoofer. Audio pin cable PREPARATIONS ➤ Connecting speakers En 16 - Yamaha RX-V373BL | User Manual - Page 17
is required. • The unit's HDMI jacks support the HDMI Control, Audio Return Channel (ARC), and 3D and 4K video transmission (through output) features. • Use high Digital Optical cable OPTICAL ( TV ) AV 4 ❑ COAXIAL jacks Transmit digital audio signals. Use a digital coaxial cable. Digital coaxial - Yamaha RX-V373BL | User Manual - Page 18
of TV audio on the unit. The connection method varies depending on the functions and video input jacks available on your TV. Refer to the instruction manual of the TV and choose a connection method. Does your TV support Audio Return Channel (ARC)? Yes ■ Connection Method 1 (p.18) No Does your TV - Yamaha RX-V373BL | User Manual - Page 19
the instruction manual for the TV. 1 After connecting external devices (such as a TV and playback devices) and the power cable to the unit, turn on the unit, TV, and playback devices. 2 Configure the settings of the unit. a Check that ARC is enabled on the TV. b Switch the TV input to display video - Yamaha RX-V373BL | User Manual - Page 20
your TV, refer to the instruction manual for the TV. 1 After connecting external devices (such as a TV and playback devices) and power cable of the unit, turn on the unit, TV, and playback devices. 2 Configure the settings of the unit. a Switch the TV input to display video from the unit. b Press - Yamaha RX-V373BL | User Manual - Page 21
problem. • If the unit is not synchronized to the TV's power operations, check the priority of the audio output setting VIDEO VIDEO HDMI O OPTICAL COAXIAL COAXIAL (CD) OPTICAL ( TV ) OPTICAL AV 1 AV 2 AV 3 AV 4 (TV) AV 4 AV 4 (OPTICAL) jack HDMI HDMI OPTICAL O TV Audio output (digital - Yamaha RX-V373BL | User Manual - Page 22
COAXIAL OPTICAL (CD) ( TV ) OPTICAL AV 1 AV 2 AV 3 AV 4 (TV) AV 4 AV 4 (OPTICAL) jack Video input (component video) COMPONENT VIDEO PR PR PB PB Y Y OPTICAL O TV Audio output (digital optical) ❑ VIDEO (composite video) connection (with a video pin cable) The unit (rear) MONITOR - Yamaha RX-V373BL | User Manual - Page 23
Choose a set of input jacks (on the unit) depending on the audio output jacks available on your video device. Output jacks on video device Video Audio Component video Digital optical Digital coaxial Input jacks on the unit AV 1 (COMPONENT VIDEO + OPTICAL) AV 2 (COMPONENT VIDEO + COAXIAL) AV - Yamaha RX-V373BL | User Manual - Page 24
a set of input jacks (on the unit) depending on the audio output jacks available on your video device. Output jacks on video device Video Audio Digital coaxial Composite video Digital optical Analog stereo Input jacks on the unit AV 3 (VIDEO + COAXIAL) AV 4 (VIDEO + OPTICAL) AV 5 (VIDEO - Yamaha RX-V373BL | User Manual - Page 25
completes the necessary settings. If you select "AV 2" as the input source by pressing AV 2, the video/audio played back on the video device will be audio device Digital optical Digital coaxial Analog stereo Audio output jacks on the unit AV 1 (OPTICAL) AV 4 (OPTICAL) AV 2-3 (COAXIAL) AV 5 (AUDIO - Yamaha RX-V373BL | User Manual - Page 26
HDMI 4 MONITOR OUT ANTENNA AM FM SPEAKERS SURROUND CENTER FRONT OPTICAL ( TV ) AV 4 AV 5 AV OUT AUDIO 1 AUDIO 2 AUDIO OUT SUBWOOFER Camcorder If you select "V-AUX" as the input source by pressing V-AUX, the video/audio played back on the device will be output from the unit. Assembling - Yamaha RX-V373BL | User Manual - Page 27
device OPTICAL AV 1 COAXIAL AV 2 COAXIAL (CD) AV 3 OPTICAL ( TV ) AV 4 AV 5 AV OUT AUDIO 1 AUDIO 2 AUDIO OUT L R AUDIO OUT AUDIO OUT jacks L L R R AUDIO Audio recording device Audio input 7 Connecting the power cable Before connecting the power cable (General model only) Set the switch - Yamaha RX-V373BL | User Manual - Page 28
5 6 7 8 Language setting 9 TRANSMIT SLEEP RECEIVER HDMI 1 2 3 4 AV 1 2 3 4 AUDIO 5 1 2 USB V-AUX MODE FM INFO TUNER AM MEMORY PRESET TUNING MOVIE MUSIC SUR. DECODE STRAIGHT ENHANCER BD DVD SETUP SCENE TV CD RADIO OPTION RECEIVER z SETUP ENTER RETURN VOLUME Cursor - Yamaha RX-V373BL | User Manual - Page 29
4 AV 1 2 3 4 AUDIO 5 1 2 USB V-AUX MODE FM INFO TUNER AM MEMORY PRESET TUNING MOVIE MUSIC SUR. DECODE STRAIGHT ENHANCER BD DVD SETUP SCENE TV CD RADIO OPTION RECEIVER z ENTER RETURN VOLUME MUTE 9 Optimizing the speaker settings automatically (YPAO) The Yamaha Parametric - Yamaha RX-V373BL | User Manual - Page 30
setup TRANSMIT SLEEP RECEIVER HDMI 1 2 3 4 AV 1 2 3 subwoofer) 2 Speaker distance (nearest/farthest) 3 Adjustment range of speaker output level 4 Warning message (if available) • A speaker with a problem 0.1 ch 3.0 / 10.5 m -3.0 / 10.0 dB The adjusted speaker settings are applied - Yamaha RX-V373BL | User Manual - Page 31
displayed during the measurement, resolve the problem and perform YPAO again. Auto Setup Start MIC) E-8:No Signal (E-8:NO SIGNAL) E-9:User Cancel (E-9:CANCEL) E-10:Internal Err. the nearest authorized Yamaha dealer or service center. The measurement Yamaha dealer or service center. • - Yamaha RX-V373BL | User Manual - Page 32
on-screen instructions. However, we recommend you perform YPAO again in order to use the unit with the optimal speaker settings. Auto Setup Start Exit Measurement Finished Result 3 / 2 / 0.1 ch 3.0 / 10.5 m -3.0 / 10.0 dB W-1:Out of Phase Warning message TV screen Problem speaker (blinks - Yamaha RX-V373BL | User Manual - Page 33
RECEIVER HDMI 1 2 3 4 AV a radio station. Refer to the instruction manual for the external device. For details on MUTE again to unmute. • To adjust the treble/bass settings, use the "Option" menu or TONE CONTROL on the and Europe models only) Radio Data System data is also available when the - Yamaha RX-V373BL | User Manual - Page 34
SLEEP RECEIVER HDMI 1 2 3 4 AV 1 2 3 4 AUDIO 5 1 2 USB V-AUX MODE FM INFO TUNER AM MEMORY PRESET TUNING MOVIE MUSIC SUR. DECODE STRAIGHT ENHANCER BD DVD SETUP SCENE TV CD RADIO OPTION SCENE ENTER RETURN VOLUME MUTE Selecting the input source and favorite settings - Yamaha RX-V373BL | User Manual - Page 35
TRANSMIT SLEEP RECEIVER HDMI 1 2 3 4 AV 1 2 3 4 AUDIO 5 1 2 USB V-AUX MODE FM INFO TUNER can be applied separately to each input source. • When you play back audio signals with a sampling rate of higher than 96 kHz or playing back DTS Express, the straight decode mode (p.38) is - Yamaha RX-V373BL | User Manual - Page 36
Yamaha's original DSP technology (CINEMA DSP). It allows you to easily create sound fields like actual movie theaters programs are optimized for viewing video sources, such as movies, Digital and DTS. Its design is based on the concept of the ideal movie theater separation of the channels. Drama Mono - Yamaha RX-V373BL | User Manual - Page 37
a sound field offering real and vibrant sound. This program allows you to enjoy videos of pop, rock, and jazz concerts, as if you were there yourself. you play back multichannel sources, the unit mixes down the source to 2 channels, and then outputs the sound from all speakers. This program creates a - Yamaha RX-V373BL | User Manual - Page 38
TRANSMIT SLEEP RECEIVER HDMI 1 2 3 4 AV 1 2 3 4 AUDIO 5 1 2 USB V-AUX MODE FM INFO TUNER decode mode is enabled, each speaker produces its own channel audio signal (without sound field processing). When you play back 2-channel sources, such as a CD player, stereo sound is - Yamaha RX-V373BL | User Manual - Page 39
RECEIVER HDMI 1 2 3 4 AV unprocessed multichannel playback from 2-channel sources. When a multichannel on the following audio sources. - Signals whose sampling rate is over 48 kHz - High-definition streaming audio • , like a multichannel speaker system, with stereo headphones by connecting - Yamaha RX-V373BL | User Manual - Page 40
TRANSMIT SLEEP RECEIVER HDMI 1 2 3 4 AV 1 2 3 4 AUDIO 5 1 2 USB V-AUX MODE FM antennas. Setting the frequency steps (Asia and General models only) At the factory, the frequency step setting is set to 50 kHz for FM and 9 kHz for AM. Depending on your listening environment, set the - Yamaha RX-V373BL | User Manual - Page 41
TRANSMIT SLEEP RECEIVER HDMI 1 2 3 4 AV 1 2 3 4 AUDIO 5 1 2 USB V-AUX MODE register AM radio stations, follow "Registering a radio station manually". • (U.K. and Europe models only) Only Radio Data System broadcasting stations are stored automatically by the Auto Preset function. - Yamaha RX-V373BL | User Manual - Page 42
TRANSMIT SLEEP RECEIVER HDMI 1 2 3 4 AV 1 2 3 4 AUDIO 5 1 2 USB V-AUX MODE FM INFO TUNER AM MEMORY PRESET TUNING MOVIE MUSIC SUR. DECODE STRAIGHT ENHANCER BD DVD SETUP SCENE TV CD RADIO OPTION - Yamaha RX-V373BL | User Manual - Page 43
Cursor keys ENTER RETURN Radio Data System tuning (U.K. and Europe models only) Radio Data System is a data transmission system used by FM stations in many countries. The unit can receive various types of Radio Data System data, such as "Program Service", "Program Type," "Radio Text" and "Clock - Yamaha RX-V373BL | User Manual - Page 44
on the unit using a USB cable supplied with the iPod. • This manual describes both the "iPod" and "iPhone" as the "iPod". "iPod video plugs of the Apple Composite AV cable to the USB jack and VIDEO AUX (VIDEO) jack of the unit, and connect your TV and the unit with a video pin cable (p.22). Supported - Yamaha RX-V373BL | User Manual - Page 45
RECEIVER HDMI 1 2 3 4 AV will be displayed for characters not supported by the unit. 1 Press USB on the TV. iPod Top Music Video 1/ 2 • If playback is ongoing • To operate the iPod manually to select content or control Display the current shuffle/repeat settings (p.47) and playback status - Yamaha RX-V373BL | User Manual - Page 46
TRANSMIT SLEEP RECEIVER HDMI 1 2 3 4 AV 1 2 3 4 AUDIO 5 1 2 USB V-AUX MODE FM INFO TUNER Title Song Title 2:30 5:10 1 2 1 Status indicators Display the current shuffle/repeat settings (p.47) and playback status (such as play/pause). 2 Playback information Displays the artist - Yamaha RX-V373BL | User Manual - Page 47
RECEIVER HDMI 1 2 3 4 AV 1 2 3 4 AUDIO 5 1 2 USB V-AUX MODE FM INFO TUNER AM MEMORY PRESET TUNING MOVIE MUSIC SUR. DECODE STRAIGHT ENHANCER BD DVD SETUP SCENE TV CD RADIO OPTION MODE OPTION ENTER RETURN VOLUME MUTE Cursor keys ENTER RETURN ■ Shuffle/repeat settings - Yamaha RX-V373BL | User Manual - Page 48
Refer to the instruction manuals for the USB storage device for more information. The unit supports USB mass supports WAV (PCM format only), MP3, WMA and MPEG-4 AAC files. • The unit is compatible with sampling rate of up to 48 kHz. • Some features may not be compatible, depending on the model - Yamaha RX-V373BL | User Manual - Page 49
SLEEP RECEIVER HDMI 1 2 3 4 AV 1 screen during playback, press the cursor key (e). • Files not supported by the unit cannot be selected. ■ Browse screen 1 2 Item number/total 4 Status indicators Display the current repeat/random settings (p.50) and playback status (such as play/pause). 5 - Yamaha RX-V373BL | User Manual - Page 50
TRANSMIT SLEEP RECEIVER HDMI 1 2 3 4 AV 1 2 3 4 AUDIO 5 1 2 USB V-AUX MODE FM INFO TUNER in parentheses denote indicators on the front display. 3 Use the cursor keys (e/r) to select a setting. Setting Off (Off) One (One) All (All) Random (Random) Function Turns off the repeat - Yamaha RX-V373BL | User Manual - Page 51
(SW.Trim) Fine-adjusts the subwoofer volume during playback. 53 Lipsync (Lipsync) Enables/disables the "Lipsync" setting in the "Setup" menu. 53 Signal Info (Signal Info) Displays information about the video/audio signal. 53 Audio In (Audio In) Combines the video jack of the selected input - Yamaha RX-V373BL | User Manual - Page 52
Setting range -6.0 dB to +6.0 dB (0.5 dB increments) Default 0.0 dB • If you set an extreme value, sounds may not match those from other channels. Trim (Volume Trim) Fine-adjusts volume difference between input sources or subwoofer volume. ❑ Input Trim (In.Trim) Corrects volume differences between - Yamaha RX-V373BL | User Manual - Page 53
device that supports HDMI video output, but not HDMI audio output • Connecting a playback device that has component video jacks and analog stereo jacks (such as game consoles) Input sources HDMI 1-4, AV 1-2 ■ Setup procedure (To input audio through a digital optical jack) Select "AV 1" or "AV 4" and - Yamaha RX-V373BL | User Manual - Page 54
functions (Setup menu) You can configure the unit's various function with the menu displayed on the TV screen. 4 Use the cursor keys (e/r) to select a setting and press ENTER. 5 To exit from the menu, press SETUP. • Operations with TV screen are available only when your TV is connected to the unit - Yamaha RX-V373BL | User Manual - Page 55
Adjusts the delay between video and audio output manually. Selects the dynamic range adjustment method for bitstream audio (Dolby Digital and DTS signals) playback. Sets the maximum volume to prevent excessive loudness. Sets the initial volume for when this receiver is turned on. Sets the amount of - Yamaha RX-V373BL | User Manual - Page 56
Memory Guard Function Changes the input source name displayed on the front display. Adjusts the brightness of the front display. Prevents accidental changes to the settings. Select an on-screen menu language. Page 63 64 64 64 CONFIGURATIONS ➤ Configuring various functions (Setup menu) En 56 - Yamaha RX-V373BL | User Manual - Page 57
Speaker Configures the speaker settings manually. Setup Speaker HDMI Sound ECO Function Language Configuration front speakers will produce all of the front channel frequency components. • "Front" is automatically set to "Large" when "Subwoofer" is set to "None". ❑ Center Selects whether or - Yamaha RX-V373BL | User Manual - Page 58
low-frequency components. Both the front speakers and subwoofer produce the front channel lowfrequency components. • This setting is not available when "Subwoofer" is set to "None", or when "Front" is set to "Small". ■ Distance Sets the distance between each speaker and listening position so - Yamaha RX-V373BL | User Manual - Page 59
3 Use the cursor keys (q/w) to select the desired band (frequency) and the cursor keys (e/r) to adjust the gain. Setting range -6.0 dB to +6.0 dB Equalizer EQ Select GEQ Edit Channel 63Hz 160Hz 400Hz 1kHz 2.5kHz 6.3kHz 16kHz GEQ Front L Back:RETURN 4 To exit from the menu, press SETUP. ■ Test - Yamaha RX-V373BL | User Manual - Page 60
set to "On". Settings AV 1-5, AUDIO 1-2 Default AV receiving TV audio or HDMI signals. ❑ ARC Enables/disables ARC (p.18) when "HDMI Control" is set to "On". Settings set video from the playback device • Playback device: starting playback Choices (SCENE keys) BD/DVD, TV, CD, RADIO Settings setting - Yamaha RX-V373BL | User Manual - Page 61
and audio output. Setting range Manual Auto (default) Select this option when you want to adjust the delay between video and audio output manually. Adjust the audio output timing in "Adjustment". Adjusts the delay between video and audio output automatically when a TV that supports an automatic - Yamaha RX-V373BL | User Manual - Page 62
Adjusts the delay between video and audio output manually when "Select" is set to "Manual". You can fine-adjust the audio output timing when "Select" is set to "Auto". Setting range 0 ms to 250 ms (1 ms increments) Default 0 ms ■ Volume Configures the volume settings. ❑ Dynamic Range Selects the - Yamaha RX-V373BL | User Manual - Page 63
. The new setting will take effect after the unit is restarted. ■ Input Rename Changes the input source name displayed on the front display. Input sources HDMI 1-4, AV 1-5, AUDIO 1-2, USB, V-AUX ■ Procedure 1 Use the cursor keys (q/w) to select an input source to be renamed and press ENTER. • To - Yamaha RX-V373BL | User Manual - Page 64
Back:RETURN Language Select an on-screen menu language. Setup Speaker HDMI Sound ECO Function Language English Français Deutsch Español Settings English (default) Français Deutsch Español English French German Spanish Russian Chinese • Chinese characters used in content information (such as - Yamaha RX-V373BL | User Manual - Page 65
ID so that it matches the remote control's ID (default: ID1). When using multiple Yamaha AV receivers, you can set each remote control with a unique remote control ID for its corresponding receiver. Settings ID1 (default), ID2 ■ Changing the remote control ID of the remote control • (Australia - Yamaha RX-V373BL | User Manual - Page 66
video signal type so that it matches to the TV, it is unnecessary to change the setting normally. Change the setting only when images on the TV screen do not appear correctly. Settings NTSC, PAL Default U.S.A., Canada, Korea and General models: NTSC Other models: PAL Restoring the default settings - Yamaha RX-V373BL | User Manual - Page 67
, use "Initial Volume" in the "Setup" menu to set the volume to be applied when the receiver is turned on (p.62). I made HDMI connections but HDMI device to your system. For information on how HDMI Control works between your TV and playback devices, refer to the instruction manuals for each device. - Yamaha RX-V373BL | User Manual - Page 68
Troubleshooting Refer to the table below when the unit does not function properly. If the problem you are experiencing is not listed below or if the instructions below do not help, turn off the unit, disconnect the power cable, and contact the nearest authorized Yamaha dealer or service center. - Yamaha RX-V373BL | User Manual - Page 69
function. Disable the auto-standby function of the subwoofer or adjust its sensitivity level. The TV does not support HDCP (High-bandwidth Digital Content Protection). Refer to the instruction manuals for the TV and check the TV's specifications. No sound from the playback device (connected to - Yamaha RX-V373BL | User Manual - Page 70
AV receivers.) Turn on all devices connected to the unit's output jacks. Video Problem No video. video from the unit. Check the video output setting of the playback device. For information about video signals supported by the TV, refer to the instruction manuals for the TV. If there is no problem - Yamaha RX-V373BL | User Manual - Page 71
cannot be registered as presets. Auto Preset has been used. USB Problem The unit does not detect the USB device. Folders and files system of the USB device is not FAT 16 or FAT 32. The folder structure not supported by the unit is applied. Remedy Select the station manually Troubleshooting En 71 - Yamaha RX-V373BL | User Manual - Page 72
Remedy Turn off the unit and reconnect your USB device. If the problem persists, try another USB device. Turn off the iPod and turn turn it on again. Contact the nearest authorized Yamaha dealer or service center. Select a folder that contains files supported by the unit. Change the remote control ID - Yamaha RX-V373BL | User Manual - Page 73
with the existing multichannel audio systems that support DTS Digital Surround. This technology is used for audio on most BD (Blu-ray discs). DTS-HD Master Audio DTS-HD Master Audio is an advanced lossless audio format developed to offer a high-definition home theater experience with the quality of - Yamaha RX-V373BL | User Manual - Page 74
natural images. Yamaha technologies CINEMA DSP (Digital Sound Field Processor) Since the Dolby Surround and DTS systems were originally designed for use in movie theaters, their effect is best experienced in a theater that has many speakers designed for acoustic effects. Since home conditions (such - Yamaha RX-V373BL | User Manual - Page 75
Y COMPONENT VIDEO in COMPONENT VIDEO PR PB Y VIDEO in VIDEO VIDEO COMPONENT VIDEO out COMPONENT VIDEO PR PB Y COMPONENT VIDEO PR PB Y VIDEO out VIDEO VIDEO Information on HDMI HDMI Control HDMI Control allows you to operate external devices via HDMI. If you connect a TV that supports HDMI - Yamaha RX-V373BL | User Manual - Page 76
your system. 1 the problem. Also video/audio signals may not be output, depending on the type of the DVD player. • The unit is not compatible with HDCP-incompatible HDMI or DVI devices. For details, refer to the instruction manual for each device. • To decode audio bitstream signals on the unit, set - Yamaha RX-V373BL | User Manual - Page 77
HDMI 3 HDMI 4 MONITOR OUT ANTENNA AM FM SPEAKERS SURROUND CENTER FRONT OPTICAL AV 1 COAXIAL AV 2 COAXIAL (CD) AV 3 OPTICAL ( TV ) AV 4 AV 5 AV OUT AUDIO 1 AUDIO 2 AUDIO OUT SUBWOOFER • The area around the video/audio output jacks is marked in white on the actual product to prevent - Yamaha RX-V373BL | User Manual - Page 78
" and "Made for iPhone" mean that an electronic accessory has been designed to connect specifically to iPod or iPhone, respectively, and has been certified by the developer to meet Apple trademark of Sony Corporation. "SILENT CINEMA" is a trademark of Yamaha Corporation. APPENDIX ➤ Trademarks En 78 - Yamaha RX-V373BL | User Manual - Page 79
Specifications Input jacks • Analog Audio Audio x 4 (AV 5, AUDIO 1-2, V-AUX [Mini Jack]) • Digital Audio (Supported frequencies: 32 kHz to 96 kHz) Optical x 2 (AV 1, AV 4) Coaxial x 2 (AV 2-3) • Video Composite x 4 (AV 3-5, V-AUX) Component x 2 (AV 1-2) • HDMI Input HDMI x 4 (HDMI 1-4) • Other USB x - Yamaha RX-V373BL | User Manual - Page 80
250 W • Standby Power Consumption [General model 0.5 W or less [Other models 0.3 W or less • Maximum Power Consumption [Asia and General models 470 W • Dimensions (W x H x D 435 x 151 x 315 mm (17-1/8" x 6" x 12-3/8") • Weight 7.5 kg (16.5 lbs) * Specifications are subject to change without - Yamaha RX-V373BL | User Manual - Page 81
, setup menu 59 Audio Return Channel 18 Auto Power Down, setup menu 62 Auto Preset, FM/AM radio 41 Automatic speaker settings optimizing .....29 C Cellar Club, subwoofer 16 Connecting to jack on front panel 26 Connecting TV 18 Connecting video devices 23 Crossover, setup menu 57 D Dimension - Yamaha RX-V373BL | User Manual - Page 82
8 Speaker placement 12 Speaker settings, automatic optimizing ... 29 Speaker, setup menu 57 Specifications 79 Spectacle, CINEMA DSP 36 Sports, CINEMA DSP 36 Standard, CINEMA DSP 36 Standby Sync, setup menu 60 Straight decode 38 Subwoofer connection 16 Subwoofer Phase, setup menu 58 - Yamaha RX-V373BL | User Manual - Page 83
© 2012 Yamaha Corporation YE159B0/EN
-
 1
1 -
 2
2 -
 3
3 -
 4
4 -
 5
5 -
 6
6 -
 7
7 -
8
-
9
-
10
-
11
-
12
-
13
-
14
-
15
-
16
-
17
-
18
-
19
-
20
-
21
-
22
-
23
-
24
-
25
-
26
-
27
-
28
-
29
-
30
-
31
-
32
-
33
-
34
-
35
-
36
-
37
-
38
-
39
-
40
-
41
-
42
-
43
-
44
-
45
-
46
-
47
-
48
-
49
-
50
-
51
-
52
-
53
-
54
-
55
-
56
-
57
-
58
-
59
-
60
-
61
-
62
-
63
-
64
-
65
-
66
-
67
-
68
-
69
-
70
-
71
-
72
-
73
-
74
-
75
-
76
-
77
-
78
-
79
-
80
-
81
-
82
-
83
 |
 |
AV Receiver
Owner’s Manual
English
Read the supplied booklet “Safety Brochure” before using the unit.