Yamaha YVS-140 Venova YVS-140 Owners Manual
Yamaha YVS-140 Manual
 |
View all Yamaha YVS-140 manuals
Add to My Manuals
Save this manual to your list of manuals |
Yamaha YVS-140 manual content summary:
- Yamaha YVS-140 | Venova YVS-140 Owners Manual - Page 1
Português Español Français Deutsch English Owner's Manual Bedienungsanleitung Mode d'emploi Manual de instrucciones Manual do Proprietário - Yamaha YVS-140 | Venova YVS-140 Owners Manual - Page 2
Owner's Manual Introduction Thank you for purchasing the Yamaha Tenor Venova™. The Venova is a totally new type of wind instrument its deeper bass sounds than the Alto Venova, the Tenor Venova lets you enjoy performing music in a wonderfully new way. For instruction on the proper assembly of the - Yamaha YVS-140 | Venova YVS-140 Owners Manual - Page 3
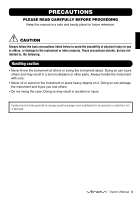
PRECAUTIONS PLEASE READ CAREFULLY BEFORE PROCEEDING Keep this manual in a safe and handy place for future . • Do not swing the case. Doing so may result in accident or injury. Yamaha cannot be held responsible for damage caused by improper use or modifications to the instrument, or data - Yamaha YVS-140 | Venova YVS-140 Owners Manual - Page 4
from the joint section. • After playing, remove moisture from inside the instrument. • Inspect and clean the instrument regularly (page 8). * The illustrations as shown in this manual are for instructional purposes only, and may appear somewhat different from those on your instrument. 4 Owner - Yamaha YVS-140 | Venova YVS-140 Owners Manual - Page 5
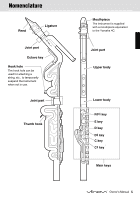
a string, etc., to temporarily suspend the instrument when not in use. Joint part Thumb hook Mouthpiece The instrument is supplied with a mouthpiece equivalent to the Yamaha 4C. Joint part Upper body Lower body F/F# key E key D key D# key C key C# key Main keys Owner - Yamaha YVS-140 | Venova YVS-140 Owners Manual - Page 6
lower bodies. Make sure that the groove shape on the upper body and the marking on lower body are aligned. Groove shape Upper body • Owner's Manual (this booklet) ×1 • "Let's play Venova™ !" (separate booklet) ×1 6 Owner's Manual Lower body Marking - Yamaha YVS-140 | Venova YVS-140 Owners Manual - Page 7
instrument up against a wall, etc. Place the instrument with the keys facing up, to prevent them from touching the surface. Ligature screws For more detailed instructions on attaching the reed, refer to the accompanying "Let's play Venova™ !" booklet. Owner's Manual 7 - Yamaha YVS-140 | Venova YVS-140 Owners Manual - Page 8
excessive force on the keys. Both the mouthpiece and body are washable. After washing, use a cleaning swab or a soft cloth to thoroughly remove moisture. 8 Owner's Manual - Yamaha YVS-140 | Venova YVS-140 Owners Manual - Page 9
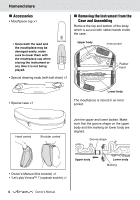
Separately Sold Accessories Yamaha offers a wide variety of accessories to enrich your playing experience. Here is a selection of accessories created especially for the Tenor Venova. Please give them a try. Part Name Swab for Tenor Venova Resin Reed for Tenor Venova Mouthpiece Patch (M) Features - Yamaha YVS-140 | Venova YVS-140 Owners Manual - Page 10
10-1 Nakazawa-cho, Naka-ku, Hamamatsu, 430-8650 Japan Manual Development Group © 2021 Yamaha Corporation Published 10/2021 POPI-B1 JA EN DE FR ES PT RU ZH-CN KO ZH-TW VEA1620
-
 1
1 -
 2
2 -
 3
3 -
 4
4 -
 5
5 -
 6
6 -
 7
7 -
8
-
9
-
10
 |
 |

日本語
English
Deutsch
Français
Español
Português
한국어
Русский
繁體中文
取扱説明書
Owner’s Manual
Bedienungsanleitung
Mode d’emploi
Manual de instrucciones
Manual do Proprietário
Руководство пользователя
使用说明书
사용설명서
使用說明書
简体中文