Zenith SL-6142-C User Guide
Zenith SL-6142-C - Heath - Basic Wireless Plug-In Door Chime Manual
 |
UPC - 016963614208
View all Zenith SL-6142-C manuals
Add to My Manuals
Save this manual to your list of manuals |
Zenith SL-6142-C manual content summary:
- Zenith SL-6142-C | User Guide - Page 1
position push button where you want it mounted. Press push button to verify chime and push button work properly. If chime does not sound, see Troubleshooting. © 2007 HeathCo LLC 595-5684-08 - Zenith SL-6142-C | User Guide - Page 2
to expand your system and prevent outside interference. Other wireless products may cause interference and the system may not function properly. Follow the instructions below for setting a new code. 1. Unplug wireless chime. 2. Open the cases and locate the jumpers on both the push button and chime - Zenith SL-6142-C | User Guide - Page 3
on selected chimes). The factory setting is for the Ding-Dong tune (or Westminster, when available). This tune can be changed by following the instructions below. • Ding (one note tune) Push Button: Add a jumper to location 8. • Ding-Dong (two note tune) Push Button: Remove jumper from location - Zenith SL-6142-C | User Guide - Page 4
Troubleshooting Chime does not sound: • Make sure push button and chime codes are the same ( and battery condition. Technical Service Please call 1-800-858-8501 (English speaking only) for assistance before returning product to store. If you experience a problem, follow this guide. You may also want - Zenith SL-6142-C | User Guide - Page 5
void this warranty in its entirety. This warranty does not include reimbursement for inconvenience, installation, setup time, loss of use, or unauthorized service. This warranty covers only HeathCo LLC assembled products and is not extended to other equipment and components that a customer uses in - Zenith SL-6142-C | User Guide - Page 6
Campana Enchufable Inalámbrica Este paquete tiene (El estilo del pulsador y de la campana puede variar de la ilustración): • Campana Enchufable Inalámbrica • Pulsador inalámbrico con batería (Modelos específcos incluyen 2) • Campana del timbre 1. Instalar pila alcalina de botón tipo A23 de 12 - Zenith SL-6142-C | User Guide - Page 7
4. Instale el pulsador. Use ya sean tornillos o cinta adhesiva por ambas caras para instalar el pulsador. Para montar con tornillos, quite la parte de atrás de la caja empujando hacia adentro la lengüeta de abajo con un destornillador pequeño y girando la cuchilla. Coloque la parte de atrás de la - Zenith SL-6142-C | User Guide - Page 8
Programación del tono Su campana inalámbrica tiene tonos diferentes que pueden seleccionarse: Tilín (una nota), Tilín-Talán (dos notas), o Westminster (ocho notas) (Disponible en los timbres seleccionados). La calibración de fábrica es el tono Tilín-talán (o el tono Westminster cuando está - Zenith SL-6142-C | User Guide - Page 9
inglés), de 7:30 AM a 4:30 PM CST (L-V). Usted puede también escribir a: HeathCo LLC P.O. Box 90004, Bowling Green, KY 42102-9004 ATTN: Technical Service (Servicio Técnic) * Si se llama al Servicio Técnico, por favor tener lista la siguiente información: Número de Modelo, Fecha de compra y Lugar de - Zenith SL-6142-C | User Guide - Page 10
GARANTÍA LIMITADA A 1 AÑO Esta es una "Garantía Limitada" que le da a Ud. derechos legales específicos. Usted puede también tener otros derechos que varían de estado a estado o de provincia a provincia. Por un período de 1 año desde la fecha de compra, cualquier mal funcionamiento ocasionado por - Zenith SL-6142-C | User Guide - Page 11
Carillon enfichable, sans fil Cet emballage contient (Le style de l'unité de bouton-poussoir et du carillon peut varier par rapport à l'illustration): • Carillon enfichable, sans fil • Unité de bouton-poussoir sans fil, avec pile (Modèles précis en contenant deux [2]) • un ensemble de ferrures 1. - Zenith SL-6142-C | User Guide - Page 12
4. Montez l'unité de bouton-poussoir. Utilisez soit des vis, soit du ruban adhésif double face pour monter l'unité de bouton-poussoir. Pour faire l'installation avec les vis, enlevez le dos du boîtier en poussant sur les agrafes de la base avec un tournevis. Fixez le dos du boîtier au chambranle ou - Zenith SL-6142-C | User Guide - Page 13
Réglage de la mélodie Votre carillon sans fil peut jouer différents airs à sélectionner : Ding (une note), Ding-Dong (deux notes) et Westminster (huit notes) (Disponible sur certains modèles de carillon). Le réglage de l'usine est celui du timbre Ding-Dong (ou l'air Westminster, lorsque disponible). - Zenith SL-6142-C | User Guide - Page 14
de l'aide avant de retourner l'article au magasin. En cas de problème, suivez ce guide. Vous pouvez aussi visiter notre site Web à www.hzsupport.com. Si le problème persiste, composez* le 1 800 858-8501 (service en anglais seulement), entre 7 h 30 et 16 h 30, HNC, du lundi au vendredi. Vous pouvez - Zenith SL-6142-C | User Guide - Page 15
un mauvais traitement ou à la négligence. Les ampoules, les piles et des autres articles non durables ne sont pas couverts par cette garantie. Le service non autorisé ou la modification du produit ou d'un ou l'autre de ses composants fournis invalidera totalement la présente garantie.Cette garantie - Zenith SL-6142-C | User Guide - Page 16
Chime Purchase Information Información de la compra de la campana Renseignements d'achat du carillon Model Nº de modelo / N° de modèle Date of Purchase Fecha de compra / Date d'achat Staple Purchase Receipt Here Engrape aquí el recibo de compra Agrafez le reçu d'achat ici Please keep your dated
-
 1
1 -
 2
2 -
 3
3 -
 4
4 -
 5
5 -
 6
6 -
 7
7 -
8
-
9
-
10
-
11
-
12
-
13
-
14
-
15
-
16
 |
 |

© 2007 HeathCo LLC
595-5684-08
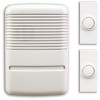
Wireless Plug-In Chime
This package includes (Style of push button and chime may vary from illustra-
tion):
• Wireless plug-in chime
•
Wireless push button w/ battery (Specific models include 2)
• Hardware pack
To reduce the risk of electrical shock, this
equipment has a polarized plug (one blade
is wider than the other). This plug will fit in
a polarized outlet only one way. If the plug
does not fit fully in the outlet, reverse the
plug. If it still does not fit, contact a qualified
electrician to install the proper outlet. Do
not change the plug in any way.
2.
Plug in wireless chime.
3.
Test range.
Temporarily position push button where you want it mounted.
Press push button to verify chime and push button work properly. If chime
does not sound, see Troubleshooting.
1.
Install alkaline type A23 12 volt push button
battery.
Remove back of case by pushing in tab on
bottom with a small screwdriver. Make sure battery
is oriented properly (see page 3).