1999 Chevrolet S10 Pickup Owner's Manual - Page 137
1999 Chevrolet S10 Pickup Manual

Page 137 highlights
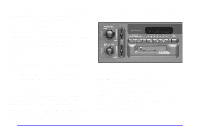
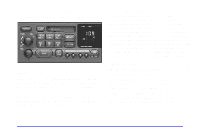
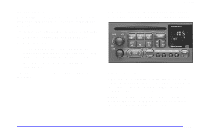
yellowblue AUTO TONE: Press this button to select among the six preset equalization settings and tailor the sound to the music or voice being heard. Each time you press the button, the selection will switch to one of the preset settings of CLASSIC, NEWS, ROCK, POP, C/W (Country/Western) or JAZZ. To return to the manual mode, press and release this button until the AUTO TONE display goes blank. This will return the tone adjustment to the BASS and TREB controls. If a BASS or TREB control is rotated, the AUTO TONE display will go blank. Use PUSHBUTTONS to program AUTO TONE. Adjusting the Speakers BAL: Press lightly on this knob to release it from its stored position. Turn the control clockwise to adjust sound to the right speakers and counterclockwise to adjust sound to the left speakers. The middle position balances the sound between the speakers. FADE: Press lightly on this knob to release it from its stored position. Turn the control clockwise to adjust the sound to the front speakers and counterclockwise for the rear speakers. The middle position balances the sound between the speakers. Push these knobs back into their stored positions when you're not using them. Playing a Cassette Tape Your tape player is built to work best with tapes that are up to 30 to 45 minutes long on each side. Tapes longer than that are so thin they may not work well in this player. To load a cassette tape with the ignition off, press EJECT or RECALL. Then, insert the cassette tape. If the ignition is on but the radio is off, the tape will begin playing. Once the tape is playing, use the VOL, AUTO TONE, BAL, FADE, BASS and TREB controls just as you do for the radio. The tape symbol and a direction arrow will be on the display whenever a tape is being played. Anytime a tape is inserted, the top side is selected for play first. The player automatically senses if the cassette tape is metal or CrO2 and adjusts for best playback sound. For metal tapes, the double-D symbol will appear on the display. PREV (1): Press the PREV button or the SEEK left arrow to search for the previous selection. A minimum three-second blank gap is required for the player to stop at the beginning of the selection. The tape direction arrow will blink during the SEEK operation. 3-13
-
 1
1 -
2
-
3
-
4
-
5
-
6
-
7
-
8
-
9
-
10
-
11
-
12
-
13
-
14
-
15
-
16
-
17
-
18
-
19
-
20
-
21
-
22
-
23
-
24
-
25
-
26
-
27
-
28
-
29
-
30
-
31
-
32
-
33
-
34
-
35
-
36
-
37
-
38
-
39
-
40
-
41
-
42
-
43
-
44
-
45
-
46
-
47
-
48
-
49
-
50
-
51
-
52
-
53
-
54
-
55
-
56
-
57
-
58
-
59
-
60
-
61
-
62
-
63
-
64
-
65
-
66
-
67
-
68
-
69
-
70
-
71
-
72
-
73
-
74
-
75
-
76
-
77
-
78
-
79
-
80
-
81
-
82
-
83
-
84
-
85
-
86
-
87
-
88
-
89
-
90
-
91
-
92
-
93
-
94
-
95
-
96
-
97
-
98
-
99
-
100
-
101
-
102
-
103
-
104
-
105
-
106
-
107
-
108
-
109
-
110
-
111
-
112
-
113
-
114
-
115
-
116
-
117
-
118
-
119
-
120
-
121
-
122
-
123
-
124
-
125
-
126
-
127
-
128
-
129
-
130
-
131
-
 132
132 -
 133
133 -
 134
134 -
 135
135 -
 136
136 -
 137
137 -
 138
138 -
 139
139 -
 140
140 -
 141
141 -
 142
142 -
143
-
144
-
145
-
146
-
147
-
148
-
149
-
150
-
151
-
152
-
153
-
154
-
155
-
156
-
157
-
158
-
159
-
160
-
161
-
162
-
163
-
164
-
165
-
166
-
167
-
168
-
169
-
170
-
171
-
172
-
173
-
174
-
175
-
176
-
177
-
178
-
179
-
180
-
181
-
182
-
183
-
184
-
185
-
186
-
187
-
188
-
189
-
190
-
191
-
192
-
193
-
194
-
195
-
196
-
197
-
198
-
199
-
200
-
201
-
202
-
203
-
204
-
205
-
206
-
207
-
208
-
209
-
210
-
211
-
212
-
213
-
214
-
215
-
216
-
217
-
218
-
219
-
220
-
221
-
222
-
223
-
224
-
225
-
226
-
227
-
228
-
229
-
230
-
231
-
232
-
233
-
234
-
235
-
236
-
237
-
238
-
239
-
240
-
241
-
242
-
243
-
244
-
245
-
246
-
247
-
248
-
249
-
250
-
251
-
252
-
253
-
254
-
255
-
256
-
257
-
258
-
259
-
260
-
261
-
262
-
263
-
264
-
265
-
266
-
267
-
268
-
269
-
270
-
271
-
272
-
273
-
274
-
275
-
276
-
277
-
278
-
279
-
280
-
281
-
282
-
283
-
284
-
285
-
286
-
287
-
288
-
289
-
290
-
291
-
292
-
293
-
294
-
295
-
296
-
297
-
298
-
299
-
300
-
301
-
302
-
303
-
304
-
305
-
306
-
307
-
308
-
309
-
310
-
311
-
312
-
313
-
314
-
315
-
316
-
317
-
318
-
319
-
320
-
321
-
322
-
323
-
324
-
325
-
326
-
327
-
328
-
329
-
330
-
331
-
332
-
333
-
334
-
335
-
336
-
337
-
338
-
339
-
340
-
341
-
342
-
343
-
344
-
345
-
346
-
347
-
348
-
349
-
350
-
351
-
352
-
353
-
354
-
355
-
356
-
357
-
358
-
359
-
360
-
361
-
362
-
363
-
364
-
365
-
366
-
367
-
368
-
369
-
370
-
371
-
372
-
373
-
374
-
375
-
376
-
377
-
378
-
379
-
380
-
381
-
382
-
383
-
384
 |
 |