2004 Dodge Stratus Owner's Manual - Page 227
2004 Dodge Stratus Manual
Page 227 highlights
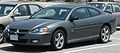
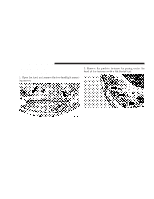
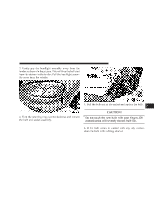
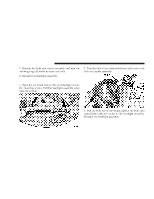
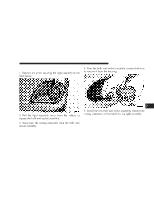
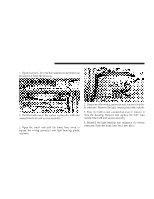
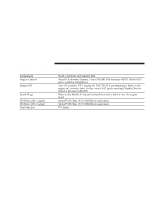
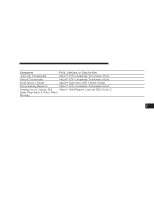
MAINTAINING YOUR VEHICLE 227 License Plate Bulb Replacement 1. Locate both small slots on the outboard side of the license lamp. Using a small screwdriver, remove the entire housing. 2. Turn the bulb socket counterclockwise to remove it from the housing. Pull the bulb out of the socket. Replace the bulb and snap it back into place on the housing of the chrome appliqué. Headlight Aiming The headlights on your new vehicle were aimed at the factory. The factory setting was made at a no load setting. A great increase in weight will change the aiming and it may be necessary to readjust the headlights if carrying an excessive amount of weight in the trunk, rear seats or pulling a trailer. To readjust the headlights first mark the position of the headlights on a wall prior to loading the vehicle. Load the vehicle and then readjust the headlights to the original position. If any further adjustments are necessary contact your manfacturer's dealer. A detailed service procedure is contained in the manufacturer's Service Manual. Information on purchasing a Service Manual can be found at the back of this Owner's Manual. FLUIDS AND CAPACITIES U.S. Fuel (Approximate) 2.4 Liter Engine (87 Octane) 2.7 Liter Engine (87 Octane) 16 Gallons 16 Gallons 61 Liters 61 Liters Metric Engine Oil-with filter 2.4 Liter Engines (SAE 5W-30) 5 qts. 2.7 Liter Engines (SAE 5W-30) 5 qts. Cooling System * 2.4 Liter Engines* (Mopar 8 qts. Antifreeze/Coolant 5 Year/ 100,000 Mile Formula) 2.7 Liter Engines (Mopar 9.5 qts. Antifreeze/Coolant 5 Year/ 100,000 Mile Formula) * Includes 1 qt. for coolant tank. 4.7 Liters 4.7 Liters 7.5 Liters 7 9.0 Liters
-
 1
1 -
2
-
3
-
4
-
5
-
6
-
7
-
8
-
9
-
10
-
11
-
12
-
13
-
14
-
15
-
16
-
17
-
18
-
19
-
20
-
21
-
22
-
23
-
24
-
25
-
26
-
27
-
28
-
29
-
30
-
31
-
32
-
33
-
34
-
35
-
36
-
37
-
38
-
39
-
40
-
41
-
42
-
43
-
44
-
45
-
46
-
47
-
48
-
49
-
50
-
51
-
52
-
53
-
54
-
55
-
56
-
57
-
58
-
59
-
60
-
61
-
62
-
63
-
64
-
65
-
66
-
67
-
68
-
69
-
70
-
71
-
72
-
73
-
74
-
75
-
76
-
77
-
78
-
79
-
80
-
81
-
82
-
83
-
84
-
85
-
86
-
87
-
88
-
89
-
90
-
91
-
92
-
93
-
94
-
95
-
96
-
97
-
98
-
99
-
100
-
101
-
102
-
103
-
104
-
105
-
106
-
107
-
108
-
109
-
110
-
111
-
112
-
113
-
114
-
115
-
116
-
117
-
118
-
119
-
120
-
121
-
122
-
123
-
124
-
125
-
126
-
127
-
128
-
129
-
130
-
131
-
132
-
133
-
134
-
135
-
136
-
137
-
138
-
139
-
140
-
141
-
142
-
143
-
144
-
145
-
146
-
147
-
148
-
149
-
150
-
151
-
152
-
153
-
154
-
155
-
156
-
157
-
158
-
159
-
160
-
161
-
162
-
163
-
164
-
165
-
166
-
167
-
168
-
169
-
170
-
171
-
172
-
173
-
174
-
175
-
176
-
177
-
178
-
179
-
180
-
181
-
182
-
183
-
184
-
185
-
186
-
187
-
188
-
189
-
190
-
191
-
192
-
193
-
194
-
195
-
196
-
197
-
198
-
199
-
200
-
201
-
202
-
203
-
204
-
205
-
206
-
207
-
208
-
209
-
210
-
211
-
212
-
213
-
214
-
215
-
216
-
217
-
218
-
219
-
220
-
221
-
 222
222 -
 223
223 -
 224
224 -
 225
225 -
 226
226 -
 227
227 -
 228
228 -
 229
229 -
 230
230 -
 231
231 -
 232
232 -
233
-
234
-
235
-
236
-
237
-
238
-
239
-
240
-
241
-
242
-
243
-
244
-
245
-
246
-
247
-
248
-
249
-
250
-
251
-
252
-
253
-
254
-
255
-
256
-
257
-
258
-
259
-
260
-
261
-
262
-
263
-
264
-
265
-
266
-
267
-
268
-
269
-
270
-
271
-
272
-
273
 |
 |