2005 Ford Thunderbird Quick Reference Guide 1st Printing - Page 2
2005 Ford Thunderbird Manual
Page 2 highlights
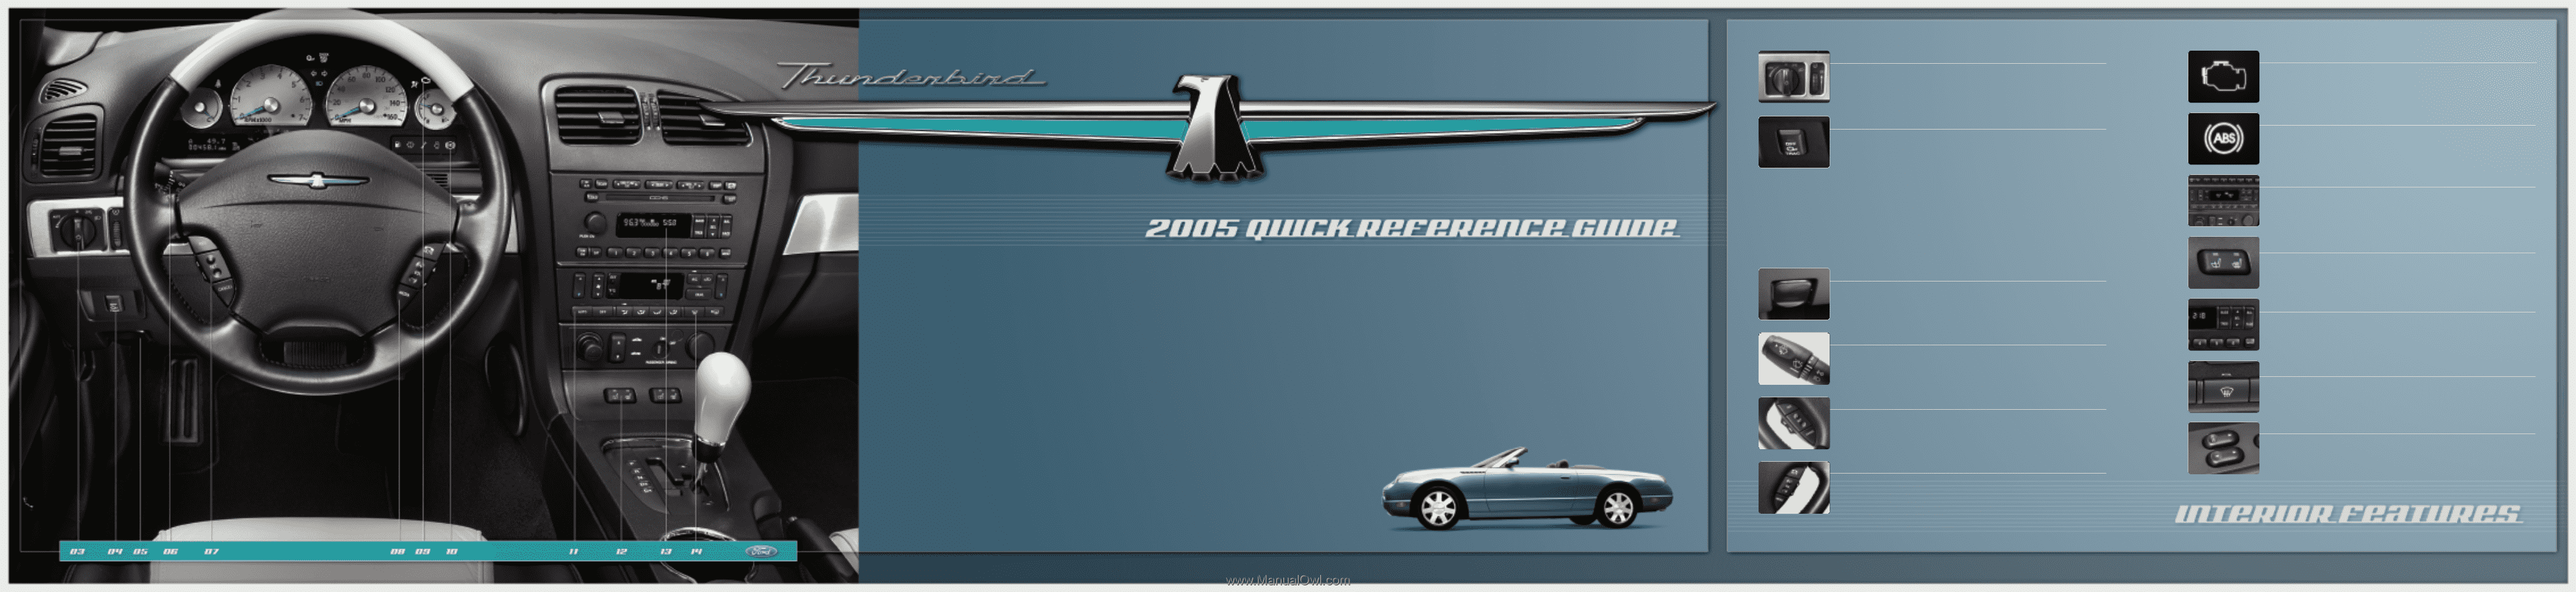
03 Headlamp Controls Turn the control clockwise to the first position to turn on the parking lamps, instrument panel lamps, license plate lamps and tail lamps. Turn to the second position to turn on the headlamps. Turn the control counterclockwise to initiate the autolamp system. Autolamp turns your exterior lamps on and off automatically, based on available daylight; it also keeps the lights on for a short time after the ignition switch is turned off. 09 Emission System/Check Engine It's normal for this light to illuminate briefly when you start your engine. If the light stays on or flashes, there could be a problem. Have your vehicle serviced as soon as possible. 04 Traction Control ™ On/Off 10 Anti-lock Brake System If the ABS light stays illuminated or continues to flash after start-up, a malfunction has been detected; have the system serviced immediately. Normal braking will continue to function unless the brake warning light is also illuminated. Your vehicle is equipped with a Traction Control™ system that helps you maintain the stability and steering ability of your vehicle by making better use of available traction on slippery road surfaces, such as snow or ice-covered roads and gravel roads. The Traction Control™ switch (located on the left-hand side of the instrument panel) has an indicator lamp that illuminates when the system is off. The Traction Control™ system will automatically turn on every time the ignition is turned off and on. During Traction Control™ operation, the traction control OFF indicator will illuminate. It's normal to hear an electric motor type of sound coming from the engine compartment and the engine will not "rev-up" when you use the accelerator. If you should become stuck in snow or ice or on a very slippery road surface, try switching the Traction Control™ system off. This may allow excess wheel spin to "dig" the vehicle out and enable a successful "rocking" maneuver. If a system fault is detected, the traction control OFF indicator will illuminate and your vehicle should be serviced. 11 Climate Control Your Thunderbird is equipped with a Dual Electronic Automatic Temperature Control System. Please see your Owner's Guide for information on using this system. 12 Heated seats (if equipped) From the classic exterior design with chrome grille and porthole windows to the personal luxury of the comfortable, stylish interior, Thunderbird is designed to please. This Quick Reference Guide reviews some of the features you'll be using most. It also provides directions for installing, removing, and maintaining your removable top (if equipped). When you have time, take advantage of the information provided in your "Interactive Owner Experience" CD-ROM. Use any audio CD player to listen to the information in an audio format, or use it with your computer for a more interactive experience. (The CD jacket will tell you if your computer meets the minimum configuration requirements.) You can use this guide alone or with the audio component of your "Interactive Owner Experience" CD-ROM. Whether you use them together or separately, the Quick Reference Guide and audio tracks are an excellent way to get acquainted with your vehicle. To use this guide with the audio, refer to the numbered call-outs in the instrument panel section, locate the feature you'd like to learn more about, and then locate the SEEK control on your audio system. Push the right arrow once to select the next audio track. If you would like to skip ahead, press the right arrow again until the desired selection is reached. To select a previous track, press the left arrow until the desired selection is reached. This Quick Reference Guide is not intended to replace your Owner's Guide which contains more detailed information concerning the features of your vehicle and important safety warnings. To help reduce the risk of injury to you and your passengers, always carefully read your entire Owner's Guide when first learning about your vehicle. Should any questions arise, be sure to consult the appropriate section of your Owner's Guide. 05 Opening the Hood Pull the hood release handle located at the bottom left of the instrument panel. Go to the front of your vehicle and release the auxiliary latch (located under the front center of the hood) by pushing the handle toward the passenger side of the vehicle. Raise the hood until the lift cylinders hold it open. The heated seat function will activate when the ignition is in the "run" position. Push the right side of the control for maximum heat; push again to deactivate. Push the left side of the control for minimum heat; push again to deactivate. 13 Setting the Clock Press MENU until SELECT HOUR or SELECT MINS is displayed. Use SEL to manually increase or decrease the hours or minutes. Press MENU again to disengage clock mode. 06 Windshield Wipers/Washers To wipe: Rotate the end of the control away from you to increase the speed of the wipers; rotate toward you to decrease the speed of the wipers. To wash: Push the end of the stalk briefly for a single swipe without washer fluid. Briefly push and hold the end of the stalk for three swipes with washer fluid. Push and hold to have the wipers and washer fluid activate for up to ten seconds. 14 Windshield Defrost To clear ice or fog from the windshield, press the defrost control; your climate control system will begin distributing outside air through the windshield defroster ducts and the demister outlets. The system will automatically provide outside air to reduce window fogging. 07 Speed Control The speed controls are located on the steering wheel. Press ON to enable speed control. (You must be traveling at or above 30 miles per hour.) Press SET to set a speed, then + or - to increase or decrease speed. Pressing RES will return to a previously set speed. To disengage speed control, press CANCEL or depress the brake pedal. 15 Power Windows Press and hold the rear portion of the rocker switch to open the window. Press and hold the forward portion of the rocker switch to close the window. For one touch down, press completely down on AUTO and release quickly; press again to stop. 08 Steering Wheel Audio Controls Press MEDIA to select AM, FM1, FM2, or CD. Radio Presets: In AM, FM1, or FM2 mode, use the up or down arrow to select preset radio stations within the selected radio band. CD Selection: In CD mode, press the up or down arrow to select the next or previous selection on the CD. Volume: Press VOL + or - in any mode to adjust the volume. Mute: Press this control to silence the playing media; press again to return to normal volume. For complete information on your vehicle's audio system controls, please see your Owner's Guide.
-
 1
1 -
 2
2
 |
 |