2006 Ford Expedition Quick Reference Guide 2nd Printing - Page 1
2006 Ford Expedition Manual
Page 1 highlights
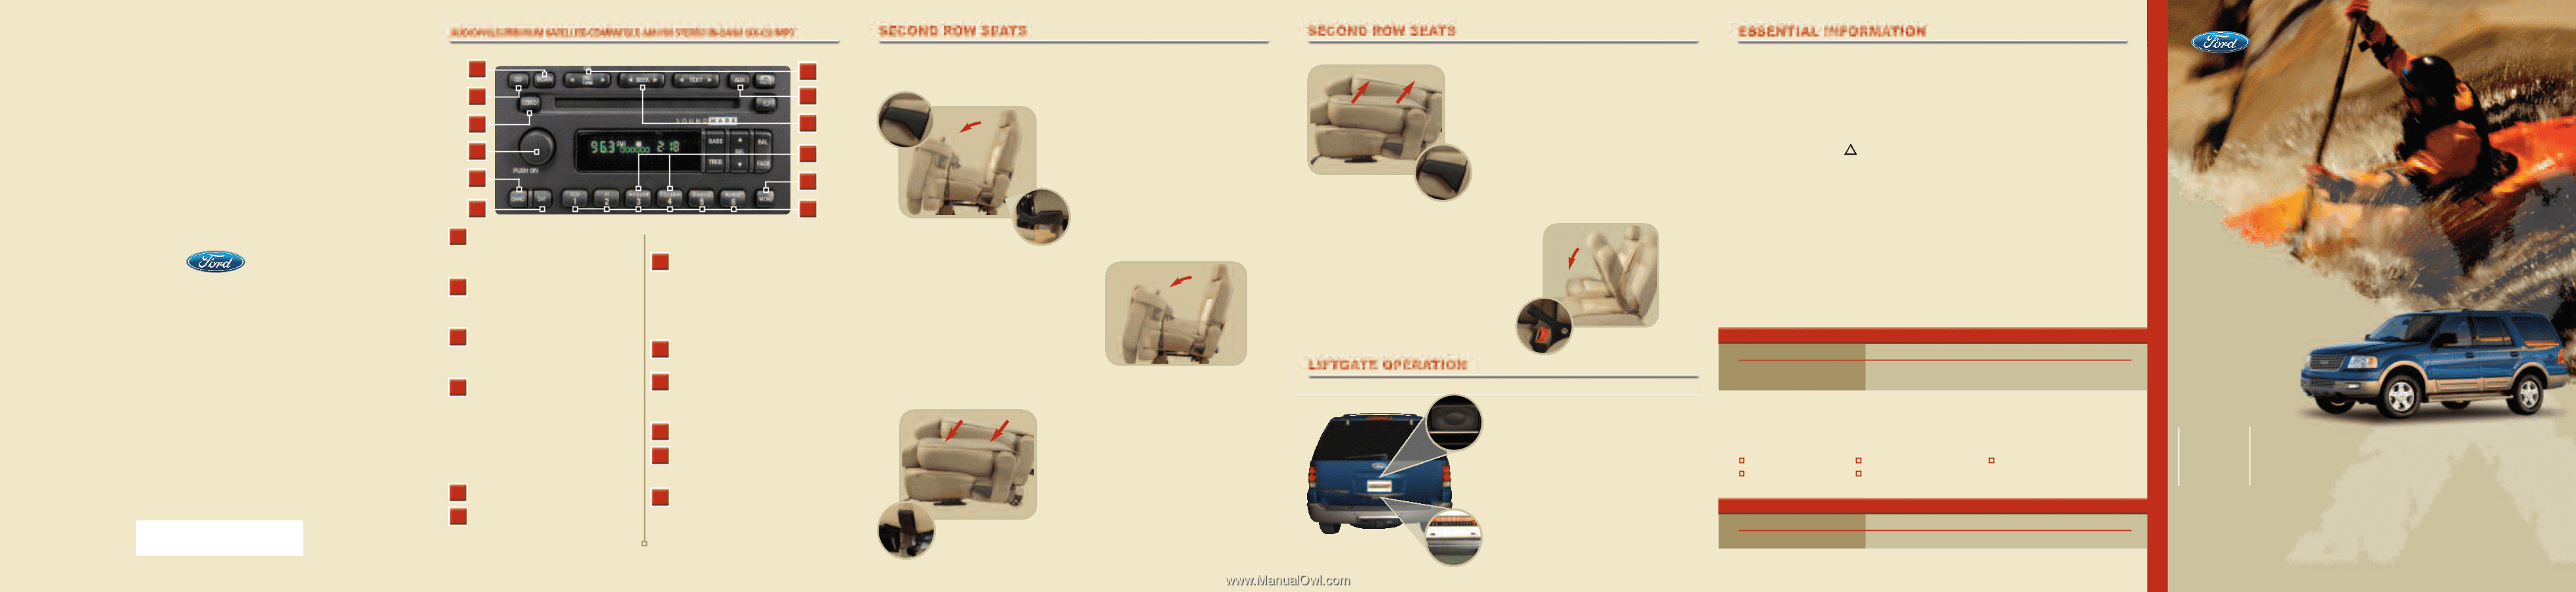
(if equipped) (continued) Fuel Tank Capacity - Your vehicle's fuel tank can accommodate 28 gallons (106L) of gasoline. Your vehicle is designed to use "Regular" unleaded gasoline with a pump (R+M)/2 octane rating of 87 for optimum performance. The use of gasoline with lower octane ratings may degrade performance. Tire Pressure - Your tire pressure is properly set at the dealership according to the recommended specifications found on the Certification Label located on the front door latch pillar on the driver's side. Please check your tire pressure during routine maintenance and seasonal changes and when the Tire Pressure Monitoring System warning indicator (if equipped) is illuminated. ! Warning: Improperly inflated tires can affect vehicle handling and can fail suddenly, possibly resulting in loss of vehicle control. See "Additional Features" on the reverse side for more information. Fuses - If electrical components in the vehicle are not working, a fuse may have blown. For more information about changing a fuse, please consult your Owner's Guide. Fuel Pump Shut-Off Switch - After a collision, if the engine cranks but does not start, the fuel pump shut-off switch may have to be reset. The switch is located in the left rear quarter trim panel, near the liftgate, behind an access panel. For complete details on resetting the switch, please consult your Owner's Guide. Changing the Tires - If you get a flat tire while driving, do not apply the brake heavily. Instead, gradually decrease your speed. Hold the steering wheel firmly and slowly move to a safe place on the side of the road. Your vehicle is equipped with a spare tire that may be used as a spare or a regular tire. Location of the Spare Tire and Tools release strap Item Spare Tire Jack Tools and Jacking Instructions To unlatch the liftgate glass, push the button (figure a) under the center of the license plate lamp shield. figure a To open the liftgate, place your hand on top of the liftgate handle (figure b) and pull. Do not pull the handle from the bottom. To close, make certain the liftgate glass is closed, and then push the liftgate closed until it latches securely. Do not open the liftgate or liftgate glass in a garage or other enclosed area with a low ceiling. You can also unlock/lock the liftgate and liftgate glass using your remote entry system. figure b Location Under the vehicle, just forward of the rear bumper Under the access panel, located in the floor compartment behind the third row seat CAUTION: DO NOT USE CD WITH ADHESIVE LABEL* A B C D E F A Scan Function - In radio mode, press to hear a sampling of all listenable stations. In CD mode, press to hear a brief sampling of all selections on the current CD/MP3. CD - Press to select CD mode. No CD will display if there is not a CD present in the audio system. If a disc is loaded, there will be a number (1-6) inside the circle on the display. Loading CD - Press LOAD to open the CD door, then load a CD into the player. Press LOAD and then a preset number to select a slot. Press and hold to load up to six discs. Volume/Power Control - Push the control to turn the audio system on or off. Turn the control to raise or lower volume. The speed-sensitive volume feature automatically adjusts radio volume in accordance with vehicle speed, to compensate for road and wind noise. To engage, press MENU until SPEED VOL X appears in the display. Then press SEL to increase or decrease the volume setting. The level will appear in the display. Band - Press BAND to toggle AM, FM1 or FM2 frequency band. SAT (if equipped) - Your radio comes equipped with Satellite Ready capability. The kit to enable Satellite reception is available through your dealer. Detailed G H Before folding the second row seats, ensure that the head restraints are fully lowered and that all items have been removed from in front of and on the seats. Entering the Third Row Seat Returning the Seats to the Upright Position From the Fully-Lowered Floor Position The seat back cannot be returned to the upright position until the seat is returned from the kneel-down position. To return the seat to the upright position, lift and pull the seat rearward until the latch is engaged. Do not attempt to unlatch the rear floor hooks while the seat is in the kneel-down position. With the seat in the flat back position, lift up on the lever (lever 1) located on the side of the seat lever 1 cushion. This will allow the seat back to be lifted to the upright locked position. Folding the 20% Middle Seat (if equipped) to a Load Floor Position To fold the seat, pull the release strap located between the seat cushion and the seat back to release the folding seat latch. With the latch released, the seat back can be lowered into the load floor position. I lever 1 J K L Satellite instructions are included with the dealer-installed kit. Pull up on the lever (lever 1) located on the side of either outboard second row seat until the seat back folds forward to the cushion. Pull up on the lever (lever 2) located on the back of the seat. The seat will then flip forward. G B Ford Motor Company Customer Relationship Center P.O. Box 6248 Dearborn, MI 48121 1-800-392-3673 (FORD) (TDD for the hearing impaired: 1-800-232-5952) This Quick Reference Guide is not intended to replace your vehicle Owner's Guide which contains more detailed information concerning the features of your vehicle, as well as important safety warnings designed to help reduce the risk of injury to you and your occupants. Please read your entire Owner's Guide carefully as you begin learning about your new vehicle and refer to the appropriate chapters when questions arise. All information contained in this Quick Reference Guide was accurate at the time of duplication. We reserve the right to change features, operation and/or functionality of any vehicle specification at any time. Your Ford dealer is the best source for the most current information. For detailed operating and safety information, please consult your Owner's Guide. C H I AUX - Press to toggle between the current playing media and DVD (if equipped). Seek Function - In radio mode, press to move to the next listenable station up or down the band. In CD mode, press to select the next/previous track on the current disc. Folders - Press these buttons to access the next or previous MP3 directory. Setting the Clock - Press MENU until SELECT HOUR or SELECT MINUTE is displayed. Press SEL to set the time. Press MENU again to disengage the clock mode. Setting Memory Preset Stations - Select AM, FM1, or FM2 band, then select a station. Next, press and hold a numbered control until the sound returns. To return the seat to the upright position, push the seat down and back until it is latched to the floor. Then, lift up on the lever located on the side of the seat cushion and lift the seat back to the upright position. D J K Folding the Outboard Seats to a Load Floor Position To fold the seats to a load floor position, lift the lever (lever 1) located on the outboard side of the seat to release the seat back. Ensure that the seat back is locked in the down position by applying pressure to it. To lower the seat further to the fully-lowered position for maximum cargo capacity, locate the pull strap at the front of the seat, then pull forward to release the seat into a kneel-down load floor position. A moderate force may be required to move the seat forward and down. Roadside Emergencies - To fully assist you if you should have a vehicle concern, Ford Motor Company offers a complimentary roadside assistance program. This program is separate from the New Vehicle Limited Warranty. The service is available 24 hours a day, seven days a week for the New Vehicle Limited Warranty period (U.S.) or Basic Warranty period (Canada) of three years or 36,000 miles (60,000 km). Roadside assistance will cover: Changing a flat tire Lockout assistance Roadside Assistance Centers Country United States Canada Phone Number 1-800-241-3673 Jump-starts Towing of your vehicle Limited fuel delivery E X P E D I T I O N Disc/Tune CAT - In radio mode, press to move to the next frequency up or down the band. In CD mode, press to play the next/previous CD. CAT is only available when equipped with Satellite radio. The kit to enable Satellite reception is available through your dealer. Detailed Satellite instructions are included with the dealer-installed kit. Exiting the Third Row Seat Pull up on the lever (lever 2) located at the back of the second row seat. First, the seat back will fold forward to the cushion, then the seat will flip forward. Q U I C K lever 2 R E F E R E N C E G U I D E M O D E L 2006 model E F October 2005 Second Printing Quick Reference Guide L EXPEDITION Quick Reference Guide pull strap 6L1J-19G217-AA Expedition Litho in U.S.A. *CDs with adhesive labels and irregularly shaped CDs may get stuck in the CD player. Homemade CDs should be identified with permanent felt tip marker rather than adhesive labels. For complete details on any roadside assistance concern, please consult the Roadside Emergencies chapter, or the Customer Assistance chapter in your Owner's Guide. 2 0 0 6 *F6L1j19g217aa* 1-800-665-2006
-
 1
1 -
 2
2
 |
 |