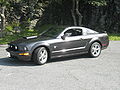
2009 Ford Mustang Quick Reference Guide 1st Printing - Page 2
2009 Ford Mustang Manual
Page 2 highlights
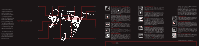
2 4 3 12 11 1 HEADLAMPs, FOG LAMPS (IF EQUIPPED) and panel dimmer control 6 TILT STEERING COLUMN (IF EQUIPPED) How does it feel to own an American Icon? Your 2009 Mustang is the newest member of a proud family of legendary road machines. 45 years of refinement and innovation have made your new Mustang one of the most exciting, comfortable, safest and smartest cars to ever roam the American road. This Quick Reference Guide was designed to help you get to know your new Mustang. It will allow you to familiarize yourself with many of your new Mustang's features and functions. For the most detailed information and important safety information refer to your Owner's Guide. 1 Use extreme caution when using any device or feature that may take your attention off the road. Your primary responsibility is the safe operation of the vehicle. Only use non-essential features and devices when it is safe to do so. 6 8 5 10 9 MUSTANG QUICK REFERENCE GUIDE 2009 7 Turn the control one position to the right to turn on the parking lamps, instrument panel lamps, license plate lamps and tail lamps. Turn the control to the second position on the right to turn on the headlamps. Pull the control towards you to activate the fog lamps (if equipped). The fog lamps will not operate when the control is turned off or when the high beams are on. Use the panel dimmer control to adjust the level of brightness on the instrument panel during parking lamp and headlamp operation. Move the control to the full upright position, past the detent, to turn on the interior lamps. 2 Tire Pressure Monitoring System (TPMS) To adjust the steering wheel, push the lever down to unlock the steering column. While the lever is in the down position, tilt the steering column to your desired position. Then, while holding the steering column in place, pull the lever up to its original position to lock the steering column. 7 TRACTION CONTROL™ (IF EQUIPPED) Pressing RESET will scroll through the following selectable colors: Green, Purple, Orange, Blue, White, Red, and Adjust (to define MyColor™). Adjusting MyColor™: The vehicle must be stationary to enter the MyColor™ adjust mode. To enter the MyColor™ adjust mode, hold RESET for three seconds at the Adjust menu, or press SETUP to scroll through the display colors again. When in the MyColor™ adjust mode, pressing RESET will step through the Red, Green, Blue and Exit options. You can create your own color by adjusting the levels of the three primary colors to achieve any of 125 different combinations. Pressing SETUP will increment the proportion of the color (Red, Green, or Blue) being adjusted. Try many combinations and record your favorites. To save and exit MyColor™, adjust and hold RESET for three seconds when prompted.* 11 MESSAGE CENTER (IF EQUIPPED) When the Tire Pressure Monitoring System (TPMS) warning light is lit, one or more of your tires is significantly under-inflated. You should stop and check the tires as soon as possible and inflate them to the proper pressure, as shown on the Safety Compliance Certification Label or Tire Label (located on the edge of the driver's door). Driving on a significantly under-inflated tire causes the tire to overheat and can eventually lead to tire failure. NOTE Outside temperatures affect tire pressure; refer to the Owner's Guide for additional tire information. 3 ANTI-LOCK BRAKE SYSTEM (IF EQUIPPED) This system helps you maintain the stability and steerability of your vehicle on slippery road surfaces such as snow, ice or gravel. The system works closely with many of the elements already present in the Anti-Lock Braking System. The system defaults to on. However, should you become stuck, try switching the Traction Control™ off. Remember to reactivate Traction Control™ once you resume normal driving. 8 SPEED CONTROL The ABS warning lamp will momentarily illuminate when the ignition is turned on. If the light fails to illuminate when the ignition is turned on, stays on or flashes, have your vehicle serviced. In an emergency, apply continuous force to the brake pedal. Do not pump the brakes. Any pulsation or mechanical noise you may feel or hear is normal. 4 SERVICE ENGINE SOON LIGHT To set the speed control, press and release ON. Accelerate to the desired speed. Press and release the SET + control. Take your foot off the accelerator pedal. The speed control indicator light will illuminate in the cluster. To set a higher speed: press and hold SET+ until the desired speed is reached, or briefly press SET+ to increase the speed by small amounts. To set a lower speed: press and hold SET- until the desired speed is reached, or briefly press SET- to decrease the speed by small amounts. Press RESUME to return to the previously set speed. To turn speed control off, depress the brake pedal or clutch pedal (if equipped). 9 WINDSHIELD WIPER / WASHER With the ignition turned on, the message center displays important vehicle information by constantly monitoring vehicle systems. You may select display features on the message center for a display of status. The system will also notify you of potential vehicle problems with a display of system warnings followed by a long indicator chime.* 12 SECURILOCK™ PASSIVE ANTI-THEFT SYSTEM The Service Engine Soon indicator light illuminates when the ignition is first turned on. If the light stays on or blinks, the On Board Diagnostics System has detected a malfunction. Drive moderately (avoid heavy acceleration or deceleration) and have your vehicle serviced immediately. 5 GEARSHIFT / OVERDRIVE CONTROL The windshield wiper/washer lever controls the windshield wiper modes, speeds and the windshield washer. For intermittent operation, move the control up one position, then rotate the rotary control to the speed you want. For normal or low speed wiper operation, move the control up two positions from OFF. For high-speed operation, move the control up three positions from OFF. For windshield washer control, pull the end of the stalk toward you. A quick pull and hold, and the wipers will swipe three times with washer fluid. A long pull and hold, and the wipers and washer fluid will be activated for up to ten seconds. 10 mycolor™ (IF EQUIPPED) This system is designed to help prevent the engine from being started unless a coded key programmed to your vehicle is used. Your SecuriLock™ system is armed immediately after turning the ignition off. The theft indicator (if equipped) will flash every two seconds when the vehicle is armed. Switching the ignition to the ON position with a coded key disarms the system. Your vehicle comes with two coded keys. You can purchase additional coded keys from your dealer.* Ambient / mood lighting (IF EQUIPPED) Your vehicle may be equipped with an ambient lighting feature which, when activated, illuminates the footwells, cup holders and console bin with a choice of seven colors. Ambient lighting is operational when the ignition is on or in the accessory position. Press the control repeatedly to turn on, cycle through your color choices, and turn off. Adjusting the front power seatS (IF EQUIPPED) Drive with the vehicle in D (Overdrive) for the best fuel economy. You can deactivate overdrive by pressing the transmission control switch on the right side of the shift handle. You may want to deactivate overdrive when driving conditions cause excessive shifting such as heavy city traffic, hilly terrain, heavy loads, etc. and when engine breaking is required. To return to overdrive, simply press the transmission control switch again. The instrument cluster gauges are backlit with white backlighting when the headlamps are off. When the headlamps are on, you can select one of six preset colors or create your own color (MyColor™) for the nighttime gauge backlighting. Headlamps must be on to set up the nighttime display. NOTE A gauge in a warning condition will be lit red when the headlamps are on. Press SETUP to get to the DISPLAY COLOR set-up menu. The control is located on the side of the seat. Press the front to raise or lower the front portion of the seat cushion. Press the rear to raise or lower the rear portion of the seat cushion. Press the control to move the seat forward, backward, up or down.* *For more detailed information, please refer to your Owner's Guide. INSTRUMENT PANEL
-
 1
1 -
 2
2
 |
 |
