2010 Ford Explorer Sport Trac Quick Reference Guide 2nd Printing - Page 2
2010 Ford Explorer Sport Trac Manual
Page 2 highlights
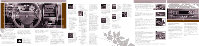
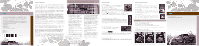
ESSENTIAL INFORMATION Location of Spare Tire: If you get a flat tire while driving, do not apply the brake heavily. Instead, gradually decrease your speed. Hold the steering wheel firmly and slowly move to a safe place on the side of the road. Your vehicle is equipped with a temporary spare tire located under the vehicle, just forward of the rear bumper. The temporary spare is designed for emergency use only and should be replaced as soon as possible. The jack and tools are located under the carpeted floor panel in the rear cargo area. For complete details on how to change your tire, refer to the Roadside Emergencies chapter in your Owner's Guide. Fuel Type and Tank Capacity: Your fuel tank capacity is 22.5 gallons (85.2L). Your vehicle is designed to use "Regular" unleaded gasoline with an octane rating of 87. Do not use gasoline labeled as "Regular" in high altitude areas that are sold with octane ratings less than 87. Do not use E85 fuels because your vehicle was not designed to run on fuels with more than 10% ethanol. Tire Pressure: Your tire pressure is properly set at the dealership according to the recommended specifications found on the Safety Compliance Certification Label or Tire Label located on the B-Pillar or the edge of the driver's door. Check your tire pressure at least once a month and before long trips (including spare). As an added safety feature, your vehicle may be equipped with a Tire Pressure Monitoring System (TPMS) that illuminates a low tire pressure warning light when one or more of your tires is significantly under-inflated. Improperly inflated tires can affect vehicle handling and can fail suddenly, possibly resulting in loss of vehicle control. Refer to the Tires, Wheels and Loading chapter in your Owner's Guide for more information. Fuel Pump Shut-Off Switch: The fuel pump shut-off switch is a device intended to stop the electric fuel pump when your vehicle has been involved in a substantial jolt. The switch is located in the passenger's footwell, by the kick panel. After a collision, if the engine cranks but does not start, the fuel pump shut-off switch may have been activated. For more information regarding the fuel pump shut-off switch, refer to the Roadside Emergencies chapter of your Owner's Guide. Roadside Assistance: Your new Ford Explorer Sport Trac comes with the assurance and support of 24-hour emergency roadside assistance. Roadside assistance includes such services as: lockout assistance, limited fuel delivery, battery jump starts, changing a flat tire, towing, and winch out. To receive roadside assistance in the United States, call 1 (800) 241-3673. In Canada, call 1 (800) 665-2006. SOS Post-Crash Alert SystemTM: Your vehicle is equipped with the SOS Post-Crash Alert systemTM. This system provides audible and visual alarms in the event of a crash which causes the deployment of airbags or the activation of the safety belt pretensioners. The turn signals will flash and the horn will sound. To deactivate the system, press the hazard flasher control, or you can press on your remote transmitter. Roof Rack Crossbars (if equipped): If the crossbars are repositioned close to each other, the vehicle may exhibit objectionable noise at highway speeds. This noise can be minimized by positioning the front crossbar just behind the front door, and the rear crossbar in the furthest rearward position. Refer to the Owner's Guide for more information. Premium AM/FM In-Dash Six CD/MP3 Satellite Compatible Sound System (if equipped) ADDITIONAL FEATURES Remote Entry System Your vehicle is equipped with a remote entry system which allows you to: Press once to unlock the driver's door. The interior lamps will illuminate. Press twice to unlock the passenger doors. Press once to lock all the doors. The lamps will flash. Press twice to confirm all the doors are closed and locked. The doors will lock again, the horn will chirp and the lamps will flash once if all the doors and trunk are closed. Press to activate the panic alarm. The horn will sound and the turn lamps will flash. Press again or turn the ignition on to deactivate the panic alarm. Car Finder: Press twice within three seconds. The horn will chirp and the lamps will flash. It is recommended to use this method to locate your vehicle, rather than using the panic alarm. ADDITIONAL FEATURES (Continued) Auxiliary Input Jack Your vehicle is equipped with an Auxiliary Input Jack located inside the console bin. This allows you to plug and play auxiliary audio devices. Press AUX repeatedly on your audio system to access. When LINE IN appears in the display, plug in your auxiliary audio device. For more detailed information, please refer to your Owner's Guide. USB Port (if equipped) Your vehicle may be equipped with a USB port inside your center console. This feature allows you to plug in your media playing devices among other options. For more detailed information, please refer to the SYNC® supplement or the SYNC® section of the Navigation Supplement. Power Down Back Window To lower the back window, the ignition must be turned on or in the accessory position. Press and release the control located in the overhead console to lower the window to the vent position. Press and release the control again to lower the window to the full open position. Pull and hold the control to close the window. 1 2 9 3 4 5 6 7 8 10 11 12 13 14 15 This Quick Reference Guide is not intended to replace your vehicle Owner's Guide which contains more detailed information concerning the features of your vehicle, as well as important safety warnings designed to help reduce the risk of injury to you and your passengers. Please read your entire Owner's Guide carefully as you begin learning about your new vehicle and refer to the appropriate sections when questions arise. All information contained in this Quick Reference Guide was accurate at the time of duplication. We reserve the right to change features, operation and/or functionality of any vehicle specification at any time. Your Ford dealer is the best source for the most current information. For detailed operating and safety information, please refer to your Owner's Guide. Ford Motor Company Customer Relationship Center P.O. Box 6248 Dearborn, MI 48121 1-800-392-3673 (FORD) (TDD for the hearing impaired: 1-800-232-5952) October 2009 Second Printing Quick Reference Guide Sport Trac Litho in U.S.A. 1. (CD Eject): Press and hold to auto eject all CDs present in the system. Press and a memory preset to eject from a specific slot. 2. LOAD: Press LOAD and a memory preset to load to a specific slot. Press and hold to autoload up to six CDs. 3. CD: Press to enter CD/MP3 mode. If a CD/ MP3 is already loaded into the system, CD play will begin where it ended last. If no CD is loaded, NO DISC will appear in the display. 4. TEXT/SCAN: Press and hold for a brief sampling of radio stations or CD tracks. Press again to stop. In CD/MP3 mode, press to display track title, artist name and disc title. 5. SEEK: Press to access the previous strong station or track. Press to access the next strong station or track. 6. FF (Fast Forward): Press to manually advance in a CD or MP3 track. 7. REW (Rewind): Press to manually reverse in a CD or MP3 track. 8. FOLDER: In folder mode, press to access the previous or next folder on MP3 discs, if available. 9. / (Tune/Disc Selector): Press and release to manually advance up/down the radio frequency or to select a desired disc. Press and hold for a fast advance through radio frequencies or all loaded discs. Also use in menu mode to select various settings. 10. (Phone): If your vehicle is equipped with SYNC®, press to access SYNC® PHONE features. For more information, please refer to the SYNC® supplement. If your vehicle is not equipped with SYNC®, the display will read NO PHONE. 11. MENU: Press this button when satellite radio mode is active to access. Press OK to enter into the satellite radio menu. Press / to cycle through the following options: Category, Save Song, Delete Song, Delete All Songs and Enable Alerts/Disable Alerts. For more information, please consult your Owner's Guide. Satellite Radio Controls: (if equipped) 12. AUX: Press repeatedly to cycle through SAT1, SAT2, SAT3 (satellite radio mode, if equipped), or LINE IN (auxiliary audio mode). Press AM/FM to return to radio mode. Satellite radio is available only with a valid SIRIUS® radio subscription. Check with your authorized dealer for availability. 13. SHUFFLE: Press to play the tracks on the current disc in random order. 14. / II (PLAY/PAUSE): When a CD is playing press the control to play or pause the current CD. The CD status will display in the radio display. OK - Your vehicle may be equipped with special phone and media features which will require you to confirm commands by pressing OK. For further information, refer to the SYNC® supplement. 15. Memory Presets: To set a station, select frequency band AM/FM1/FM2, tune to a station, press and hold a preset button (1-6) until sound returns. 2010 SPORT TRAC Quick Reference Guide SecuriCode™ Keyless Entry System (if equipped) You can use the keyless entry keypad to lock or unlock the doors without a key. To unlock the driver's door, enter your five digit factory code (available on the owner's wallet card in the glove box or from your authorized dealer.) To unlock all doors, enter your five digit factory code and, within five seconds, press 3-4. To lock all doors, simply press 7-8 and 9-0 at the same time (you do not need to enter your factory code first). Refer to your Owner's Guide for more information. 2010 SPORT TRAC Seating Rear Seats - Folding down the 2nd row 60/40 seats 1. Lower the head restraints by pulling the strap. 2. Locate the handle on the side of the seat cushion by the door. 3. Pull up on the handle and push the seatback forward toward the front of the vehicle. To return the seat to the upright position make sure there are no objects trapped behind the seatback and then: 1. Lift the seatback toward the rear of the vehicle. 2. Pull up on the handle and rotate the seatback until you hear a click, locking it in the upright position. 3. Lift up on the head restraint until it locks into its original position. Truck Bed Auxiliary Power Point An additional 12V auxiliary power point is located in the bed of the truck. Lift the cover to access the auxiliary power point. SYNC® (if equipped) Your vehicle may be equipped with SYNC® - a hands-free communications and entertainment system with special phone and media features. For more information, please refer to the SYNC® Supplement or to the SYNC® section in the Navigation Supplement. Please also feel free to visit www.SyncMyRide.com. AL2J 19G217 BB Navigation System (if equipped) The mobile media navigation system allows you to record CDs, list to your saved music and play DVDs in addition to navigating the vehicle. For more information, refer to your Navigation supplement (if equipped). Please refer to the Seating and Safety Restraints chapter in your Owner's Guide for additional seating information.
-
 1
1 -
 2
2
 |
 |
