2013 Ford F450 Super Duty Crew Cab Diesel Supplement Printing 1 - Page 34
2013 Ford F450 Super Duty Crew Cab Manual

Page 34 highlights
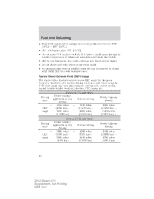
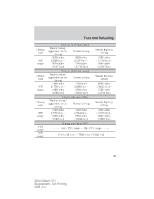
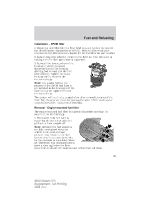
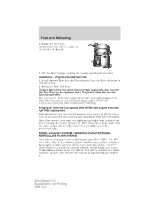
Fuel and Refueling Installation - DFCM filter 1. Install the new filter into the filter bowl tabs and replace the seal on the DFCM header (top portion of DFCM). Refer to Motorcraft part numbers in the Maintenance chapter for the fuel filter kit part number. 2. Lube O-ring with lubricant packet in the filter kit. This will assist in making sure the filter gets properly tightened. 3. Reinstall the lower portion of the housing by slowly turning it clockwise onto DFCM housing, allowing fuel to soak into the fuel filter element. Tighten the lower housing until it contacts the mechanical stop. Note: The engine will not run properly if the DFCM fuel filter is not installed in the housing or if the filter bowl is not tightened to the mechanical stop. The system will need to be purged of air after removal/changing of the filter. See Purging air from the fuel system after DFCM and engine mounted fuel filter replacement following. Removal - Engine-mounted fuel filter The engine-mounted fuel filter is a plastic disposable cartridge. To remove it, do the following: 1. Disconnect both fuel lines by squeezing the connector tabs and pulling the lines straight off. Note: Although the fuel system is not fully pressurized when the vehicle is off, some residual pressure may remain in the fuel system since it can take some time for the pressure to completely bleed off. Therefore, it is recommended to place a shop rag below the filter connectors to absorb the small amount of fuel that will drain. 33 2013 Diesel (67l) Supplement, 1st Printing USA (fus)
-
 1
1 -
2
-
3
-
4
-
5
-
6
-
7
-
8
-
9
-
10
-
11
-
12
-
13
-
14
-
15
-
16
-
17
-
18
-
19
-
20
-
21
-
22
-
23
-
24
-
25
-
26
-
27
-
28
-
 29
29 -
 30
30 -
 31
31 -
 32
32 -
 33
33 -
 34
34 -
 35
35 -
 36
36 -
 37
37 -
 38
38 -
 39
39 -
40
-
41
-
42
-
43
-
44
-
45
-
46
-
47
-
48
-
49
-
50
-
51
-
52
-
53
-
54
-
55
-
56
-
57
-
58
-
59
-
60
-
61
-
62
-
63
-
64
-
65
-
66
-
67
-
68
-
69
-
70
-
71
-
72
-
73
-
74
-
75
-
76
-
77
-
78
-
79
-
80
-
81
-
82
-
83
-
84
-
85
-
86
-
87
-
88
-
89
-
90
-
91
-
92
-
93
-
94
-
95
 |
 |