1997 Honda Odyssey Owner's Manual - Page 160
1997 Honda Odyssey Manual
Page 160 highlights
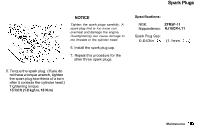
Air Cleaner Element 8. Reinstall the air duct on the air cleaner housing cover. Reinstall the maintenance hole cap. MAINTENANCE HOLE CAP BOLTS AIR CLEANER ELEMENT 3. Loosen the four bolts and remove the air cleaner housing cover. Remove the maintenance hole cap so you can reach the right front bolt through the hole. 4. Remove the old air cleaner element. Clean the inside of the air cleaner housing with a damp rag. 5. Place the new air cleaner element in the air cleaner housing. 6. Reinstall the air cleaner housing cover, tighten the four bolts. 7. Reinstall the air intake cover. Reinstall the two pins and secure them by pushing on the heads until they lock. Maintenance
-
 1
1 -
2
-
3
-
4
-
5
-
6
-
7
-
8
-
9
-
10
-
11
-
12
-
13
-
14
-
15
-
16
-
17
-
18
-
19
-
20
-
21
-
22
-
23
-
24
-
25
-
26
-
27
-
28
-
29
-
30
-
31
-
32
-
33
-
34
-
35
-
36
-
37
-
38
-
39
-
40
-
41
-
42
-
43
-
44
-
45
-
46
-
47
-
48
-
49
-
50
-
51
-
52
-
53
-
54
-
55
-
56
-
57
-
58
-
59
-
60
-
61
-
62
-
63
-
64
-
65
-
66
-
67
-
68
-
69
-
70
-
71
-
72
-
73
-
74
-
75
-
76
-
77
-
78
-
79
-
80
-
81
-
82
-
83
-
84
-
85
-
86
-
87
-
88
-
89
-
90
-
91
-
92
-
93
-
94
-
95
-
96
-
97
-
98
-
99
-
100
-
101
-
102
-
103
-
104
-
105
-
106
-
107
-
108
-
109
-
110
-
111
-
112
-
113
-
114
-
115
-
116
-
117
-
118
-
119
-
120
-
121
-
122
-
123
-
124
-
125
-
126
-
127
-
128
-
129
-
130
-
131
-
132
-
133
-
134
-
135
-
136
-
137
-
138
-
139
-
140
-
141
-
142
-
143
-
144
-
145
-
146
-
147
-
148
-
149
-
150
-
151
-
152
-
153
-
154
-
 155
155 -
 156
156 -
 157
157 -
 158
158 -
 159
159 -
 160
160 -
 161
161 -
 162
162 -
 163
163 -
 164
164 -
 165
165 -
166
-
167
-
168
-
169
-
170
-
171
-
172
-
173
-
174
-
175
-
176
-
177
-
178
-
179
-
180
-
181
-
182
-
183
-
184
-
185
-
186
-
187
-
188
-
189
-
190
-
191
-
192
-
193
-
194
-
195
-
196
-
197
-
198
-
199
-
200
-
201
-
202
-
203
-
204
-
205
-
206
-
207
-
208
-
209
-
210
-
211
-
212
-
213
-
214
-
215
-
216
-
217
-
218
-
219
-
220
-
221
-
222
-
223
-
224
-
225
-
226
-
227
-
228
-
229
-
230
-
231
-
232
-
233
-
234
-
235
-
236
-
237
-
238
-
239
-
240
-
241
 |
 |

Air Cleaner Element
MAINTENANCE
HOLE CAP
BOLTS
3. Loosen the four bolts and remove
the air cleaner housing cover.
Remove the maintenance hole cap
so you can reach the right front
bolt through the hole.
4. Remove the old air cleaner
element.
Clean the inside of the air cleaner
housing with a damp rag.
5. Place the new air cleaner element
in the air cleaner housing.
6. Reinstall the air cleaner housing
cover, tighten the four bolts.
7. Reinstall the air intake cover.
Reinstall the two pins and secure
them by pushing on the heads
until they lock.
8. Reinstall the air duct on the air
cleaner housing cover.
Reinstall themaintenanceholecap.
Maintenance
AIR CLEANER ELEMENT