2013 Lexus GS 350 Navigation Manual - Page 71
2013 Lexus GS 350 Manual

Page 71 highlights
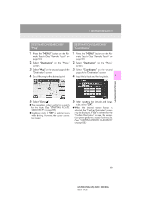
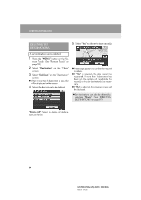
1. DESTINATION SEARCH The list of previous destinations can also be deleted by selecting "Delete Previous Dest." on the "Navigation Settings" screen when the vehicle is stopped. (See "DELETING PREVIOUS DESTINATIONS" on page 122.) When the desired address book entry is selected, the "Confirm Destination" screen may be displayed. If "Go" is selected on the "Confirm Destination" screen, the navigation system performs a search for the route. (See "STARTING ROUTE GUIDANCE" on page 85.) DESTINATION SEARCH BY "Address Book" DESTINATION SEARCH BY "Emergency" 1 Press the "MENU" button on the Remote Touch. (See "Remote Touch" on page 10.) 1 Press the "MENU" button on the Re2 Select "Destination" on the "Menu" screen. mote Touch. (See "Remote Touch" on 3 page 10.) NAVIGATION SYSTEM 2 Select "Destination" on the "Menu" screen. 3 Select "Address Book" on the "Destination" screen. 3 Select "Emergency" on the second page of the "Destination" screen. The display changes to a screen to select police stations, dealers, hospitals or fire stations. 4 Select the screen button of the desired address book entry. 4 Select the desired emergency category. A list of registered address book entries is displayed. "Options": Select to register or edit address book entries. (See page 114.) The selected emergency category is displayed. 79 GS350/450h (US) NAVI 30C46U 11.12.13 07:32
-
 1
1 -
2
-
3
-
4
-
5
-
6
-
7
-
8
-
9
-
10
-
11
-
12
-
13
-
14
-
15
-
16
-
17
-
18
-
19
-
20
-
21
-
22
-
23
-
24
-
25
-
26
-
27
-
28
-
29
-
30
-
31
-
32
-
33
-
34
-
35
-
36
-
37
-
38
-
39
-
40
-
41
-
42
-
43
-
44
-
45
-
46
-
47
-
48
-
49
-
50
-
51
-
52
-
53
-
54
-
55
-
56
-
57
-
58
-
59
-
60
-
61
-
62
-
63
-
64
-
65
-
 66
66 -
 67
67 -
 68
68 -
 69
69 -
 70
70 -
 71
71 -
 72
72 -
 73
73 -
 74
74 -
 75
75 -
 76
76 -
77
-
78
-
79
-
80
-
81
-
82
-
83
-
84
-
85
-
86
-
87
-
88
-
89
-
90
-
91
-
92
-
93
-
94
-
95
-
96
-
97
-
98
-
99
-
100
-
101
-
102
-
103
-
104
-
105
-
106
-
107
-
108
-
109
-
110
-
111
-
112
-
113
-
114
-
115
-
116
-
117
-
118
-
119
-
120
-
121
-
122
-
123
-
124
-
125
-
126
-
127
-
128
-
129
-
130
-
131
-
132
-
133
-
134
-
135
-
136
-
137
-
138
-
139
-
140
-
141
-
142
-
143
-
144
-
145
-
146
-
147
-
148
-
149
-
150
-
151
-
152
-
153
-
154
-
155
-
156
-
157
-
158
-
159
-
160
-
161
-
162
-
163
-
164
-
165
-
166
-
167
-
168
-
169
-
170
-
171
-
172
-
173
-
174
-
175
-
176
-
177
-
178
-
179
-
180
-
181
-
182
-
183
-
184
-
185
-
186
-
187
-
188
-
189
-
190
-
191
-
192
-
193
-
194
-
195
-
196
-
197
-
198
-
199
-
200
-
201
-
202
-
203
-
204
-
205
-
206
-
207
-
208
-
209
-
210
-
211
-
212
-
213
-
214
-
215
-
216
-
217
-
218
-
219
-
220
-
221
-
222
-
223
-
224
-
225
-
226
-
227
-
228
-
229
-
230
-
231
-
232
-
233
-
234
-
235
-
236
-
237
-
238
-
239
-
240
 |
 |
