2005 Lincoln Town Car Quick Reference Guide 1st Printing - Page 2
2005 Lincoln Town Car Manual
Page 2 highlights
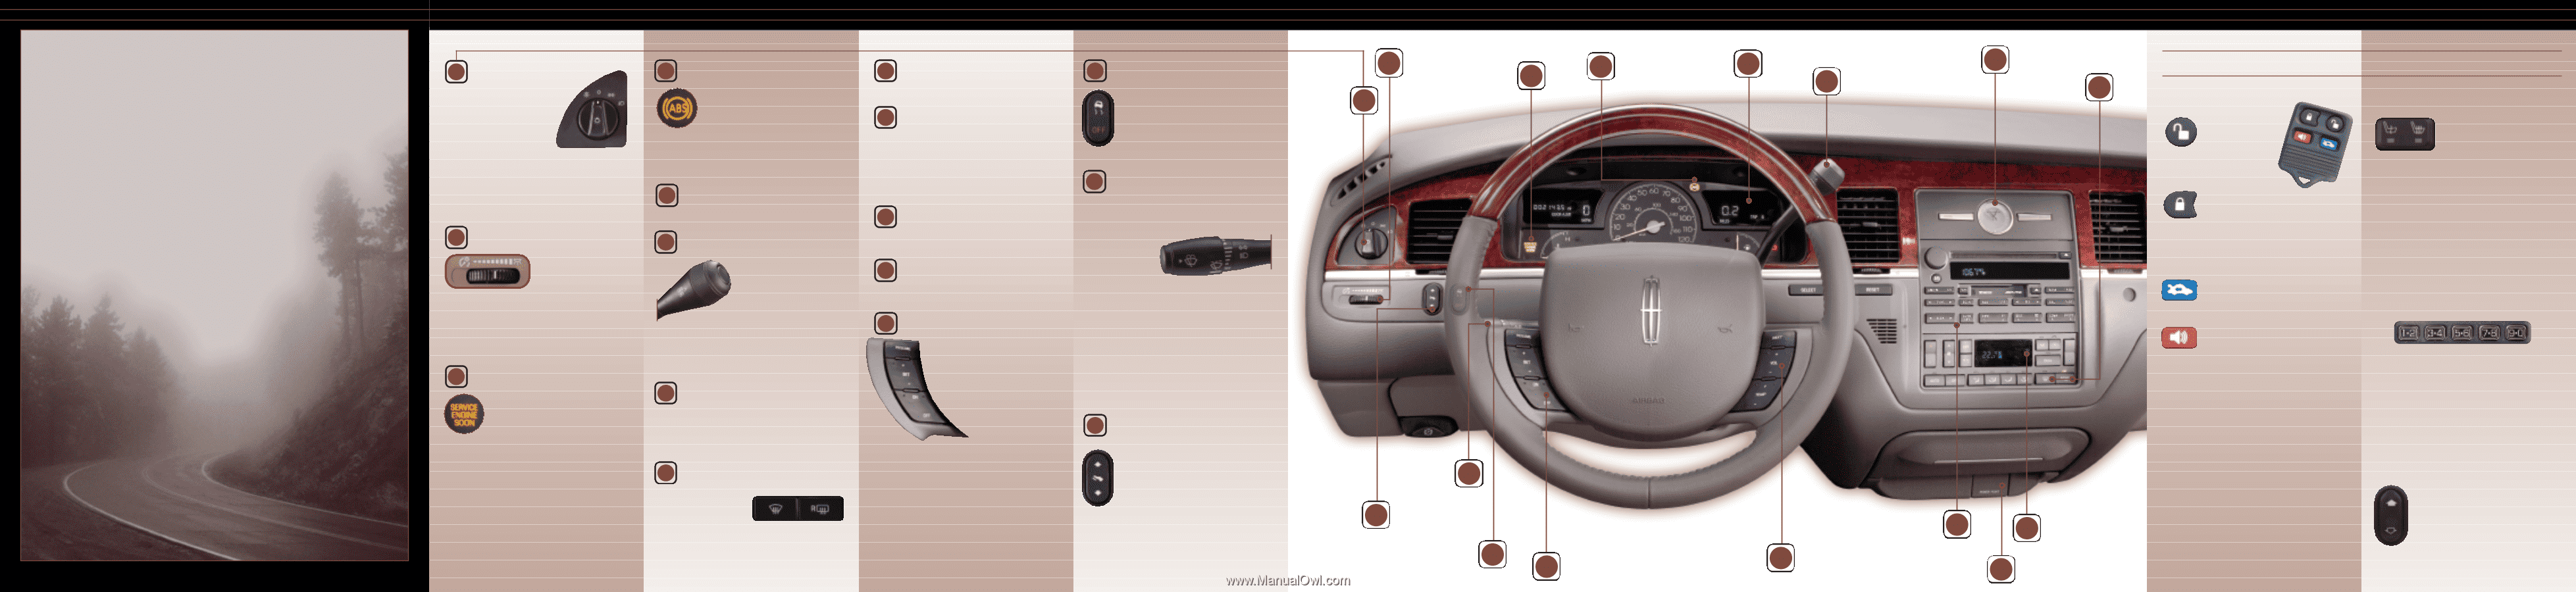
1 Headlamp Control 4 ABS Warning Lamp 9 Climate Control System 14 Traction Control TM 2 Headlamp Control Congratulations on acquiring a Lincoln Town Car. Your elegant new vehicle possesses many sophisticated features, from steering wheel mounted controls to power adjustable foot pedals. This Quick Reference Guide was designed to acquaint you with many of the features you'll be using most. Rotate clockwise one position to turn on the parking, instrument panel, license plate, and tail lamps. Rotate to the second position to also turn on the headlamps. Rotate counterclockwise to activate autolamp, which provides light-sensitive automatic on-off control of the exterior lights and keeps them on for a short period of time after the ignition is turned OFF. Illuminates briefly when the ignition is turned to the ON position. In an emergency, apply continuous force on the brake to prevent wheel lock when braking on slippery surfaces - do not pump your brakes. Any pulsation or noise you may feel or hear is normal. Please see reverse side for more details. 10 Auxiliary Power Point Located under the instrument panel, the auxiliary power point is an additional power source for electrical accessories. Improper use of the power outlet may cause damage not covered by your warranty. This system allows your vehicle to make better use of available traction on slippery surfaces. The system defaults to ON; however, should your vehicle become stuck, try switching the traction control off. Panel Dimmer Service Control Engine Soon Lamp 3 4 ABS Warning Lamp Electronic Message Center 5 6 Gearshift/ Overdrive Control Clock 7 1 Front and Rear Window Defroster Controls A d d i t i o n a l F e a t u r e s 8 Remote Entry System Press this control once to unlock the driver's door, and twice to unlock all doors. Press this control once to lock all doors; the horn will chirp and the parklamps/taillamps will flash to confirm that all doors are closed and locked. If you press a second time, the parklamps/taillamps will flash. Press this control to open the trunk. If equipped with a power trunk, press twice to open and twice to close. Press this control to activate the panic alarm. To deactivate, press the control again, or turn the ignition to the ACC, ON or START position. Heated Seats (if equipped) 15 5 Electronic Message Center Turn Signal and Wiper/Washer Control Please see reverse side for more details. 1 1 Dual-Media Radio System Please see reverse side for more details. 2 Panel Dimmer Control 6 Gearshift/Overdrive Control For detailed information, please consult your Owner's Guide. Use to adjust the brightness of the instrument panel during headlamp and parklamp operation. Rotate to the right to brighten and to the left to dim. Rotate fully to the right to also turn on the domelamp. To turn off the domelamp, rotate to the left. 3 Service Engine Soon Lamp Overdrive is the normal drive position for the best fuel economy. Only deactivate (OFF) overdrive when: driving with a heavy load, towing a trailer up or down steep hills, or when additional engine braking is desired. To deactivate, press the transmission control switch (TCS) located on the end of the gearshift lever. 12 Steering Wheel Controls (if equipped) Please see reverse side for more details. 13 Speed Control To operate, the speed control must be ON and the vehicle's speed must be at or above 48 km/h (30 mph). To set a speed, press ON. To set a higher speed, press and hold SET+ until the desired speed is reached. Vehicle speed can also be increased incrementally one mph by briefly tapping SET+. To set a lower speed, press and hold SET- until the desired speed is reached. Pressing RESUME will return to a previously set speed. To disengage the speed control without erasing the previously programmed set speed, depress the brake pedal. To turn the speed control off, press the OFF button or turn off the ignition. Rotate the control to the desired interval, low or high speed. The bars of varying length are for intermittent wipers. Rotate up for fast intervals and down for slow. Push the end of the stalk to activate the washer. Push and release quickly to operate the mist function. The wipers will cycle one or two times. Push and hold for a longer wash cycle. The exterior lamps will illuminate when the ignition is ON and the windshield wiper control is in the interval, LO or HI position. The headlamps will automatically turn off 30 seconds after the wipers are turned off. Push the right portion of the control for maximum heat. Push again to deactivate. Push the left portion for minimum heat. Push again to deactivate. The heated seats will activate when the ignition is in the RUN position, and, if activated, turn off automatically when the ignition is switched off. Keyless Entry System With this control you can open the trunk or lock/unlock all doors without using a key. First, enter your five-digit program code and then press the corresponding quick key: Open the trunk...5-6 Unlock all doors...3-4 Lock all simultaneously...7-8 and 9-0 If your vehicle is equipped with a power trunk, pressing the 5-6 control (after entering your access code again) will close the trunk. Illuminates briefly to ensure the system is functional. If the light comes on after the engine is started, please refer to your Owner's Guide. To help prevent activation, always secure your fuel cap by turning it clockwise 1/8 of a turn until it stops. If the fuel cap is not properly secured, the warning "Check Fuel Cap" will also be displayed on the message center. The warning will be reset once the cap is properly tightened and your vehicle is driven a short distance. 7 Clock Memory Functions (if equipped) To set the instrument panel mounted clock, press the right or left control to increase or decrease the time displayed. 16 Power Adjustable Foot Pedals Press and hold the rocker control to adjust the accelerator and brake pedal toward you or away from you. Adjust the pedals only when the vehicle is stopped and the gearshift lever is in the P (Park) position. Turn Signal and Wiper/ Washer Control Power Adjustable Foot Pedals Each key fob corresponds to different memory positions. Key fob 1 corresponds to memory setting 1, while key fob 2 corresponds to memory setting 2. 8 Front and Rear Window Defroster Controls 15 Dual-Media Radio System Climate Control System Push to clear the front or rear window of thin ice and fog. If equipped with heated outside mirrors, press the rear window defrost control to heat. The rear defroster turns off after a predetermined time, or when the ignition is turned off. 16 Traction ControlTM 11 10 9 14 13 Speed Control Steering Wheel Controls (if equipped) 12 You may set the memory functions for the driver's seat, side view mirrors, and adjustable pedals by using the SET memory control located on the driver's door. To deactivate the memory feature of your key fob, or to learn more about any of your memory settings, please consult your Owner's Guide. Power Lumbar Support (if equipped) This control is located on the front of the seat cushion on the inboard side of the seat. Press the top side of the control to adjust firmness. Press the bottom side of the control to adjust softness. Auxiliary Power Point
-
 1
1 -
 2
2
 |
 |