2011 Mercedes C-Class Owner's Manual - Page 148
2011 Mercedes C-Class Manual

Page 148 highlights
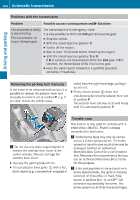
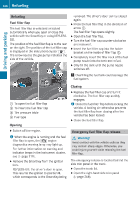
146 Refueling Refueling Fuel filler flap The fuel filler flap is unlocked or locked automatically when you open or close the vehicle with the SmartKey or using KEYLESSGO. The position of the fuel filler flap is to the rear on the right. The position of the fuel filler cap is displayed in the instrument cluster 8. The arrow next to the gas pump indicates the side of the vehicle. removed. The driver's door can be closed again. X Press the fuel filler flap in the direction of arrow :. The fuel filler flap opens slightly. X Open the fuel filler flap. X Turn the fuel filler cap counter-clockwise and remove it. X Insert the fuel filler cap into the holder bracket on the inside of filler flap ;. X Completely insert the filler neck of the fuel pump nozzle into the tank and refuel. X Only fill the tank until the pump nozzle switches off. Driving and parking ! Overfilling the fuel tank could damage the fuel system. Closing X : To open the fuel filler flap ; To insert the fuel filler cap = Tire pressure table ? Fuel type Replace the fuel filler cap and turn it clockwise. The fuel filler cap audibly engages. i Close the fuel filler flap before locking the vehicle. A locking pin otherwise prevents the fuel filler flap from closing after the vehicle has been locked. X Close the fuel filler flap. Opening X Switch off the engine. Emergency fuel filler flap release G Warning! Avoid contact with the vehicle walls as they may contain sharp edges. Otherwise, you could injure yourself while releasing the fuel filler flap. i When the engine is running and the fuel filler flap is open, the ; engine diagnostics warning lamp may light up. For further information on warning and indicator lamps in the instrument cluster, see (Y page 210). X Remove the SmartKey from the ignition lock. KEYLESS-GO: the driver's door is open. This returns the ignition to position 0, which corresponds to the SmartKey being The emergency release is located behind the side trim panel in the trunk. X Open the trunk lid. X Open the right-hand side trim panel (Y page 268).
-
 1
1 -
2
-
3
-
4
-
5
-
6
-
7
-
8
-
9
-
10
-
11
-
12
-
13
-
14
-
15
-
16
-
17
-
18
-
19
-
20
-
21
-
22
-
23
-
24
-
25
-
26
-
27
-
28
-
29
-
30
-
31
-
32
-
33
-
34
-
35
-
36
-
37
-
38
-
39
-
40
-
41
-
42
-
43
-
44
-
45
-
46
-
47
-
48
-
49
-
50
-
51
-
52
-
53
-
54
-
55
-
56
-
57
-
58
-
59
-
60
-
61
-
62
-
63
-
64
-
65
-
66
-
67
-
68
-
69
-
70
-
71
-
72
-
73
-
74
-
75
-
76
-
77
-
78
-
79
-
80
-
81
-
82
-
83
-
84
-
85
-
86
-
87
-
88
-
89
-
90
-
91
-
92
-
93
-
94
-
95
-
96
-
97
-
98
-
99
-
100
-
101
-
102
-
103
-
104
-
105
-
106
-
107
-
108
-
109
-
110
-
111
-
112
-
113
-
114
-
115
-
116
-
117
-
118
-
119
-
120
-
121
-
122
-
123
-
124
-
125
-
126
-
127
-
128
-
129
-
130
-
131
-
132
-
133
-
134
-
135
-
136
-
137
-
138
-
139
-
140
-
141
-
142
-
 143
143 -
 144
144 -
 145
145 -
 146
146 -
 147
147 -
 148
148 -
 149
149 -
 150
150 -
 151
151 -
 152
152 -
 153
153 -
154
-
155
-
156
-
157
-
158
-
159
-
160
-
161
-
162
-
163
-
164
-
165
-
166
-
167
-
168
-
169
-
170
-
171
-
172
-
173
-
174
-
175
-
176
-
177
-
178
-
179
-
180
-
181
-
182
-
183
-
184
-
185
-
186
-
187
-
188
-
189
-
190
-
191
-
192
-
193
-
194
-
195
-
196
-
197
-
198
-
199
-
200
-
201
-
202
-
203
-
204
-
205
-
206
-
207
-
208
-
209
-
210
-
211
-
212
-
213
-
214
-
215
-
216
-
217
-
218
-
219
-
220
-
221
-
222
-
223
-
224
-
225
-
226
-
227
-
228
-
229
-
230
-
231
-
232
-
233
-
234
-
235
-
236
-
237
-
238
-
239
-
240
-
241
-
242
-
243
-
244
-
245
-
246
-
247
-
248
-
249
-
250
-
251
-
252
-
253
-
254
-
255
-
256
-
257
-
258
-
259
-
260
-
261
-
262
-
263
-
264
-
265
-
266
-
267
-
268
-
269
-
270
-
271
-
272
-
273
-
274
-
275
-
276
-
277
-
278
-
279
-
280
-
281
-
282
-
283
-
284
-
285
-
286
-
287
-
288
-
289
-
290
-
291
-
292
-
293
-
294
-
295
-
296
-
297
-
298
-
299
-
300
-
301
-
302
-
303
-
304
-
305
-
306
-
307
-
308
-
309
-
310
-
311
-
312
-
313
-
314
-
315
-
316
-
317
-
318
-
319
-
320
 |
 |
