1994 Pontiac Firebird Owner's Manual - Page 102
1994 Pontiac Firebird Manual

Page 102 highlights
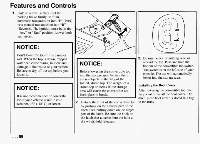
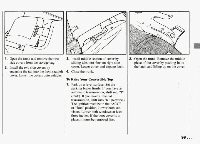
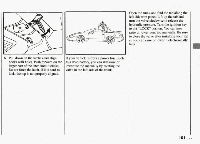
left side trim panel. Lift up the tab and turn the valve clockwise to release the hydraulic pressure. Turn the ignition key to the "LOCK" positon. You can now raise or lower your top manually. sure Be to close the valve after installing your top so you can raise or lower itelectronically later. 6. Pull down on the latches and align hooks with holes. Push forward the on larger part of the latch until it clicks. Do not force the latch. If it is hard to lock, the top not properly aligned. is f your vehicle suffers a power loss, such 1 a dead battery, you can still raise or s ower the top manually by rotating the ralve in the left side of the trunk. 101 ...
-
 1
1 -
2
-
3
-
4
-
5
-
6
-
7
-
8
-
9
-
10
-
11
-
12
-
13
-
14
-
15
-
16
-
17
-
18
-
19
-
20
-
21
-
22
-
23
-
24
-
25
-
26
-
27
-
28
-
29
-
30
-
31
-
32
-
33
-
34
-
35
-
36
-
37
-
38
-
39
-
40
-
41
-
42
-
43
-
44
-
45
-
46
-
47
-
48
-
49
-
50
-
51
-
52
-
53
-
54
-
55
-
56
-
57
-
58
-
59
-
60
-
61
-
62
-
63
-
64
-
65
-
66
-
67
-
68
-
69
-
70
-
71
-
72
-
73
-
74
-
75
-
76
-
77
-
78
-
79
-
80
-
81
-
82
-
83
-
84
-
85
-
86
-
87
-
88
-
89
-
90
-
91
-
92
-
93
-
94
-
95
-
96
-
 97
97 -
 98
98 -
 99
99 -
 100
100 -
 101
101 -
 102
102 -
 103
103 -
 104
104 -
 105
105 -
 106
106 -
 107
107 -
108
-
109
-
110
-
111
-
112
-
113
-
114
-
115
-
116
-
117
-
118
-
119
-
120
-
121
-
122
-
123
-
124
-
125
-
126
-
127
-
128
-
129
-
130
-
131
-
132
-
133
-
134
-
135
-
136
-
137
-
138
-
139
-
140
-
141
-
142
-
143
-
144
-
145
-
146
-
147
-
148
-
149
-
150
-
151
-
152
-
153
-
154
-
155
-
156
-
157
-
158
-
159
-
160
-
161
-
162
-
163
-
164
-
165
-
166
-
167
-
168
-
169
-
170
-
171
-
172
-
173
-
174
-
175
-
176
-
177
-
178
-
179
-
180
-
181
-
182
-
183
-
184
-
185
-
186
-
187
-
188
-
189
-
190
-
191
-
192
-
193
-
194
-
195
-
196
-
197
-
198
-
199
-
200
-
201
-
202
-
203
-
204
-
205
-
206
-
207
-
208
-
209
-
210
-
211
-
212
-
213
-
214
-
215
-
216
-
217
-
218
-
219
-
220
-
221
-
222
-
223
-
224
-
225
-
226
-
227
-
228
-
229
-
230
-
231
-
232
-
233
-
234
-
235
-
236
-
237
-
238
-
239
-
240
-
241
-
242
-
243
-
244
-
245
-
246
-
247
-
248
-
249
-
250
-
251
-
252
-
253
-
254
-
255
-
256
-
257
-
258
-
259
-
260
-
261
-
262
-
263
-
264
-
265
-
266
-
267
-
268
-
269
-
270
-
271
-
272
-
273
-
274
-
275
-
276
-
277
-
278
-
279
-
280
-
281
-
282
-
283
-
284
-
285
-
286
-
287
-
288
-
289
-
290
 |
 |

6.
Pull
down
on
the latches
and
align
hooks
with
holes.
Push
forward on the
larger
part
of the latch
until
it
clicks.
Do
not force the latch. If
it is hard to
lock,
the
top
is not
properly aligned.
f
your vehicle suffers a power
loss,
such
1s
a dead battery,
you can still raise or
ower
the
top manually by rotating the
ralve
in the left side
of
the
trunk.
left side trim panel. Lift
up the tab
and
turn
the valve clockwise to release the
hydraulic pressure. Turn the ignition key
to the
“LOCK”
positon.
You
can now
raise or
lower
your
top
manually. Be sure
to close the valve
after installing your top
so
you can raise
or
lower
it electronically
later.
101
...