2008 Subaru Forester Owner's Manual - Page 181
2008 Subaru Forester Manual
Page 181 highlights
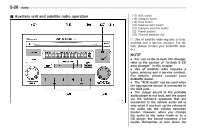
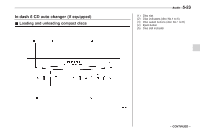
5-24 Audio CAUTION . Do not attempt to insert two or more discs into the slot at a time. Doing so can cause mechanical damage to the CD changer. . Use only music CDs identified by a mark. . Do not use CDs listed in the following which could cause damage to the CD player. - 3 inch (8 cm) compact disc - Any disc with a peel-off or seal on it - Bent disc - Cleaning disc - CD accessory (e.g., 3 inch (8 cm) disc adapter) . Do not insert or remove any disc when the automatic transmission selector lever is in the park position; the selector lever in that position can interfere with disc insertion or removal, causing scratches on the disc surface (for AT vehicles). ! To insert a disc 1. Press one of the disc select buttons (3) (numbered from 1 to 6) for which the disc indicator light (2) is "OFF". The disc indicator lights are located directly above the corresponding disc select buttons. 2. The indicator will begin blinking. The blinking will last for 15 seconds. During this period, insert a desired disc, and the disc will begin to play. (If any disc is not inserted during this period, the "Disc slot" (1) door will close. Repeat Step 1.) Be sure to hold a disc with the label side (the side where titles are printed) up. 3. To insert another disc, repeat Steps 1 and 2 choosing a different disc select button. ! To insert six discs at a time 1. Press and hold the disc select button number 1 until all disc indicators begin blinking (approximately 1.5 seconds). 2. The indicators will blink for 15 seconds. During this period, insert desired six discs. 3. When all discs are loaded, the first disc will begin to play. (If no disc is inserted within this 15 seconds, the entire disc load sequence will be canceled.) ! To remove a disc 1. Press the desired one of the disc select buttons (3) (numbered from 1 to 6) for which the disc indicator light is on. 2. Press the eject button (4). The selected disc will be ejected and the indicator light will begin blinking. 3. To remove another disc, repeat Steps 1 and 2 choosing a different disc select button. (To remove discs when the ignition switch is in the "Lock" position, press the eject button, and the first disc will be ejected. Press the eject button again, and the next disc will be ejected and so on. At this time, the disc select buttons are disabled.) ! To remove all discs at one time 1. Press and hold the eject button (4) until all "Disc" indicators begin blinking (approximately 1.5 seconds), and the first disc will be ejected. 2. When the disc is removed, the next one will be ejected, and so on. ! To replace a playing disc with another Simply press the desired one of disc select buttons (3) (numbered from 1 to 6) or press the disc select button on the radio unit to select the desired disc, and the disc
-
 1
1 -
2
-
3
-
4
-
5
-
6
-
7
-
8
-
9
-
10
-
11
-
12
-
13
-
14
-
15
-
16
-
17
-
18
-
19
-
20
-
21
-
22
-
23
-
24
-
25
-
26
-
27
-
28
-
29
-
30
-
31
-
32
-
33
-
34
-
35
-
36
-
37
-
38
-
39
-
40
-
41
-
42
-
43
-
44
-
45
-
46
-
47
-
48
-
49
-
50
-
51
-
52
-
53
-
54
-
55
-
56
-
57
-
58
-
59
-
60
-
61
-
62
-
63
-
64
-
65
-
66
-
67
-
68
-
69
-
70
-
71
-
72
-
73
-
74
-
75
-
76
-
77
-
78
-
79
-
80
-
81
-
82
-
83
-
84
-
85
-
86
-
87
-
88
-
89
-
90
-
91
-
92
-
93
-
94
-
95
-
96
-
97
-
98
-
99
-
100
-
101
-
102
-
103
-
104
-
105
-
106
-
107
-
108
-
109
-
110
-
111
-
112
-
113
-
114
-
115
-
116
-
117
-
118
-
119
-
120
-
121
-
122
-
123
-
124
-
125
-
126
-
127
-
128
-
129
-
130
-
131
-
132
-
133
-
134
-
135
-
136
-
137
-
138
-
139
-
140
-
141
-
142
-
143
-
144
-
145
-
146
-
147
-
148
-
149
-
150
-
151
-
152
-
153
-
154
-
155
-
156
-
157
-
158
-
159
-
160
-
161
-
162
-
163
-
164
-
165
-
166
-
167
-
168
-
169
-
170
-
171
-
172
-
173
-
174
-
175
-
 176
176 -
 177
177 -
 178
178 -
 179
179 -
 180
180 -
 181
181 -
 182
182 -
 183
183 -
 184
184 -
 185
185 -
 186
186 -
187
-
188
-
189
-
190
-
191
-
192
-
193
-
194
-
195
-
196
-
197
-
198
-
199
-
200
-
201
-
202
-
203
-
204
-
205
-
206
-
207
-
208
-
209
-
210
-
211
-
212
-
213
-
214
-
215
-
216
-
217
-
218
-
219
-
220
-
221
-
222
-
223
-
224
-
225
-
226
-
227
-
228
-
229
-
230
-
231
-
232
-
233
-
234
-
235
-
236
-
237
-
238
-
239
-
240
-
241
-
242
-
243
-
244
-
245
-
246
-
247
-
248
-
249
-
250
-
251
-
252
-
253
-
254
-
255
-
256
-
257
-
258
-
259
-
260
-
261
-
262
-
263
-
264
-
265
-
266
-
267
-
268
-
269
-
270
-
271
-
272
-
273
-
274
-
275
-
276
-
277
-
278
-
279
-
280
-
281
-
282
-
283
-
284
-
285
-
286
-
287
-
288
-
289
-
290
-
291
-
292
-
293
-
294
-
295
-
296
-
297
-
298
-
299
-
300
-
301
-
302
-
303
-
304
-
305
-
306
-
307
-
308
-
309
-
310
-
311
-
312
-
313
-
314
-
315
-
316
-
317
-
318
-
319
-
320
-
321
-
322
-
323
-
324
-
325
-
326
-
327
-
328
-
329
-
330
-
331
-
332
-
333
-
334
-
335
-
336
-
337
-
338
-
339
-
340
-
341
-
342
-
343
-
344
-
345
-
346
-
347
-
348
-
349
-
350
-
351
-
352
-
353
-
354
-
355
-
356
-
357
-
358
-
359
-
360
-
361
-
362
-
363
-
364
-
365
-
366
-
367
-
368
-
369
-
370
-
371
 |
 |
