3Ware 9550SXU-4LP-SGL Quick Installation Guide
3Ware 9550SXU-4LP-SGL - Pci-x Sataraid Manual
 |
UPC - 693494980042
View all 3Ware 9550SXU-4LP-SGL manuals
Add to My Manuals
Save this manual to your list of manuals |
3Ware 9550SXU-4LP-SGL manual content summary:
- 3Ware 9550SXU-4LP-SGL | Quick Installation Guide - Page 1
Quick Install Guide 3ware® SATA RAID Controller Supports the 9550SX Series PN 720-0124-03 January 2006 - 3Ware 9550SXU-4LP-SGL | Quick Installation Guide - Page 2
consent of AMCC, 215 Moffett Park Drive, Sunnyvale, CA 94089. Trademarks 3ware, Escalade, and 3DM are all registered trademarks of AMCC. The 3ware logo, as possible, AMCC assumes no responsibility for errors or omissions in this document, nor does AMCC make any commitment to update the information - 3Ware 9550SXU-4LP-SGL | Quick Installation Guide - Page 3
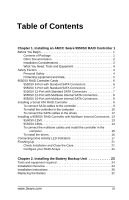
4 Protecting Equipment and Data 5 9550SX RAID Controller Cards 6 9550SX 8-Port with Standard SATA Connectors 6 9550SX 4-Port with Standard SATA Connectors 7 9550SX 12-Port with Standard SATA Connectors 7 9550SX 12-Port with Multilane Internal SATA Connectors 8 9550SX 16-Port with Multilane - 3Ware 9550SXU-4LP-SGL | Quick Installation Guide - Page 4
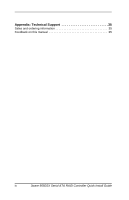
Appendix: Technical Support 35 Sales and ordering information 35 Feedback on this manual 35 iv 3ware 9550SX Serial ATA RAID Controller Quick Install Guide - 3Ware 9550SXU-4LP-SGL | Quick Installation Guide - Page 5
Internal Connectors" provide step-by-step instructions for installing a Serial ATA RAID controller. „ "Finishing Up" describes the final steps required when installing a serial controller. Before You Begin Contents of Package „ 3ware 9550SX RAID controller „ SATA interface cables, one for each port - 3Ware 9550SXU-4LP-SGL | Quick Installation Guide - Page 6
came with your controller, and available through the 3ware website: „ 3ware 9550SX Serial ATA RAID Controller User Guide „ 3ware 9000 Series Serial ATA RAID Controller CLI Guide In HTML format: „ Online help is available from 3DM 2 (3ware Disk Manager) „ Additional support information is available - 3Ware 9550SXU-4LP-SGL | Quick Installation Guide - Page 7
. The 3ware 9550SX controller performs best when installed in a PCI-X 133MHz 64-bit slot. However, it can also operate at 66MHz or 100MHz. Whether to Use the LED Status Connector 3ware RAID controllers include two types of LED status connectors: „ Overall indicator, which lights when any drive is - 3Ware 9550SXU-4LP-SGL | Quick Installation Guide - Page 8
1. Installing an AMCC 3ware 9550SX RAID Controller Drive Installation Considerations „ Selecting an enclosure. If you are planning to use RAID 1, 5, 10, or 50, you may want to consider installing drives into hotswappable enclosures, so that they can be easily removed in the event of a drive failure - 3Ware 9550SXU-4LP-SGL | Quick Installation Guide - Page 9
Up Your Data Back up your data! Creating or deleting disk arrays destroys existing files on the member drives. If your drives contain valuable data, back them up and save the data elsewhere before attaching the drives to the controller. ESD (Electrostatic Discharge) Precautions To avoid damaging - 3Ware 9550SXU-4LP-SGL | Quick Installation Guide - Page 10
an AMCC 3ware 9550SX RAID Controller 9550SX RAID Controller Cards Serial ATA ports are usually double-stacked connectors. Oddnumbered ports are usually located below even-numbered ports. On the 8-port controller shown below, ports 6 and 7 are both on top. 9550SX 8-Port with Standard SATA Connectors - 3Ware 9550SXU-4LP-SGL | Quick Installation Guide - Page 11
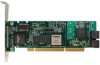
Cards 9550SX 4-Port with Standard SATA Connectors Figure 2. 4-Port 3ware 9550SX-4LP Serial ATA RAID Controller I2C connector Odd-numbered ports 1 and 3 are located below even-numbered ports 0 and 2. Slots for battery holder BBU connector and hole for post Ports: 2 and 3 0 and 1 9550SX 12 - 3Ware 9550SXU-4LP-SGL | Quick Installation Guide - Page 12
AMCC 3ware 9550SX RAID Controller 9550SX 12-Port with Multilane Internal SATA Connectors Figure 4. 12-Port 3ware 9550SX-12MI Serial ATA RAID Controller I2C connector Multi-lane connectors can each handle up to four drives. Ports: 8 to 11 4 to 7 0 to 3 Holes for battery holder connection BBU - 3Ware 9550SXU-4LP-SGL | Quick Installation Guide - Page 13
(BBU), install it on the controller before proceeding. For details, see "Chapter 2. Installing the Battery Backup Unit". To connect SATA cables to the controller Note: If you have a multilane controller, turn to page 13. 1 Take out the SATA cables provided with the 3ware SATA RAID controller. One - 3Ware 9550SXU-4LP-SGL | Quick Installation Guide - Page 14
Chapter 1. Installing an AMCC 3ware 9550SX RAID Controller 3 Align the cable connector with the connector on the controller, matching the slotted key and carefully mate the connectors. Note: The connectors on the end of the serial controller and the drive are susceptible to damage from excessive - 3Ware 9550SXU-4LP-SGL | Quick Installation Guide - Page 15
to secure the serial 3ware RAID controller after you have seated it in the slot. 6 Position the card in the slot so that the contacts will mate with the grooves in the slot, and all pins make proper contact with the PCI slot pins when pushed into place. The 3ware RAID controller is keyed to ensure - 3Ware 9550SXU-4LP-SGL | Quick Installation Guide - Page 16
on "Connecting Drive Activity LED Indicators" on page 17. For a discussion of whether to make these connections, see "Whether to Use the LED Status Connector" on page 3. 4 Turn to "Check Installation and Close the Case" on page 21. 12 3ware 9550SX Serial ATA RAID Controller Quick Install Guide - 3Ware 9550SXU-4LP-SGL | Quick Installation Guide - Page 17
Installing a 9550SX RAID Controller with Multilane Internal Connectors Installing a 9550SX RAID Controller with Multilane Internal Connectors Models 9550SX-12MI and 9550SX-16ML come with multilane internal connectors, each of which can handle up to four drives. These controllers can be installed in - 3Ware 9550SXU-4LP-SGL | Quick Installation Guide - Page 18
ATA drives, use the multilane break-out cable, which has an SFF-8087 multilane connector on one end, and four individual SATA connectors on the other end (see Figure 12). Figure 12. Multi-lane Serial ATA Break-out Cable (SFF-8087) 14 3ware 9550SX Serial ATA RAID Controller Quick Install Guide - 3Ware 9550SXU-4LP-SGL | Quick Installation Guide - Page 19
Installing a 9550SX RAID Controller with Multilane Internal Connectors To connect the multilane cables and install the controller in the computer Depending on the number of drives you will be connecting, you will connect one to three multilane cables (for the 12-port card) or one to four multilane - 3Ware 9550SXU-4LP-SGL | Quick Installation Guide - Page 20
Chapter 1. Installing an AMCC 3ware 9550SX RAID Controller 2 Insert the controller into the computer. For details, see "To install the controller in the computer" on page 10. 3 If to either the backplane or the individual drives. 16 3ware 9550SX Serial ATA RAID Controller Quick Install Guide - 3Ware 9550SXU-4LP-SGL | Quick Installation Guide - Page 21
LED connector details J7 is for drives 0, 1, 2, 3 (left to right) J8 is for drives 4, 5, 6, 7 (left to right) Figure 16. 4-Port 3ware 9550SX-4LP Serial ATA RAID Controller LED indicators for individual drives on J7: 0, 1, 2, 3 (left to right) Overall LED drive status indicator: the last two pins - 3Ware 9550SXU-4LP-SGL | Quick Installation Guide - Page 22
Chapter 1. Installing an AMCC 3ware 9550SX RAID Controller Note: The LED headers on the 9550SX-12 and the 9550SX-12MI are in a very similar place. Figure 17. 12-Port 3ware 9550SX-12 Serial ATA RAID Controller LED indicators for individual drives J7 is for drives 0, 1, 2, 3 (left to right) J8 is - 3Ware 9550SXU-4LP-SGL | Quick Installation Guide - Page 23
LED Indicators Figure 18. 16-Port 3ware 9550SX-16ML Serial ATA RAID Controller LED indicators for individual drives J7 is for drives 0, 1, 2, 3 (left to right) J8 is for drives 4, 5, 6, 7 (left to right) J9 is for drives 8, 9, 10, 11 (left to right) J1 is for drives 12, 13, 14, 15 (left to right - 3Ware 9550SXU-4LP-SGL | Quick Installation Guide - Page 24
AMCC 3ware 9550SX RAID Controller Table 1 summarizes the LED indicator pin positions for the different controllers. Warning: If using a chassis that has a common or shared LED ground, be sure to only connect LED cables to the anode pins on the controller Orientation Horizontal 9550SX-12/12MI J7 - 3Ware 9550SXU-4LP-SGL | Quick Installation Guide - Page 25
of any other components in the case or block the flow of cooling air. 2 Close the case and reconnect the power cables. Configure your RAID Arrays Turn to "Configuring Units" in 3ware 9550SX Serial ATA RAID Controller User Guide for information about configuring RAID arrays. www.3ware.com 21 - 3Ware 9550SXU-4LP-SGL | Quick Installation Guide - Page 26
Chapter 1. Installing an AMCC 3ware 9550SX RAID Controller 22 3ware 9550SX Serial ATA RAID Controller Quick Install Guide - 3Ware 9550SXU-4LP-SGL | Quick Installation Guide - Page 27
Backup Unit The Battery Backup Unit (BBU) is an add-on that can be attached to a 3ware 9550SX RAID controller to supply power to the memory module from an attached battery pack in the event of a system power loss. This allows the controller to use write-caching for optimal performance and not be - 3Ware 9550SXU-4LP-SGL | Quick Installation Guide - Page 28
controllers (12-port and 16-port). b Connector on the BBU mates to receptacle on the controller. c Post on the BBU mates to post hole on the controller. a) Clips b) BBU connector c) Post Figure 19. Points of connection on the BBU 24 3ware 9550SX Serial ATA RAID Controller Quick Install Guide - 3Ware 9550SXU-4LP-SGL | Quick Installation Guide - Page 29
Installation Overview a) Slots for the clips b) BBU receptacle c) Hole for post Figure 20. Points of connection on the half-height controller a) Holes for the clips b) BBU receptacle c) Hole for post Figure 21. Points of connection on the full-height controller www.3ware.com 25 - 3Ware 9550SXU-4LP-SGL | Quick Installation Guide - Page 30
sure to: „ Mate the connector on the BBU control module with the receptacle on the controller. „ Match the plastic post on the BBU with the hole on the controller. Figure 23. BBU control module ready to connect to the controller 26 3ware 9550SX Serial ATA RAID Controller Quick Install Guide - 3Ware 9550SXU-4LP-SGL | Quick Installation Guide - Page 31
Installation Instructions 3 Press down gently until the BBU is seated. Figure 24. BBU control module connected to the controller 4 Turn the controller over, insert the plastic screw head that you removed in step 1 into the plastic post, and tighten it gently but firmly. (Do not over-tighten!) - 3Ware 9550SXU-4LP-SGL | Quick Installation Guide - Page 32
the battery module to the half-height controller b Press down gently on the top of the battery unit so that the battery holder flexes slightly and the clip on the bottom slips over the slot on the bottom edge of the controller. 28 3ware 9550SX Serial ATA RAID Controller Quick Install Guide - 3Ware 9550SXU-4LP-SGL | Quick Installation Guide - Page 33
Installation Instructions Bottom clip Figure 27. Pressing down gently on the battery unit flexes the holder slightly so that the bottom clip can be inserted If you have a 12-port or 16-port 9550SX: a Insert the clips on the top of the battery module into the holes on the controller. Figure 28. - 3Ware 9550SXU-4LP-SGL | Quick Installation Guide - Page 34
to do this step until the system is ready for use. Figure 29. Battery power connector inserted in power receptacle The controller is now ready to install in your system. Figure 23 shows the BBU fully installed on 3ware controllers. 30 3ware 9550SX Serial ATA RAID Controller Quick Install Guide - 3Ware 9550SXU-4LP-SGL | Quick Installation Guide - Page 35
Installation Instructions Figure 30. BBU installed on controllers www.3ware.com 31 - 3Ware 9550SXU-4LP-SGL | Quick Installation Guide - Page 36
, and test it. For details, see instructions in 3ware 9550SX Serial ATA RAID Controller User Guide. Caution: There is a risk of explosion if the battery is replaced by an incorrect type. To obtain a replacement battery module, contact AMCC. For proper battery disposal resources, contact RBRC, the - 3Ware 9550SXU-4LP-SGL | Quick Installation Guide - Page 37
31. Removing the battery module 6 Disconnect the battery power cable from the BBU. To do so, press down on the lever-like clip on the battery power connector and slide it out of the slot. (If desired, you can remove the BBU control module to facilitate disconnecting the power cable.) www.3ware - 3Ware 9550SXU-4LP-SGL | Quick Installation Guide - Page 38
run the battery test from the BBU page of either 3BM or 3DM 2, or by using the 3ware CLI. For detailed instructions, see the 3ware 9550SX Serial ATA RAID Controller User Guide and the 3ware 9000 Series Serial ATA RAID Controller CLI Guide. 34 3ware 9550SX Serial ATA RAID Controller Quick Install - 3Ware 9550SXU-4LP-SGL | Quick Installation Guide - Page 39
Support For support, troubleshooting tips, frequently asked questions, software releases, and compatibility information related to 3ware RAID controllers, refer to: „ 3ware support page at: http://www.3ware.com/support/ „ 3ware knowledgebase: http://www.3ware.com/KB/kb.asp „ 3ware software downloads - 3Ware 9550SXU-4LP-SGL | Quick Installation Guide - Page 40
Appendix: Technical Support 36 3ware 9550SX Serial ATA RAID Controller Quick Install Guide
-
 1
1 -
 2
2 -
 3
3 -
 4
4 -
 5
5 -
 6
6 -
 7
7 -
8
-
9
-
10
-
11
-
12
-
13
-
14
-
15
-
16
-
17
-
18
-
19
-
20
-
21
-
22
-
23
-
24
-
25
-
26
-
27
-
28
-
29
-
30
-
31
-
32
-
33
-
34
-
35
-
36
-
37
-
38
-
39
-
40
 |
 |
3ware
®
SATA RAID Controller
Supports the 9550SX Series
PN 720-0124-03
January 2006
Quick Install Guide