ASRock 4Core1333-eSATA2 Quick Installation Guide - Page 133
Surround Display, 4 Slot di espansione Slot PCI, Slot PCI Express e Slot, AGI Express, Installare
 |
View all ASRock 4Core1333-eSATA2 manuals
Add to My Manuals
Save this manual to your list of manuals |
Page 133 highlights
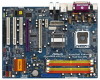
2.4 Slot di espansione (Slot PCI, Slot PCI Express e Slot AGI Express) Esistono 3 slot PCI, 2 slot PCI Express e 1 slot AGI Express (PCI Express x4) su entrambe le schede madri 4Core1333-eSATA2. Slot PCI: Sono utilizzati per installare schede di espansione con Interfaccia PCI a 32-bit. Slot PCI Express: PCIE1 (slot PCIE x1) usato per schede PCI Express con schede grafiche di larghezza x1, quali scheda Gigabit LAN, SATA 2, ecc. PCIE2 (slot PCIE x16) usato per schede PCI Express con schede grafiche di larghezza x16. Slot AGI Express (PCI Express x4): lo slot AGI Express (PCI Express x4) viene usato per installare le schede di espansione di PCI Express. Se si intende installare una sola scheda PCI Express su questa scheda madre, installarla nell'alloggio PCIE2 (alloggio PCIE x16). Installare una scheda di espansione Step 1. Prima d'installare la scheda di espansione, assicurarsi che l'alimentazione sia stata esclusa oppure che il cavo di alimentazione sia scollegato. Prima di iniziare l'installazione, si prega di leggere la documentazione della scheda di espansione e di effettuare le necessarie impostazioni del hardware. Step 2. Rimuovere i ganci sullo slot che si intende utilizzare. Tenere a portata di mano le viti. Step 3. Allineare il connettore della scheda con lo slot e premere con decisione finché la scheda è completamente inserita nello slot. Step 4. Agganciare la scheda allo chassis con le viti. 2.5 "Surround Display" Questa scheda madre supporta l'aggiornamento Surround Display. Con la scheda integrativa PCI Express VGA, si possono sfruttare con facilità i benefici della funzione Surround Display. Per le istruzioni dettagliate, fare riferimento al documento nel seguente percorso sul CD di supporto: ..\ Surround Display Information Italiano ASRock 4Core1333-eSATA2 Motherboard 133
-
 1
1 -
2
-
3
-
4
-
5
-
6
-
7
-
8
-
9
-
10
-
11
-
12
-
13
-
14
-
15
-
16
-
17
-
18
-
19
-
20
-
21
-
22
-
23
-
24
-
25
-
26
-
27
-
28
-
29
-
30
-
31
-
32
-
33
-
34
-
35
-
36
-
37
-
38
-
39
-
40
-
41
-
42
-
43
-
44
-
45
-
46
-
47
-
48
-
49
-
50
-
51
-
52
-
53
-
54
-
55
-
56
-
57
-
58
-
59
-
60
-
61
-
62
-
63
-
64
-
65
-
66
-
67
-
68
-
69
-
70
-
71
-
72
-
73
-
74
-
75
-
76
-
77
-
78
-
79
-
80
-
81
-
82
-
83
-
84
-
85
-
86
-
87
-
88
-
89
-
90
-
91
-
92
-
93
-
94
-
95
-
96
-
97
-
98
-
99
-
100
-
101
-
102
-
103
-
104
-
105
-
106
-
107
-
108
-
109
-
110
-
111
-
112
-
113
-
114
-
115
-
116
-
117
-
118
-
119
-
120
-
121
-
122
-
123
-
124
-
125
-
126
-
127
-
 128
128 -
 129
129 -
 130
130 -
 131
131 -
 132
132 -
 133
133 -
 134
134 -
 135
135 -
 136
136 -
 137
137 -
 138
138 -
139
-
140
-
141
-
142
-
143
-
144
-
145
-
146
-
147
-
148
-
149
-
150
-
151
-
152
-
153
-
154
-
155
-
156
-
157
-
158
-
159
-
160
-
161
-
162
-
163
-
164
-
165
-
166
-
167
-
168
-
169
-
170
-
171
-
172
-
173
-
174
-
175
-
176
-
177
-
178
-
179
-
180
-
181
-
182
-
183
-
184
-
185
-
186
-
187
-
188
-
189
-
190
-
191
-
192
-
193
-
194
-
195
-
196
-
197
-
198
-
199
-
200
-
201
-
202
-
203
-
204
-
205
-
206
-
207
-
208
-
209
-
210
-
211
-
212
-
213
-
214
-
215
-
216
-
217
-
218
-
219
-
220
-
221
-
222
-
223
-
224
-
225
-
226
-
227
-
228
 |
 |
