ASRock 770DE3L Quick Installation Guide
ASRock 770DE3L Manual
 |
View all ASRock 770DE3L manuals
Add to My Manuals
Save this manual to your list of manuals |
ASRock 770DE3L manual content summary:
- ASRock 770DE3L | Quick Installation Guide - Page 1
benefit, without intent to infringe. Disclaimer: Specifications and information contained in this guide are furnished for informational use only and subject ASRock Website: http://www.asrock.com Published May 2010 Copyright©2010 ASRock INC. All rights reserved. 1 ASRock 770DE3L Motherboard - ASRock 770DE3L | Quick Installation Guide - Page 2
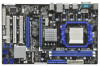
Motherboard Layout English 1 ATX 12V Power Connector (ATX12V1) 22 USB 2.0 Header (USB8_9, Blue) 2 PS2_USB_PW1 Jumper 23 USB 2.0 Header (USB6_7, Blue) 3 AM3 CPU Socket 24 USB_PW2 Jumper 4 CPU Heatsink Retention Module 25 SPI Flash Memory (8Mb) 5 CPU , Blue) 2 ASRock 770DE3L Motherboard - ASRock 770DE3L | Quick Installation Guide - Page 3
) 8 USB 2.0 Ports (USB23) 9 Serial Port: COM1 10 PS/2 Keyboard Port (Purple) * There are two LED next Audio Deck" tool on your system. Please follow below instructions according to the OS you install. For Windows® XP / XP 64-bit OS: Please click "VIA HD Audio ASRock 770DE3L Motherboard English - ASRock 770DE3L | Quick Installation Guide - Page 4
guide to BIOS setup and information of the Support CD. Because the motherboard specifications and the BIOS software might be updated, the content of this manual will be subject to change without notice. In case any modifications of this manual occur, the updated version will be available on ASRock - ASRock 770DE3L | Quick Installation Guide - Page 5
CPU Ready - Supports CPU up to 140W - Supports ASRock UCC - Unlock CPU Core - Supports AMD's Cool 'n' QuietTM Technology - FSB 2600 MHz (5.2 GT/s) - Supports Untied Overclocking Technology (see CAUTION 1) - Supports Hyper-Transport 3.0 (HT 3.0) Technology - Northbridge: AMD 770 - Southbridge: AMD - ASRock 770DE3L | Quick Installation Guide - Page 6
Up Events - Supports jumperfree - SMBIOS 2.3.1 Support - CPU VID Voltage Multi-adjustment Support CD - Drivers, Utilities, AntiVirus Software (Trial Version), AMD OverDriveTM Utility, ASRock Software Suite (CyberLink DVD Suite - OEM and Trial; Creative Sound Blaster X-Fi MB - Trial) Unique - ASRock 770DE3L | Quick Installation Guide - Page 7
, please read the "SATAII Hard Disk Setup Guide" on page 27 of "User Manual" in the support CD to adjust your SATAII hard disk drive to SATAII mode. You can also connect SATA hard disk to SATAII connector directly. 6. It is a user-friendly ASRock overclocking tool which allows you to surveil your - ASRock 770DE3L | Quick Installation Guide - Page 8
embedded in Flash ROM. This convenient BIOS update tool allows you to update system BIOS without entering operating systems first like MS-DOS or Windows®. With this utility, you can press key during the POST or press key to BIOS setup menu to access ASRock Instant Flash. Just launch this - ASRock 770DE3L | Quick Installation Guide - Page 9
wall socket before touching any component. 2. To avoid damaging the motherboard components due to static electricity, NEVER place your motherboard directly the motherboard to the chassis, please do not over-tighten the screws! Doing so may damage the motherboard. 9 ASRock 770DE3L Motherboard English - ASRock 770DE3L | Quick Installation Guide - Page 10
the heatsink are securely fastened and in good contact with each other. Then connect the CPU fan to the CPU FAN connector (CPU_FAN1, see Page 2, No. 5). For proper installation, please kindly refer to the instruction manuals of the CPU fan and the heatsink. English 10 ASRock 770DE3L Motherboard - ASRock 770DE3L | Quick Installation Guide - Page 11
Step 1. Step 2. Unlock a DIMM slot by motherboard and the DIMM if you force the DIMM into the slot at incorrect orientation. Step 3. Firmly insert the DIMM into the slot until the retaining clips at both ends fully snap back in place and the DIMM is properly seated. 11 ASRock 770DE3L Motherboard - ASRock 770DE3L | Quick Installation Guide - Page 12
cards to support CrossFireXTM motherboard, please install it on PCIE2 slot. 2. For the information of the compatible CrossFireXTM Mode PCI Express VGA cards and CrossFireXTM setup procedures, please refer to "CrossFireXTM and Quad CrossFireXTM Operation Guide ASRock 770DE3L Motherboard English - ASRock 770DE3L | Quick Installation Guide - Page 13
3D application. Currently CrossFireXTM feature is supported with Windows® XP with Service Pack 2 / VistaTM / 7 OS. Quad CrossFireXTM feature are supported with Windows® VistaTM / 7 OS only. Please check AMD website for ATITM CrossFireXTM driver updates. 1. If a customer incorrectly configures their - ASRock 770DE3L | Quick Installation Guide - Page 14
provided with the graphics card you purchase, not bundled with this motherboard. Please refer to your graphics card vendor for details.) CrossFire Bridge Step 3. Connect the DVI monitor cable to the DVI connector monitor cable to the DVI to D-Sub adapter.) English 14 ASRock 770DE3L Motherboard - ASRock 770DE3L | Quick Installation Guide - Page 15
prior to installation. Please check AMD website for ATITM driver updates. Step 3. Step 4. Step 5. Install the required drivers to your system. For Windows® XP OS: A. ATITM recommends Windows® XP Service Pack 2 or higher to be installed (If you have Windows® XP Service Pack 2 or higher installed in - ASRock 770DE3L | Quick Installation Guide - Page 16
upgrade. With the external add-on ATITM PCI Express VGA cards, you can easily enjoy the benefits of Surround Display feature. For the detailed instruction, please refer to the document at the following path in the Support CD: ..\ Surround Display Information 16 ASRock 770DE3L Motherboard English - ASRock 770DE3L | Quick Installation Guide - Page 17
for 5 seconds. However, please do not clear the CMOS right after you update the BIOS. If you need to clear the CMOS when you just finish updating the BIOS, you must boot up the system first, and then shut it down before you do the clear-CMOS action. English 17 ASRock 770DE3L Motherboard - ASRock 770DE3L | Quick Installation Guide - Page 18
Audio Jumper (EUP_LAN1, 3-pin jumper, see p.2 No. 35) (EUP_AUDIO1, 3-pin jumper, see p.2 No. 31) Default (Enable EuP) Note: EUP_LAN and EUP_AUDIO jumper design decreases the power consumption of this motherboard to meet EuP standard. With an ASRock EuP ready motherboard ASRock 770DE3L Motherboard - ASRock 770DE3L | Quick Installation Guide - Page 19
the motherboard connect the black end to the IDE devices 80-conductor ATA 66/100/133 cable Note: Please refer to the instruction SATAII_3 These six Serial ATAII (SATAII) connectors support SATAII or SATA hard disk for internal storage devices motherboard. English 19 ASRock 770DE3L Motherboard - ASRock 770DE3L | Quick Installation Guide - Page 20
manual to install your system. 2. If you use AC'97 audio panel, please install it to the front panel audio header as below: A. Connect Mic_IN (MIC) to MIC2_L. B. Connect Audio_R (RIN) to OUT2_R and Audio_L (LIN) to OUT2_L. C. Connect Ground (GND) to Ground (GND). 20 ASRock 770DE3L Motherboard - ASRock 770DE3L | Quick Installation Guide - Page 21
Pin CPU fan (Quiet Fan) support, the 3-Pin CPU fan still can work successfully even without the fan speed control function. If you plan to connect the 3-Pin CPU fan to the CPU fan connector on this motherboard, please connect it to Pin 1-3. Pin 1-3 Connected 3-Pin Fan Installation 21 ASRock 770DE3L - ASRock 770DE3L | Quick Installation Guide - Page 22
34) 4-Pin ATX 12V Power Supply Installation 1 6 HDMI_SPDIF header, providing SPDIF audio output to HDMI VGA card, allows the system to con nect HDMI Digital TV/ projector/LCD devices. Please connect the HDMI_SPDIF connector of HDMI VGA card to this header. English 22 ASRock 770DE3L Motherboard - ASRock 770DE3L | Quick Installation Guide - Page 23
HDDs without NCQ and Hot Plug functions (IDE mode) STEP 1: Set up BIOS. A. Enter BIOS SETUP UTILITY Advanced screen Storage Configuration. B. Set the "SATA Operation Mode" option to [IDE]. STEP 2: Install Windows® XP / XP 64-bit OS on your system. English 23 ASRock 770DE3L Motherboard - ASRock 770DE3L | Quick Installation Guide - Page 24
Up BIOS. A. Enter BIOS SETUP UTILITY Advanced screen Storage Configuration. B. Set the "SATA Operation Mode" option to [AHCI]. STEP 2: Install Windows® 7 / 7 64-bit / VistaTM / VistaTM 64-bit OS on your system. 2.12 Untied Overclocking Technology This motherboard supports Untied Overclocking - ASRock 770DE3L | Quick Installation Guide - Page 25
about BIOS Setup, please refer to the User Manual (PDF file) contained in the Support CD. 4. Software Support CD information This motherboard supports various Microsoft® Windows® operating from the "BIN" folder in the Support CD to display the menus. 25 ASRock 770DE3L Motherboard English - ASRock 770DE3L | Quick Installation Guide - Page 26
26 ASRock 770DE3L Motherboard - ASRock 770DE3L | Quick Installation Guide - Page 27
'' ™ ® 27 ASRock 770DE3L Motherboard - ASRock 770DE3L | Quick Installation Guide - Page 28
® ® 28 ASRock 770DE3L Motherboard - ASRock 770DE3L | Quick Installation Guide - Page 29
® ® ® ® 29 ASRock 770DE3L Motherboard - ASRock 770DE3L | Quick Installation Guide - Page 30
® 30 ASRock 770DE3L Motherboard - ASRock 770DE3L | Quick Installation Guide - Page 31
31 ASRock 770DE3L Motherboard - ASRock 770DE3L | Quick Installation Guide - Page 32
32 ASRock 770DE3L Motherboard - ASRock 770DE3L | Quick Installation Guide - Page 33
SATAII_6 SATAII_2 SATAII_5 SATAII_4 SATAII_1 SATAII_3 33 ASRock 770DE3L Motherboard - ASRock 770DE3L | Quick Installation Guide - Page 34
CD1 34 ASRock 770DE3L Motherboard - ASRock 770DE3L | Quick Installation Guide - Page 35
4 3 2 1 12 24 1 13 35 ASRock 770DE3L Motherboard - ASRock 770DE3L | Quick Installation Guide - Page 36
4 8 1 6 12 24 1 13 4 8 1 6 36 ASRock 770DE3L Motherboard - ASRock 770DE3L | Quick Installation Guide - Page 37
® ® 37 ASRock 770DE3L Motherboard - ASRock 770DE3L | Quick Installation Guide - Page 38
X O O O X O O O O: X: O O O O 38 ASRock 770DE3L Motherboard
-
 1
1 -
 2
2 -
 3
3 -
 4
4 -
 5
5 -
 6
6 -
 7
7 -
8
-
9
-
10
-
11
-
12
-
13
-
14
-
15
-
16
-
17
-
18
-
19
-
20
-
21
-
22
-
23
-
24
-
25
-
26
-
27
-
28
-
29
-
30
-
31
-
32
-
33
-
34
-
35
-
36
-
37
-
38
 |
 |

1
ASRock
770DE3L
Motherboard
English
English
English
English
English
Copyright Notice:
Copyright Notice:
Copyright Notice:
Copyright Notice:
Copyright Notice:
No part of this installation guide may be reproduced, transcribed, transmitted, or trans-
lated in any language, in any form or by any means, except duplication of documen-
tation by the purchaser for backup purpose, without written consent of ASRock Inc.
Products and corporate names appearing in this guide may or may not be registered
trademarks or copyrights of their respective companies, and are used only for identifica-
tion or explanation and to the owners’ benefit, without intent to infringe.
Disclaimer:
Disclaimer:
Disclaimer:
Disclaimer:
Disclaimer:
Specifications and information contained in this guide are furnished for informational
use only and subject to change without notice, and should not be constructed as a
commitment by ASRock. ASRock assumes no responsibility for any errors or omissions
that may appear in this guide.
With respect to the contents of this guide, ASRock does not provide warranty of any kind,
either expressed or implied, including but not limited to the implied warranties or
conditions of merchantability or fitness for a particular purpose. In no event shall
ASRock, its directors, officers, employees, or agents be liable for any indirect, special,
incidental, or consequential damages (including damages for loss of profits, loss of
business, loss of data, interruption of business and the like), even if ASRock has been
advised of the possibility of such damages arising from any defect or error in the guide
or product.
This device complies with Part 15 of the FCC Rules. Operation is subject to the
following two conditions:
(1)
this device may not cause harmful interference, and
(2)
this device must accept any interference received, including interference that
may cause undesired operation.
Published May 2010
Copyright
©
2010 ASRock INC. All rights reserved.
CALIFORNIA, USA ONLY
The Lithium battery adopted on this motherboard contains Perchlorate, a toxic
substance controlled in Perchlorate Best Management Practices (BMP) regulations
passed by the California Legislature. When you discard the Lithium battery in
California, USA, please follow the related regulations in advance.
“Perchlorate Material-special handling may apply, see
www
.dtsc.ca.gov/hazardouswa
ste/perchlorate”
ASRock Website: http://www.asrock.com