ASRock 775Twins-HDTV Quick Installation Guide
ASRock 775Twins-HDTV Manual
 |
View all ASRock 775Twins-HDTV manuals
Add to My Manuals
Save this manual to your list of manuals |
ASRock 775Twins-HDTV manual content summary:
- ASRock 775Twins-HDTV | Quick Installation Guide - Page 1
for backup purpose, without written consent of ASRock Inc. Products and corporate names appearing in this guide may or may not be registered trademarks or ASRock Website: http://www.asrock.com Published December 2005 Copyright©2005 ASRock INC. All rights reserved. 1 ASRock 775Twins-HDTV Motherboard - ASRock 775Twins-HDTV | Quick Installation Guide - Page 2
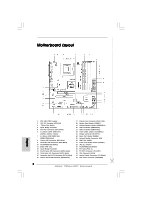
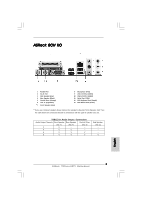
(IR1) 26 AMR Slot (AMR1) 27 Front Panel Audio Header (AUDIO1) 28 JR1 / JL1 Jumpers 29 PCI EXPRESS Slot (PCIE2) 30 PCI Slots (PCI1- 2) 31 TV-OUT Connector (TV-OUT1) 32 VGA Connector (VGA1) 33 Internal Audio Connector: CD1 (Black) 34 ATX Power Connector (ATXPWR1) 2 ASRock 775Twins-HDTV Motherboard - ASRock 775Twins-HDTV | Quick Installation Guide - Page 3
in accordance with the type of speaker you use. TABLE for Audio Output Connection Audio Output Channels Front Speaker Rear Speaker Central / Bass (No. 7) (No. 4) (No. 5) 2 V -- -- 4 V V -- 6 V V V 8 V V V Side Speaker (No. 3) ---V 3 ASRock 775Twins-HDTV Motherboard English - ASRock 775Twins-HDTV | Quick Installation Guide - Page 4
and CPU support lists on ASRock website as well. ASRock website http://www.asrock.com 1.1 Package Contents ASRock 775Twins-HDTV Motherboard (Micro ATX Form Factor: 9.6-in x 9.6-in, 24.4 cm x 24.4 cm) ASRock 775Twins-HDTV Quick Installation Guide ASRock 775Twins-HDTV Support CD (including LGA 775 CPU - ASRock 775Twins-HDTV | Quick Installation Guide - Page 5
® Dual Core Pentium® XE and Pentium® D / Pentium® 4 / Celeron® D processor (in 775-land LGA package) - FSB 1066/800/533 MHz - Supports EM64T CPU - Supports Hyper-Threading Technology (see CAUTION 1) - Supports Untied Overclocking Technology (see CAUTION 2) - Northbridge: ATITM Radeon® Xpress 200 - ASRock 775Twins-HDTV | Quick Installation Guide - Page 6
CPU Temperature Sensing - Chassis Temperature Sensing - CPU Overheat Shutdown to Protect CPU Life - CPU Fan Tachometer - Chassis Fan Tachometer - Voltage Monitoring: +12V, +5V, +3.3V, Vcore - Microsoft® Windows® 2000/XP/XP 64-bit compliant - FCC, CE, WHQL English 6 ASRock 775Twins-HDTV Motherboard - ASRock 775Twins-HDTV | Quick Installation Guide - Page 7
modes. For audio output, this motherboard supports 2-channel, 4-channel, 6-channel, and 8-channel modes. Please check the table on page 3 for proper connection. 6. Power Management for USB 2.0 works fine under Microsoft® Windows® XP SP1 or SP2 / 2000 SP4. 7 ASRock 775Twins-HDTV Motherboard English - ASRock 775Twins-HDTV | Quick Installation Guide - Page 8
you insert the 775-LAND CPU into the socket, please check if the CPU surface is unclean or if there is any bent pin on the socket. Do not force to insert the CPU into the socket if above situation is found. Otherwise, the CPU will be seriously damaged. 8 ASRock 775Twins-HDTV Motherboard English - ASRock 775Twins-HDTV | Quick Installation Guide - Page 9
100 degrees. Step 2. Insert the 775-LAND CPU: Step 2-1. Hold the CPU by the edges where are marked with black support the load plate edge, engage PnP cap with right hand thumb and peel the cap from the socket while pressing on center of PnP cap to assist in removal. 9 ASRock 775Twins-HDTV Motherboard - ASRock 775Twins-HDTV | Quick Installation Guide - Page 10
clockwise, the heatsink cannot be secured on the motherboard. Step 5. Step 6. 10 Connect fan header with the CPU fan connector on the motherboard. Secure excess cable with tie-wrap to ensure cable does not interfere with fan operation or contact other components. ASRock 775Twins-HDTV Motherboard - ASRock 775Twins-HDTV | Quick Installation Guide - Page 11
permanent damage to the motherboard and the DIMM if you force the DIMM into the slot at incorrect orientation. Step 3. Firmly insert the DIMM into the slot until the retaining clips at both ends fully snap back in place and the DIMM is properly seated. 11 ASRock 775Twins-HDTV Motherboard English - ASRock 775Twins-HDTV | Quick Installation Guide - Page 12
is "Open". The illustration shows a 3-pin jumper whose pin1 and pin2 are "Short" when jumper cap is placed on these 2 pins. Short Open English 12 ASRock 775Twins-HDTV Motherboard - ASRock 775Twins-HDTV | Quick Installation Guide - Page 13
short, both the front panel and the rear panel audio connectors can work. Clear CMOS (CLRCMOS1, 3-pin jumper update the BIOS. If you need to clear the CMOS when you just finish updating the BIOS motherboard to the IDE devices 80-conductor ATA 66/100/133 cable 13 ASRock 775Twins-HDTV Motherboard - ASRock 775Twins-HDTV | Quick Installation Guide - Page 14
panel and the other end to VGA1 header of this motherboard. Please connect either end of AV/S_2x3 cable to J2 jumper of VGA_HDTV panel and the other end to TV-OUT header of this motherboard. Please connect either end of VGA_2X8 cable to VGA header. English 14 ASRock 775Twins-HDTV Motherboard - ASRock 775Twins-HDTV | Quick Installation Guide - Page 15
to support 2 additional USB 2.0 ports. ASRock 8CH audio input from sound sources such as a CD-ROM, DVD-ROM, TV tuner card, or MPEG card. This is an interface for front panel audio cable that allows convenient connection and control of audio devices. English 15 ASRock 775Twins-HDTV Motherboard - ASRock 775Twins-HDTV | Quick Installation Guide - Page 16
Speaker Header (4-pin SPEAKER 1) (see p.2 No. 19) Chassis Fan Connector (3-pin CHA_FAN1) (see p.2 No. 17) CPU Fan Connector (3-pin CPU_FAN1) (see p.2 No. 5) ATX Power Connector (20-pin ATXPWR1) (see p.2 No. 34) if the Game port bracket is installed. English 16 ASRock 775Twins-HDTV Motherboard - ASRock 775Twins-HDTV | Quick Installation Guide - Page 17
device you use. Therefore, if you only install HDTV or TV instead of VGA monitor, it is not necessary for you to enable the TV display setting in Windows control panel or change BIOS setup, and you can enjoy the HDTV or TV display function directly. 17 ASRock 775Twins-HDTV Motherboard English - ASRock 775Twins-HDTV | Quick Installation Guide - Page 18
OS. Step 3. Change HDTV display settings. For maximum performance when you watch DVD movies or play computer games on your HDTV, you should find the mode and screen resolution that provide the best result on your TV, and use those settings exclusively. 18 ASRock 775Twins-HDTV Motherboard English - ASRock 775Twins-HDTV | Quick Installation Guide - Page 19
to boot into OS. Step 4. Enable the TV display. Please follow the below steps: A. Access the Windows Control Panel. Double-click Display. B. Click the Settings tab and then the Advanced button. C. Click the ATI Displays tab. Click the TV button. English 19 ASRock 775Twins-HDTV Motherboard - ASRock 775Twins-HDTV | Quick Installation Guide - Page 20
HDTV will start to display. Step 5. Change HDTV display settings. (Please refer to Step 3 on page 18 for details.) 2.8.2 TV Support Function Connecting to TV With AV Output Capability Step 1. Connect the AV video cable to the Typical TV Video instruction. ASRock 775Twins-HDTV Motherboard English - ASRock 775Twins-HDTV | Quick Installation Guide - Page 21
the other end of the SATA data cable to the SATA hard disk. If you plan to use RAID 0, RAID 1, or JBOD functions on SATA, SATA HDDs must not operate in ATA Combination Mode enabled. Please refer to page 34 of "User Manual" in the support CD for details. 21 ASRock 775Twins-HDTV Motherboard English - ASRock 775Twins-HDTV | Quick Installation Guide - Page 22
guide in the Support CD for proper configuration. Please find the document, "Guide to SATA Hard Disks Installation and RAID Configuration", at the following path in the Support CD: .. \ Information \ Manual \ RAID Installation Guide \ English.pdf 22 ASRock 775Twins-HDTV Motherboard English - ASRock 775Twins-HDTV | Quick Installation Guide - Page 23
about BIOS Setup, please refer to the User Manual (PDF file) contained in the Support CD. 4. Software Support CD information This motherboard supports various Microsoft® Windows® operating systems: 2000/ XP/XP 64-bit. The Support CD that came with the motherboard contains necessary drivers and - ASRock 775Twins-HDTV | Quick Installation Guide - Page 24
24 ASRock 775Twins-HDTV Motherboard - ASRock 775Twins-HDTV | Quick Installation Guide - Page 25
® TM ® ® TM ® 25 ASRock 775Twins-HDTV Motherboard - ASRock 775Twins-HDTV | Quick Installation Guide - Page 26
- ® ® 26 ASRock 775Twins-HDTV Motherboard - ASRock 775Twins-HDTV | Quick Installation Guide - Page 27
27 ASRock 775Twins-HDTV Motherboard - ASRock 775Twins-HDTV | Quick Installation Guide - Page 28
28 ASRock 775Twins-HDTV Motherboard - ASRock 775Twins-HDTV | Quick Installation Guide - Page 29
29 ASRock 775Twins-HDTV Motherboard - ASRock 775Twins-HDTV | Quick Installation Guide - Page 30
30 ASRock 775Twins-HDTV Motherboard - ASRock 775Twins-HDTV | Quick Installation Guide - Page 31
31 ASRock 775Twins-HDTV Motherboard - ASRock 775Twins-HDTV | Quick Installation Guide - Page 32
32 ASRock 775Twins-HDTV Motherboard - ASRock 775Twins-HDTV | Quick Installation Guide - Page 33
" " SATA3 SATA4 SATA1 SATA2 33 ASRock 775Twins-HDTV Motherboard - ASRock 775Twins-HDTV | Quick Installation Guide - Page 34
34 ASRock 775Twins-HDTV Motherboard - ASRock 775Twins-HDTV | Quick Installation Guide - Page 35
CD1 35 ASRock 775Twins-HDTV Motherboard - ASRock 775Twins-HDTV | Quick Installation Guide - Page 36
36 ASRock 775Twins-HDTV Motherboard - ASRock 775Twins-HDTV | Quick Installation Guide - Page 37
37 ASRock 775Twins-HDTV Motherboard - ASRock 775Twins-HDTV | Quick Installation Guide - Page 38
38 ASRock 775Twins-HDTV Motherboard - ASRock 775Twins-HDTV | Quick Installation Guide - Page 39
39 ASRock 775Twins-HDTV Motherboard - ASRock 775Twins-HDTV | Quick Installation Guide - Page 40
40 ASRock 775Twins-HDTV Motherboard - ASRock 775Twins-HDTV | Quick Installation Guide - Page 41
41 ASRock 775Twins-HDTV Motherboard - ASRock 775Twins-HDTV | Quick Installation Guide - Page 42
42 ASRock 775Twins-HDTV Motherboard - ASRock 775Twins-HDTV | Quick Installation Guide - Page 43
® ® "LGA 775 CPU Installation Live Demo" 43 ASRock 775Twins-HDTV Motherboard - ASRock 775Twins-HDTV | Quick Installation Guide - Page 44
der Webseite von ASRock. ASRock-Website: http://www.asrock.com 1.1 Kartoninhalt ASRock 775Twins-HDTV Motherboard (Micro ATX-Formfaktor: 24.4 cm x 24.4 cm; 9.6 Zoll x 9.6 Zoll) ASRock 775Twins-HDTV Schnellinstallationsanleitung ASRock 775Twins-HDTV Support-CD (einschl. LGA 775 CPU Installation Live - ASRock 775Twins-HDTV | Quick Installation Guide - Page 45
'97 Audio - Realtek PCI LAN 8100C - Speed: 10/100Mb Ethernet - Unterstützt Wake-On-LAN ASRock 8CH I/O - 1 x PS/2 Mouse Port - 1 x PS/2 Keyboard Port - 1 x Serieller Port: COM 1 - 1 x Parallel Port (ECP/EPP Support) - 4 x Ready-to-Use USB 2.0 Ports - 1 x RJ-45 Port 45 ASRock 775Twins-HDTV Motherboard - ASRock 775Twins-HDTV | Quick Installation Guide - Page 46
rechtzeitigen - Systemshutdown - Drehzahlmessung für CPU-Lüfter - Drehzahlmessung für Gehäuselüfter - Spannungsüberwachung: +12V, +5V, +3.3V, Vcore Betriebssysteme - Unterstützt Microsoft® Windows® 2000/XP/XP 64-Bit Zertifizierungen - FCC, CE, WHQL Deutsch 46 ASRock 775Twins-HDTV Motherboard - ASRock 775Twins-HDTV | Quick Installation Guide - Page 47
dieses Motherboards unterstützt 2-Kanal-, 4Kanal-, 6-Kanal- und 8-Kanal-Modi. Stellen Sie die richtige Verbindung anhand der Tabelle auf Seite 3 her. 6. Das Power Management für USB 2.0 arbeitet unter Microsoft® Windows® XP SP1 oder SP2/2000 SP4 einwandfrei. 47 ASRock 775Twins-HDTV Motherboard - ASRock 775Twins-HDTV | Quick Installation Guide - Page 48
) 775-Pin Sockel Übersicht Bevor Sie die 775-Pin CPU in den Sockel sitzen, prüfen Sie bitte, ob die CPU-Oberfläche sauber ist und keine der Kontakte verbogen sind. Setzen Sie die CPU nicht mit Gewalt in den Sockel, dies kann die CPU schwer beschädigen. Deutsch 48 ASRock 775Twins-HDTV Motherboard - ASRock 775Twins-HDTV | Quick Installation Guide - Page 49
775-Pin Sockel 775-Pin CPU Um die CPU ordnungsgemäß einsetzen zu können, richten Sie die zwei Orientierungskerben der CPU mit den beiden Markierungen des Sockels aus. Schritt 2-3. Drücken Sie die CPU vorsichtig in vertikaler Richtung in den Sockel. 49 ASRock 775Twins-HDTV Motherboard - ASRock 775Twins-HDTV | Quick Installation Guide - Page 50
Schritt 2-4. Prüfen Sie, dass die CPU ordnungsgemäß im Sockel sitzt und die Orientierungskerben einwandfrei in den entsprechenden Auskerbungen sitzen. en Sie den Ladehebel. Schritt 4-3. Sichern Sie Ladehebel und Ladeplatte mithilfe des Hebelverschlusses. 50 ASRock 775Twins-HDTV Motherboard Deutsch - ASRock 775Twins-HDTV | Quick Installation Guide - Page 51
ordnungsgemäß am Motherboard befestigt. Schritt 5. Schließen Sie den Lüfter an den CPULüfteranschluss des Motherboards. Schritt 6. Befestigen Sie überschüssiges Kabel mit Band, um eine Störung des Lüfters oder Kontakt mit anderen Teilen zu vermeiden. Deutsch 51 ASRock 775Twins-HDTV Motherboard - ASRock 775Twins-HDTV | Quick Installation Guide - Page 52
Erweiterungssteckplätze: (PCI-, AMR-, und PCI Express-Slots): Es stehen 2 PCI-, 1 AMR-, und 2 PCI Express-Slot auf dem 775Twins-HDTV Motherboard zur Verfügung. PCI-Slots: PCI-Slots werden zur Installation von Erweiterungskarten mit dem 32bit PCI-Interface genutzt. 52 ASRock 775Twins-HDTV Motherboard - ASRock 775Twins-HDTV | Quick Installation Guide - Page 53
Upgrade. Mit der integrierten Grafikkarte und der externen, zusätzlichen PCI Express-Grafikkarte kommen Sie in den Genuss der Multi-Monitor-Funktion. Möchten Sie die Funktion der integrierten Grafikkarte aktivieren, setzen Sie die BIOS zu aktivieren. 5 3 ASRock 775Twins-HDTV Motherboard Deutsch - ASRock 775Twins-HDTV | Quick Installation Guide - Page 54
Sie Jumperkappen auf Header und Anschlüsse setzen, wird das Motherboard unreparierbar beschädigt! Anschluss für das Floppy-Laufwerk (33-Pin 9) Deutsch Blauer Anschluss Schwarzer Anschluss zum Motherboard zur Festplatte 54 80-adriges ATA 66/100/133-Kabel ASRock 775Twins-HDTV Motherboard - ASRock 775Twins-HDTV | Quick Installation Guide - Page 55
Sie dann das weiße Ende des SATA-Stromversorgungskabels mit dem Stromanschluss des Netzteils. Motherboard. Bitte verbinden Sie ein Ende des AV/S_2x3-Kabels mit dem J2-Anschluss an der VGA_HDTV-Tafel und das andere Ende mit dem TV-OUTSockel am Motherboard. 55 ASRock 775Twins-HDTV Motherboard - ASRock 775Twins-HDTV | Quick Installation Guide - Page 56
USB67) (siehe S.2 - Nr. 21) ASRock 8CH I/O (E/A) verfügt über 4 Standard Audio-Anschlüsse (4-Pin CD1) (CD1: siehe S.2 - No. 33) CD1 Diese ermöglichen Ihnen Stereo-Signalquellen, wie z. B. CD-ROM, DVD-ROM, TV-Tuner oder MPEG-Karten mit Ihrem System zu verbinden. 56 ASRock 775Twins-HDTV Motherboard - ASRock 775Twins-HDTV | Quick Installation Guide - Page 57
CPU-Lüfteranschluss (3-pin CPU_FAN1) (siehe S.2 - No. 5) ATX-Netz-Header (20-pin ATXPWR1) (siehe S.2 - No. 34) ATX 12V Anschluss (4-pin ATX12V1) (siehe S.2 - No. 2) Game-Anschluss (15-pin GAME1) (siehe S.2 - No. 24) Dieses Interface zu einem Audio ist. Deutsch 57 ASRock 775Twins-HDTV Motherboard - ASRock 775Twins-HDTV | Quick Installation Guide - Page 58
nur ein HDTV oder TV statt einen VGAMonitor anschließen, dann ist es nicht nötig, die TV-Anzeigeeinstellung in der Systemsteuerung von Windows zu aktivieren oder die BIOS-Einstellung zu ändern. Sie können direkt die HDTV- oder TV-Anzeigefunktion genießen. 58 ASRock 775Twins-HDTV Motherboard Deutsch - ASRock 775Twins-HDTV | Quick Installation Guide - Page 59
gemäß der farbigen Kennzeichnung (grün, blau, rot) sowohl an die HDTV-Videoeingänge als auch an die Cinch-Component-Videoanschlüsse an. Beispielsweise mü Computer ein und warten, bis das Betriebssystem hochgefahren wird. HDTV-Anzeigeeinstellungen ändern. Deutsch 59 ASRock 775Twins-HDTV Motherboard - ASRock 775Twins-HDTV | Quick Installation Guide - Page 60
-Modi (960 x 720; 1280 x 720) oder 1080i-Modi (1920 x 1080) auswählen. Klicken Sie auf den Modus, der zu Ihrem HDTV-Gerät passt. 60 Hz = Progressive 30 Hz = Interlaced (Zeilensprungverfahren) Im DOS-Modus wird lediglich 480p zur HDTV-Ausgabe unterstützt. 60 ASRock 775Twins-HDTV Motherboard Deutsch - ASRock 775Twins-HDTV | Quick Installation Guide - Page 61
RCA-Patchkabel mit den üblichen HDTV-Component-Videoeingängen und den Cinch-ComponentVideoanschlü ffnen Sie die Windows-Systemsteuerung. Doppelklicken HDTV-Bild wird angezeigt. HDTV-Anzeigeeinstellungen ändern. ( Siehe Schritt 3 auf Seite 59 für Details.) Deutsch 61 ASRock 775Twins-HDTV Motherboard - ASRock 775Twins-HDTV | Quick Installation Guide - Page 62
nachstehenden Schritten, um das richtige TV-Format auszuwählen: A. Klicken Sie auf die Windows-Start-Schaltfläche, wählen Sie Einstellungen und klicken Sie dann auf Systemsteuerung. B. Doppelklicken hlen Sie NTSC, PAL. E. Das Fernsehbild wird angezeigt. 62 ASRock 775Twins-HDTV Motherboard Deutsch - ASRock 775Twins-HDTV | Quick Installation Guide - Page 63
, Windows XP oder Windows XP 64-Bit auf Ihren SATA-Festplatten installieren möchten. SCHRITT 1: Legen Sie die ASRock Support-CD in Ihr optisches Laufwerk, um Ihr System hochzufahren. (Legen Sie zu diesem Zeitpunkt KEINE Diskette in das Diskettenlaufwerk ein!) 63 ASRock 775Twins-HDTV Motherboard - ASRock 775Twins-HDTV | Quick Installation Guide - Page 64
richtige Konfiguration sicher zu stellen. Lesen Sie bitte das Dokument "Anleitung zur Installation von SATA-Festplatten und zur RAID-Konfiguration" im folgenden Ordner auf der Support-CD: .. \ Information \ Manual \ RAID Installation Guide \ German.pdf Deutsch 64 ASRock 775Twins-HDTV Motherboard - ASRock 775Twins-HDTV | Quick Installation Guide - Page 65
der CPU oder Motherboards durch unsachgemäße Handhabung zu verringern. Öffnen Sie die Datei mit Microsoft Media Player, um das Live-Demo anzusehen. Sie finden das Live-Demo auf der Motherboard Support-CD in folgendem Verzeichnis: ..\ MPEGAV \ LGA775INST.DAT 65 ASRock 775Twins-HDTV Motherboard - ASRock 775Twins-HDTV | Quick Installation Guide - Page 66
24.4 cm) Guide d'installation rapide ASRock 775Twins-HDTV CD de soutien ASRock 775Twins-HDTV (avec Démo vidéo d'installation de processeur LGA 775) Un câble ruban IDE Ultra ATA 66/100/133 80 conducteurs Un câble ruban pour un lecteur de disquettes 3,5 pouces Un câble de données Serial ATA (SATA) Un - ASRock 775Twins-HDTV | Quick Installation Guide - Page 67
7.1 canaux audio AC'97 - Realtek PHY RTL8201CL - Vitesse: 10/100Mb Ethernet - Support du Wake-On-LAN ASRock 8CH I/O - 1 x port souris PS/2 - 1 x port clavier PS/2 - 1 x port série: COM 1 - 1 x port parallèle: Support ECP/EPP - 4 x ports USB 2.0 par défaut 67 ASRock 775Twins-HDTV Motherboard Fran - ASRock 775Twins-HDTV | Quick Installation Guide - Page 68
re - Coupure du CPU en cas de surchauffe afin de protéger la durée de vie du CPU - Tachéomètre ventilateur CPU - Tachéomètre ventilateur châssis - Monitoring de la tension: +12V, +5V, +3.3V, Vcore - Microsoft® Windows® 2000/XP/XP 64-bit - FCC, CE, WHQL Français 68 ASRock 775Twins-HDTV Motherboard - ASRock 775Twins-HDTV | Quick Installation Guide - Page 69
mère supporte les modes 2-canaux, 4-canaux, 6-canaux et 8-canaux. Veuillez vous référer au tableau en page 3 pour effectuer la bonne connexion. 6. La gestion de l'alimentation pour l'USB 2.0 fonctionne bien sous Microsoft® Windows® XP SP1 ou SP2/2000 SP4. 69 ASRock 775Twins-HDTV Motherboard Fran - ASRock 775Twins-HDTV | Quick Installation Guide - Page 70
processeur 775 broches : Etape 2-1. Tenez le processeur par ses bords là où se trouvent des lignes noires Etape 2-2. Orientez le paquet avec le dissipateur thermique intégré (IHS) vers le haut. Repérez la broche 1 et les deux encoches d'orientation. 70 ASRock 775Twins-HDTV Motherboard Ligne noire - ASRock 775Twins-HDTV | Quick Installation Guide - Page 71
775 broches Socket 775 broches Pour une insertion correcte, veuillez vérifier que vous faites bien correspondre les deux encoches d'orientation sur le processeur avec les deux détrompeurs du socket renvoyez la carte mère pour service après vente. Etape 4. Refermez ASRock 775Twins-HDTV Motherboard - ASRock 775Twins-HDTV | Quick Installation Guide - Page 72
reporter aux manuels d'instructions de votre ventilateur du dissipateur thermique pour un processeur 775 broches. (Appliquez le matériau mère) Etape 2. Placez le dissipateur thermique sur le socket. Vérifiez que les câbles du ventilateur sont orient ASRock 775Twins-HDTV Motherboard Français - ASRock 775Twins-HDTV | Quick Installation Guide - Page 73
2.3 Installation des modules mémoire (DIMM) La carte mère 775Twins-HDTV possède deux emplacements DIMM DDR (Double Débit de données) 184 broches, et deux emplacements DIMM PCI sont utilisés pour installer des cartes d'extension dotées d'une interface PCI 32 bits. 73 ASRock 775Twins-HDTV Motherboard - ASRock 775Twins-HDTV | Quick Installation Guide - Page 74
cartes PCI Express, telles que les cartes Gigabit LAN, les cartes SATA II, etc. Installation d'une carte d'extension Etape 1. Avant d' VGA, veuillez sélectionner l'option "Adaptateur Graphique Primaire " du BIOS à [Intégré], et puis installer la carte VGA et . 74 ASRock 775Twins-HDTV Motherboard - ASRock 775Twins-HDTV | Quick Installation Guide - Page 75
JL1(voir p.2 No. 28) Note: Si les cavaliers JL1 et JR1 sont reliés, les connecteurs audio du panneau avant et du panneau arrière peuvent fonctionner. Effacer la CMOS (CLRCMOS1, le cavalier Connecteur IDE secondaire (noir) (39-pin IDE2, voir p.2 No. 9) Français 75 ASRock 775Twins-HDTV Motherboard - ASRock 775Twins-HDTV | Quick Installation Guide - Page 76
rique IDE comme "Maître". Veuillez vous reporter aux instructions du fabricant de votre IDE périphérique pour les connecteurs Série ATA (SATA) prennent en charge les câbles SATA pour les périphériques de stockage internes. L'interface SATA actuelle permet des taux ASRock 775Twins-HDTV Motherboard - ASRock 775Twins-HDTV | Quick Installation Guide - Page 77
, cet en-tête USB 2.0 (USB_45) est capable de supporter 2 ports USB 2.0 supplémentaires. En-tête du module infrarouge Cet en-tête supporte un module (IR1 br.5) infrarouge optionnel de (voir p.2 No. 25) transfert et de réception sans fil. 77 ASRock 775Twins-HDTV Motherboard Français - ASRock 775Twins-HDTV | Quick Installation Guide - Page 78
carte MPEG. C'est une interface pour un câble audio en façade qui permet le branchement et le contrôle commodes de périphériques audio. Cet en-tête permet d'utiliser plusieurs fonctions du une unité d'alimentation électrique ATX 12V sur ce connecteur. 78 ASRock 775Twins-HDTV Motherboard Français - ASRock 775Twins-HDTV | Quick Installation Guide - Page 79
Connectez un câble jeux sur ce connecteur si le support pour port jeux est installée. 2.8 Installation du panneau VGA_HDTV pour apprécier la fonction de prise en charge HDTV (TV Haute Définition) / TV Panneau supplé sur le connecteur SORTIETV de cette carte mère. 79 ASRock 775Twins-HDTV Motherboard - ASRock 775Twins-HDTV | Quick Installation Guide - Page 80
de configuration Windows ou à modifier le paramétrage du BIOS, car vous pouvez directement profiter de la fonction d'affichage HDTV ou TV. 2.8.1 Fonction de support TVHD (TV correctifs RCA Mâle/Mâle - disponible auprès d'un vendeur d'appareils électroniques. 80 ASRock 775Twins-HDTV Motherboard - ASRock 775Twins-HDTV | Quick Installation Guide - Page 81
et utilisez uniquement ces réglages. A. Cliquez sur le bouton « Démarrer » de Windows, cliquez sur « Paramètres » puis cliquez sur « Panneau de configuration ». B. Double Entrelacé En mode DOS, seulement le mode 480p est supporté par la sortie TVHD. Français 81 ASRock 775Twins-HDTV Motherboard - ASRock 775Twins-HDTV | Quick Installation Guide - Page 82
du moniteur sur l'affichage HDTV en suivant les instructions ci-dessous. Etape 1. Ouvrez le « Panneau de Configuration » de Windows. Double-cliquez sur « Affichage ». B. Cliquez Avancé ». C. Cliquez sur l'onglet « Affichage ATI ». Cliquez sur le bouton « TV ». ASRock 775Twins-HDTV Motherboard - ASRock 775Twins-HDTV | Quick Installation Guide - Page 83
support basculer l'affichage du moniteur sur l'affichage TV en suivant les instructions ci-dessous. Etape 1. Branchez un coté du câble ci-dessous: A. Cliquez sur le bouton « Démarrer » de Windows, cliquez sur « Paramètres » puis cliquez sur « Panneau TV. 83 ASRock 775Twins-HDTV Motherboard Français - ASRock 775Twins-HDTV | Quick Installation Guide - Page 84
ble de données SATA au disque dur SATA. Si vous voulez utilisez les fonctions RAID 0, RAID 1 ou JBOD avec un disque dur SATA, l'option Mode Combinaison ATA des disques durs SATA doit être désactivée. Pour plus d'informations, veuillez lire la page 34. Français 84 ASRock 775Twins-HDTV Motherboard - ASRock 775Twins-HDTV | Quick Installation Guide - Page 85
de support pour une configuration adaptée. Veuillez consulter le document, "Guide pour Installation des Disques Durs SATA et Configuration RAID" à l'emplacement suivant sur le CD de support : .. \ Information \ Manual \ RAID Installation Guide \ French.pdf 85 ASRock 775Twins-HDTV Motherboard Fran - ASRock 775Twins-HDTV | Quick Installation Guide - Page 86
BIOS, veuillez consulter le Guide de l'utilisateur (fichier PDF) dans le CD technique. 4. Informations sur le CD de support Cette carte mère supporte divers systèmes d'exploitation Microsoft Windows: 2000/XP/XP accès suivant : ..\ MPEGAV \ LGA775INST.DAT 86 ASRock 775Twins-HDTV Motherboard Français - ASRock 775Twins-HDTV | Quick Installation Guide - Page 87
in, 24.4 cm x 24.4 cm) Guida di installazione rapida ASRock 775Twins-HDTV CD di supporto ASRock 775Twins-HDTV (compreso il demo installazione CPU LGA 775 ) Un cavo IDE 80-pin Ultra ATA 66/100/133 Un cavo per floppy drive a 1,44 Mb Un cavo dati Serial ATA (SATA) Un cavo alimentatore HDD Serial ATA - ASRock 775Twins-HDTV | Quick Installation Guide - Page 88
- Socket da 775 pin che supporta i processori Intel® Dual Core Pentium XE e Pentium D / Pentium 4 / Celeron D (nella confezione 775-land LGA) - FSB 1066/800/533 MHz - Supporto CPU EM64T - Supporto tecnologia Hyper Threading (vedi ATTENZIONE 1) - Supporta la tecnologia overclocking "slegata - ASRock 775Twins-HDTV | Quick Installation Guide - Page 89
la CPU - Indicatore di velocità per la ventola del processore - Indicatore di velocità per la ventola di raffreddamento - Voltaggio: +12V, +5V, +3.3V, Vcore Compatibi- - Microsoft® Windows® 2000/XP/XP 64 bit lità SO Certificazioni- FCC, CE, WHQL Italiano 89 ASRock 775Twins-HDTV Motherboard - ASRock 775Twins-HDTV | Quick Installation Guide - Page 90
le modalità 2 canali, 4 canali, 6 canali e 8 canali per l'uscita audio. Controllare la tavola a pagina 3 per eseguire il collegamento appropriato. 6. La Gestione Risorse per USB 2.0 funziona perfettamente con Microsoft® Windows® XP SP1 o SP2/2000 SP4. 90 ASRock 775Twins-HDTV Motherboard Italiano - ASRock 775Twins-HDTV | Quick Installation Guide - Page 91
135 gradi la leva di carico per aprirla completamente. Fase 1-3. Ruotare di circa 100 gradi la piastra di carico per aprirla completamente. Fase 2. Inserire la CPU 775-Pin: Fase 2-1. Tenere la CPU dai bordi segnati con linee nere. Linea nera Linea nera Italiano 91 ASRock 775Twins-HDTV Motherboard - ASRock 775Twins-HDTV | Quick Installation Guide - Page 92
di orientamento Pin1 Dente di Tacca di allineamento orientamento Tacca di allineamento CPU da 775-Pin Socket da 775-Pin Per il corretto inserimento, verificare di far combaciare i due denti leva di carico mentre si preme leggermente sulla piastra di carico. 92 ASRock 775Twins-HDTV Motherboard - ASRock 775Twins-HDTV | Quick Installation Guide - Page 93
di alimentazione della ventola al connettore ventola della CPU sulla scheda madre. fissare il cavo in eccesso con fascette per assicurare che il cavo non interferisca con il funzionamento della ventola o che venga a contatto con gli altri componenti. 93 ASRock 775Twins-HDTV Motherboard Italiano - ASRock 775Twins-HDTV | Quick Installation Guide - Page 94
2.3 Installazione dei moduli di memoria (DIMM) La motherboard 775Twins-HDTV dispone di due slot DIMM DDR (Double Data Rate) a 184 pin e due slot DIMM PCI Express) Esistono 2 slot PCI, 1 slot AMR, e 2 slot PCI Express su entrambe le schede madri 775Twins-HDTV. 94 ASRock 775Twins-HDTV Motherboard - ASRock 775Twins-HDTV | Quick Installation Guide - Page 95
schede PCI Express, quali scheda Gigabit LAN, SATA II, ecc. Installare una scheda di espansione Step multi-monitor Questa scheda madre supporta l'upgrading multi-monitor. Con la scheda VGA BIOS su [Onboard], quindi installare la scheda VGA e i relativi driver . 95 ASRock 775Twins-HDTV Motherboard - ASRock 775Twins-HDTV | Quick Installation Guide - Page 96
JL1(vedi p.2 Nr. 28) Nota: Se i jumper JL1 e JR1 sono chiusi, funzionano sia i connettori audio frontali che posteriori. Resettare la CMOS (CLRCMOS1, jumper a 3 pin) (vedi p.2 Nr. 22) Impostazione madre all'hard disk drive Cavo ATA 66/100/133 a 80 pin 96 ASRock 775Twins-HDTV Motherboard - ASRock 775Twins-HDTV | Quick Installation Guide - Page 97
Serial ATA (SATA) supportano cavi dati SATA per dispositivi di immagazzinamento interni. ATA (SATA) supportano cavi SATA per dispositivi di memoria interni. L'interfaccia SATA attuale permette velocit VGA_HDTV e l'altro all'uscita TV-OUT della scheda madre. 97 ASRock 775Twins-HDTV Motherboard - ASRock 775Twins-HDTV | Quick Installation Guide - Page 98
ad infrarossi optional per la trasmissione e la ricezione senza fili. Connettori audio interni Permettono di ricevere input (4-pin CD1) stereo audio da fonti di (CD1: vedi p.2 Nr. 33) suono come CD-ROM, DVD - CD1 ROM,TV tuner, o schede MPEG. 98 ASRock 775Twins-HDTV Motherboard Italiano - ASRock 775Twins-HDTV | Quick Installation Guide - Page 99
CPU (3-pin CPU_FAN1) (vedi p.2 Nr. 5) Connettore alimentazione ATX (20-pin ATXPWR1) (vedi p.2 Nr. 34) Connettore ATX 12 V (4-pin ATX12V1) (voir p.2 Nr. 2) Connettore porta giochi (15-pin GAME1) (vedi p.2 item 24) È un'interfaccia per il cavo del pannello audio 99 ASRock 775Twins-HDTV Motherboard - ASRock 775Twins-HDTV | Quick Installation Guide - Page 100
HDTV o TV, in luogo di un VGA, non è necessario impostare la visualizzazione della TV dal pannello di controllo di Windows o modificare le impostazioni del BIOS ed è invece possibile utilizzare direttamente la funzione di visualizzazione HDTV o TV. 100 ASRock 775Twins-HDTV Motherboard Italiano - ASRock 775Twins-HDTV | Quick Installation Guide - Page 101
dell'HDTV. Per avere prestazioni migliori sull'HDTV quando si vede un DVD o si gioca con il computer , è necessario identificare la modalità e la risoluzione dello schermo che offre i risultati migliori sulla TV, e utilizzare esclusivamente quelle impostazioni. ASRock 775Twins-HDTV Motherboard 101 - ASRock 775Twins-HDTV | Quick Installation Guide - Page 102
VGA_HDTV. 2. Collegare il cavi patch RCA maschio/maschio ai connettori ingresso video componente HDTV tipico e ai connettori di tipo RCA (Y-CON1, PB-CON1, e PRCON1 Windows. Fare doppio clic su Schermo. B. Fare clic su Impostazioni e poi sul pulsante Avanzate. 102 ASRock 775Twins-HDTV Motherboard - ASRock 775Twins-HDTV | Quick Installation Guide - Page 103
clic su ATI Displays. Fare video TV (giallo) e al connettore video componente di tipo RCA (blu)/connettore di segnale (AV composito) (PB-CON1, vedi pagina 100, N. 2) dello schermo VGA_HDTV. 3. Accendere il computer e attendere l'avvio del sistema operativo. Italiano ASRock 775Twins-HDTV Motherboard - ASRock 775Twins-HDTV | Quick Installation Guide - Page 104
selezione del formato TV, è necessario procedere come segue: A. Fare clic sul tasto Start di Windows, puntare su Impostazioni, e fare clic sul Pannello di controllo. B. Fare doppio clic sull su TV, e selezionare NTSC, PAL. E. La TV viene visualizzata. Italiano 104 ASRock 775Twins-HDTV Motherboard - ASRock 775Twins-HDTV | Quick Installation Guide - Page 105
Windows 2000, Windows XP o Windows XP 64 bit su un hard disk SATA, è necessario creare un dischetto driver SATA prima di procedere con l'installazione del sistema operativo. 1° PASSO: 2° PASSO: Inserire il CD di supporto ASRock CD-ROM come dispositivo di boot. ASRock 775Twins-HDTV Motherboard 105 - ASRock 775Twins-HDTV | Quick Installation Guide - Page 106
eseguita correttamente. Il documento "Guida all'installazione degli Hard Disk SATA ed alla configurazione del RAID" si trova sul CD di supporto, selezionando il percorso seguente: .. \ Information \ Manual \ RAID Installation Guide \ Italian.pdf Italiano 106 ASRock 775Twins-HDTV Motherboard - ASRock 775Twins-HDTV | Quick Installation Guide - Page 107
BIOS. 4. Software di supporto e informazioni su CD Questa scheda madre supporta vari sistemi operativi Microsoft Windows: 2000/ XP/XP 64 bit. Il CD di supporto a corredo della scheda madre contiene i driver indirizzo: ..\ MPEGAV \ LGA775INST.DAT Italiano ASRock 775Twins-HDTV Motherboard 107 - ASRock 775Twins-HDTV | Quick Installation Guide - Page 108
instalación rápida de ASRock 775Twins-HDTV CD de soporte de ASRock 775Twins-HDTV (incluye la Demo de instalación de la CPU LGA 775) Una cinta de datos IDE de conducción 80 Ultra ATA 66/100/133 Una cinta de datos para una unidad de disco de 3,5" Un Cable de Datos Serial ATA (SATA) Un cable serie ATA - ASRock 775Twins-HDTV | Quick Installation Guide - Page 109
® Dual Core Pentium XE y Pentium D / Pentium 4 / Celeron D (en paquete LGA para 775 agujas) - FSB 1066/800/533 MHz - Admite CPU EM64T - Admite tecnología Hyper Threading (ver ATENCIÓN 1) - Admite tecnología de aumento de velocidad liberada (vea ATENCIÓN 2) - North Bridge: ATITM Radeon® Xpress 200 - ASRock 775Twins-HDTV | Quick Installation Guide - Page 110
procesador para proteger el procesador - Taquímetros de los ventiladores del procesador y del chasis - Monitor de Voltaje: +12V, +5V, +3.3V, Vcore - En conformidad con Microsoft® Windows® 2000/XP /XP 64 bits - FCC, CE, WHQL Español 110 ASRock 775Twins-HDTV Motherboard - ASRock 775Twins-HDTV | Quick Installation Guide - Page 111
de audio, este placa madre ofrece soporte para modos de 2 canales, 4 canales, 6 canales y 8 canales. Consulte la tabla en la página 3 para una conexión correcta. 6. Power Management para USB 2.0 funciona bien bajo Microsoft® Windows® XP SP1 o SP2/2000 SP4. Español ASRock 775Twins-HDTV Motherboard - ASRock 775Twins-HDTV | Quick Installation Guide - Page 112
. Eso podría dañar la placa madre. 2.1 Instalación de Procesador Para la instalación de la CPU Intel de (Placa de carga) 775 agujas, siga los siguientes pasos. (Matriz de contacto) (Cuerpo del socket) Introducción al socket de 775 agujas Español 112 ASRock 775Twins-HDTV Motherboard - ASRock 775Twins-HDTV | Quick Installation Guide - Page 113
ón Muesca de orientación aguja 1 Tecla de alineación Tecla de alineación CPU de 775 agujas Socket de 775 agujas Para insertarla correctamente, asegúrese de que las dos muescas de orientación de la CPU coinciden con las teclas de alineación del socket. ASRock 775Twins-HDTV Motherboard 113 - ASRock 775Twins-HDTV | Quick Installation Guide - Page 114
de la CPU. A continuación se ofrece un ejemplo para ilustrar la instalación del disipador para la CPU de 775 agujas. (Aplique el material termal de interfaz) Paso 1. Aplique el material termal de interfaz en el centro del IHS de la superficie del socket. 114 ASRock 775Twins-HDTV Motherboard - ASRock 775Twins-HDTV | Quick Installation Guide - Page 115
cabezal del ventilador con el conector del ventilador de la CPU en la placa madre. Fije el cable que sobre con un lazo para asegurarse de que el cable no interfiere en el funcionamiento del ventilador y tampoco entra en contacto con otros componentes. Español ASRock 775Twins-HDTV Motherboard 115 - ASRock 775Twins-HDTV | Quick Installation Guide - Page 116
apropiadamente. 2.4 Ranuras de Expansión (Ranuras PCI, AMR, y PCI Express) Hay 2 ranuras PCI, 1 ranura AMR, y 2 ranura PCI Express sobre las placas mardres 775Twins-HDTV. Ranuras PCI: Para instalar tarjetas de expansión que tienen 32-bit Interface PCI. 116 ASRock 775Twins-HDTV Motherboard - ASRock 775Twins-HDTV | Quick Installation Guide - Page 117
tarjetas PCI Express, como por ejemplo, para tarjetas Gi gabit LAN, SATA II, etc. Instalación de Tarjetas de Expansión. Paso 1. Antes de , seleccione la opción "Primary Graphics Adapter" del sistema BIOS y fíjelo en la opción [Onboard], e instale despu N. 28) ASRock 775Twins-HDTV Motherboard 117 - ASRock 775Twins-HDTV | Quick Installation Guide - Page 118
Atención: Si los puentes JL1 y JR1 son cortos, tanto el conector de audio del panel frontal como del panel posterior pueden funcionar. Limpiar CMOS (CLRCMOS1, jumper de 3 pins) IDE primaria, 118 (IDE1, azul) y el CD-ROM a la conexión IDE secundaria (IDE2, negra). ASRock 775Twins-HDTV Motherboard - ASRock 775Twins-HDTV | Quick Installation Guide - Page 119
datos de serie ATA (SATA) SATA2 SATA4 SATA1 SATA3 Estas dos conexiones de serie ATA (SATA) admiten cables SATA para dispositivos de almacenamiento internos. La interfaz SATA actual permite una velocidad extremo del cable VGA_2X8 al cabezal VGA. Español ASRock 775Twins-HDTV Motherboard 119 - ASRock 775Twins-HDTV | Quick Installation Guide - Page 120
) (vea p.2, No. 27) CD1 Permite recepción de input audio de fuente sónica como CD-ROM, DVD-ROM, TV tuner, o tarjeta MPEG. Este es una interface para cable de audio de panel frontal que permite conexión y control conveniente de apparatos de Audio. 120 ASRock 775Twins-HDTV Motherboard Español - ASRock 775Twins-HDTV | Quick Installation Guide - Page 121
conector y haga coincidir el cable negro con el conector de tierra. Conecte el cable del ventilador de la CPU a este conector y haga coincidir el cable negro con el conector de tierra. Conecte la fuente de si se instala el soporte del puerto de juegos. Español ASRock 775Twins-HDTV Motherboard 121 - ASRock 775Twins-HDTV | Quick Installation Guide - Page 122
sólo un HDTV o TV en vez de un monitor VGA, no le será necesario habilitar la configuración de visualización de TV en el panel de control de Windows ni cambiar la configuración del BIOS, y podrá disfrutar directamente de la visualización del HDTV o TV. 122 ASRock 775Twins-HDTV Motherboard Español - ASRock 775Twins-HDTV | Quick Installation Guide - Page 123
los manuales de su HDTV y los latiguillos Macho/Macho RCA para más información de configuración específica de su dispositivo. Encienda su ordenador y espere a que su sistema inicie el Sistema Operativo. Cambie las propiedades de pantalla de HDTV. Español ASRock 775Twins-HDTV Motherboard 123 - ASRock 775Twins-HDTV | Quick Installation Guide - Page 124
x 480; 720 x 480), los modos 720p (960 x 720; 1280 x 720), o los modos 1080i (1920 x 1080). Haga clic en el modo según la pantalla de su HDTV. 60Hz = Progresivo 30Hz = Entrelazado En modo DOS, sólo existe soporte para el formato 480p en la salida HDTV. Español 124 ASRock 775Twins-HDTV Motherboard - ASRock 775Twins-HDTV | Quick Installation Guide - Page 125
los Paneles de Control de Windows. Haga doble clic en clic en la ficha Pantallas ATI. Haga clic en el bot HDTV comenzará a mostrar imágenes. Cambie las propiedades de pantalla de HDTV. (Por favor, consulte el Paso 3 en la página 123 para más detalles.) Español ASRock 775Twins-HDTV Motherboard - ASRock 775Twins-HDTV | Quick Installation Guide - Page 126
TV adecuado, por favor siga los pasos siguientes: A. Haga clic en el botón de Inicio de Windows, seleccione Configuración y haga clic en Panel de control. B. Haga doble clic en el icono de y selecciona NTSC o PAL. E. Su TV comenzará a mostrar imágenes. Español 126 ASRock 775Twins-HDTV Motherboard - ASRock 775Twins-HDTV | Quick Installation Guide - Page 127
4: Conecte el otro extremo del cable de datos SATA al disco duro SATA. Si planea utilizar las funciones RAID 0, RAID 1 o JBOD en SATA, los discos duros SATA no deben funcionar en el modo de combinación ATA. Consulte la página 34 para más información. Español ASRock 775Twins-HDTV Motherboard 127 - ASRock 775Twins-HDTV | Quick Installation Guide - Page 128
CD de Ayuda para realizar correctamente la configuración. Busque el documento, "Guía para la Instalación de Discos Duros SATA y Configuración RAID" en la siguiente ruta del CD de Ayuda: .. \ Information \ Manual \ RAID Installation Guide \ Spanish.pdf Español 128 ASRock 775Twins-HDTV Motherboard - ASRock 775Twins-HDTV | Quick Installation Guide - Page 129
la BIOS, consulte el Manual del usuario (archivo PDF), que se encuentra en el CD de soporte. 4.Información de Software Support CD Esta placa-base soporta diversos tipos de sistema operativo Windows: 2000/XP/XP 64 bits El CD de instalación que acompaña la placa-base trae todos los drivers y programas
-
 1
1 -
 2
2 -
 3
3 -
 4
4 -
 5
5 -
 6
6 -
 7
7 -
8
-
9
-
10
-
11
-
12
-
13
-
14
-
15
-
16
-
17
-
18
-
19
-
20
-
21
-
22
-
23
-
24
-
25
-
26
-
27
-
28
-
29
-
30
-
31
-
32
-
33
-
34
-
35
-
36
-
37
-
38
-
39
-
40
-
41
-
42
-
43
-
44
-
45
-
46
-
47
-
48
-
49
-
50
-
51
-
52
-
53
-
54
-
55
-
56
-
57
-
58
-
59
-
60
-
61
-
62
-
63
-
64
-
65
-
66
-
67
-
68
-
69
-
70
-
71
-
72
-
73
-
74
-
75
-
76
-
77
-
78
-
79
-
80
-
81
-
82
-
83
-
84
-
85
-
86
-
87
-
88
-
89
-
90
-
91
-
92
-
93
-
94
-
95
-
96
-
97
-
98
-
99
-
100
-
101
-
102
-
103
-
104
-
105
-
106
-
107
-
108
-
109
-
110
-
111
-
112
-
113
-
114
-
115
-
116
-
117
-
118
-
119
-
120
-
121
-
122
-
123
-
124
-
125
-
126
-
127
-
128
-
129
 |
 |

1
ASRock
775Twins-HDTV
Motherboard
English
English
English
English
English
Copyright Notice:
Copyright Notice:
Copyright Notice:
Copyright Notice:
Copyright Notice:
No part of this installation guide may be reproduced, transcribed, transmitted, or
translated in any language, in any form or by any means, except duplication of
documentation by the purchaser for backup purpose, without written consent of
ASRock Inc.
Products and corporate names appearing in this guide may or may not be registered
trademarks or copyrights of their respective companies, and are used only for
identification or explanation and to the owners’ benefit, without intent to infringe.
Disclaimer:
Disclaimer:
Disclaimer:
Disclaimer:
Disclaimer:
Specifications and information contained in this guide are furnished for informational
use only and subject to change without notice, and should not be constructed as a
commitment by ASRock. ASRock assumes no responsibility for any errors or
omissions that may appear in this guide.
With respect to the contents of this guide, ASRock does not provide warranty of any
kind, either expressed or implied, including but not limited to the implied warranties or
conditions of merchantability or fitness for a particular purpose.
In no event shall ASRock, its directors, officers, employees, or agents be liable for
any indirect, special, incidental, or consequential damages (including damages for
loss of profits, loss of business, loss of data, interruption of business and the like),
even if ASRock has been advised of the possibility of such damages arising from any
defect or error in the guide or product.
This device complies with Part 15 of the FCC Rules. Operation is subject to the
following two conditions:
(1)
this device may not cause harmful interference, and
(2)
this device must accept any interference received, including interference that
may cause undesired operation.
ASRock Website: http://www.asrock.com
Published December 2005
Copyright
©
2005 ASRock INC. All rights reserved.