ASRock 939S56-M Quick Installation Guide
ASRock 939S56-M Manual
 |
View all ASRock 939S56-M manuals
Add to My Manuals
Save this manual to your list of manuals |
ASRock 939S56-M manual content summary:
- ASRock 939S56-M | Quick Installation Guide - Page 1
purchaser for backup purpose, without written consent of ASRock Inc. Products and corporate names appearing in this guide may or may not be registered trademarks or ASRock Website: http://www.asrock.com Published May 2005 Copyright©2005 ASRock INC. All rights reserved. 1 ASRock 939S56-M Motherboard - ASRock 939S56-M | Quick Installation Guide - Page 2
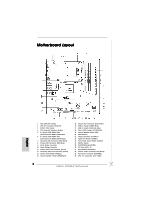
Motherboard Layout English 1 PS2_USB_PW1 Jumper 2 ATX 12V Connector (ATX12V1) 3 939-Pin CPU Socket 4 CPU Heatsink Retention Module 5 2 x 184-pin DDR DIMM Slots (Dual Channel A: DDR1, DDR2 : CD1 (Black) 29 ATX Power Connector (ATXPWR1) 30 CPU Fan Connector (CPU_FAN1) 2 ASRock 939S56-M Motherboard - ASRock 939S56-M | Quick Installation Guide - Page 3
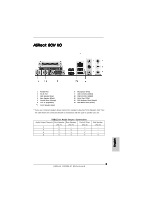
ASRock 8CH I/O 1 Parallel Port 2 RJ-45 Port 3 Side Speaker (Gray) 4 Rear Speaker (Black) 5 Central / Bass (Orange) 6 Line In Rear Speaker Central / Bass (No. 7) (No. 4) (No. 5) 2 V -- -- 4 V V -- 6 V V V 8 V V V Side Speaker (No. 3) ---V 3 ASRock 939S56-M Motherboard English - ASRock 939S56-M | Quick Installation Guide - Page 4
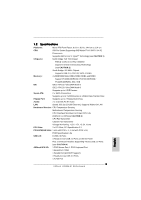
any modifications of this manual occur, the updated version will be available on ASRock website without further notice. You may find the latest memory and CPU support lists on ASRock website as well. ASRock website http://www.asrock.com 1.1 Package Contents 1 x ASRock 939S56-M Motherboard (Micro ATX - ASRock 939S56-M | Quick Installation Guide - Page 5
24.4 cm x 22.4 cm CPU: 939-Pin Socket Supporting AMD AthlonTM 64 / 64FX / 64 X2 Processors Supports AMD's Cool 'n' QuietTM Technology (see CAUTION 1) Chipsets: North Bridge: SiS 756 Chipset FSB @ 1 GHz (2.0 GT/s) / 800MHz Supports Untied Overclocking Technology (see CAUTION 2) South Bridge - ASRock 939S56-M | Quick Installation Guide - Page 6
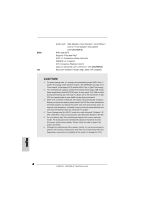
QuietTM technology under Windows system. See APPENDIX on page 37 of "User Manual" in the support CD to enable AMD's Cool 'n' QuietTM technology. 2. This motherboard supports Untied Overclocking Technology. FSB enjoys better margin due to fixed PCI/PCIE buses. In other words, CPU FSB is untied during - ASRock 939S56-M | Quick Installation Guide - Page 7
while you push down the socket lever to secure the CPU. The lever clicks on the side tab to indicate that it is locked. Install CPU fan and heatsink. For proper installation, please kindly refer to the instruction manuals of your CPU fan and heatsink vendors. English 7 ASRock 939S56-M Motherboard - ASRock 939S56-M | Quick Installation Guide - Page 8
Modules (DIMM) 939S56-M motherboard provides four 184-pin DDR (Double Data Rate) DIMM slots, and supports Dual Channel Memory is, to populate DDR DIMM from the near side of CPU towards to the far side of CPU.) 1. If you want to install two different memory modules, 8 ASRock 939S56-M Motherboard - ASRock 939S56-M | Quick Installation Guide - Page 9
cause permanent damage to the motherboard and the DIMM if you force the DIMM into the slot at incorrect orientation. STEP 3: Firmly insert the DIMM into the slot until the retaining clips at both ends fully snap back in place and the DIMM is properly seated. English 9 ASRock 939S56-M Motherboard - ASRock 939S56-M | Quick Installation Guide - Page 10
lane width graphics cards. PCIE2 (PCIE x1 slot) is used for PCI Express cards, such as Gigabit LAN card, SATA II card, etc. Installing an expansion card Step 1. Before installing the expansion card, please make 4. Fasten the card to the chassis with screws. 10 ASRock 939S56-M Motherboard English - ASRock 939S56-M | Quick Installation Guide - Page 11
default setup, please turn off the computer and unplug the power cord from the update the BIOS. If you need to clear the CMOS when you just finish updating the BIOS, you must boot up the system first, and then shut it down before you do the clear-CMOS action. English 11 ASRock 939S56-M Motherboard - ASRock 939S56-M | Quick Installation Guide - Page 12
support SATA data cables for internal storage devices. The current SATA interface allows up to 1.5 Gb/s data transfer rate. Serial ATA (SATA) Data Cable Either end of the SATA data cable can be connected to the SATA hard disk or the SATA connector on the motherboard. English 12 ASRock 939S56 - ASRock 939S56-M | Quick Installation Guide - Page 13
rear USB ports are not sufficient, this USB 2.0 header is available to support 2 extra USB 2.0 ports. USB 2.0 Header (9-pin USB_H45) (see p.2, No. 17) ASRock 8CH I/OTM provides you 4 ready-to-use USB 2.0 ports on the connection and control of audio devices. English 13 ASRock 939S56-M Motherboard - ASRock 939S56-M | Quick Installation Guide - Page 14
a chassis fan cable to this connector and match the black wire to the ground pin. Please connect a CPU fan cable to this connector and match the black wire to the ground pin. Please connect an ATX power to this connector if the Game port bracket is installed. English 14 ASRock 939S56-M Motherboard - ASRock 939S56-M | Quick Installation Guide - Page 15
in the Support CD before you use Hot Plug function. Failure to do so may lose the data in the SATA HDDs or damage the SATA HDDs. For the detailed instruction, please refer to the document in the Support CD at the following path: ..\ RAID BIOS Setting Utility 15 ASRock 939S56-M Motherboard English - ASRock 939S56-M | Quick Installation Guide - Page 16
in non-RAID mode, you don't need to make a SATA driver diskette before OS installation. Windows 98 SE and Windows ME must be installed by SATA operating in RAID mode, and you don't need to make a SATA driver diskette for these two OS before OS installation. 16 ASRock 939S56-M Motherboard English - ASRock 939S56-M | Quick Installation Guide - Page 17
about BIOS Setup, please refer to the User Manual (PDF file) contained in the Support CD. 4. Software Support CD information This motherboard supports various Microsoft® Windows® operating systems: 98 SE/ ME / 2000 / XP. The Support CD that came with the motherboard contains necessary drivers and - ASRock 939S56-M | Quick Installation Guide - Page 18
® ® 18 ASRock 939S56-M Motherboard - ASRock 939S56-M | Quick Installation Guide - Page 19
® ® '' ™ '' ™ 19 ASRock 939S56-M Motherboard - ASRock 939S56-M | Quick Installation Guide - Page 20
20 ASRock 939S56-M Motherboard - ASRock 939S56-M | Quick Installation Guide - Page 21
DDR1 DDR2 DDR3 DDR4 ( )( )( )( ) (1) - - (2) - - (3) 21 ASRock 939S56-M Motherboard - ASRock 939S56-M | Quick Installation Guide - Page 22
22 ASRock 939S56-M Motherboard - ASRock 939S56-M | Quick Installation Guide - Page 23
23 ASRock 939S56-M Motherboard - ASRock 939S56-M | Quick Installation Guide - Page 24
" " SATA1 SATA2 24 ASRock 939S56-M Motherboard - ASRock 939S56-M | Quick Installation Guide - Page 25
CD1 25 ASRock 939S56-M Motherboard - ASRock 939S56-M | Quick Installation Guide - Page 26
26 ASRock 939S56-M Motherboard - ASRock 939S56-M | Quick Installation Guide - Page 27
" " " " \ 27 ASRock 939S56-M Motherboard - ASRock 939S56-M | Quick Installation Guide - Page 28
" " " " " " " " 28 ASRock 939S56-M Motherboard - ASRock 939S56-M | Quick Installation Guide - Page 29
® ® 29 ASRock 939S56-M Motherboard - ASRock 939S56-M | Quick Installation Guide - Page 30
finden Sie ebenfalls auf der Webseite von ASRock. ASRock-Website: http://www.asrock.com 1.1 Kartoninhalt ASRock 939S56-M Motherboard (Micro ATX-Formfaktor: 24.4 cm x 22.4 cm; 9.6 Zoll x 8.8 Zoll) ASRock 939S56-M Schnellinstallationsanleitung ASRock 939S56-M Support-CD Ein 80-adriges Ultra-ATA 66 - ASRock 939S56-M | Quick Installation Guide - Page 31
CPU: 939-pol. Sockel, unterstützt AMD AthlonTM 64 / 64FX / 64 X2- Prozessoren; Unterstützt die AMD Cool 'n' QuietTM- Technologie (Siehe VORSICHT 1) Chipsatz: North Bridge: SiS® 756, FSB ECP / EPP), 4 betriebsfertigen USB 2.0-Anschlüsse, 1 RJ-45 port, Deutsch 31 ASRock 939S56-M Motherboard - ASRock 939S56-M | Quick Installation Guide - Page 32
page 3 for proper connection. 6. Obwohl dieses Motherboard stufenlose Steuerung bietet, wird Overclocking nicht empfohlen. Frequenzen, die von den empfohlenen CPU-Busfrequenzen abweichen, können Instabilität des Systems verursachen oder die CPU beschädigen. Deutsch 32 ASRock 939S56-M Motherboard - ASRock 939S56-M | Quick Installation Guide - Page 33
. Schritt 5: Installieren Sie einen aktiven CPU-Kühler, der die gesamte Fläche der CPU abdeckt und eine ausreichende Wärmeableitung für den von Ihnen verwendeten CPU-Typ bietet. Weitere Hinweise finden Sie der Installationsanleitung für Ihren CPU-Kühler. 33 ASRock 939S56-M Motherboard Deutsch - ASRock 939S56-M | Quick Installation Guide - Page 34
2.2 Installation der Speichermodule (DIMM) Die Motherboards 939S56-M bieten vier 184-pol. DDR (Double Data Rate) DIMMSteckplätze und unterstützen die Dual-Kanal- wird in DDR1 und DDR3 installiert, kann es die Dual-Kanal-Speichertechnologie nicht aktivieren. Deutsch 34 ASRock 939S56-M Motherboard - ASRock 939S56-M | Quick Installation Guide - Page 35
zu zwingen, führt dies zu dauerhaften Schäden am Mainboard und am DIMM-Modul. Schritt 3: Drücken Sie die DIMM-Module fest in die Steckplätze, so dass die Halteklammern an beiden Enden des Moduls einschnappen und das DIMM-Modul fest an Ort und Stelle sitzt. 35 ASRock 939S56-M Motherboard Deutsch - ASRock 939S56-M | Quick Installation Guide - Page 36
PCI Express-Slots): Es gibt 2 PCI-Steckplätze und 2 PCI Express-Steckplatz auf dem 939S56-MMotherboard. PCI-Slots: PCI-Slots werden zur Installation von Erweiterungskarten mit dem 32bit PCI-Interface Befestigen Sie die Karte mit der Schraube aus Schritt 2. 36 ASRock 939S56-M Motherboard Deutsch - ASRock 939S56-M | Quick Installation Guide - Page 37
die verschiedenen BIOS-Parameter. Um die Systemparameter zu löschen und auf die Werkseinstellung zurückzusetzen, schalten Sie bitte den Computer ab BIOS löschen müssen, müssen Sie zuerst das System starten und dann wieder ausschalten, bevor Sie den CMOSInhalt löschen. 37 ASRock 939S56-M Motherboard - ASRock 939S56-M | Quick Installation Guide - Page 38
Pins der Anschlussleisten. Wenn Sie die Jumperkappen auf die Anschlüsse setzen, wird das Motherboard permanent beschädigt! Anschluss Anschluss für das Floppy-Laufwerk (33-Pin FLOPPY1) (siehe -Schnittstelle ermöglicht eine Datenübertragungsrate bis 1,5 Gb/s. Deutsch 38 ASRock 939S56-M Motherboard - ASRock 939S56-M | Quick Installation Guide - Page 39
am Mainboard verbinden. ASRock 8CH I/O (E/A) verfügt über 4 Standard-USB 2.0Anschlüsse auf der Rückseite. Wenn die hinteren USBAnschlüsse nicht ausreichen, steht dieser USB 2.0-Header (USB_H4_5) zur Unterstützung 2 weiterer USB 2.0-Anschlüsse zur Verfügung.n. Deutsch 39 ASRock 939S56-M Motherboard - ASRock 939S56-M | Quick Installation Guide - Page 40
Punkt 14) Gehäuselüfteranschluss (3-pin CHA_FAN1) (siehe S.2, Punkt 15) CPU-Lüfteranschluss (3-pin CPU_FAN1) (siehe S.2, Punkt 30) Schließen Sie den Verbinden Sie das CPU Lüfterkabel mit diesem Anschluss und passen Sie den schwarzen Draht dem Erdungsstift an. Deutsch 40 ASRock 939S56-M Motherboard - ASRock 939S56-M | Quick Installation Guide - Page 41
reicht der Strom nicht aus, das System zu starten. Verbinden Sie ein Game-Kabel mit diesem Anschluss, wenn der Game-Anschlusshalter installiert ist. Deutsch 41 ASRock 939S56-M Motherboard - ASRock 939S56-M | Quick Installation Guide - Page 42
der Support CD, bevor Sie die Hot-PlugFunktion verwenden. Ansonsten können Datenverluste oder Schäden an den SATA-Festplatten auftreten. Für ausführliche Anweisungen sehen Sie bitte im Dokument auf der Support CD im folgenden Pfad nach: ..\ RAID BIOS Setting Utility 42 ASRock 939S56-M Motherboard - ASRock 939S56-M | Quick Installation Guide - Page 43
Serial ATA driver diskette [Y/N]?" Windows 2000 / Windows XP / Windows Guide to SATA Hard Disks Installation and RAID Configuration" (Anleitung der SATA-Festplatteninstallation und RAID-Konfiguration) auf der Support CD im folgenden Pfad: .. \ RAID BIOS Setting Utility 43 ASRock 939S56-M Motherboard - ASRock 939S56-M | Quick Installation Guide - Page 44
BIN-Verzeichnis der Support-CD, um die Menüs aufzurufen. Das Setup-Programm soll es Ihnen so leicht wie möglich machen. Es ist menügesteuert, d.h. Sie können in den verschiedenen Untermenüs Ihre Auswahl treffen und die Programme werden dann automatisch installiert. 44 ASRock 939S56-M Motherboard - ASRock 939S56-M | Quick Installation Guide - Page 45
en charge sur le site web d'ASRock. Site web ASRock, http://www.asrock.com 1.1 Contenu du paquet Carte mère ASRock 939S56-M (Facteur de forme Micro ATX: 9.6 pouces x 8.8 pouces, 24.4 cm x 22.4 cm) Guide d'installation rapide ASRock 939S56-M CD de soutien ASRock 939S56-M Un câble ruban IDE Ultra ATA - ASRock 939S56-M | Quick Installation Guide - Page 46
cm CPU: Socket 939 broches prenant en charge le processeur AMD AthlonTM 64 / 64FX / 64 X2; Prise en charge de la technologie Cool 'n' QuietTM d'AMD (voir ATTENTION 1) Chipsets: North Bridge: Chipset SiS 756 FSB @ 1 GHz (2.0 GT/s) / 800 MHz Prend en charge la technologie Untied Overclocking - ASRock 939S56-M | Quick Installation Guide - Page 47
BIOS AMI; Support du "Plug and Play"; Compatible pour événements de réveil ACPI 1.1; Support SMBIOS 2.3.1; Contrôle direct de la fréquence CPU (utilisateurs avancés seulement, voir ATTENTION 6) Microsoft® Windows® stabiliser le système ou d'endommager l'UC. Français 47 ASRock 939S56-M Motherboard - ASRock 939S56-M | Quick Installation Guide - Page 48
support CPU. Le verrouillage du levier dans son encoche latérale est annoncé par un clic. Etape 5. Installez le ventilateur et le radiateur du CPU. Pour une installation correcte, reportez-vous aux manuels du fabricant du ventilateur et du radiateur de CPU. 48 ASRock 939S56-M Motherboard - ASRock 939S56-M | Quick Installation Guide - Page 49
des modules m émoire [DIMM] La carte mère 939S56-M dispose de quatre emplacements DIMM DDR (Double Data Rate) de 184-broches, et supporte la Technologie de Mémoire à Canal Double. Pour effectuer impossible d'activer la Technologie de Mémoire à Canal Double. Français 49 ASRock 939S56-M Motherboard - ASRock 939S56-M | Quick Installation Guide - Page 50
jusqu'à ce que les clips de maintien situés aux deux extrémités se ferment complètement et que le module DIMM soit inséré correctement. 50 ASRock 939S56-M Motherboard - ASRock 939S56-M | Quick Installation Guide - Page 51
PCIE2 (emplacement PCIE x1) est utilisé pour les cartes PCI Express, telles que les cartes Gigabit LAN, les cartes SATA II, etc. Installation d'une carte d'extension Etape 1. Avant d'installer les cartes 4. Fixez la carte sur le châssis à l'aide d'une vis. 51 ASRock 939S56-M Motherboard Français - ASRock 939S56-M | Quick Installation Guide - Page 52
de suite après avoir mis le BIOS à jour. Si vous avez besoin d'effacer la CMOS lorsque vous avez fini de mettre le BIOS à jour, vous devez d'abord initialiser le système, puis le mettre hors tension avant de procéder à l'opération d'effacement de la CMOS. 52 ASRock 939S56-M Motherboard Français - ASRock 939S56-M | Quick Installation Guide - Page 53
carte mère, veuillez configurer le périphérique IDE comme "Maître". Veuillez vous reporter aux instructions du fabricant de votre IDE périphérique pour les détails. En outre, pour optimiser la taux transferts de données pouvant aller jusqu'à 1,5 Go/s. Français 53 ASRock 939S56-M Motherboard - ASRock 939S56-M | Quick Installation Guide - Page 54
arrières ne sont pas suffisants, cet en-tête USB 2.0 (USB_H4_5) est capable de supporter 2 ports USB 2.0 supplémentaires. En-tête module infrarouge (IR1 br. 5) (voir p.2 fig. 19) Ce en-tête gère un module en option d'émission/réception sans fil infrarouge. Français 54 ASRock 939S56-M Motherboard - ASRock 939S56-M | Quick Installation Guide - Page 55
fig. 14) Connecteur pour ventilateur de châssis (CHA_FAN1 br. 3) (voir p.2 fig. 15) Connecteur pour ventilateur CPU (CPU_FAN1 br. 3) (voir p.2 fig. 30) Connecteur d'alimentation ATX (ATXPWR1 br. 20) (voir p.2 fig. quoi, il ne sera pas possible de mettre sous tension. 55 ASRock 939S56-M Motherboard - ASRock 939S56-M | Quick Installation Guide - Page 56
si le support pour port jeux est installée. 2.6 Installation des Disques Durs Serial ATA (SATA) Cette carte mère supporte les disques options sous le "Mode Opératoire SATA" dans la configuration du BIOS. Veuillez vous référer à la page 28 pour plus de détails ASRock 939S56-M Motherboard Français - ASRock 939S56-M | Quick Installation Guide - Page 57
soin de lire les instructions sur le CD BIOS Setting Utility 2.8 Faire une disquette du pilote SATA pour le fonctionnement SATA en Mode "RAID" Si vous voulez installer Windows 2000, Windows XP, ou Windows to generate Serial ATA driver diskette [Y/N]?" (Voulez-vous ASRock 939S56-M Motherboard Français - ASRock 939S56-M | Quick Installation Guide - Page 58
de faire une disquette du pilote SATA avant l'installation du SE . Windows 98 SE et ME doivent être installés par SATA fonctionnant en Mode RAID et vous n'avez pas besoin de faire une disquette du pilote SATA pour ces deux SE avant l'installation du SE. 58 ASRock 939S56-M Motherboard Français - ASRock 939S56-M | Quick Installation Guide - Page 59
sur le BIOS, veuillez consulter le Guide de l'utilisateur (fichier PDF) dans le CD technique. 4. Informations sur le CD de support Cette carte mère supporte divers systèmes d'exploitation Microsoft Windows: 98 SE double-cliquez dessus pour afficher les menus. 59 ASRock 939S56-M Motherboard Français - ASRock 939S56-M | Quick Installation Guide - Page 60
installazione rapida ASRock 939S56-M CD di supporto ASRock 939S56-M Un cavo IDE 80-pin Ultra ATA 66/100/133 Un cavo per floppy drive a 1,44 Mb Un cavo dati Serial ATA (SATA) (Opzionale) Un cavo alimentatore HDD Serial ATA (SATA) (Opzionale) Un ASRock 8CH I/O 60 ASRock 939S56-M Motherboard Italiano - ASRock 939S56-M | Quick Installation Guide - Page 61
porte USB 2.0 (vedi ATTENZIONE 4) ASRock 8CH I/O: 1 porta PS/2 per mouse, 1 porta PS/2 per tastiera, 1 Porta seriale: COM 1, 1 Porta parallela (supporto ECP/EPP), 4 porte USB 2.0 già integrate, 1 porta RJ-45, Connettore Audio: cassa laterale / cassa posteriore / 61 ASRock 939S56-M Motherboard - ASRock 939S56-M | Quick Installation Guide - Page 62
appropriato. 6. Anche se questa motherboard offre il controllo stepless, non si consiglia di effettuare l'overclocking. L'uso di frequenze diverse da quelle raccomandate per il bus CPU possono provocare l'instabilità del sistema o danneggiare la CPU. Italiano 62 ASRock 939S56-M Motherboard - ASRock 939S56-M | Quick Installation Guide - Page 63
ventola del processore e l'heatsink. Per una corretta installazione, per favore fare riferimento ai manuali di istruzione dei produttori della ventola e dell'heatsink del processore. 63 ASRock 939S56-M Motherboard Italiano - ASRock 939S56-M | Quick Installation Guide - Page 64
2.2 Installazione dei moduli di memoria (DIMM) La scheda madre 939S56-M fornisce quattro alloggiamenti DIMM DDR (Double Data Rate) a 184 pin, e supporta la tecnologia Dual memoria su DDR1 e DD3, è impossibile attivare la tecnologia Dual Channel Memory. Italiano 64 ASRock 939S56-M Motherboard - ASRock 939S56-M | Quick Installation Guide - Page 65
DIMM nello slot fino a far scattare completamente in posizione i fermagli di ritegno alle due estremità e fino ad installare correttamente la DIMM nella sua sede. 65 ASRock 939S56-M Motherboard Italiano - ASRock 939S56-M | Quick Installation Guide - Page 66
di larghezza x16. PCIE2 (slot PCIE x1) usato per schede PCI Express, quali scheda Gigabit LAN, SATA II, ecc. Installare una scheda di espansione Step 1. Prima d'installare la scheda di nello slot. Step 4. Agganciare la scheda allo chassis con le viti. 66 ASRock 939S56-M Motherboard Italiano - ASRock 939S56-M | Quick Installation Guide - Page 67
del sistema, spegnere il computer e togliere il cavo di BIOS. Se è necessario cancellare la CMOS una volta completato l'aggiornamento del BIOS, è necessario riavviare prima il sistema, e poi spegnerlo prima di procedere alla cancellazione della CMOS. Italiano 67 ASRock 939S56-M Motherboard - ASRock 939S56-M | Quick Installation Guide - Page 68
di immagazzinamento interni. ATA (SATA) supportano cavi SATA per dispositivi di memoria interni. L'interfaccia SATA attuale permette velocità di trasferimento dati fino a 1.5 Gb/s. Italiano 68 ASRock 939S56-M Motherboard - ASRock 939S56-M | Quick Installation Guide - Page 69
. Collettore USB 2.0 (9-pin USB67) (vedi p.2 No. 16) Il dispositivo ASRock 8CH I/O mette a vostra disposizione 4 porte USB 2.0 di default sul pannello posteriore collettore supporta una wireless opzionale che trasmette e riceve moduli infrarossi. Italiano 69 ASRock 939S56-M Motherboard - ASRock 939S56-M | Quick Installation Guide - Page 70
connettore e far combaciare il filo nero al pin terra. Collegare il cavo della ventolina CPU a questo connettore e far combaciare il filo nero al pin terra. Collegare la sorgente possa fornire energia sufficiente. In caso contrario l'unità non si avvia. 70 ASRock 939S56-M Motherboard Italiano - ASRock 939S56-M | Quick Installation Guide - Page 71
BIOS sotto "SATA Operation Mode" (Modalità operativa SATA). Per ulteriori particolari vedi pag. 28 Le due modalità richiedono driver diversi in fase d'uso effettivo. 2.7 Funzione Hot Plug per SATA HDD La scheda madre 939S56 : ..\ RAID BIOS Setting Utility 71 ASRock 939S56-M Motherboard Italiano - ASRock 939S56-M | Quick Installation Guide - Page 72
"RAID". Se si desidera installare Windows 2000, Windows XP o Windows XP 64 bit su un hard disk SATA, è necessario creare un dischetto driver SATA prima di procedere con l'installazione RAID," che si trova nella cartella: .. \ RAID BIOS Setting Utility 72 ASRock 939S56-M Motherboard Italiano - ASRock 939S56-M | Quick Installation Guide - Page 73
. Se la funzione "AUTORUN" è attivata nel computer, apparirà automaticamente il Menù principale. Se il Menù principale non appare automaticamente, posizionarsi sul file ASSETUP. EXE nel CESTINO del CD di supporto e cliccare due volte per visualizzare i menù. 73 ASRock 939S56-M Motherboard Italiano - ASRock 939S56-M | Quick Installation Guide - Page 74
de este manual, la versión actualizada estará disponible en el website de ASRock sin previo aviso. Puede encontrar también las listas más recientes de soporte de memoria y CPU en el sitio web ASRock. Website de ASRock http://www.asrock.com 1.1 Contenido de la caja Placa base ASRock 939S56-M (Factor - ASRock 939S56-M | Quick Installation Guide - Page 75
, más un terminal que admite 4 puertos USB 2.0 adicionales (vea ATENCIÓN 4) ASRock 8CH I/O: 1 puerto de ratón PS/2, 1 puerto de teclado PS/2, 1 puerto serial: COM 1, 1 puerto paralelo (soporta ECP/EPP), 4 puertos USB 2.0 predeterminados, 1 puerto RJ-45, Español 75 ASRock 939S56-M Motherboard - ASRock 939S56-M | Quick Installation Guide - Page 76
Cool 'n' Quiet™ de AMD en el sistema Windows. Consulte el APÉNDICE en la página 37 del "User Manual" (Manual del usuario) del CD de soporte para activar la de bus de la CPU distintas a las recomendadas pueden causar inestabilidad en el sistema o dañar la CPU. Español 76 ASRock 939S56-M Motherboard - ASRock 939S56-M | Quick Installation Guide - Page 77
del CPU. Si no puede encajar el CPU, examine su orientación o examine si los pins están ya encorvados. Paso 4. Encierre el zócalo bajando la palanca. Paso 5. Instale el disipador de calor con ventilador del CPU ( consulte la documentación del disipador de calor). 77 ASRock 939S56-M Motherboard Espa - ASRock 939S56-M | Quick Installation Guide - Page 78
2.2 Instalación de Memoria La placa 939S56-M ofrece cuatro ranuras DIMM DDR de 184 pines, y soporta Tecnología de Memoria de Doble Canal. Para la configuración de de memoria en DDR1 y DDR3, no será posible activar la Tecnología de Memoria de Doble Canal. Español 78 ASRock 939S56-M Motherboard - ASRock 939S56-M | Quick Installation Guide - Page 79
de la ranura hasta que los clips de sujeción de ambos lados queden completamente introducidos en su sitio y la DIMM se haya asentado apropiadamente. 79 ASRock 939S56-M Motherboard Español - ASRock 939S56-M | Quick Installation Guide - Page 80
. PCIE2 (1 ranura PCIE) es utiliza para tarjetas PCI Express, como por ejemplo, para tarjetas Gigabit LAN, SATA II, etc. Instalación de Tarjetas de Expansión. Paso 1. Antes de instalar la tarjeta de en la ranura. Paso 4. Asegure la tarjeta con tornillos. 80 ASRock 939S56-M Motherboard Español - ASRock 939S56-M | Quick Installation Guide - Page 81
acuérdase de quitar el jumper cap después de limpiar el COMS. Si necesita borrar la CMOS cuando acabe de finalizar la actualización de la BIOS, debe arrancar primero el sistema y, a continuación, apagarlo antes de realizar la acción de borrado de CMOS. Español 81 ASRock 939S56-M Motherboard - ASRock 939S56-M | Quick Installation Guide - Page 82
1.5 Gb/s. Cable de datos de serie ATA (SATA) Ambos extremos del cable pueden conectarse al disco duro SATA o la conexión de la placa base. 82 ASRock 939S56-M Motherboard Español - ASRock 939S56-M | Quick Installation Guide - Page 83
blanco del cable de alimentación SATA a la conexión de alimentación de la fuente de alimentación. ASRock 8CH I/O le proporciona 4 puertos USB 2.0 predeterminados en el panel posterior. Si los puertos USB como CD-ROM, DVD-ROM, TV tuner, CD1 o tarjeta MPEG. Español 83 ASRock 939S56-M Motherboard - ASRock 939S56-M | Quick Installation Guide - Page 84
conector y haga coincidir el cable negro con el conector de tierra. Conecte el cable del ventilador de la CPU a este conector y haga coincidir el cable negro con el conector de tierra. Conecte la fuente de alimentaci se instala el soporte del puerto de juegos. Español 84 ASRock 939S56-M Motherboard - ASRock 939S56-M | Quick Installation Guide - Page 85
durante la operación real. 2.7 Función Hot Plug para unidades de disco duro SATA La placa madre 939S56-M admite la función Hot Plug para dispositivos SATA. ¿Qué es la función Hot Plug? Si CD de soporte en la siguiente ubicación: ..\ RAID BIOS Setting Utility 85 ASRock 939S56-M Motherboard Español - ASRock 939S56-M | Quick Installation Guide - Page 86
for Windows" (Utilidad SiS RAID para Windows) en el entorno Windows. Consulte el documento del CD de soporte, "Guide to SiS RAID Utility for Windows," (Guía de la Utilidad SiS RAID para Windows) ubicada en la siguiente carpeta: .. \ RAID Utility for Windows 86 ASRock 939S56-M Motherboard Espa - ASRock 939S56-M | Quick Installation Guide - Page 87
la BIOS, por favor refiérase al Manual del Usuario (archivo PDF) contenido en el CD. 4.Información de Software Support CD Esta placa-base soporta diversos tipos de sistema operativo Windows: 98SE / ME / 2000 / XP El CD de instalación que acompaña la placa-base trae todos los drivers y programas - ASRock 939S56-M | Quick Installation Guide - Page 88
ção deste manual, a versão atualizada estará disponível no website de ASRock sem prévio aviso. Você também poderá encontrar no website da ASRock, as últimas listas de suporte para a Memória e CPU. Website de ASRock http://www.asrock.com 1.1 Este pacote contém Placa-mãe ASRock 939S56-M (Formato - ASRock 939S56-M | Quick Installation Guide - Page 89
cm x 22,4 cm CPU: Soquete de 939 pinos compatível com processador AMD Athlon™ 64 / 64FX / 64 X2 Suporta a tecnologia AMD Cool 'n' Quiet™ (veja o AVISO 1) Chipsets: North Bridge: Chipset SiS 756 FSB @ 1GHz (2.0 GT/s) / 800 MHz Suporta a tecnologia Untied Overclocking (veja o AVISO 2) South - ASRock 939S56-M | Quick Installation Guide - Page 90
Windows. Consulte o APÊNDICE na página 37 do "Manual do utilizador" no CD de suporte para activar a tecnologia Cool 'n' Quiet da AMD. 2. Esta placa principal suporta a tecnologia Untied Overclocking. Durante o overclocking, o FSB é separado dos buses PCIE e PCI. Por outras palavras, o FSB da CPU - ASRock 939S56-M | Quick Installation Guide - Page 91
correta, a alavanca clica na aba lateral, indicando que está travada. 5º passo: instale o ventilador da CPU e o dissipador de calor. Para fazer uma instalação correta, consulte antes os manuais de instrução dos fabricantes da CPU e do dissipador de calor. 91 ASRock 939S56-M Motherboard Português - ASRock 939S56-M | Quick Installation Guide - Page 92
2.2 Instalação dos Módulos de Memória (DIMM) A 939S56-M possui quatro slots DIMM DDR (taxa de dados dupla) de 184 pinos e suporta a tecnologia de memória de duplo ória na ranhura DDR1 e DDR3, não será possível activar a tecnologia de memória de canal duplo. Português 92 ASRock 939S56-M Motherboard - ASRock 939S56-M | Quick Installation Guide - Page 93
slot até que os clipes de retenção em ambos os lados se encaixem totalmente em seus locais e a DIMM esteja encaixada de modo apropriado. Português 93 ASRock 939S56-M Motherboard - ASRock 939S56-M | Quick Installation Guide - Page 94
PCIE2 (ranhura PCIE x1) é utilizada para as placas PCI Express, como é o caso das placas Gigabit LAN, SATA II, etc. Instalando uma placa de expansão 1º passo: Antes de instalar a placa de no slot. 4º passo: Aparafuse a placa no chassis com os parafusos. 94 ASRock 939S56-M Motherboard Português - ASRock 939S56-M | Quick Installation Guide - Page 95
o CMOS usando um jumper. Por favor lembrese de remover o jumper depois de limpar o COMS. Se precisar limpar o CMOS ao concluir a atualização do BIOS, deverá reiniciar o sistema primeiro e, em seguida, desligá-lo antes de executar a ação de limpeza o CMOS. Português 95 ASRock 939S56-M Motherboard - ASRock 939S56-M | Quick Installation Guide - Page 96
dados ATA (SATA) 96 Tanto a saída do cabo de Serial dados SATA pode ser conectado ao disco rígido SATA quanto o conector SATA na placa mãe. ASRock 939S56-M Motherboard Português - ASRock 939S56-M | Quick Installation Guide - Page 97
ao conector de alimentação da fonte. Cabezal USB 2.0 (9-pin USB67) (ver p.2, No. 16) ASRock 8CH I/O le proporciona 4 puertos USB 2.0 predeterminados en el panel posterior. Si los puertos USB posteriores DVD-ROM, placa sintonizadora de TV ou placa MPEG. Português 97 ASRock 939S56-M Motherboard - ASRock 939S56-M | Quick Installation Guide - Page 98
No. 14) Conector do ventilador do chassis (CHA_FAN1 de 3 pinos) (veja a folha 2, No. 15) Conector do ventilador da CPU (CPU_FAN1 de 3 pinos) (veja a folha 2, No. 30) Conector de força do ATX (ATXPWR1 de 20 pinos) (veja ário, haverá falhas de funcionamento. Português 98 ASRock 939S56-M Motherboard - ASRock 939S56-M | Quick Installation Guide - Page 99
opções que existem em "SATA Operation Mode" (Modo de funcionamento SATA) na configuração da BIOS. Consulte a página 28 para mais informações. São necessários controladores diferentes durante o funcionamento. instalado na própria unidade de disco rígido SATA. 99 ASRock 939S56-M Motherboard Português - ASRock 939S56-M | Quick Installation Guide - Page 100
RAID BIOS Setting Utility" para configurar as funções RAID 0 / RAID 1 / JBOD antes de instalar o sistema operativo. Antes de iniciar a configuração das funções RAID, terá de consultar o guia de instalação existente no CD de suporte para garantir uma configuração correcta. ASRock 939S56-M Motherboard - ASRock 939S56-M | Quick Installation Guide - Page 101
BIOS Setting Utility Pode também definir as funções RAID através da utilização do utilitário "SiS RAID Utility for Windows" no Windows. Consulte o documento existente no CD de suporte com o nome "Guide to SiS RAID Utility for Windows na pasta "BIN". ASRock 939S56-M Motherboard 101 Português - ASRock 939S56-M | Quick Installation Guide - Page 102
- ASRock 939S56-M | Quick Installation Guide - Page 103
- ASRock 939S56-M | Quick Installation Guide - Page 104
-
 1
1 -
 2
2 -
 3
3 -
 4
4 -
 5
5 -
 6
6 -
 7
7 -
8
-
9
-
10
-
11
-
12
-
13
-
14
-
15
-
16
-
17
-
18
-
19
-
20
-
21
-
22
-
23
-
24
-
25
-
26
-
27
-
28
-
29
-
30
-
31
-
32
-
33
-
34
-
35
-
36
-
37
-
38
-
39
-
40
-
41
-
42
-
43
-
44
-
45
-
46
-
47
-
48
-
49
-
50
-
51
-
52
-
53
-
54
-
55
-
56
-
57
-
58
-
59
-
60
-
61
-
62
-
63
-
64
-
65
-
66
-
67
-
68
-
69
-
70
-
71
-
72
-
73
-
74
-
75
-
76
-
77
-
78
-
79
-
80
-
81
-
82
-
83
-
84
-
85
-
86
-
87
-
88
-
89
-
90
-
91
-
92
-
93
-
94
-
95
-
96
-
97
-
98
-
99
-
100
-
101
-
102
-
103
-
104
 |
 |

1
ASRock
939S56-M
Motherboard
English
English
English
English
English
Copyright Notice:
Copyright Notice:
Copyright Notice:
Copyright Notice:
Copyright Notice:
No part of this installation guide may be reproduced, transcribed, transmitted, or
translated in any language, in any form or by any means, except duplication of
documentation by the purchaser for backup purpose, without written consent of
ASRock Inc.
Products and corporate names appearing in this guide may or may not be registered
trademarks or copyrights of their respective companies, and are used only for
identification or explanation and to the owners’ benefit, without intent to infringe.
Disclaimer:
Disclaimer:
Disclaimer:
Disclaimer:
Disclaimer:
Specifications and information contained in this guide are furnished for informational
use only and subject to change without notice, and should not be constructed as a
commitment by ASRock. ASRock assumes no responsibility for any errors or
omissions that may appear in this guide.
With respect to the contents of this guide, ASRock does not provide warranty of any
kind, either expressed or implied, including but not limited to the implied warranties or
conditions of merchantability or fitness for a particular purpose.
In no event shall ASRock, its directors, officers, employees, or agents be liable for
any indirect, special, incidental, or consequential damages (including damages for
loss of profits, loss of business, loss of data, interruption of business and the like),
even if ASRock has been advised of the possibility of such damages arising from
any defect or error in the guide or product.
This device complies with Part 15 of the FCC Rules. Operation is subject to the
following two conditions:
(1)
this device may not cause harmful interference, and
(2)
this device must accept any interference received, including interference that
may cause undesired operation.
ASRock Website: http://www.asrock.com
Published May 2005
Copyright
©
2005 ASRock INC. All rights reserved.