ASRock 960GC-GS FX RAID Installation Guide
ASRock 960GC-GS FX Manual
 |
View all ASRock 960GC-GS FX manuals
Add to My Manuals
Save this manual to your list of manuals |
ASRock 960GC-GS FX manual content summary:
- ASRock 960GC-GS FX | RAID Installation Guide - Page 1
RAID Installation Guide 1. AMD BIOS RAID Installation Guide 2 1.1 Introduction to RAID 2 1.2 RAID Configurations Precautions 3 1.3 Installing Windows® 8 / 8 64-bit / 10 2. AMD Windows RAID Installation Guide 14 2.1 Components of RAIDXpert Installation Software 14 2.2 Browser Support 14 2.3 - ASRock 960GC-GS FX | RAID Installation Guide - Page 2
by using the onboard FastBuild BIOS utility under BIOS environment. After you make a SATA driver diskette, press or to enter BIOS setup to set the option to RAID mode by following the detailed instruction of the "User Manual" in our support CD or "Quick Installation Guide", then you can - ASRock 960GC-GS FX | RAID Installation Guide - Page 3
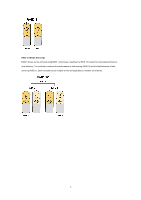
RAID 10 (Stripe Mirroring) RAID 0 drives can be mirrored using RAID 1 techniques, resulting in a RAID 10 solution for improved performance plus resiliency. The controller combines the performance of data striping (RAID 0) and the fault tolerance of disk mirroring (RAID 1). Data is striped across - ASRock 960GC-GS FX | RAID Installation Guide - Page 4
two SATA drives of the same size. If you use two drives of different sizes, the smaller capacity hard disk will be the base storage size for each drive. For example, you create RAID, the system will ask if you want to "Clear Disk Data" or not. It is recommended to select "Yes", and then your - ASRock 960GC-GS FX | RAID Installation Guide - Page 5
. Before you start to configure RAID function, you need to check this RAID installation guide for proper configuration. Please refer to the BIOS RAID installation guide part in this document for details. STEP 3: Make a SATA Driver Diskette. (Please use an USB floppy or a floppy disk.) Make a SATA - ASRock 960GC-GS FX | RAID Installation Guide - Page 6
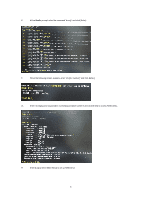
E. At the Shell> prompt, enter the command "drvcfg" and click [Enter]. F. When the following screen appears, enter "dh [Drv number]" and click [Enter]. G. Enter "drvcfg(space)-s(space)[Drv number](space)[Ctrl number]" and click [Enter] to access RAID Utility. H. Enter [Logical Drive Main Menu - ASRock 960GC-GS FX | RAID Installation Guide - Page 7
I. Choose [Logical Drive Create Menu] to create a RAID Drive. J. Choose [Usable Physical Drive List] and select the hard drives to be included in the RAID array. Click [Space] on keyboard to toggle checkbox. Then choose [Basic Setting]. 7 - ASRock 960GC-GS FX | RAID Installation Guide - Page 8
in "Ld name". Click [Enter] to confirm the selection. L. Choose [Ld Size setting] and click [Enter] three times. M. Click [Esc] to return to the previous page and choose [Logical Drive List Menu] to check the logical drive list. N. Enter UEFI SETUP UTILITY → Boot to set the "Fast Boot" option - ASRock 960GC-GS FX | RAID Installation Guide - Page 9
guide for proper configuration. Please refer to the BIOS RAID installation guide part in this document for details. STEP 3: Make a SATA Driver and exit. STEP 2: Make a SATA Driver Diskette. (Please use an USB floppy or a floppy disk.) A. Insert the ASRock Support CD into your optical drive to boot - ASRock 960GC-GS FX | RAID Installation Guide - Page 10
BIOS RAID installation guide part in this document for details. STEP 4: Install Windows® XP / XP 64-bit OS on your system. After step 1, 2, 3, you can start to install Windows® XP / XP 64-bit OS on your system. At the beginning of Windows® setup, press F6 to install a third-party RAID driver. When - ASRock 960GC-GS FX | RAID Installation Guide - Page 11
drives installed, the AMD onboard RAID Option ROM Utility will display the following screen. The RAID Option ROM includes a Utility with tools to set up your physical drives as RAID logical drives. The RAID Option ROM Utility can perform these functions: - Monitoring - ASRock 960GC-GS FX | RAID Installation Guide - Page 12
Press 2 on the Main Menu screen to display the Define LD Menu. Press the arrow keys to highlight a logical drive number you want to define and press to select it. The Define LD Menu for the logical drive number you selected will next appear. Choose the RAID level you want. In the Define LD - ASRock 960GC-GS FX | RAID Installation Guide - Page 13
a new RAID logical drive. Please install the operating system to your computer by following the detailed instruction of the "User Manual" in our support CD or "Quick Installation Guide". Two Logical Drives After selecting the logical drive in Disk Assignments as the above-mentioned procedures, press - ASRock 960GC-GS FX | RAID Installation Guide - Page 14
. 6. Press to restart the computer. You have successfully created a new RAID logical drive. Please install the operating system to your computer by following the detailed instruction of the "User Manual" in our support CD or "Quick Installation Guide". 14 - ASRock 960GC-GS FX | RAID Installation Guide - Page 15
monitoring of all AMD SATA logical drives that exist anywhere on a network. Its browser-based GUI provides email notification of all major events/alarms, memory AMD SATA RAID controllers. Other brands of RAID controllers are not supported. Please read this guide carefully and follow the instructions - ASRock 960GC-GS FX | RAID Installation Guide - Page 16
7. When the Welcome screen appears, click the Next button. 8. When the License Agreement screen appears, click the "I accept the terms of the license agreement" option to proceed with installation. Then click the Next button to continue. Note: If you leave the "I do not accept the terms of the - ASRock 960GC-GS FX | RAID Installation Guide - Page 17
SSL Security - Applies security to all connections involving the Internet or outside your company firewall. Security options are invisible to authorized users. AMD provides a default certificate for the server as well as for internal data communication. However, in some cases it is better to install - ASRock 960GC-GS FX | RAID Installation Guide - Page 18
12. When the Install Complete screen appears, click the Finish button. 2.4 Logging into RAIDXpert Choose RAIDXpert in the Windows Programs menu. Or, log on manually with your browser: 1. Launch the Browser. 2. In the Browser address field, type the entry explained below. If you did not choose the - ASRock 960GC-GS FX | RAID Installation Guide - Page 19
, your entry looks like this: https://127.0.0.1:8443/amd or https://localhost:8443/amd Note that the IP address shown above applies to a log-in at the Host PC. When you log in over a network, enter the Host PC's actual IP address or hostname. Press the Enter key. Then, when the login screen - ASRock 960GC-GS FX | RAID Installation Guide - Page 20
want to split the capacity of your physical drives between two logical drives, enter the capacity for the first logical drive in the Logical Drive Size field. Or, to use the maximum capacity of the physical drives, check the Use Maximum Capacity box. 7. Click the physical drives to select them - ASRock 960GC-GS FX | RAID Installation Guide - Page 21
is None. You cannot change this setting. 12. RAID 0 and 1. Select a Gigabyte Boundary policy from the dropdown menu. • GigaByte Boundary - Rounds the size of the logical drive down to the nearest whole gigabyte. This is the default. For more information. • None - No Boundary function. 13. Select an - ASRock 960GC-GS FX | RAID Installation Guide - Page 22
system. 2.8 Connecting to RAIDXpert from the Internet The above instructions cover connections between the Host PC and other PCs using RAIDXpert read and write data to the logical drives. However, other PCs can monitor the Host PC from virtually any location. 2.9 Running RAIDXpert without Network - ASRock 960GC-GS FX | RAID Installation Guide - Page 23
3. Installing OS on a HDD Larger Than 2TB This motherboard is adopting UEFI BIOS that allows Windows® OS to be installed on a large size HDD (>2TB). Please follow below procedure to install the operating system. 1. Please make sure to use Windows® VistaTM 64-bit (with SP1 or above), Windows® 7 - ASRock 960GC-GS FX | RAID Installation Guide - Page 24
2TB in RAID Mode This motherboard is adopting UEFI BIOS that allows Windows® OS to be installed on a large size HDD (>2TB). Please in UEFI Setup Utility > Advanced > Storage Configuration > SATA Mode. 3. Choose onboard RAID 3TB+ unlocker > UEFI Mode For GPT partition. Press to save the change - ASRock 960GC-GS FX | RAID Installation Guide - Page 25
7. And then key in drvcfg -s [Drv number] [Ctrl number] to enter Raid Utility. For example: key in drvcfg -s 4E B5. 8. Choose Logical Drive Main Menu to set up Raid Drive. 9. Choose Logical Drive Create Menu to create a Raid Drive. 10. Choose Usable Physical Drive List to select Raid HDD. 25 - ASRock 960GC-GS FX | RAID Installation Guide - Page 26
11. Press Space on keyboard to toggle checkbox. 12. Choose Ld Size setting, and key in the Raid size. 13. After set up Raid size, please click Start to Create. 14. Press to exit Utility. 15. During reboot, please press to enter Boot Menu. Choose UEFI: SCSI CD/DVD Drive. 26 - ASRock 960GC-GS FX | RAID Installation Guide - Page 27
Windows® Installation Guide to install OS. If you install Windows® 8 64-bit / 7 64-bit / VistaTM 64-bit in a large hard disk (ex. Disk volume > 2TB), it may take more time to boot into Windows® or install driver/utilities. If you encounter this problem, you will need to following instructions to fix - ASRock 960GC-GS FX | RAID Installation Guide - Page 28
B. Disable "Volume Shadow Copy" service. a. Type "computer management" in the Start Menu, then press "Enter". b. Go to "Services and Applications>Services"; Then double click "Volume Shadow Copy". 28 - ASRock 960GC-GS FX | RAID Installation Guide - Page 29
c. Set "Startup type" to "Disable" then Click "OK". 29 - ASRock 960GC-GS FX | RAID Installation Guide - Page 30
C. Reboot your system. D. After reboot, please start to install motherboard drivers and utilities. Windows® 8 64-bit / 7 64-bit: A. Please request the hotfix KB2505454 thru this link: http://support.microsoft.com/kb/2505454/ B. After installing Windows® 8 64-bit / 7 64-bit, install the hotfix
-
 1
1 -
 2
2 -
 3
3 -
 4
4 -
 5
5 -
 6
6 -
 7
7 -
8
-
9
-
10
-
11
-
12
-
13
-
14
-
15
-
16
-
17
-
18
-
19
-
20
-
21
-
22
-
23
-
24
-
25
-
26
-
27
-
28
-
29
-
30
 |
 |

1
AMD RAID Installation Guide
1.
AMD BIOS RAID Installation Guide …………………………………………………………………….. 2
1.1
Introduction to RAID ……………………………………………………………………………….. 2
1.2
RAID Configurations Precautions ………………………………………………………………… 3
1.3
Installing Windows
®
8 / 8 64-bit / 7 / 7 64-bit / Vista
TM
/ Vista
TM
64-bit / XP / XP 64-bit With
RAID Functions .……………………………………………………………………………………..4
1.3.1
Installing Windows
®
8 / 8 64-bit With RAID Funtions …………………...………………. .4
1.3.2
Installing Windows
®
7 / 7 64-bit / Vista
TM
/ Vista
TM
64-bit With RAID Funtions ………
....
8
1.3.3
Installing Windows
®
XP / XP 64-bit With RAID Funtions ……….……..
……………… ..
8
1.4
Create Disk Array ………………………………………………………………………………… .10
2.
AMD Windows RAID Installation Guide ………………………………………………………………...14
2.1
Components of RAIDXpert Installation Software ……………………………………………. 14
2.2
Browser Support ………………………………………………………………………………… 14
2.3
Installing RAIDXpert ……………………………………………………………………………. 14
2.4
Logging into RAIDXpert ………………………………………………………………………… 17
2.5
Regular Connection……………………………………………………………………………... 17
2.6
Secure Connection………………………………………………………………………………. 17
2.7
Creating a New Logical Drive
…………………………………………………………………..
18
2.8
Connecting to RAIDXpert from the Internet ………………………………………………….. 21
2.9
Running RAIDXpert without Network Connection …………………………………………… 21
3.
Installing OS on a HDD Larger Than 2TB ……………………………………………………………..23
4.
Installing OS on a HDD Larger Than 2TB in RAID Mode……………………………………………..24