ASRock 990FX Extreme6 Quick Installation Guide - Page 6
Activity / Link LED, Speed LED, Status, Description, Audio Output, Channels, Front Speaker, No. 10,
 |
View all ASRock 990FX Extreme6 manuals
Add to My Manuals
Save this manual to your list of manuals |
Page 6 highlights
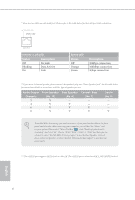
* here are two LEDs on each LAN port. Please refer to the table below for the LAN port LED indications. ACT/LINK LED SPEED LED LAN Port Activity / Link LED Status Description Of Blinking On No Link Data Activity Link Speed LED Status Of Orange Green Description 10Mbps connection 100Mbps connection 1Gbps connection ** If you use a 2-channel speaker, please connect the speaker's plug into "Front Speaker Jack". See the table below for connection details in accordance with the type of speaker you use. Audio Output Channels 2 4 6 8 Front Speaker (No. 10) V V V V Rear Speaker (No. 8) -V V V Central / Bass (No. 7) --V V Line In (No. 9) ---V To enable Multi-Streaming, you need to connect a front panel audio cable to the front panel audio header. Ater restarting your computer, you will ind the "Mixer" tool on your system. Please select "Mixer ToolBox" , click "Enable playback multistreaming", and click "ok". Choose "2CH", "4CH", "6CH", or "8CH" and then you are allowed to select "Realtek HDA Primary output" to use the Rear Speaker, Central/ Bass, and Front Speaker, or select "Realtek HDA Audio 2nd output" to use the front panel audio. *** he eSATA3 port supports SATA Gen3 in cable 1M. he eSATA3 port is shared with M.2_SSD (NGFF) Socket 3. English 4
-
 1
1 -
 2
2 -
 3
3 -
 4
4 -
 5
5 -
 6
6 -
 7
7 -
 8
8 -
 9
9 -
 10
10 -
 11
11 -
 12
12 -
13
-
14
-
15
-
16
-
17
-
18
-
19
-
20
-
21
-
22
-
23
-
24
-
25
-
26
-
27
-
28
-
29
-
30
-
31
-
32
-
33
-
34
-
35
-
36
-
37
-
38
-
39
-
40
-
41
-
42
-
43
-
44
-
45
-
46
-
47
-
48
-
49
-
50
-
51
-
52
-
53
-
54
-
55
-
56
-
57
-
58
-
59
-
60
-
61
-
62
-
63
-
64
-
65
-
66
-
67
-
68
-
69
-
70
-
71
-
72
-
73
-
74
-
75
-
76
-
77
-
78
-
79
-
80
-
81
-
82
-
83
-
84
-
85
-
86
-
87
-
88
-
89
-
90
-
91
-
92
-
93
-
94
-
95
-
96
-
97
-
98
-
99
-
100
-
101
-
102
-
103
-
104
-
105
-
106
-
107
-
108
-
109
-
110
-
111
-
112
-
113
-
114
-
115
-
116
-
117
-
118
-
119
-
120
-
121
-
122
-
123
-
124
-
125
-
126
-
127
-
128
-
129
-
130
-
131
-
132
-
133
-
134
-
135
-
136
-
137
-
138
-
139
-
140
-
141
-
142
-
143
-
144
-
145
-
146
-
147
-
148
-
149
-
150
-
151
 |
 |
