ASRock AD410PV Quick Installation Guide
ASRock AD410PV Manual
 |
View all ASRock AD410PV manuals
Add to My Manuals
Save this manual to your list of manuals |
ASRock AD410PV manual content summary:
- ASRock AD410PV | Quick Installation Guide - Page 1
for backup purpose, without written consent of ASRock Inc. Products and corporate names appearing in this guide may or may not be registered trademarks or ASRock Website: http://www.asrock.com Published March 2010 Copyright©2010 ASRock INC. All rights reserved. 1 ASRock AD510PV / AD410PV Motherboard - ASRock AD410PV | Quick Installation Guide - Page 2
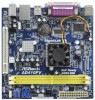
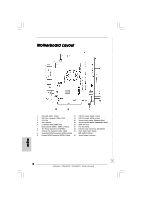
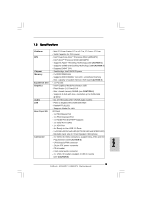
5 2 x 240-pin DDR2 DIMM Slots 14 BIOS SPI Chip (Dual Channel: DDRII_1, DDRII_2; Yellow) 15 PCI Slot (PCI1) 6 ATX Power Connector (ATXPWR1) 16 Internal Audio Connector: CD1 , White) 9 Primary SATAII Connector (SATAII_1; Blue) 18 South Bridge Controller 2 ASRock AD510PV / AD410PV Motherboard - ASRock AD410PV | Quick Installation Guide - Page 3
HD Audio Deck" tool on your system. Please follow below instructions according to the OS you install. For Windows® XP / Then you are allowed to select "2 Channel" or "4 Channel". Click "Power" to save your change. For Windows® 7 / 7 64-bit / VistaTM ASRock AD510PV / AD410PV Motherboard English - ASRock AD410PV | Quick Installation Guide - Page 4
Contents ASRock AD510PV / AD410PV Motherboard (Mini-ITX Form Factor: 6.7-in x 6.7-in, 17.0 cm x 17.0 cm) One Bundled Intel® Dual-Core AtomTM Processor D510 (AD510PV) One Bundled Intel® AtomTM Processor D410 (AD410PV) ASRock AD510PV / AD410PV Quick Installation Guide ASRock AD510PV / AD410PV Support - ASRock AD410PV | Quick Installation Guide - Page 5
Memory Expansion Slot Graphics Audio LAN Rear Panel I/O Connector - Mini-ITX Form Factor: 6.7-in x 6.7-in, 17.0 cm x 17.0 cm - Solid Capacitor for CPU power - Intel® Dual-Core AtomTM Processor D510 (AD510PV) - Intel® AtomTM Processor D410 (AD410PV) - Supports Hyper-Threading Technology (see CAUTION - ASRock AD410PV | Quick Installation Guide - Page 6
- 4Mb AMI BIOS - AMI Legal BIOS - Supports "Plug and Play" - ACPI 1.1 Compliance Wake Up Events - Supports jumperfree - AMBIOS 2.3.1 Support - VCCM, SB Voltage Multi-adjustment - Supports Smart BIOS Support CD - Drivers, Utilities, AntiVirus Software (Trial Version), ASRock Software Suite - ASRock AD410PV | Quick Installation Guide - Page 7
worked on the same motherboard. 10. Although this motherboard offers stepless control, it is not recommended to perform over-clocking. Frequencies other than the recommended CPU bus frequencies may cause the instability of the system or damage the CPU. 7 ASRock AD510PV / AD410PV Motherboard English - ASRock AD410PV | Quick Installation Guide - Page 8
, the EuP ready power supply must meet the standard of 5v standby power efficiency is higher than 50% under 100 mA current consumption. For EuP ready power supply selection, we recommend you checking with the power supply manufacturer for more details. 8 ASRock AD510PV / AD410PV Motherboard English - ASRock AD410PV | Quick Installation Guide - Page 9
AD510PV / AD410PV is a Mini-ITX form factor (6.7" x 6.7", 17.0 x 17.0 cm) motherboard. Before you install the motherboard, study the configuration of your chassis to ensure that the motherboard fits into it. Make sure to unplug the power cord before installing or removing the motherboard - ASRock AD410PV | Quick Installation Guide - Page 10
damage to the motherboard and the DIMM if you force the DIMM into the slot at incorrect orientation. Step 3. Firmly insert the DIMM into the slot until the retaining clips at both ends fully snap back in place and the DIMM is properly seated. 10 ASRock AD510PV / AD410PV Motherboard English - ASRock AD410PV | Quick Installation Guide - Page 11
motherboard. PCI slot: PCI slot is used to install expansion cards that have the 32-bit PCI interface. Installing an expansion card Step 1. Before installing the expansion card, please make sure that the power supply is switched off or the power . 11 ASRock AD510PV / AD410PV Motherboard English - ASRock AD410PV | Quick Installation Guide - Page 12
enable (see p.2 No. 1) +5VSB (standby) for PS/2 or USB wake up events. Note: To select +5VSB, it requires 2 Amp and higher standby current provided by power supply. English 12 ASRock AD510PV / AD410PV Motherboard - ASRock AD410PV | Quick Installation Guide - Page 13
default USB 2.0 ports on the I/O panel, there are two USB 2.0 headers on this motherboard. Each USB 2.0 header can support two USB 2.0 ports. English Internal Audio Connector (4-pin CD1) (CD1: see p.2 No convenient connection and control of audio devices. 13 ASRock AD510PV / AD410PV Motherboard - ASRock AD410PV | Quick Installation Guide - Page 14
Fan) support, the 3-Pin CPU fan still can work successfully even without the fan speed control function. If you plan to connect the 3-Pin CPU fan to the CPU fan connector on this motherboard, please connect it to Pin 1-3. Pin 1-3 Connected 3-Pin Fan Installation English 14 ASRock AD510PV / AD410PV - ASRock AD410PV | Quick Installation Guide - Page 15
24-pin ATX power connector, 12 24 it can still work if you adopt a traditional 20-pin ATX power supply. To use the 20-pin ATX power supply, please plug your power supply along with Pin 1 and Pin 13. 20-Pin ATX Power Supply Installation 1 13 English a 15 ASRock AD510PV / AD410PV Motherboard - ASRock AD410PV | Quick Installation Guide - Page 16
is called "Hot Plug" for the action to insert and remove the SATA / SATAII HDDs while the system is still power-on and in working condition. However, please note that it cannot perform Hot Plug if the OS has been installed into the SATA / SATAII HDD. 16 ASRock AD510PV / AD410PV Motherboard English - ASRock AD410PV | Quick Installation Guide - Page 17
HDDs without NCQ function STEP 1: Set up BIOS. A. Enter BIOS SETUP UTILITY Advanced screen Storage Configuration. B. Set the option "SATA Operation Mode" to [IDE]. STEP 2: Install Windows® 7 / 7 64-bit / VistaTM / VistaTM 64-bit OS on your system. 17 ASRock AD510PV / AD410PV Motherboard English - ASRock AD410PV | Quick Installation Guide - Page 18
motherboard supports Untied Overclocking Technology, which means during overclocking, FSB enjoys better margin due to fixed PCI bus. Before you enable Untied Overclocking function, please enter "Overclock Mode" option of BIOS Overclocking Technology. 18 ASRock AD510PV / AD410PV Motherboard English - ASRock AD410PV | Quick Installation Guide - Page 19
in your computer. If the Main Menu does not appear automatically, locate and doubleclick on the file "ASSETUP.EXE" from the BIN folder in the Support CD to display the menus. 19 ASRock AD510PV / AD410PV Motherboard English - ASRock AD410PV | Quick Installation Guide - Page 20
, besuchen Sie bitte unsere Webseite: www.asrock.com/support/index.asp 1.1 Kartoninhalt ASRock AD510PV / AD410PV Motherboard (Mini-ITX-Formfaktor: 17.0 cm x 17.1 cm; 6.7 Zoll x 6.7 Zoll) Ein mitgelieferter Intel® Dual-Core-AtomTM-Prozessor D510 (AD510PV) Eine mitgelieferter Intel® AtomTM-Prozessor - ASRock AD410PV | Quick Installation Guide - Page 21
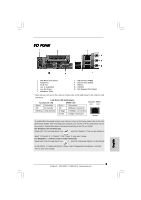
Mini-ITX-Formfaktor: 17.0 cm x 17.1 cm; 6.7 Zoll x 6.7 Zoll - Festkondensator für CPU-Leistung - Intel® Dual-Core AtomTM-Prozessor D510 (AD510PV Systemspeichers: 8GB (siehe PS/2 Keyboard Port - 1 x Parallel Port (ECP/EPP Support) - 1 x Serieller port: COM 1 - 1 x ASRock AD510PV / AD410PV Motherboard - ASRock AD410PV | Quick Installation Guide - Page 22
Multianpassung - Unterstützt Smart BIOS Support-CD - Treiber, Dienstprogramme, Antivirussoftware (Probeversion), ASRock-Software-Suite (CyberLink DVD Suite ührliche Produktinformation, besuchen Sie bitte unsere Website: http://www.asrock.com Deutsch 22 ASRock AD510PV / AD410PV Motherboard - ASRock AD410PV | Quick Installation Guide - Page 23
Support verbinden. 6. Das Power Management für USB 2.0 BIOS-Datei auf Ihrem USB-Flash-Laufwerk, Diskettenlaufwerk oder der Festplatte zu speichern, und schon können Sie Ihr BIOS mit nur wenigen Klickvorgängen ohne Bereitstellung einer zusätzlichen Diskette oder 23 ASRock AD510PV / AD410PV Motherboard - ASRock AD410PV | Quick Installation Guide - Page 24
Sie das System neu starten, prüfen Sie bitte, ob der CPU-Lüfter am Motherboard richtig funktioniert, und stecken Sie bitte den Stromkabelstecker aus und dann wieder ein. Um wir Ihnen, weitere Details beim Hersteller der Stromversorgung abzufragen. 24 ASRock AD510PV / AD410PV Motherboard Deutsch - ASRock AD410PV | Quick Installation Guide - Page 25
PS/2 oder USB- Weckfunktionen zu aktivieren. Hinweis: Um +5VSB nutzen zu können, muss das Netzteil auf dieser Leitung 2A oder mehr leisten können. Deutsch 25 ASRock AD510PV / AD410PV Motherboard - ASRock AD410PV | Quick Installation Guide - Page 26
üblichen USB 2.0-Ports an den I/O-Anschlüssen befinden sich zwei USB 2.0-Anschlussleisten am Motherboard. Pro USB 2.0Anschlussleiste werden zwei USB 2.0-Ports unterstützt. Deutsch Interne Audio-Anschlü TV-Tuner oder MPEG-Karten mit Ihrem System zu verbinden. 26 ASRock AD510PV / AD410PV Motherboard - ASRock AD410PV | Quick Installation Guide - Page 27
sse müssen nicht an die AC'97-Audioleiste angeschlossen werden. E. Rufen Sie das BIOS-Setup-Dienstprogramm auf. Wechseln Sie zu Erweiterte Einstellungen und wählen Sie Chipset-Konfiguration. und passen Sie den schwarzen Draht dem Erdungsstift an. Deutsch 27 ASRock AD510PV / AD410PV Motherboard - ASRock AD410PV | Quick Installation Guide - Page 28
No. 6) 12 24 Verbinden Sie die ATXStromversorgung mit diesem Header. 1 13 Obwohl dieses Motherboard einen 24-pol. ATX-Stromanschluss 12 24 bietet, kann es auch mit einem modifizierten traditionellen eines 20-pol. ATX-Netzteils 1 13 Deutsch 28 ASRock AD510PV / AD410PV Motherboard - ASRock AD410PV | Quick Installation Guide - Page 29
der Support-CD, um die Menüs aufzurufen. Das Setup-Programm soll es Ihnen so leicht wie möglich machen. Es ist menügesteuert, d.h. Sie können in den verschiedenen Untermenüs Ihre Auswahl treffen und die Programme werden dann automatisch installiert. 29 ASRock AD510PV / AD410PV Motherboard Deutsch - ASRock AD410PV | Quick Installation Guide - Page 30
asrock.com/support/index.asp 1.1 Contenu du paquet Carte mère ASRock AD510PV / AD410PV (Facteur de forme Mini-ITX : 6.7 pouces x 6.7 pouces, 17.0 cm x 17.0 cm) Un processeur Intel® AtomTM double-cœur D510 (AD510PV) Un processeur Intel® AtomTM D410 (AD410PV) Guide d'installation rapide ASRock AD510PV - ASRock AD410PV | Quick Installation Guide - Page 31
x port clavier PS/2 - 1 x port parallèle: Support ECP/EPP - 1 x port série: COM 1 - 1 x port VGA - 4 x ports USB 2.0 par défaut - 1 x port LAN RJ-45 avec LED (ACT/LED CLIGNOTANTE et LED VITESSE) - Jack audio: entrée ligne / sortie ligne / microphone Français 31 ASRock AD510PV / AD410PV Motherboard - ASRock AD410PV | Quick Installation Guide - Page 32
USB 2.0) (voir ATTENTION 6) - 4Mb BIOS AMI - BIOS AMI - Support du "Plug and Play" - Compatible pour événements de réveil ACPI 1.1 - Gestion jumperless - Support SMBIOS 2.3.1 - VCCM, SB Tension Multi- Prêt pour ErP/EuP requise) (voir ATTENTION 12) Français 32 ASRock AD510PV / AD410PV Motherboard - ASRock AD410PV | Quick Installation Guide - Page 33
exibir o menu de configuração do BIOS para aceder ao ASRock Instant Flash. Execute esta ferramenta para guardar o novo ficheiro de BIOS numa unidade flash USB, numa disquete ou num disco rígido, em seguida, poderá actualizar o BIOS com apenas alguns 33 ASRock AD510PV / AD410PV Motherboard Français - ASRock AD410PV | Quick Installation Guide - Page 34
DNA vous indique littéralement ce dont il est capable. OC DNA, utilitaire exclusif développé par ASRock, offre une façon pratique pour l'utilisateur d'enregistrer les paramètres d'overclockage et de les partager de courant pour plus de détails. 34 ASRock AD510PV / AD410PV Motherboard Français - ASRock AD410PV | Quick Installation Guide - Page 35
de réveiller le système. Note: Pour sélectionner +5VSB, il faut obligatoirement 2 Amp et un courant standby supérieur fourni par l'alimentation. Français 35 ASRock AD510PV / AD410PV Motherboard - ASRock AD410PV | Quick Installation Guide - Page 36
2.0 par défaut sur le panneau E/S, il y a deux embases USB 2.0 sur cette carte mère. Chaque embase USB 2.0 peut prendre en charge 2 ports USB 2.0. Français 36 ASRock AD510PV / AD410PV Motherboard - ASRock AD410PV | Quick Installation Guide - Page 37
HDA pour fonctionner correctement. Veuillez suivre les instructions dans notre manuel et le manuel de ch BIOS. Saisir les Paramètres avancés puis sélectionner Configuration du jeu de puces. Définir l'option panneau de commande de [Auto] à [Activé]. Français 37 ASRock AD510PV / AD410PV Motherboard - ASRock AD410PV | Quick Installation Guide - Page 38
ble de ventilateur d'UC sur ce connecteur et brancher le fil ien que cette carte mère offre un support de (Ventilateur silencieux) ventilateur de CPU à 4 broches , le ventilateur de CPU à 3 broches peut à 3 broches Broches 1-3 connectées Français 38 ASRock AD510PV / AD410PV Motherboard - ASRock AD410PV | Quick Installation Guide - Page 39
utiliser une alimentation ATX 20 broches, branchez à l'alimentation électrique ainsi qu'aux broches 1 et 13. 20-Installation de l'alimentation électrique ATX 1 13 Français 39 ASRock AD510PV / AD410PV Motherboard - ASRock AD410PV | Quick Installation Guide - Page 40
détaillées sur le BIOS, veuillez consulter le Guide de l'utilisateur (fichier PDF) dans le CD technique. 3. Informations sur le CD de support Cette carte mère supporte divers systèmes d'exploitation et double-cliquez dessus pour afficher les menus. 40 ASRock AD510PV / AD410PV Motherboard Français - ASRock AD410PV | Quick Installation Guide - Page 41
sul modello che si sta usando. www.asrock.com/support/index.asp 1.1 Contenuto della confezione Scheda madre ASRock AD510PV / AD410PV (Mini-ITX Form Factor: 6.7-in x 6.7-in, 17.0 cm x 17.0 cm) un processore Intel® Dual-Core AtomTM D510 (AD510PV) incluso un processore Intel® AtomTM D410 (AD410PV - ASRock AD410PV | Quick Installation Guide - Page 42
Mini-ITX Form Factor: 6.7-in x 6.7-in, 17.0 cm x 17.0 cm - Condensatore solido per alimentazione CPU Processore - processore Intel® Dual-Core AtomTM D510 (AD510PV buffer - Capacità massima della memoria di sistema: 8GB (vedi ATTENZIONE 3) Slot di - 1 x slot ASRock AD510PV / AD410PV Motherboard - ASRock AD410PV | Quick Installation Guide - Page 43
voltaggio VCCM, SB - Smart BIOS supportato CD di - Driver, utilità, software antivirus (Versione dimostrativa), supporto Suite software ASRock (Suite CyberLink DVD e informazioni, prego visitare il nostro sito internet: http://www.asrock.com Italiano 43 ASRock AD510PV / AD410PV Motherboard - ASRock AD410PV | Quick Installation Guide - Page 44
" a pagina 19 del "Manuale utente" nel CD in dotazione BIOS con pochi clic, senza preparare altri dischetti (dischi floppy) o altre complicate utilità Flash. Si prega di notare che l'unità Flash USB o il disco rigido devono usare il File System FAT32/16/ 12. 44 ASRock AD510PV / AD410PV Motherboard - ASRock AD410PV | Quick Installation Guide - Page 45
ò essere condiviso e modificato solo sulla stessa scheda madre. 10. Anche se questa motherboard offre il controllo stepless, non si consiglia di effettuare l'overclocking. Frequenze del bus di verificare ulteriori dettagli con il produttore. 45 ASRock AD510PV / AD410PV Motherboard Italiano - ASRock AD410PV | Quick Installation Guide - Page 46
(standby) e abilitare PS/2 o USB wake up events. Nota: Per selezionare +5VSB, si richiedono almeno 2 Ampere e il consumo di corrente in standby sarà maggiore. Italiano 46 ASRock AD510PV / AD410PV Motherboard - ASRock AD410PV | Quick Installation Guide - Page 47
. Oltre alle quattro porte USB 2.0 predefinite nel pannello I/O, la scheda madre dispone di due intestazioni USB 2.0. Ciascuna intestazione USB 2.0 supporta due porte USB 2.0. Italiano 47 ASRock AD510PV / AD410PV Motherboard - ASRock AD410PV | Quick Installation Guide - Page 48
in modo corretto. Attenersi alle istruzioni del nostro manuale e del manuale del telaio per installare il sistema. 2. Se AC'97. E. Entrare nel programma di impostazione BIOS. Entrare su Impostazioni avanzate, quindi selezionare Configurazione al pin terra. 48 ASRock AD510PV / AD410PV Motherboard - ASRock AD410PV | Quick Installation Guide - Page 49
a 20 pin. Per usare l'alimentatore ATX a 20 pin, collegare l'alimentatore con il Pin 1 e il Pin 13. Installazione dell'alimentatore ATX a 20 pin 1 13 Italiano 49 ASRock AD510PV / AD410PV Motherboard - ASRock AD410PV | Quick Installation Guide - Page 50
Power-On-Self-Test (POST) della Setup utility del BIOS; altrimenti, POST continua con i suoi test di routine. Per entrare il BIOS di supporto a corredo della scheda madre contiene i driver e utilità necessari a potenziare le caratteristiche della scheda ASRock AD510PV / AD410PV Motherboard Italiano - ASRock AD410PV | Quick Installation Guide - Page 51
mero de modelo específico de su placa. www.asrock.com/support/index.asp 1.1 Contenido de la caja Placa base ASRock AD510PV / AD410PV (Factor forma Mini-ITX: 17,0 cm x 17,0 cm, 6,7" x 6,7") Un Procesador Integrado Intel® AtomTM D510 de Doble Núcleo (AD510PV) Un Procesador Integrado Intel® AtomTM D410 - ASRock AD410PV | Quick Installation Guide - Page 52
Mini-ITX: 17,0 cm x 17,0 cm, 6,7" x 6,7" - Condensador sólido para alimentación de CPU - Procesador Intel® AtomTM D510 de Doble Núcleo (AD510PV de un-buffered - Máxima capacidad de la memoria del sistema: 8GB (vea ATENCIÓN 3) - 1 x ranuras PCI - Intel® Graphics ASRock AD510PV / AD410PV Motherboard - ASRock AD410PV | Quick Installation Guide - Page 53
x Conector USB 2.0 (compatible con 4 puertos USB 2.0) (vea ATENCIÓN 6) BIOS - 4Mb AMI BIOS - AMI legal BIOS - Soporta "Plug and Play" - ACPI 1.1 compliance wake up events - productos, por favor visite nuestro sitio web: http://www.asrock.com Español 53 ASRock AD510PV / AD410PV Motherboard - ASRock AD410PV | Quick Installation Guide - Page 54
Manual . 6. Power Management para BIOS y a la utilidad ASRock Instant Flash. Ejecute esta herramienta y guarde el archivo correspondiente al sistema BIOS nuevo en su unidad flash USB, unidad de disco flexible o disco duro para poder actualizar el BIOS con sólo 54 ASRock AD510PV / AD410PV Motherboard - ASRock AD410PV | Quick Installation Guide - Page 55
, indica con claridad aquello de lo que es capaz. OC DNA, una exclusiva utilidad desarrollada por ASRock, representa para el usuario una forma cómoda de grabar su configuración de OC y compartirla con fuente de alimentación para obtener más detalles. 55 ASRock AD510PV / AD410PV Motherboard Español - ASRock AD410PV | Quick Installation Guide - Page 56
) para PS/2 o USB wake up events. Atención: Para elegir +5VSB, se necesita corriente mas que 2 Amp proveida por la fuente de electricidad. Español 56 ASRock AD510PV / AD410PV Motherboard - ASRock AD410PV | Quick Installation Guide - Page 57
(4-pin CD1) (CD1: vea p. 2, N. 16) CD1 Permite recepción de input audio de fuente sónica como CDROM, DVD-ROM, TV tuner, o tarjeta MPEG. Español 57 ASRock AD510PV / AD410PV Motherboard - ASRock AD410PV | Quick Installation Guide - Page 58
correctamente. Por favor, siga las instrucciones en nuestro manual y en el manual de chasis para instalar su sistema. 2. Si utiliza AC'97. E. Entre en la Utilidad de configuración del BIOS Entre en Configuración avanzada y, a continuación, seleccione Configuración ASRock AD510PV / AD410PV Motherboard - ASRock AD410PV | Quick Installation Guide - Page 59
, por favor, conecte su fuente de alimentación usando los Pins 1 y 13. Instalación de una Fuente de Alimentación ATX de 20 Pins 1 13 Español 59 ASRock AD510PV / AD410PV Motherboard - ASRock AD410PV | Quick Installation Guide - Page 60
la Utilidad de configuración de la BIOS, consulte el Manual del usuario (archivo PDF), que se encuentra en el CD de soporte. 3.Información de Software Support CD Esta placa-base soporta diversos en el archivo "ASSETUP.EXE" para iniciar la instalación. 60 ASRock AD510PV / AD410PV Motherboard Español - ASRock AD410PV | Quick Installation Guide - Page 61
. . ASRock. ( - ASRock Mini-ITX: 6,7 x 6,7 / 17,0 x 17,0 ) ASRock ASRock Serial ATA (SATA) ( ) - I/O 61 ASRock AD510PV / AD410PV Motherboard - ASRock AD410PV | Quick Installation Guide - Page 62
- Mini-ITX: 6,7 x 6,7 / 17,0 x 17,0 62 ASRock AD510PV / AD410PV Motherboard - ASRock AD410PV | Quick Installation Guide - Page 63
Hot-Plug 63 ASRock AD510PV / AD410PV Motherboard - ASRock AD410PV | Quick Installation Guide - Page 64
64 ASRock AD510PV / AD410PV Motherboard - ASRock AD410PV | Quick Installation Guide - Page 65
65 ASRock AD510PV / AD410PV Motherboard - ASRock AD410PV | Quick Installation Guide - Page 66
Short Open 66 ASRock AD510PV / AD410PV Motherboard - ASRock AD410PV | Quick Installation Guide - Page 67
SATAII_2 SATAII_1 CD1 67 ASRock AD510PV / AD410PV Motherboard - ASRock AD410PV | Quick Installation Guide - Page 68
(9- PANEL1) 4 3 2 1 68 ASRock AD510PV / AD410PV Motherboard - ASRock AD410PV | Quick Installation Guide - Page 69
ATX 12 24 1 13 ATX. 12 24 1 13 69 ASRock AD510PV / AD410PV Motherboard - ASRock AD410PV | Quick Installation Guide - Page 70
BIOS Setup F Power-On-Self-Test - POST POST BIOS Setup POST Ctrl> + + - ASRock AD410PV | Quick Installation Guide - Page 71
do modelo que está a utilizar. www.asrock.com/support/index.asp 1.1 Este pacote contém Placa-mãe ASRock AD510PV / AD410PV (Formato Mini-ITX: 6,7 pol. x 6,7 pol., 17,0 cm x 17,0 cm) Um Processador Intel® Dual-Core AtomTM D510 integrado (AD510PV) Um Processador Intel® AtomTM D410 integrado (AD410PV - ASRock AD410PV | Quick Installation Guide - Page 72
Mini-ITX: 6,7 pol. x 6,7 pol., 17,0 cm x 17,0 cm - Condensador Solid para alimentação da CPU - Processador Intel® Dual-Core AtomTM D510 (AD510PV 667, não ECC - Capacidade máxima de memória do sistema: 8GB (veja o AVISO 3) - 1 slot de PCI - Intel® ASRock AD510PV / AD410PV Motherboard Português - ASRock AD410PV | Quick Installation Guide - Page 73
2 x cabezal USB 2.0 (suporta 4 portas USB 2.0) (veja o AVISO 6) BIOS - 4Mb BIOS AMI - BIOS AMI - Suporta dispositivos "Plug and Play" - ACPI 1.1 atendendo a eventos de mais detalhadas por favor visite o nosso sítio Web: http://www.asrock.com Português 73 ASRock AD510PV / AD410PV Motherboard - ASRock AD410PV | Quick Installation Guide - Page 74
Manual do . 6. Power Management para BIOS en quelques clics seulement, sans préparer de disquette supplémentaire ni d'autre utilitaire flash compliqué. Veuillez noter que le lecteur flash USB ou le disque dur doit utiliser le système de fichiers FAT32/16/12. 74 ASRock AD510PV / AD410PV Motherboard - ASRock AD410PV | Quick Installation Guide - Page 75
diz-lhe literalmente aquilo de que é capaz. OC DNA, um utilitário exclusivo desenvolvido pela ASRock, proporciona uma forma conveniente para o utilizador gravar as definições OC e partilhar com outros. da fonte de alimentação para mais detalhes. 75 ASRock AD510PV / AD410PV Motherboard Português - ASRock AD410PV | Quick Installation Guide - Page 76
by) para PS/2 ou eventos de wake up na USB. Nota: Para escolher +5VSB, é preciso uma corrente de stand by de 2 A ou mais. Português 76 ASRock AD510PV / AD410PV Motherboard - ASRock AD410PV | Quick Installation Guide - Page 77
se receba entrada de áudio em estéreo de fontes de áudio como CD-ROM, DVD-ROM, placa sintonizadora de TV ou placa MPEG. 77 ASRock AD510PV / AD410PV Motherboard - ASRock AD410PV | Quick Installation Guide - Page 78
funcionar correctamente. Siga s instruções que aparecem no manual e no manual do chassis para instalar o sistema. 2. Se utilizar painel de áudio AC'97. E. Entre no utilitário de configuração do BIOS. Vá até à opção Definições avançadas e escolha Configuração do ASRock AD510PV / AD410PV Motherboard - ASRock AD410PV | Quick Installation Guide - Page 79
29 pinos, por favor ligue a sua fonte de alimentação com o Pino 1 e o Pino 13. Instalação da Fonte de alimentação ATX de 20 Pinos 1 13 Português 79 ASRock AD510PV / AD410PV Motherboard - ASRock AD410PV | Quick Installation Guide - Page 80
do computador. Automaticamente iniciará o menu principal, casa o AUTORUN esteja ativado. Se o menu principal não aparecer automaticamente, explore o CD e execute o "ASSETUP.EXE" localizado na pasta BIN. 80 ASRock AD510PV / AD410PV Motherboard Português - ASRock AD410PV | Quick Installation Guide - Page 81
® ® 81 ASRock AD510PV / AD410PV Motherboard - ASRock AD410PV | Quick Installation Guide - Page 82
® ® ® ® ® 82 ASRock AD510PV / AD410PV Motherboard - ASRock AD410PV | Quick Installation Guide - Page 83
® 83 ASRock AD510PV / AD410PV Motherboard - ASRock AD410PV | Quick Installation Guide - Page 84
" " ® ® " " " " ® ® 84 ASRock AD510PV / AD410PV Motherboard - ASRock AD410PV | Quick Installation Guide - Page 85
85 ASRock AD510PV / AD410PV Motherboard - ASRock AD410PV | Quick Installation Guide - Page 86
"" "" "" "" 86 ASRock AD510PV / AD410PV Motherboard - ASRock AD410PV | Quick Installation Guide - Page 87
SATAII_2 SATAII_1 CD1 87 ASRock AD510PV / AD410PV Motherboard - ASRock AD410PV | Quick Installation Guide - Page 88
4 3 2 1 88 ASRock AD510PV / AD410PV Motherboard - ASRock AD410PV | Quick Installation Guide - Page 89
12 24 1 13 12 24 1 13 89 ASRock AD510PV / AD410PV Motherboard - ASRock AD410PV | Quick Installation Guide - Page 90
" " \\ " " 90 ASRock AD510PV / AD410PV Motherboard - ASRock AD410PV | Quick Installation Guide - Page 91
® ® 91 ASRock AD510PV / AD410PV Motherboard - ASRock AD410PV | Quick Installation Guide - Page 92
® ® ® ® ® 92 ASRock AD510PV / AD410PV Motherboard - ASRock AD410PV | Quick Installation Guide - Page 93
® ® 93 ASRock AD510PV / AD410PV Motherboard - ASRock AD410PV | Quick Installation Guide - Page 94
" " ® ® TM TM ® ® ® ® - 94 ASRock AD510PV / AD410PV Motherboard - ASRock AD410PV | Quick Installation Guide - Page 95
95 ASRock AD510PV / AD410PV Motherboard - ASRock AD410PV | Quick Installation Guide - Page 96
96 ASRock AD510PV / AD410PV Motherboard - ASRock AD410PV | Quick Installation Guide - Page 97
SATAII_2 SATAII_1 CD1 97 ASRock AD510PV / AD410PV Motherboard - ASRock AD410PV | Quick Installation Guide - Page 98
4 3 2 1 98 ASRock AD510PV / AD410PV Motherboard - ASRock AD410PV | Quick Installation Guide - Page 99
12 24 1 13 12 24 1 13 99 ASRock AD510PV / AD410PV Motherboard - ASRock AD410PV | Quick Installation Guide - Page 100
® ® TM TM 100 ASRock AD510PV / AD410PV Motherboard - ASRock AD410PV | Quick Installation Guide - Page 101
® ® ASRock AD510PV / AD410PV Motherboard 101 - ASRock AD410PV | Quick Installation Guide - Page 102
® ® ® ® ® 102 ASRock AD510PV / AD410PV Motherboard - ASRock AD410PV | Quick Installation Guide - Page 103
® ® ASRock AD510PV / AD410PV Motherboard 103 - ASRock AD410PV | Quick Installation Guide - Page 104
® ® ® ® ® 104 ASRock AD510PV / AD410PV Motherboard - ASRock AD410PV | Quick Installation Guide - Page 105
® ASRock AD510PV / AD410PV Motherboard 105 - ASRock AD410PV | Quick Installation Guide - Page 106
106 ASRock AD510PV / AD410PV Motherboard - ASRock AD410PV | Quick Installation Guide - Page 107
SATAII_2 SATAII_1 CD1 ASRock AD510PV / AD410PV Motherboard 107 - ASRock AD410PV | Quick Installation Guide - Page 108
4 3 2 1 108 ASRock AD510PV / AD410PV Motherboard - ASRock AD410PV | Quick Installation Guide - Page 109
12 24 1 13 12 24 1 13 ASRock AD510PV / AD410PV Motherboard 109 - ASRock AD410PV | Quick Installation Guide - Page 110
® ® 110 ASRock AD510PV / AD410PV Motherboard - ASRock AD410PV | Quick Installation Guide - Page 111
X O O O X O O O O: X: O O O O ASRock AD510PV / AD410PV Motherboard 111 - ASRock AD410PV | Quick Installation Guide - Page 112
® ® 112 ASRock AD510PV / AD410PV Motherboard - ASRock AD410PV | Quick Installation Guide - Page 113
® ® ® ® ® ASRock AD510PV / AD410PV Motherboard 113 - ASRock AD410PV | Quick Installation Guide - Page 114
® ® 114 ASRock AD510PV / AD410PV Motherboard - ASRock AD410PV | Quick Installation Guide - Page 115
® ® ® ® ® ASRock AD510PV / AD410PV Motherboard 115 - ASRock AD410PV | Quick Installation Guide - Page 116
® 116 ASRock AD510PV / AD410PV Motherboard - ASRock AD410PV | Quick Installation Guide - Page 117
ASRock AD510PV / AD410PV Motherboard 117 - ASRock AD410PV | Quick Installation Guide - Page 118
SATAII_2 SATAII_1 CD1 118 ASRock AD510PV / AD410PV Motherboard - ASRock AD410PV | Quick Installation Guide - Page 119
4 3 2 1 ASRock AD510PV / AD410PV Motherboard 119 - ASRock AD410PV | Quick Installation Guide - Page 120
12 24 1 13 12 24 1 13 120 ASRock AD510PV / AD410PV Motherboard - ASRock AD410PV | Quick Installation Guide - Page 121
® ® ® ASRock AD510PV / AD410PV Motherboard 121
-
 1
1 -
 2
2 -
 3
3 -
 4
4 -
 5
5 -
 6
6 -
 7
7 -
8
-
9
-
10
-
11
-
12
-
13
-
14
-
15
-
16
-
17
-
18
-
19
-
20
-
21
-
22
-
23
-
24
-
25
-
26
-
27
-
28
-
29
-
30
-
31
-
32
-
33
-
34
-
35
-
36
-
37
-
38
-
39
-
40
-
41
-
42
-
43
-
44
-
45
-
46
-
47
-
48
-
49
-
50
-
51
-
52
-
53
-
54
-
55
-
56
-
57
-
58
-
59
-
60
-
61
-
62
-
63
-
64
-
65
-
66
-
67
-
68
-
69
-
70
-
71
-
72
-
73
-
74
-
75
-
76
-
77
-
78
-
79
-
80
-
81
-
82
-
83
-
84
-
85
-
86
-
87
-
88
-
89
-
90
-
91
-
92
-
93
-
94
-
95
-
96
-
97
-
98
-
99
-
100
-
101
-
102
-
103
-
104
-
105
-
106
-
107
-
108
-
109
-
110
-
111
-
112
-
113
-
114
-
115
-
116
-
117
-
118
-
119
-
120
-
121
 |
 |
1
ASRock
AD510PV / AD410PV
Motherboard
English
English
English
English
English
Copyright Notice:
Copyright Notice:
Copyright Notice:
Copyright Notice:
Copyright Notice:
No part of this installation guide may be reproduced, transcribed, transmitted, or trans-
lated in any language, in any form or by any means, except duplication of documen-
tation by the purchaser for backup purpose, without written consent of ASRock Inc.
Products and corporate names appearing in this guide may or may not be registered
trademarks or copyrights of their respective companies, and are used only for identifica-
tion or explanation and to the owners’ benefit, without intent to infringe.
Disclaimer:
Disclaimer:
Disclaimer:
Disclaimer:
Disclaimer:
Specifications and information contained in this guide are furnished for informational
use only and subject to change without notice, and should not be constructed as a
commitment by ASRock. ASRock assumes no responsibility for any errors or omissions
that may appear in this guide.
With respect to the contents of this guide, ASRock does not provide warranty of any kind,
either expressed or implied, including but not limited to the implied warranties or
conditions of merchantability or fitness for a particular purpose. In no event shall
ASRock, its directors, officers, employees, or agents be liable for any indirect, special,
incidental, or consequential damages (including damages for loss of profits, loss of
business, loss of data, interruption of business and the like), even if ASRock has been
advised of the possibility of such damages arising from any defect or error in the guide
or product.
This device complies with Part 15 of the FCC Rules. Operation is subject to the
following two conditions:
(1)
this device may not cause harmful interference, and
(2)
this device must accept any interference received, including interference that
may cause undesired operation.
Published March 2010
Copyright
©
2010 ASRock INC. All rights reserved.
CALIFORNIA, USA ONLY
The Lithium battery adopted on this motherboard contains Perchlorate, a toxic
substance controlled in Perchlorate Best Management Practices (BMP) regulations
passed by the California Legislature. When you discard the Lithium battery in
California, USA, please follow the related regulations in advance.
“Perchlorate Material-special handling may apply, see
www
.dtsc.ca.gov/hazardouswa
ste/perchlorate”
ASRock Website: http://www.asrock.com