ASRock H110 Pro BTC Quick Installation Guide
ASRock H110 Pro BTC Manual
 |
View all ASRock H110 Pro BTC manuals
Add to My Manuals
Save this manual to your list of manuals |
ASRock H110 Pro BTC manual content summary:
- ASRock H110 Pro BTC | Quick Installation Guide - Page 1
change without notice, and should not be constructed as a commitment by ASRock. ASRock assumes no responsibility for any errors or omissions that may appear in CALIFORNIA, USA ONLY The Lithium battery adopted on this motherboard contains Perchlorate, a toxic substance controlled in Perchlorate Best - ASRock H110 Pro BTC | Quick Installation Guide - Page 2
replaced if the goods fail to be of acceptable quality and the failure does not amount to a major failure. If you require assistance please call ASRock Tel : +886-2-28965588 ext.123 (Standard International call charges apply) - ASRock H110 Pro BTC | Quick Installation Guide - Page 3
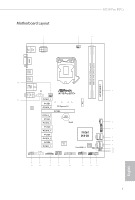
Motherboard Layout H110 Pro BTC+ PS2 Mouse PS2 Keyboard Top: LINE IN Center: FRONT Bottom: MIC IN ATX12V1 CPU_FAN1 DVI1 M2_1 DDR4_A1 (64 bit, 288-pin module) DDR4_B1 (64 bit, - ASRock H110 Pro BTC | Quick Installation Guide - Page 4
1 ATX 12V Power Connector (ATX12V1) 2 CPU Fan Connector (CPU_FAN1) 3 2 x 288-pin DDR4 DIMM Slots (DDR4_A1, DDR4_B1) 4 ATX Power Connector (ATXPWR1) 5 Chassis Fan Connector (CHA_FAN1) 6 TPM Header (TPMS1) 7 SATA3 Connector (SATA3_1) 8 SATA3 Connector (SATA3_0) 9 SATA3 Connector (SATA3_3) 10 SATA3 - ASRock H110 Pro BTC | Quick Installation Guide - Page 5
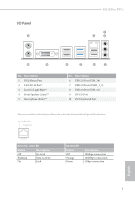
I/O Panel 1 H110 Pro BTC+ 3 2 4 10 9 No. Description 1 PS/2 Mouse Port 2 LAN RJ-45 Port* 3 Line In (Light Blue)** 4 Front Speaker (Lime)** 5 Microphone (Pink)** 8 7 6 5 No. Description 6 USB 2.0 Port (USB_34) 7 USB 3.0 Ports (USB3_1_2) 8 USB 2.0 Port (USB_12) 9 DVI-D Port 10 PS/2 - ASRock H110 Pro BTC | Quick Installation Guide - Page 6
CH HD Audio, it is required to use an HD front panel audio module and enable the multichannel audio feature through the audio driver. Please set Speaker Configuration to "7.1 Speaker"in the Realtek HD Audio Manager. Function of the Audio Ports in 7.1-channel Configuration: Port Light Blue (Rear - ASRock H110 Pro BTC | Quick Installation Guide - Page 7
the latest VGA cards and CPU support list on ASRock's website as well. ASRock website http://www.asrock.com. 1.1 Package Contents • ASRock H110 Pro BTC+ Motherboard (ATX Form Factor) • ASRock H110 Pro BTC+ Quick Installation Guide • ASRock H110 Pro BTC+ Support CD • 1 x I/O Panel Shield • 2 x Serial - ASRock H110 Pro BTC | Quick Installation Guide - Page 8
7th and 6th Generation Intel® CoreTM i7/i5/i3/ Pentium®/Celeron® Processors (Socket 1151) • Supports CPU up to 91W • Digi Power design • 8 Power Phase design • Supports Intel® Turbo Boost 2.0 Technology Chipset • Intel® H110 Memory • Dual Channel DDR4 Memory Technology • 2 x DDR4 DIMM Slots - ASRock H110 Pro BTC | Quick Installation Guide - Page 9
H110 Pro BTC+ • HWA Encode/Decode: VP8 , HEVC 8b; GPU/SWEncode/ Decode: VP9, HEVC 10b (For 6th Gen Intel® CPU) • Max. shared memory 1024MB * The size of maximum shared memory may vary from different operating systems. • Supports DVI-D with max. resolution up to 1920x1200 @ 60Hz • Supports - ASRock H110 Pro BTC | Quick Installation Guide - Page 10
12V Power Connector • 2 x PCIe Power Connectors • 1 x SATA Power Connector • 1 x Front Panel Audio Connector • 1 x USB 2.0 Header (Supports 2 USB 2.0 ports) (Supports ESD Protection) • 1 x USB 3.0 Header (Supports 2 USB 3.0 ports) (Supports ESD Protection) BIOS Feature • AMI UEFI Legal BIOS with - ASRock H110 Pro BTC | Quick Installation Guide - Page 11
H110 Pro BTC+ OS Certifications • Microsoft® Windows® 10 64-bit (For 7th Gen Intel® CPU) • Microsoft® Windows® 10 64-bit / 8.1 64-bit / 7 32-bit / 7 64- bit (For 6th Gen Intel® CPU) * To install Windows® 7 OS, a modified installation disk with xHCI drivers packed into the ISO file is required. - ASRock H110 Pro BTC | Quick Installation Guide - Page 12
you install motherboard components or change any motherboard settings. • Make sure to unplug the power cord before installing or removing the motherboard components. Failure . • When placing screws to secure the motherboard to the chassis, please do not overtighten the screws! Doing so may damage the - ASRock H110 Pro BTC | Quick Installation Guide - Page 13
H110 Pro BTC+ 2.1 Installing the CPU 1. Before you insert the 1151-Pin CPU into the socket, please check if the PnP cap is on the socket, if the CPU surface is unclean, or if there are any bent pins in the socket. Do not force to insert the CPU into the socket if above situation is found. Otherwise - ASRock H110 Pro BTC | Quick Installation Guide - Page 14
4 5 12 3 English - ASRock H110 Pro BTC | Quick Installation Guide - Page 15
H110 Pro BTC+ Please save and replace the cover if the processor is removed. The cover must be placed if you wish to return the motherboard for after service. 13 English - ASRock H110 Pro BTC | Quick Installation Guide - Page 16
2.2 Installing the CPU Fan and Heatsink 1 2 CPU_FAN English 14 - ASRock H110 Pro BTC | Quick Installation Guide - Page 17
H110 Pro BTC+ 2.3 Installing Memory Modules (DIMM) This motherboard provides two 288-pin DDR4 (Double Data Rate 4) DIMM slots, and supports Dual Channel Memory Technology. 1. For dual channel configuration, you always need to install identical (the same brand, speed, size and chip-type) DDR4 DIMM - ASRock H110 Pro BTC | Quick Installation Guide - Page 18
1 2 3 16 English - ASRock H110 Pro BTC | Quick Installation Guide - Page 19
H110 Pro BTC+ 2.4 Expansion Slots (PCI Express Slots) There are 13 PCI Express slots on the motherboard. Before installing an expansion card, please make sure that the power supply is switched off or the power cord is unplugged. Please read the documentation of the expansion card and make necessary - ASRock H110 Pro BTC | Quick Installation Guide - Page 20
and unplug the power cord from the power supply. After waiting for 15 seconds, use a jumper cap to short pin2 and pin3 on CLRMOS2 for 5 seconds. However, please do not clear the CMOS right after you update the BIOS. If you need to clear the CMOS when you just finish updating the BIOS, you must boot - ASRock H110 Pro BTC | Quick Installation Guide - Page 21
H110 Pro BTC+ 2.6 Onboard Headers and Connectors Onboard headers and connectors are NOT jumpers. Do NOT place jumper caps over these headers and connectors. Placing jumper caps over the headers and connectors will cause permanent damage to the motherboard in S4 sleep state or powered off (S5). HDLED - ASRock H110 Pro BTC | Quick Installation Guide - Page 22
to the power supply when three graphics cards are installed on this motherboard. USB 2.0 Header (9-pin USB_5_6) (see p.1, No. 14) USB 3.0 Header (19-pin USB3_3_4) (see p.1, No. 15) USB_PWR PP+ GND DUMMY 1 GND P+ PUSB_PWR There is one header on this motherboard. This USB 2.0 header can support two - ASRock H110 Pro BTC | Quick Installation Guide - Page 23
H110 Pro BTC+ 1. High Definition Audio supports Jack Sensing, but the panel wire on the chassis must support HDA to function correctly. Please follow the instructions in our manual and chassis manual to install your system. 2. If you use an AC'97 audio panel, please install it to the front panel - ASRock H110 Pro BTC | Quick Installation Guide - Page 24
three graphics cards are installed on this motherboard. Please refer to page 23 for PCIe Power Connector Installation Guide. Serial Port Header (9-pin COM1) (see p.1, No. 17) RRXD1 DDTR#1 DDSR#1 CCTS#1 1 RRI#1 RRTS#1 GND TTXD1 DDCD#1 This COM1 header supports a serial port module. TPM Header (17 - ASRock H110 Pro BTC | Quick Installation Guide - Page 25
H110 Pro BTC+ 2.7 PCIe Power Connector Installation Guide The two extra 4-pin power connectors on this motherboard offer more power for your graphics cards. They provide stable voltages and greatly reduce the risks of burning your motherboard or graphics cards. When more than three graphics cards - ASRock H110 Pro BTC | Quick Installation Guide - Page 26
2.8 M.2_SSD (NGFF) Module Installation Guide The M.2, also known as the Next Generation Form Factor (NGFF), is a small size and versatile card edge connector that aims to replace mPCIe and mSATA. The M.2 Socket (M2_1) supports M Key type 2230/2242/2260/2280 M.2 SATA3 6.0 Gb/s module. * Please be - ASRock H110 Pro BTC | Quick Installation Guide - Page 27
D C B A D C B A C B A H110 Pro BTC+ Step 3 Move the standoff based on the module type and the desired nut location on the motherboard. Step 5 Align and gently insert the M.2 (NGFF) SSD module into the M.2 slot. Please be aware that the M.2 (NGFF) SSD module only fits in one orientation. - ASRock H110 Pro BTC | Quick Installation Guide - Page 28
Z400s-SD8SNAT-128G-1122 Transcend TS256GMTS800-256GB Transcend TS64GMTS400-64GB V-Color 120G V-Color 240G WD BLUE WDS100T1B0B-00AS40 WD GREEN WDS240G1G0B-00RC30 For the latest updates of M.2_SSD (NFGG) module support list, please visit our website for details: http://www.asrock.com English 26 - ASRock H110 Pro BTC | Quick Installation Guide - Page 29
. Auch finden Sie eine aktuelle Liste unterstützter VGA-Karten und Prozessoren auf der ASRock-Webseite: ASRock-Website http://www.asrock.com. 1.1 Lieferumfang • ASRock H110 Pro BTC+ - Motherboard (ATX-Formfaktor) • ASRock H110 Pro BTC+-Schnellinstallationsanleitung • ASRock H110 Pro BTC+-Support-CD - ASRock H110 Pro BTC | Quick Installation Guide - Page 30
CPU bis 91 W • Digi Power design • 8-Leistungsphasendesign • Unterstützt Intel® Turbo Boost 2.0-Technologie Chipsatz • Intel® H110 PCIE2:x16-Modus)* * Unterstützt NVMe-SSD als Bootplatte • 12 x PCI-Express-2.0- Video mit AVC, MVC (S3D) und MPEG2 Full HW Encode1, Intel® InTruTM 3D, Intel® Clear Video - ASRock H110 Pro BTC | Quick Installation Guide - Page 31
H110 Pro BTC+ • HWA encodieren/decodieren: VP8, HEVC 8b; GPU/SW encodieren/decodieren: VP9, HEVC 10b über den Audiotreiber aktivieren. • Unterstützt Überspannungsschutz • ELNA-Audiokondensatoren LAN • Gigabit LAN 10/100/1000 Mb/s • Giga PHY Intel® I219V • Unterstützt Wake-On-LAN (nur - ASRock H110 Pro BTC | Quick Installation Guide - Page 32
• AMI-UEFI-Legal-BIOS mit Unterstützung mehrsprachiger grafischer Benutzerschnittstellen • ACPI 5.0-konforme Aufweckereignisse • SMBIOS 2.7-Unterstützung • CPU, DRAM, PCH 1,05 V / Mehrfachspannungsanpassung Hardware überwachung • CPU-/Gehäusetemperaturerkennung • CPU-/Gehäuselüftertachometer - ASRock H110 Pro BTC | Quick Installation Guide - Page 33
H110 Pro BTC+ Betriebssystem Zertifizierungen • Microsoft® Windows® 10, 64 Bit (nur bei Intel®-Prozessor der 7. Generation) • Microsoft® Windows® 10, 64 Bit / 8.1, 64 Bit / 7, 32 Bit / 7, 64 Bit (nur bei Intel®-Prozessor der 6. Generation) * Zur Installation des Windows® 7-Betriebssystems wird ein - ASRock H110 Pro BTC | Quick Installation Guide - Page 34
Sie dann Kontakt 2 und Kontakt 3 an CLRMOS2 5 Sekunden lang mit einer Jumper-Kappe kurz. Löschen Sie den CMOS jedoch nicht direkt nach der BIOS-Aktualisierung. Falls Sie den CMOS direkt nach Abschluss der BIOSAktualisierung löschen müssen, starten Sie das System zunächst; fahren Sie es dann vor der - ASRock H110 Pro BTC | Quick Installation Guide - Page 35
H110 Pro BTC+ 1.4 Integrierte Stiftleisten und Anschlüsse Integrierte Stiftleisten und Anschlüsse sind KEINE Jumper. Bringen Sie KEINE JumperKappen an diesen Stiftleisten und Anschlüssen an. Durch Anbringen von Jumper-Kappen an diesen Stiftleisten und Anschlüssen können Sie das Motherboard dauerhaft - ASRock H110 Pro BTC | Quick Installation Guide - Page 36
Nr. 8) (SATA3_1: siehe S. 1, Nr. 7) (SATA3_2: siehe S. 1, Nr. 10) (SATA3_3: siehe S. 1, Nr. 9) SATA-Netzanschluss (SATA_POW1) (siehe S. 1, Nr Sie diesen Anschluss mit dem Netzteil, wenn drei Grafikkarten an diesem Motherboard installiert sind. USB 2.0-Stiftleiste (9-polig, USB_5_6) (siehe S. 1, - ASRock H110 Pro BTC | Quick Installation Guide - Page 37
H110 Pro BTC+ 1. High Definition Audio unterstützt Anschlusserkennung, der Draht am Gehäuse muss Nr. 22) CPU-Lüfteranschluss (4-polig, CPU_FAN1) (siehe S. 1, Nr. 2) FAN_SPEED Dieses Motherboard bietet einen FAN_VOLTAGE_CONTROL GND FAN_SPEED_CONTROL 4-poligen CPU-Lüfteranschluss (lautloser Lü - ASRock H110 Pro BTC | Quick Installation Guide - Page 38
polig, PCIE_PWR2) (siehe S. 1, Nr. 19) Bitte verbinden Sie diese Anschlüsse mit dem Netzteil, wenn drei Grafikkarten an diesem Motherboard installiert sind. Bitte beachten Sie für Installationsanweisungen zum PCIe-Stromanschluss Seite XX. Serieller-Port-Stiftleiste (9-polig, COM1) (siehe S. 1, Nr - ASRock H110 Pro BTC | Quick Installation Guide - Page 39
La liste la plus récente des cartes VGA et des processeurs pris en charge est également disponible sur le site Internet de ASRock. Site Internet ASRock http://www.asrock.com. 1.1 Contenu de l'emballage • Carte mère ASRock H110 Pro BTC+ (facteur de forme ATX) • Guide d'installation rapide ASRock H110 - ASRock H110 Pro BTC | Quick Installation Guide - Page 40
Power design • Alimentation à 8 phases • Prend en charge la technologie Intel® Turbo Boost 2.0 • Intel® H110 CPU Intel® prend en charge DDR4 jusqu'à 2400 ; la 6ème Génération de CPU en charge les SSD NVMe comme Video avec AVC, MVC (S3D) et MPEG-2 Full HW Encode1, Intel® InTruTM 3D, Intel® Clear Video - ASRock H110 Pro BTC | Quick Installation Guide - Page 41
H110 Pro BTC+ Audio Réseau Connectique du panneau arrière • Codage/Décodage HWA : VP8 , HEVC 8b ; Codage/Décodage GPU/SW : VP9, HEVC 10b (Pour la 6ème Génération de CPU la protection contre les surtensions • Capuchons ELNA Audio • Gigabit LAN 10/100/1000 Mo/s • Giga PHY Intel® I219V • Prend en - ASRock H110 Pro BTC | Quick Installation Guide - Page 42
USB 3.0 pris en charge) (Protection contre les décharges électrostatiques) • BIOS UEFI AMI avec prise en charge d'interface graphique multilingue • Compatible ACPI 5.0 Wake Up Events • Compatible SMBIOS 2.7 • Réglage de la tension CPU, DRAM, PCH 1,05 V • Détection de la température du processeur - ASRock H110 Pro BTC | Quick Installation Guide - Page 43
H110 Pro BTC+ Système d'exploitation • Microsoft® Windows® 10 64 bits (Pour la 7ème Génération de CPU Intel®) • Microsoft® Windows® 10 64 bits / 8.1 64 bits / 7 32 bits / 7 64 bits (Pour la 6ème Génération de CPU Intel®) * Pour installer Windows® 7, un disque d'installation modifié avec les - ASRock H110 Pro BTC | Quick Installation Guide - Page 44
broche 3 sur CLRMOS2 pendant 5 secondes. Toutefois, n'effacez pas la CMOS immédiatement après avoir mis à jour le BIOS. Si vous avez besoin d'effacer les données CMOS après une mise à jour du BIOS, vous devez tout d'abord redémarrer le système, puis l'éteindre avant de procéder à l'effacement de la - ASRock H110 Pro BTC | Quick Installation Guide - Page 45
H110 Pro BTC+ 1.4 Embases et connecteurs de la carte mère Les embases et connecteurs situés sur la carte NE SONT PAS des cavaliers. Ne placez JAMAIS de capuchons - ASRock H110 Pro BTC | Quick Installation Guide - Page 46
Connecteurs Serial ATA3 (SATA3_0: voir p.1, No. 8) (SATA3_1: voir p.1, No. 7) (SATA3_2: voir p.1, No. 10) (SATA3_3: voir p.1, No. 9) SATA3_2 SATA3_0 SATA3_3 SATA3_1 Ces quatre connecteurs SATA3 sont compatibles avec les câbles de données SATA pour les appareils de stockage - ASRock H110 Pro BTC | Quick Installation Guide - Page 47
H110 Pro BTC+ 1. L'audio haute définition prend en charge la technologie Jack Sensing (détection de la fiche), mais le panneau grillagé du châssis doit être compatible avec la HDA pour fonctionner correctement. Veuillez suivre les instructions figurant dans notre manuel et dans le manuel du châssis - ASRock H110 Pro BTC | Quick Installation Guide - Page 48
) Veuillez brancher ces connecteurs à l'alimentation électrique lorsque trois cartes graphiques sont installées sur cette carte mère. Veuillez consulter le Guide d'installation des connecteurs d'alimentation PCIe en page XX. Embase pour port série (COM1 à 9 broches) (voir p.1, No. 17) RRXD1 DDTR - ASRock H110 Pro BTC | Quick Installation Guide - Page 49
e di supporto di CPU anche sul sito Web di ASRock. Sito Web di ASRock http://www.asrock.com. 1.1 Contenuto della confezione • Scheda madre ASRock H110 Pro BTC+ (Form Factor ATX) • Guida all'installazione rapida di ASRock H110 Pro BTC+ • CD di supporto ASRock H110 Pro BTC+ • 1 x mascherina metallica - ASRock H110 Pro BTC | Quick Installation Guide - Page 50
CPU fino a 91W • Digi Power design • Potenza a 8 fasi • Supporta la tecnologia Intel® Turbo Boost 2.0 Chipset • Intel® H110 SSD NVMe come disco d'avvio • 12 x alloggi PCI Express 2.0 x1 Grafica • La videografica integrata della scheda video HD Intel® e le uscite VGA possono essere supportate - ASRock H110 Pro BTC | Quick Installation Guide - Page 51
H110 Pro BTC+ Audio • Codifica/decodifica HWA: VP8 , HEVC 8b; Codifica/decodifica GPU/SW: VP9, HEVC 10b (per 6a Gen Intel® CPU) • Memoria multicanale tramite il driver audio. • Supporta protezione da sovratensione • Cappucci audio ELNA LAN I/O pannello posteriore • LAN Gigabit 10/100/1000 Mb/s - ASRock H110 Pro BTC | Quick Installation Guide - Page 52
Legal BIOS con interfaccia di supporto multilingue • Eventi di riattivazione conformi a ACPI 5.0 • Supporto di SMBIOS 2.7 • Regolazione tensione CPU, DRAM, PCH 1,05V Hardware Monitor • Rilevamento temperatura CPU/telaio • Tachimetro ventola CPU/telaio • Ventola silenziosa CPU/telaio (regolazione - ASRock H110 Pro BTC | Quick Installation Guide - Page 53
H110 Pro BTC+ SO • Microsoft® Windows® 10 64-bit (per 7th Gen Intel® CPU) • Microsoft® Windows® 10 64-bit / 8.1 64-bit / 7 32-bit / 7 64-bit (per 6th Gen Intel® CPU) * Per installare Windows® 7, è necessario un disco di installazione modificato con i driver xHCI integrati nel file ISO. Fare - ASRock H110 Pro BTC | Quick Installation Guide - Page 54
pin 2 ed il pin 3 su CLRMOS2 per 5 secondi. Tuttavia, non azzerare la CMOS subito dopo aver aggiornato il BIOS. Se è necessario azzerare la CMOS dopo l'aggiornamento del BIOS, è necessario riavviare prima il sistema e in seguito spegnerlo prima di eseguire l'operazione di azzeramento della CMOS. La - ASRock H110 Pro BTC | Quick Installation Guide - Page 55
H110 Pro BTC+ 1.4 Header e connettori sulla scheda Gli header e i connettori sulla scheda NON sono jumper. NON posizionare cappucci del jumper su questi header e connettori. Il posizionamento di cappucci - ASRock H110 Pro BTC | Quick Installation Guide - Page 56
Connettori Serial ATA3 (SATA3_0: vedere pag. 1, n. 8) (SATA3_1: vedere pag. 1, n. 7) (SATA3_2: vedere pag.1, n. 10) (SATA3_3: vedere pag.1, n. 9) Connettore alimentazione SATA (SATA_POW1) (vedere pag. 1, n. 18) SATA3_2 SATA3_0 SATA3_3 SATA3_1 Questi quattro connettori SATA3 supportano cavi dati - ASRock H110 Pro BTC | Quick Installation Guide - Page 57
H110 Pro BTC+ 1. L'audio ad alta definizione supporta le funzioni Jack sensing, ma il filo del pannello sullo chassis deve supportare HDA per funzionare correttamente. Seguire le istruzioni presenti nel nostro manuale e nel manuale 1, n. 22) Connettore ventola CPU Questa scheda madre è dotata ( - ASRock H110 Pro BTC | Quick Installation Guide - Page 58
Connettori alimentazione PCIe (PCIE_PWR1 a 4 pin) (vedere pag. 1, n. 21) (PCIE_PWR2 a 4 pin) (vedere pag. 1, n. 19) Collegare questi connettori all'alimentazione quando sulla scheda madre sono installate tre schede grafiche. Fare riferimento a pagina XX per la guida ll'installazione del connettore - ASRock H110 Pro BTC | Quick Installation Guide - Page 59
lista de compatibilidad de la CPU, en el sitio web de ASRock. Sitio web de ASRock http://www.asrock.com. 1.1 Contenido del paquete • Placa base ASRock H110 Pro BTC+ (factor de forma ATX) • Guía de instalación rápida de ASRock H110 Pro BTC+ • CD de soporte de ASRock H110 Pro BTC+ • 1 x escudo panel - ASRock H110 Pro BTC | Quick Installation Guide - Page 60
generación • Admite CPU de hasta 91 W. • Digi Power design • Diseño de 8 fases de alimentación • Admite la tecnología Intel® Turbo Boost 2.0 • Intel® H110 • Tecnología : Intel® Quick Sync Video con AVC, MVC (S3D) y MPEG-2 Full HW Encode1, Intel® InTruTM 3D, Intel® Clear Video HD Technology, Intel® - ASRock H110 Pro BTC | Quick Installation Guide - Page 61
H110 Pro BTC+ Audio • Codificación y descodificación HWA: VP8, HEVC 8b; codificación y descodificación GPU/SW: VP9, HEVC 10b (para CPU Intel® de la sobretensiones • Tapas de audio ELNA LAN E/S en panel posterior • Gigabit LAN 10/100/1000 Mb/s • Giga PHY Intel® I219V • Admite la función Reactivaci - ASRock H110 Pro BTC | Quick Installation Guide - Page 62
• BIOS legal UEFI AMI compatible con interfaz gráfica de usuario multilingüe • Eventos de reactivación compatibles con ACPI 5.0 • Admite SMBIOS 2.7 • Multiajuste de voltaje de CPU, DRAM, PCH 1,05V Monitor de hardware • Método de sensor de temperatura de la CPU/Chasis • Tacómetro del ventilador - ASRock H110 Pro BTC | Quick Installation Guide - Page 63
H110 Pro BTC+ SO Certificaciones • Microsoft® Windows® 10 64 bits (para CPU Intel® de la 7a) • Microsoft® Windows® 10 64 bits / 8.1 64 bits / 7 32 bits / 7 64 bits (para CPU Intel® de la 6a generación) * Para instalar el sistema operativo Windows® 7, se necesita un disco de instalación modificado - ASRock H110 Pro BTC | Quick Installation Guide - Page 64
pin3 en el CLRMOS2 durante 5 segundos. Sin embargo, no borre el CMOS justo después de que haya actualizado el BIOS. Si necesita borrar el CMOS cuando acabe de actualizar el BIOS, deberá arrancar el sistema primero y, a continuación, deberá apagarlo antes de que realice el borrado del CMOS. Tenga en - ASRock H110 Pro BTC | Quick Installation Guide - Page 65
H110 Pro BTC+ 1.4 Conectores y cabezales incorporados Los cabezales y conectores incorporados NO son puentes. NO coloque tapas de puente sobre estos cabezales y conectores. Si coloca tapas de puente sobre - ASRock H110 Pro BTC | Quick Installation Guide - Page 66
Conectores Serie ATA3 (SATA3_0: consulte la pág.1, N.º 8) (SATA3_1: consulte la pág.1, N.º 7) (SATA3_2: consulte la pág.1, N.º 10) (SATA3_3: consulte la pág.1, N.º 9) Conector de alimentación SATA (SATA_POW1) (consulte la pág.1, Nº 18) SATA3_2 SATA3_0 SATA3_3 SATA3_1 Estos cuatro conectores SATA3 - ASRock H110 Pro BTC | Quick Installation Guide - Page 67
H110 Pro BTC+ 1. El Audio de Alta Definición (HDA, en inglés) es compatible con el método de sensor de conectores, sin embargo, el cable del panel del chasis deberá ser compatible con HDA para que pueda funcionar correctamente. Siga las instrucciones que se indican en nuestro manual y en el manual - ASRock H110 Pro BTC | Quick Installation Guide - Page 68
Conectores de alimentación PCIe (PCIE_PWR1 de 4 pines) (consulte la pág.1, Nº 21) (PCIE_PWR2 de 4 pines) (consulte la pág.1, Nº 19) Enchufe estos conectores a la fuente de alimentación cuando haya instaladas tres tarjetas gráficas en esta placa base. Consulte la página XX para la guía de instalaci - ASRock H110 Pro BTC | Quick Installation Guide - Page 69
H110 Pro BTC+ 1 ASRock H110 Pro BTC ASRock ASRock BIOS ASRock ASRock VGA ASRock http://www.asrock.com. 1.1 ASRock H110 Pro BTC ATX ASRock H110 Pro BTC ASRock H110 Pro BTC+ • 1 x 2 x Serial ATA (SATA 1 x M.2 67 - ASRock H110 Pro BTC | Quick Installation Guide - Page 70
7-го и 6 91 Вт. • Digi Power design 8 Intel® Turbo Boost 2.0 • Intel® H110 DDR4 • 2 x DDR4 DIMM DDR4 2400/ SSD NVMe • 12 x слота PCI Express 2.0 x1 Intel® HD Graphics VGA Intel® HD Graphics: Intel® Quick Sync Video 1 AVC, MVC (S3D) и MPEG-2, Intel® InTruTM 3D Intel® Clear Video - ASRock H110 Pro BTC | Quick Installation Guide - Page 71
H110 Pro BTC+ VP8 , HEVC 8b VP9, HEVC 10b Intel® 6 1024 DVI-D 1920x1200 60 HEVC, VP8, VP9 HDCP DVI-D Full HD 1080p Blu-ray (BD) DVI-D Звук • 7.1 Realtek ALC887) 7.1 HD Audio HD ELNA LAN • Gigabit Ethernet 10/100/1000 Мбит/с • Giga PHY Intel® I219V PCIe) - ASRock H110 Pro BTC | Quick Installation Guide - Page 72
1 x 1 x 1 x (4 1 А (12 Вт). • 2 x 4 1 x 24 1 x 12 В, 8 2 x PCIe • 1 x SATA • 1 x 1 x USB 2.0 (2 порта USB 2.0 1 x USB 3.0 (2 порта USB 3.0 BIOS • AMI UEFI Legal BIOS ACPI 5.0 SMBIOS 2.7 DRAM, PCH 1,05 В 12 В, +5 В, +3,3 В, Vcore ЦП 70 - ASRock H110 Pro BTC | Quick Installation Guide - Page 73
H110 Pro BTC+ • Microsoft® Windows® 10 64 Intel® 7 • Microsoft® Windows® 10 64 8.1 64 7 32 7 64 Intel® 6 Windows® 7 xHCI ISO 142 Windows® 10 ASRock: http://www.asrock.com FCC, CE http://www.asrock.com BIOS Untied Overclocking 71 - ASRock H110 Pro BTC | Quick Installation Guide - Page 74
1.3 3 1 и 2 CMOS (CLRMOS2) 1, № 12) CMOS CLRMOS2 CMOS 15 2 и 3 на CLRMOS2 на 5 CMOS BIOS CMOS BIOS CMOS CMOS. 72 - ASRock H110 Pro BTC | Quick Installation Guide - Page 75
H110 Pro BTC+ 1.4 9 PANEL1 1,№ 13) PLED+ PLEDPWRBTN# GND 1 GND RESET# GND HDLEDHDLED+ PWRBTN RESET PLED S1/S3 S4 S5 HDLED 7 SPK_ CI1 1, № 11) SPEAKER DUMMY DUMMY +5V 1 SIGNAL GND DUMMY 73 - ASRock H110 Pro BTC | Quick Installation Guide - Page 76
Serial ATA3 (SATA3_0 1, № 8) (SATA3_1 1, № 7) (SATA3_2 1,№ 10) (SATA3_3 1,№ 9) SATA (SATA_POW1 1, № 18) SATA3_2 SATA3_0 SATA3_3 SATA3_1 SATA3 SATA 6,0 M2_1 2 типа SATA SATA3_0 USB 2.0 (9 USB_5_6 1, № 14) USB_PWR PP+ GND DUMMY 1 GND P+ PUSB_PWR USB 2.0 USB 3.0 - ASRock H110 Pro BTC | Quick Installation Guide - Page 77
H110 Pro BTC+ 1 HDA 2 AC'97 A Mic_IN (MIC) к MIC2_L. B Audio_R (RIN) к OUT2_R, Audio_L (LIN) к OUT2_L. C GND GND). D MIC_RET и OUT_RET AC'97 E FrontMic Realtek Recording Volume GND 4 FAN_VOLTAGE_CONTROL FAN_SPEED - ASRock H110 Pro BTC | Quick Installation Guide - Page 78
PCIe (4 PCIE_ PWR1 1, № 21) (4 PCIE_ PWR2 1, № 19) PCIe 9 COM1 1, № 17) RRXD1 DDTR#1 DDSR#1 CCTS#1 1 RRI#1 RRTS#1 GND TTXD1 DDCD#1 COM1 1 17 TPMS1 1, № 6) Trusted Platform Module (TPM (25 LPT1) AFD# ERROR# 1, № 16) PINIT# SLIN# GND 1 SPD7 - ASRock H110 Pro BTC | Quick Installation Guide - Page 79
a lista de placas VGA e CPU mais recentes suportadas no site da ASRock. Site da ASRock http://www.asrock.com. 1.1 Conteúdo da embalagem • Placa Mãe ASRock H110 Pro BTC+ (Fator de Forma ATX) • Guia de Instalação Rápida da ASRock H110 Pro BTC+ • CD de Suporte do ASRock H110 Pro BTC+ • 1 x Painel de - ASRock H110 Pro BTC | Quick Installation Guide - Page 80
CPU até 91W • Digi Power design • Design com 8 fases de alimentação • Suporta a tecnologia Intel® Turbo Boost 2.0 Chipset • Intel® H110 :modo x16)* * Suporta NVMe SSD nos discos de inicialização • Video com AVC, MVC (S3D) e MPEG-2 Full HW Encode1, Intel® InTruTM 3D, Tecnologia Intel® Clear Video - ASRock H110 Pro BTC | Quick Installation Guide - Page 81
H110 Pro BTC+ Português • Codificador/decodificador HWA: VP8 , HEVC 8b; Codificador/ decodificador GPU/SW: VP9, HEVC 10b (Para 6ª Ger Intel® CPU recurso de áudio multicanal pelo driver de áudio. • Suporta Proteção de Sobretensão • Fones de Áudio ELNA LAN • LAN Gigabit a 10/100/1000 Mb/s • Giga - ASRock H110 Pro BTC | Quick Installation Guide - Page 82
USB 2.0) (Suporta Proteção ESD) • 1 x Plataforma USB 3.0 (Suporta 2 portas USB 3.0) (Suporta Proteção ESD) • AMI Legal UEFI BIOS com suporte multilingue GUI • ACPI 5.0 compatível com eventos de despertar • Suporte SMBIOS 2.7 • CPU, A DRAM, PCH multi-ajuste de tensão 1,05V • Sensor de temperatura da - ASRock H110 Pro BTC | Quick Installation Guide - Page 83
H110 Pro BTC+ SO • Microsoft® Windows® 10 64-bit (Para 7a Ger Intel® CPU) • Microsoft® Windows® 10 64-bit / 8.1 64-bit / 7 32-bit / 7 64-bit (Para 6a Ger Intel® CPU) *Para instalar o SO Windows 7, um disco de instalação modificado com condutores xHCI no arquivo ISO é necessário. Favor consul- - ASRock H110 Pro BTC | Quick Installation Guide - Page 84
pino3 no CLRMOS2 por 5 segundos. No entanto, não apague o CMOS logo após ter realizado a atualização da BIOS. Se você precisar apagar o CMOS logo após ter terminado uma atualização da BIOS, deverá primeiro iniciar o sistema e voltar a encerrá-lo antes de apagar o CMOS. Por favor, observe que a senha - ASRock H110 Pro BTC | Quick Installation Guide - Page 85
H110 Pro BTC+ 1.4 Suportes e conectores onboard Os conectores e suportes onboard NÃO são jumpers. NÃO coloque tampas de jumpers sobre estes terminais e conectores Colocar tampas de jumpers sobre os terminais e conectores irá - ASRock H110 Pro BTC | Quick Installation Guide - Page 86
Conectores série ATA3 (SATA3_0: ver p.1, N.º 8) (SATA3_1: ver p.1, N.º 7) (SATA3_2: ver p.1, N.º 10) (SATA3_3: ver p.1, N.º 9) Conector de alimentação SATA (SATA_POW1) (ver p.1, N.º 18) SATA3_2 SATA3_0 SATA3_3 SATA3_1 Estes quatro conectores SATA3 suportam cabos de dados SATA para dispositivos de - ASRock H110 Pro BTC | Quick Installation Guide - Page 87
H110 Pro BTC+ Português 1. O Áudio de alta definição suporta Sensor de Adaptador, mas o fio do painel no chassi deverá suportar HDA para funcionar corretamente. Por favor, siga as instruções no nosso manual e no manual Se você pretende conectar um ventilador da CPU de 3 pinos, por favor, conecte - ASRock H110 Pro BTC | Quick Installation Guide - Page 88
Conectores de Energia PCIe (PCIE_PWR1 de 4 pinos) (ver p.1, N.º 21) (PCIE_PWR2 de 4 pinos) (ver p.1, N.º 19) Por favor conecte estes conectores à fonte de alimentação quando três placas são instaladas nesta placa-mãe. Por favor consulte a página XX para Guia de Instalação do Conector de Alimentação - ASRock H110 Pro BTC | Quick Installation Guide - Page 89
Türkçe H110 Pro BTC+ 1 Giriş ASRock'ın zorlu kalite kontrol süreçlerinden geçmiş olan ASRock H110 Pro BTC+ ana kartını satın aldığınız için teşekkür ederiz. Sağlam tasarımı ile ASRock'ın kalite ve dayanıklılık taahhüdüne uygun şekilde mükemmel performans sağlar. Ana kart özellikleri ve BIOS yaz - ASRock H110 Pro BTC | Quick Installation Guide - Page 90
2.0 Teknolojisini destekler Yonga kümesi • Intel® H110 Bellek • Çift Kanallı DDR4 Bellek Teknolojisi :x16 modu)* * Önyükleme diski olarak NVMe SSD destekler • 12 tane PCI Express 2.0 x1 Yuva ® Net Video HD Teknolojisi, Intel® InsiderTM, Intel® HD Graphics ile Intel® Quick Sync Video • Gen9 - ASRock H110 Pro BTC | Quick Installation Guide - Page 91
H110 Pro BTC+ Ses LAN Arka Panel G/Ç • HWA Kodlama/Kod Çözme: VP8 , HEVC 8b; GPU/SW aracılığıyla etkinleştirilmesi gereklidir. • Aşırı Gerilim Korumasını destekler • ELNA Ses Kapakları • Gigabit LAN 10/100/1000 Mb/s • Giga PHY Intel® I219V • Yerel Ağ Üzerinden Açma destekler (yalnızca siyah - ASRock H110 Pro BTC | Quick Installation Guide - Page 92
Korumasını destekler) • 1 tane USB 3.0 Bağlantısı (2 USB 3.0 bağlantı noktasını destekler) (ESD Korumasını destekler) BIOS Özelliği • Çok dilli kullanıcı arayüzü desteğiyle AMI UEFI Legal BIOS • ACPI 5.0 Uyumlu uyandırma olayları • SMBIOS 2.7 Desteği • İşlemci, DRAM, PCH 1,05 V Voltaj çoklu ayar - ASRock H110 Pro BTC | Quick Installation Guide - Page 93
H110 Pro BTC+ İşletim Sistemi Onaylar • Microsoft® Windows® 10 64 bit (7. nesil Intel® işlemci için) • Microsoft® Windows® 10 64 bit / 8.1 64 bit / 7 32 bit / 7 64 bit (6. Nesil Intel® işlemci için) * Windows® 7 işletim sistemini yüklemek için, ISO dosyasında sıkıştırılmış xHCI sürücülerine sahip - ASRock H110 Pro BTC | Quick Installation Guide - Page 94
pin2 ve pin3'e 5 saniye boyunca kısa devre yaptırmak için bir bağlantı teli kullanın. Ancak, CMOS'u lütfen BIOS'u güncelledikten hemen sonra temizlemeyin. BIOS'u güncelledikten hemen sonra CMOS'u temizlemeniz gerekirse, önce sistemi başlatın ve ardından CMOS temizleme işlemi öncesinde yeniden kapat - ASRock H110 Pro BTC | Quick Installation Guide - Page 95
H110 Pro BTC+ 1.4 Yerleşik Bağlantılar ve Bağlayıcılar Yerleşik bağlantılar ve bağlayıcılar bağlantı teli değildir. Bağlantı - ASRock H110 Pro BTC | Quick Installation Guide - Page 96
Seri ATA3 Bağlayıcıları (SATA3_0: bkz. s.1, No. 8) (SATA3_1: bkz. s.1, No. 7) (SATA3_2: bkz. s.1, No. 10) (SATA3_3: bkz. s.1, No. 9) SATA Güç Bağlayıcı (SATA_POW1) (bkz. s.1, No. 18) SATA3_2 SATA3_0 SATA3_3 SATA3_1 Bu dört SATA3 bağlayıcısı, veri aktarım hızı 6,0 Gb/sn'ye kadar - ASRock H110 Pro BTC | Quick Installation Guide - Page 97
H110 Pro BTC+ 1. Yüksek Tanımlı Ses, Jak Algılama özelliğini destekler ancak bu işlevin düzgün çalışabilmesi için kasa üzerindeki panel kablosunun HDA işlevini desteklemesi gerekmektedir. - ASRock H110 Pro BTC | Quick Installation Guide - Page 98
PCIe Güç Bağlayıcıları (4 pimli PCIE_PWR1) (bkz. s.1, No. 21) (4 pimli PCIE_PWR2) (bkz. s.1, No. 19) Bu ana karta üç tane grafik kartı takıldığında lütfen bu bağlayıcıları güç kaynağına bağlayın. PCIe Güç Bağlayıcı Kurulum Kılavuzu için lütfen XX. sayfaya başvurun. Seri Bağlantı Noktası Bağlantısı - ASRock H110 Pro BTC | Quick Installation Guide - Page 99
한국어 H110 Pro BTC+ 1 개요 ASRock H110 Pro BTC ASRock ASRock BIOS ASRock ASRock VGA 카드와 CPU ASRock http://www.asrock.com. 1.1 • ASRock H110 Pro BTC ATX ASRock H110 Pro BTC ASRock H110 Pro BTC+ 지원 CD • I/O 1 ATA (SATA 2 M.2 1 97 - ASRock H110 Pro BTC | Quick Installation Guide - Page 100
세대 Intel® CoreTM i7/i5/i3/Pentium®/Celeron 1151) 지원 • 최대 91W 의 CPU 지원 • Digi Power design • 8 Intel® Turbo Boost 2.0 • Intel® H110 DDR4 DDR4 DIMM 슬롯 2 개 • DDR4 2400/2133 비 ECC 7 세대 Intel® CPU 는 최대 2400 까지 DDR4 6 세 대 Intel® CPU 는 2133 까지 DDR4 ECC UDIMM ECC 32GB • Intel® Extreme Memory - ASRock H110 Pro BTC | Quick Installation Guide - Page 101
H110 Pro BTC+ • HWA VP8 , HEVC 8b; GPU/SW VP9, HEVC 10b(6 세대 Intel® CPU 1,024MB 다. • DVI-D 1920x1200 @ 60Hz HEVC, VP8, VP9 • DVI-D HDCP 지원 • DVI-D Full HD 1080p Blu-ray (BD) 재생 지 원 오디오 • 7.1 CH HD 오디오 (Realtek ALC887 7.1 CH HD HD ELNA LAN • Gigabit LAN 10/100/1000 Mb/s • - ASRock H110 Pro BTC | Quick Installation Guide - Page 102
1 개 * CPU 1A(12W) 인 CPU 2 개 (4 핀 ) • 24 핀 ATX 1 개 • 8 핀 12V 1 개 • PCIe 2 개 • SATA 1 1 개 • USB 2.0 헤더 1 개 (USB 2.0 포트 2 ESD USB 3.0 헤더 1 개 (USB 3.0 포트 2 ESD GUI AMI UEFI 적합형 BIOS • ACPI 5.0 SMBIOS 2.7 지원 • CPU, DRAM, PCH 1.05V • CPU CPU CPU CPU CPU 12V, +5V, +3.3V, CPU Vcore - ASRock H110 Pro BTC | Quick Installation Guide - Page 103
H110 Pro BTC+ OS 인증 • Microsoft® Windows® 10 64 비트 (7 세대 Intel® CPU Microsoft® Windows® 10 64 비트 /8.1 64 비트 /7 32 비트 /7 64 비트 (6 세대 Intel® CPU Windows® 7 OS xHCI ISO 142 Windows® 10 ASRock http://www.asrock.com • FCC, CE http://www.asrock.com BIOS Untied Overclocking Technology 한국어 - ASRock H110 Pro BTC | Quick Installation Guide - Page 104
1.3 3 1 과 핀 2 Clear CMOS 점퍼 (CLRMOS2) (1 12 기본값 Clear CMOS CLRMOS2 CMOS 15 CLRMOS2 의 핀 2 와 핀 3 을 5 BIOS CMOS BIOS CMOS CMOS CMOS 한 국 어 102 - ASRock H110 Pro BTC | Quick Installation Guide - Page 105
한국어 H110 Pro BTC+ 1.4 9 핀 PANEL1) (1 13 PLED+ PLEDPWRBTN# GND 1 GND RESET# GND HDLEDHDLED+ PWRBTN RESET PLED LED LED S1/S3 LED S4 S5 LED HDLED LED LED LED LED LED 7 핀 SPK_CI1) (1 11 SPEAKER DUMMY DUMMY +5V 1 SIGNAL GND DUMMY 103 - ASRock H110 Pro BTC | Quick Installation Guide - Page 106
한 국 어 시리얼 ATA3 커넥터 (SATA3_0: 1 8 SATA3_1: 1 7 SATA3_2: 1 10 SATA3_3: 1 9 SATA3_2 SATA3_0 SATA3_3 SATA3_1 SATA3 6.0 Gb/s SATA SATA- 타입 M.2 M2_1 SATA3_0 SATA SATA_POW1) (1 18 USB 2.0 헤더 (9 핀 USB_5_6) (1 14 USB_PWR PP+ GND DUMMY 1 GND P+ PUSB_PWR USB 2.0 USB 3.0 - ASRock H110 Pro BTC | Quick Installation Guide - Page 107
H110 Pro BTC+ 한국어 1 HDA 2. AC' 97 A. Mic_IN (MIC) 를 MIC2_L B. Audio_R (RIN) 을 OUT2_R Audio_L (LIN) 을 OUT2_L C. 접지 (GND GND D. (4 핀 CHA_FAN2) (1 22 CPU 4 핀 CPU_FAN1) (1 2 4 핀 CPU 팬 FAN_SPEED FAN_VOLTAGE_CONTROL GND FAN_SPEED_CONTROL 3 핀 CPU 팬을 1-3 에 연 ATX - ASRock H110 Pro BTC | Quick Installation Guide - Page 108
한 국 어 PCIe 4 핀 PCIE_PWR1) (1 21 4 핀 PCIE_PWR2) (1 19 PCIe XX 9 핀 COM1) (1 17 RRXD1 DDTR#1 DDSR#1 CCTS#1 1 RRI#1 RRTS#1 GND TTXD1 DDCD#1 이 COM1 1 TPM 헤더 (17 핀 TPMS1) (1 6 TPM(Trusted Platform Module TPM 25 핀 LPT1) AFD# ERROR# PINIT# SLIN# GND (1 16 1 - ASRock H110 Pro BTC | Quick Installation Guide - Page 109
日本語 H110 Pro BTC+ 1 ͡Ίʹ ASRock H110 Pro BTC ASRock BIOS ASRock ASRock VGA CPU ASRock http://www.asrock.com. 1.1 • ASRock H110 Pro BTC ATX ASRock H110 Pro BTC ASRock H110 Pro BTC+ αϙʔτ CD • 1 x I/O 2 x γϦΞϧ ATAʢSATA 1 x M.2 107 - ASRock H110 Pro BTC | Quick Installation Guide - Page 110
CoreTM i7/i5/i3/Pentium®/ Celeron 1151ʣ • ࠷େ 91W ·Ͱͷ CPU ʹରԠ • Digi Power design • 8 • Intel 2.0 νοϓηοτ • Intel® H110 ϝϞϦ DDR4 2 x DDR4 DIMM DDR4 2400/2133 ϊϯ ECC * ୈ 7 ੈ Intel® CPU ࠷େ 2400 ·Ͱͷ DDR4 ୈ 6 ੈ Intel® CPU ࠷େ 2133 ·Ͱͷ DDR4 ECC UDIMM non-ECC ϞʔυͰ 32GB • Intel - ASRock H110 Pro BTC | Quick Installation Guide - Page 111
日本語 H110 Pro BTC+ • HWA VP8 ɺHEVC 8bɺGPU/SW VP9ɺHEVC 10ʢb ୈ 6 ੈ Intel® CPU ͚ʣ 1,024MB DVI-D 1920x1200 @60Hz HEVC, VP8, VP9 • DVI-D ϙʔτͰ HDCP DVI-D ϙʔτͰ Full HD 1080p Blu-ray (BD ΦʔσΟΦ • 7.1 CH HD Realtek ALC887 Audio Codec) *7.1 CH HD HD ELNA LAN LAN 10/100/1000 - ASRock H110 Pro BTC | Quick Installation Guide - Page 112
CPU 4 ϐϯʣ * CPU 1A (12W CPU ϑΝϯʹ 2 x 4 ϐϯʣ • 1 x 24 ϐϯ ATX 1 x 8 ϐϯ 12V 2 x PCIe 1 x SATA 1 x 1 x USB 2.0 ϔομʔʢ2 ͭͷ USB 2.0 ESD 1 x USB 3.0 ϔομʔʢ2 ͭͷ USB 3.0 ESD BIOS ػೳ • AMI UEFI Legal BIOS GUI ACPI 5.0 SMBIOS 2.7 CPUɺDRAMɺPCH 1.05V • CPU CPU CPU CPU CPU - ASRock H110 Pro BTC | Quick Installation Guide - Page 113
H110 Pro BTC+ OS ೝূ • Microsoft® Windows® 10 64-biʢt ୈ 7 ੈ Intel® CPU ͚ʣ • Microsoft® Windows® 10 64-bit / 8.1 64-bit / 7 32-bit / 7 64-bit ʢୈ 6 ੈ Intel® CPU ͚ʣ * Windows® 7 OS xHCI υϥΠό͕ ISO 142 Windows® 10 ASRock http://www.asrock.com • FCCɺCE http://www.asrock.com BIOS 日本語 111 - ASRock H110 Pro BTC | Quick Installation Guide - Page 114
日本語 1.3 3 1 ͱϐϯ 2 CMOS CLRMOS2) ʢp.1ɺNo. 12 ࢀরʣ σϑΥϧτ CMOS ͷΫϦΞ CLRMOS2 Λͬͯ CMOS 15 CLRCMOS2 ͷϐϯ 2 ͱϐϯ 3 Λ 5 BIOS CMOS BIOS CMOS CMOS CMOS 112 - ASRock H110 Pro BTC | Quick Installation Guide - Page 115
H110 Pro BTC+ 1.4 日本語 9 ϐϯ PANEL1ʣ ʢp.1ɺNo. 13 ࢀরʣ PLED+ PLEDPWRBTN# GND 1 GND RESET# GND HDLEDHDLED+ PWRBTN RESET PLED LED LED S1/S3 LED S4 S5 LED HDLED LED LED LED - ASRock H110 Pro BTC | Quick Installation Guide - Page 116
γϦΞϧ ATA3 SATA3_0: p.1ɺNo. 8 ࢀরʣ (SATA3_1: p.1ɺNo. 7 ࢀরʣ (SATA3_2: p.1ɺNo. 10 ࢀরʣ (SATA3_3: p.1ɺNo. 9 ࢀরʣ SATA SATA_POW1) ʢp.1ɺNo. 18 ࢀরʣ SATA3_2 SATA3_0 SATA3_3 SATA3_1 ͜ΕΒ4 ͭͷ SATA3 6.0 Gb SATA SATA λ Πϓ M.2 σόΠεͰ M2_1 SATA3_0 3 日本語 USB 2.0 ϔομʔ ʢ9 ϐϯ USB_5_6ʣ ʢp.1ɺNo. 14 ࢀরʣ USB - ASRock H110 Pro BTC | Quick Installation Guide - Page 117
H110 Pro BTC+ 日本語 1 HDA 2. AC`97 A. Mic_IN (MIC) Λ MIC2_L B. Audio_R (RIN) Λ OUT2_R ʹɺAudio_L (LIN) Λ OUT2_L C. Ξʔε (GND) ΛΞʔε (GND D. No. 22 ࢀরʣ CPU 4 ϐϯ CPU_FAN1ʣ ʢp.1ɺNo. 2 ࢀরʣ FAN_SPEED 4 ϐϯ FAN_VOLTAGE_CONTROL GND FAN_SPEED_CONTROL CPU 3 ϐϯͷ CPU 1-3 ͍ͩ͘͞ɻ ATX 24 - ASRock H110 Pro BTC | Quick Installation Guide - Page 118
日本語 PCIe 4 ϐϯ PCIE_PWR1ʣ ʢp.1ɺNo. 21 ࢀরʣ ʢ4 ϐϯ PCIE_PWR2ʣ ʢp.1ɺNo. 19 ࢀরʣ 3 PCIe XX 9 ϐϯ COM1ʣ ʢp.1ɺNo. 17 ࢀরʣ RRXD1 DDTR#1 DDSR#1 CCTS#1 1 RRI#1 RRTS#1 GND TTXD1 DDCD#1 ͜ͷ COM1 1 TPM ϔομʔ ʢ17 ϐϯ TPMS1ʣ ʢp.1ɺNo. 6 ࢀরʣ TPM TPM AFD# ERROR# PINIT# SLIN# GND ʢ25 ϐϯ LPT1ʣ - ASRock H110 Pro BTC | Quick Installation Guide - Page 119
H110 Pro BTC+ 1 简介 H110 Pro BTC BIOS VGA 卡和 CPU http://www.asrock.com。 1.1 • 华擎 H110 Pro BTC+ 主板(ATX H110 Pro BTC H110 Pro BTC 1 x I/O 面板 • 2 x 串行 ATA (SATA 1 x M.2 117 - ASRock H110 Pro BTC | Quick Installation Guide - Page 120
代 Intel® CoreTM i7/i5/i3/Pentium®/Celeron Socket 1151) 91W 的 CPU • Digi Power design • 8 Intel® Turbo Boost 2.0 技术 • Intel® H110 DDR4 2 x DDR4 DIMM DDR4 2400/2133 非 ECC 7 代 Intel® CPU 支持 DDR4 最高达 2400,第 6 代 Intel® CPU 支持 DDR4 最高达 2133 ECC UDIMM ECC 32GB • 支持 Intel® Extreme Memory Profile - ASRock H110 Pro BTC | Quick Installation Guide - Page 121
H110 Pro BTC+ 音频 LAN 后面板 I/O • HWA VP8 , HEVC 8b; GPU/SW VP9, HEVC 10b 6 代 Intel® CPU) 1,024MB DVI-D,60Hz 1920x1200 HEVC, VP8, VP9 • 通过 DVI-D HDCP • 通过 DVI-D 1080p Blu-ray (BD) 播放。 • 7.1 CH Realtek ALC887 7.1 CH ELNA • Gigabit LAN 10/100/1000 Mb/s • Giga PHY Intel® I219V PCIe - ASRock H110 Pro BTC | Quick Installation Guide - Page 122
CPU 4 针 ) * CPU 1A (12W) 功率的 CPU 2 x 4 针 ) • 1 x 24 针 ATX 1 x 8 针 12V 2 x PCIe 1 x SATA 1 x 1 x USB 2.0 2 个 USB 2.0 ESD 1 x USB 3.0 2 个 USB 3.0 ESD 保护) • AMI UEFI Legal BIOS GUI • ACPI 5.0 SMBIOS 2.7 支持 • CPU、DRAM, PCH 1.05V Voltage Multi- adjustment) • CPU CPU CPU CPU 度) • CPU - ASRock H110 Pro BTC | Quick Installation Guide - Page 123
H110 Pro BTC+ • Microsoft® Windows® 10 64-bit 7 代 Intel® CPU) • Microsoft® Windows® 10 64-bit / 8.1 64-bit / 7 32-bit / 7 64-bit 6 代 Intel® CPU Windows® 7 OS,需要 xHCI ISO 142 Windows® 10 http://www.asrock.com • FCC、CE http://www.asrock.com BIOS 121 - ASRock H110 Pro BTC | Quick Installation Guide - Page 124
1.3 3 1 和针脚 2 清除 CMOS 跳线 (CLRMOS2) (见第 1 页,第 12 个) 默认 清除 CMOS CLRMOS2 CMOS 15 CLRMOS2 2 和针脚 3 短接 5 BIOS CMOS BIOS CMOS CMOS CMOS 122 - ASRock H110 Pro BTC | Quick Installation Guide - Page 125
H110 Pro BTC+ 1.4 9 针 PANEL1) (见第 1 页, 第 13 个) PLED+ PLEDPWRBTN# GND 1 GND RESET# GND HDLEDHDLED+ PWRBTN RESET PLED LED LED S1/S3 LED S4 S5) 时,此 LED 熄灭。 HDLED LED LED LED 亮起。 LED - ASRock H110 Pro BTC | Quick Installation Guide - Page 126
串行 ATA3 接口 (SATA3_0: 见第 1 页, 第 8 个) (SATA3_1: 见第 1 页, 第 7 个) (SATA3_2: 见第 1 页,第 10 个) (SATA3_3: 见第 1 页,第 9 个) SATA SATA_POW1) (见第 1 页,第 18 个) SATA3_2 SATA3_0 SATA3_3 SATA3_1 这四个 SATA3 6.0 Gb/s SATA M2_1 被 SATA 型 M.2 SATA3_0 USB 2.0 接脚 (9- 针 USB_5_6 1 页,第 14 个) USB_PWR PP+ GND - ASRock H110 Pro BTC | Quick Installation Guide - Page 127
H110 Pro BTC+ 1 HDA 2 AC'97 A. 将 Mic_IN (MIC) 连接到 MIC2_L。 B. 将 Audio_R (RIN) 连接到 OUT2_R,将 Audio_L (LIN) 连接到 OUT2_L。 C GND GND)。 D. MIC_RET 页, 第 22 个) CPU 4 针 CPU_FAN1) FAN_SPEED 4 针 CPU FAN_VOLTAGE_CONTROL GND FAN_SPEED_CONTROL (见第 1 页, 第 2 个) 接 3 针 CPU 1-3。 ATX 24 针 - ASRock H110 Pro BTC | Quick Installation Guide - Page 128
PCIe 4- 针 PCIE_PWR1 1 页,第 21 个) (4- 针 PCIE_PWR2 1 页,第 19 个) PCIe XX 页。 9 针 COM1) (见第 1 页,第 17 个) TPM 接脚 (17 针 TPMS1) (见第 1 页,第 6 个) 1 RRXD1 DDTR#1 DDSR#1 CCTS#1 1 RRI#1 RRTS#1 GND TTXD1 DDCD#1 此 COM1 Trusted Platform Module TPM TPM 25 针 LPT1) AFD# ERROR# PINIT# SLIN# - ASRock H110 Pro BTC | Quick Installation Guide - Page 129
H110 Pro BTC+ SJ/T 11364-2006 10 年。 图一 部件名称 Pb) 镉 (Cd) 汞 (Hg Cr(VI PBB PBDE) X O O O O O X O O O O O O SJ/T 11363-2006 X SJ/T 11363-2006 2002/95/EC 127 - ASRock H110 Pro BTC | Quick Installation Guide - Page 130
繁體中文 1 簡介 H110 Pro BTC BIOS VGA 卡及 CPU http://www.asrock.com。 1.1 • 華擎 H110 Pro BTC ATX H110 Pro BTC H110 Pro BTC 1 x I/O 2 x Serial ATA (SATA 1 x M.2 128 - ASRock H110 Pro BTC | Quick Installation Guide - Page 131
繁體中文 H110 Pro BTC+ 1.2 規格 平台 CPU • ATX 7 代與第 6 代 Intel® CoreTM i7/i5/i3/Pentium®/Celeron 1151) 91W CPU • Digi Power design • 8 Intel® Turbo Boost 2.0 技術 • Intel® H110 DDR4 2 x DDR4 DIMM DDR4 2400/2133 非 ECC 7 代 Intel® CPU 2400 DDR4;第 6 代 Intel® CPU 2133 DDR4 ECC UDIMM ECC - ASRock H110 Pro BTC | Quick Installation Guide - Page 132
• HWA VP8、HEVC 8b;GPU/SW VP9、HEVC 10b 6 代 Intel® CPU) 1024MB 1920x1200 @ 60Hz DVI-D HEVC, VP8, VP9 DVI-D HDCP DVI-D Full HD 1080p 藍光 (BD) 播放 • 7.1 CH HD 音訊 (Realtek ALC887 7.1 CH HD HD ELNA • Gigabit LAN 10/100/1000 Mb/s • Giga PHY Intel® I219V PCIe Energy Efficient Ethernet 802 - ASRock H110 Pro BTC | Quick Installation Guide - Page 133
繁體中文 H110 Pro BTC+ BIOS • 4 x SATA3 6.0 Gb/s NCQ、AHCI M2_1 為 SATA 類型的 M.2 SATA3_0。 • 1 x M.2 M Key 型 2230/2242/2260/2280 M.2 SATA3 6.0 Gb/s 模組 • 1 x 1 x COM 1 x TPM 排針 • 1 x 1 x CPU 4-pin) * CPU 1A (12W CPU 2 x 4-pin) • 1 x 24 pin ATX 1 x 8 pin 12V 2 x PCIe 1 x SATA 1 x 1 x - ASRock H110 Pro BTC | Quick Installation Guide - Page 134
繁體中文 • Microsoft® Windows® 10 64 7 代 Intel® CPU) • Microsoft® Windows® 10 64 位元/ 8.1 64 位元/ 7 32 位元/ 7 64 6 代 Intel® CPU Windows® 7 xHCI ISO 142 Windows® 10 http://www.asrock.com • FCC、CE http://www.asrock.com BIOS 132 - ASRock H110 Pro BTC | Quick Installation Guide - Page 135
繁體中文 H110 Pro BTC+ 1.3 3-pin pin1 及 pin2 清除 CMOS 跳線 (CLRMOS2 1 12) 預設 清除 CMOS CLRMOS2 清除 CMOS 15 CLRMOS2 上的 pin2 及 pin3 短路約 5 BIOS CMOS BIOS CMOS CMOS CMOS 133 - ASRock H110 Pro BTC | Quick Installation Guide - Page 136
繁體中文 1.4 (9-pin PANEL1 1 13) PLED+ PLEDPWRBTN# GND 1 GND RESET# GND HDLEDHDLED+ PWRBTN RESET PLED LED LED S1/S3 LED S4 S5) 時,LED HDLED LED LED LED LED LED 7-pin SPK_CI1 1 11) 134 SPEAKER DUMMY DUMMY +5V 1 SIGNAL GND DUMMY - ASRock H110 Pro BTC | Quick Installation Guide - Page 137
SATA3_2 SATA3_0 SATA3_3 SATA3_1 繁體中文 Serial ATA3 接頭 (SATA3_0 1 8) (SATA3_1 1 7) (SATA3_2 1 10) (SATA3_3 1 9) SATA SATA_POW1 1 18) H110 Pro BTC+ 這四組 SATA3 SATA 6.0 Gb/s M2_1 為 SATA 類型的 M.2 SATA3_0。 USB 2.0 排針 (9-pin USB_5_6 1 14) USB_PWR PP+ GND DUMMY 1 GND P+ PUSB_PWR USB - ASRock H110 Pro BTC | Quick Installation Guide - Page 138
1 22) GND FAN_VOLTAGE_CONTROL FAN_SPEED FAN_SPEED_CONTROL FAN_SPEED FAN_VOLTAGE_CONTROL GND FAN_SPEED_CONTROL CPU 4-pin CPU_FAN1 1 2) FAN_SPEED 4-Pin CPU 風扇 FAN_VOLTAGE_CONTROL GND FAN_SPEED_CONTROL 連接 3-Pin CPU Pin 1-3。 ATX 24-pin ATXPWR1 1 4) ATX 12V 8-pin ATX12V1 - ASRock H110 Pro BTC | Quick Installation Guide - Page 139
1 繁體中文 PCIe 4-pin PCIE_PWR1 1 21) (4-pin PCIE_PWR2 1 19) H110 Pro BTC+ PCIe XX 頁。 (9-pin COM1 1 17) RRXD1 DDTR#1 DDSR#1 CCTS#1 1 RRI#1 RRTS#1 GND TTXD1 DDCD#1 此 COM1 TPM 排針 (17-pin TPMS1 1 6) TPM TPM (25-pin LPT1 1 16) - ASRock H110 Pro BTC | Quick Installation Guide - Page 140
CPU hingga 91W • Digi Power design • Desain 8 Fase Daya • Mendukung Teknologi Intel® Turbo Boost 2.0 Chipset • Intel® H110 3.0 x16 (PCIE2:x16 mode)* * Mendukung SSD NVMe sebagai disk boot • 12 x Slot PCI Video dengan AVC, MVC (S3D) dan MPEG-2 Full HW Encode1, Intel® InTruTM 3D, Intel® Clear Video - ASRock H110 Pro BTC | Quick Installation Guide - Page 141
H110 Pro BTC+ Audio LAN I/O Panel Belakang • Encode/Decode HWA: VP8, HEVC 8b; Encode/Decode GPU/ SW: VP9, HEVC 10b, (untuk CPU fitur audio multisaluran harus diaktifkan melalui driver audio. • Mendukung Perlindungan dari Arus Pendek • ELNA Audio Caps • Gigabit LAN 10/100/1000 Mb/s • Giga - ASRock H110 Pro BTC | Quick Installation Guide - Page 142
USB 3.0 (Mendukung 2 port USB 3.0) (Mendukung Perlindungan dari ESD) Fitur BIOS • AMI UEFI Legal BIOS dengan dukungan GUI multibahasa • ACPI 5.0 Kompatibel dengan aktivitas pengaktifan • Dukungan SMBIOS 2.7 • Multipengatur Tegangan CPU, DRAM, PCH 1,05V Monitor Perangkat Keras • Sensor suhu - ASRock H110 Pro BTC | Quick Installation Guide - Page 143
Indonesia H110 Pro BTC+ OS Sertifikasi • Microsoft® Windows® 10 64-bit (Untuk Intel® CPU Generasi ke7) • Microsoft® Windows® 10 64-bit / 8.1 64-bit / 7 32-bit / 7 64-bit (Untuk CPU Intel® Generasi ke-6) * Untuk menginstal OS Windows® 7, diperlukan disk instalan termodifikasi dengan driver xHCI - ASRock H110 Pro BTC | Quick Installation Guide - Page 144
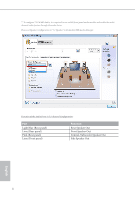
drivers (included in the ASRock Support CD or website) • A Windows® PC • Win7 USB Patcher (included in the ASRock Support CD or website) Scenarios You have an ODD and PS/2 ports: If there is an optical disc drive, PS/2 ports and PS/2 Keyboard or mouse on your computer, you can skip the instructions - ASRock H110 Pro BTC | Quick Installation Guide - Page 145
H110 Pro BTC+ Instructions Step 1 Insert the Windows® 7 installation disk or USB drive to your system. Step 2 Extract the tool (Win7 USB Patcher) and launch it. Step 3 Select the "Win7 Folder" from Step1 by clicking the red circle as shown as the picture below. Step 4 Select the "USB Driver Folder" - ASRock H110 Pro BTC | Quick Installation Guide - Page 146
, the patched ISO image will be exported to the destination selected in Step5. Then Press "Start" to proceed. Step 7 Now you are able to install Windows® 7 on Braswell or Skylake with the new burned CD. Or please use the patched ISO image to make an OS USB drive to install the - ASRock H110 Pro BTC | Quick Installation Guide - Page 147
or want to know more about ASRock, you're welcome to visit ASRock's website at http://www.asrock.com; or you may contact your dealer for further information. For technical questions, please submit a support request form at http://www.asrock.com/support/tsd.asp ASRock Incorporation 2F., No.37, Sec - ASRock H110 Pro BTC | Quick Installation Guide - Page 148
Motherboard (Product Name) H110 Pro BTC+ / ASRock (Model Designation / Trade Name) ASRock Incorporation (Manufacturer Name) 2F., No.37, Sec. 2, Jhongyang S. Rd., Beitou District, Taipei City 112, Taiwan (R.O.C.) (Manufacturer Address) is herewith confirmed to comply with the requirements set
-
 1
1 -
 2
2 -
 3
3 -
 4
4 -
 5
5 -
 6
6 -
 7
7 -
8
-
9
-
10
-
11
-
12
-
13
-
14
-
15
-
16
-
17
-
18
-
19
-
20
-
21
-
22
-
23
-
24
-
25
-
26
-
27
-
28
-
29
-
30
-
31
-
32
-
33
-
34
-
35
-
36
-
37
-
38
-
39
-
40
-
41
-
42
-
43
-
44
-
45
-
46
-
47
-
48
-
49
-
50
-
51
-
52
-
53
-
54
-
55
-
56
-
57
-
58
-
59
-
60
-
61
-
62
-
63
-
64
-
65
-
66
-
67
-
68
-
69
-
70
-
71
-
72
-
73
-
74
-
75
-
76
-
77
-
78
-
79
-
80
-
81
-
82
-
83
-
84
-
85
-
86
-
87
-
88
-
89
-
90
-
91
-
92
-
93
-
94
-
95
-
96
-
97
-
98
-
99
-
100
-
101
-
102
-
103
-
104
-
105
-
106
-
107
-
108
-
109
-
110
-
111
-
112
-
113
-
114
-
115
-
116
-
117
-
118
-
119
-
120
-
121
-
122
-
123
-
124
-
125
-
126
-
127
-
128
-
129
-
130
-
131
-
132
-
133
-
134
-
135
-
136
-
137
-
138
-
139
-
140
-
141
-
142
-
143
-
144
-
145
-
146
-
147
-
148
 |
 |

Version 1.0
Published June 2017
Copyright©2017 ASRock INC. All rights reserved.
Copyright Notice:
No part of this documentation may be reproduced, transcribed, transmitted, or
translated in any language, in any form or by any means, except duplication of
documentation by the purchaser for backup purpose, without written consent of
ASRock Inc.
Products and corporate names appearing in this documentation may or may not
be registered trademarks or copyrights of their respective companies, and are used
only for identiFcation or explanation and to the owners’ beneFt, without intent to
infringe.
Disclaimer:
SpeciFcations and information contained in this documentation are furnished for
informational use only and subject to change without notice, and should not be
constructed as a commitment by ASRock. ASRock assumes no responsibility for
any errors or omissions that may appear in this documentation.
With respect to the contents of this documentation, ASRock does not provide
warranty of any kind, either expressed or implied, including but not limited to
the implied warranties or conditions of merchantability or Ftness for a particular
purpose.
In no event shall ASRock, its directors, o±cers, employees, or agents be liable for
any indirect, special, incidental, or consequential damages (including damages for
loss of proFts, loss of business, loss of data, interruption of business and the like),
even if ASRock has been advised of the possibility of such damages arising from any
defect or error in the documentation or product.
Tis device complies with Part 15 of the ²CC Rules. Operation is subject to the following
two conditions:
(1)
this device may not cause harmful interference, and
(2)
this device must accept any interference received, including interference that
may cause undesired operation.
CALIFORNIA, USA ONLY
Te Lithium battery adopted on this motherboard contains Perchlorate, a toxic substance
controlled in Perchlorate Best Management Practices (BMP) regulations passed by the
California Legislature. When you discard the Lithium battery in California, USA, please
follow the related regulations in advance.
“Perchlorate Material-special handling may apply, see www.dtsc.ca.gov/hazardouswaste/
perchlorate”
ASRock Website: http://www.asrock.com