ASRock H61M-DG3/USB3 Quick Installation Guide
ASRock H61M-DG3/USB3 Manual
 |
View all ASRock H61M-DG3/USB3 manuals
Add to My Manuals
Save this manual to your list of manuals |
ASRock H61M-DG3/USB3 manual content summary:
- ASRock H61M-DG3/USB3 | Quick Installation Guide - Page 1
for backup purpose, without written consent of ASRock Inc. Products and corporate names appearing in this guide may or may not be registered trademarks or ASRock Website: http://www.asrock.com Published September 2012 Copyright©2012 ASRock INC. All rights reserved. 1 ASRock H61M-DG3/USB3 Motherboard - ASRock H61M-DG3/USB3 | Quick Installation Guide - Page 2
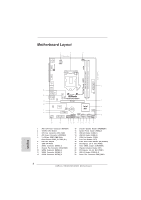
Intel 6 H61 32Mb BIOS 7 Front USB 3.0 HD_AUDIO1 1 1 LPT1 USB8_9 1 SATA2_3 SATA2_1 SPEAKER1 1 CHA_FAN1 8 COM1 USB6_7 PLED PWRBTN 1 1 1 HDLED RESET PANEL1 SATA2_2 SATA2_0 19 18 17 16 15 14 13 12 11 10 9 1 ATX 12V Power Connector (ATX12V1) 2 1155-Pin CPU Socket 3 CPU - ASRock H61M-DG3/USB3 | Quick Installation Guide - Page 3
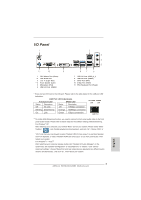
". Click "Device advanced settings", choose "Make front and rear output devices playbacks two different audio streams simultaneously", and click "ok". Then reboot your system. English 3 ASRock H61M-DG3/USB3 Motherboard - ASRock H61M-DG3/USB3 | Quick Installation Guide - Page 4
ASRock H61M-DG3/USB3 Motherboard (Micro ATX Form Factor: 8.9-in x 6.8-in, 22.6 cm x 17.3 cm) ASRock H61M-DG3/USB3 Quick Installation Guide ASRock H61M-DG3/USB3 Support CD 2 x Serial ATA (SATA) Data Cables (Optional) 1 x I/O Panel Shield ASRock Reminds You... To get better performance in Windows - ASRock H61M-DG3/USB3 | Quick Installation Guide - Page 5
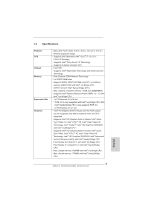
Intel® Sandy Bridge CPU - Pixel Shader 5.0, DirectX 11 with Intel® Ivy Bridge CPU. Pixel Shader 4.1, DirectX 10.1 with Intel® Sandy Bridge CPU. - Max. shared memory 1760MB with Intel® Ivy Bridge CPU. Max. shared memory 1759MB with Intel® Sandy Bridge CPU. English 5 ASRock H61M-DG3/USB3 Motherboard - ASRock H61M-DG3/USB3 | Quick Installation Guide - Page 6
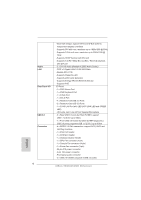
- 1 x Chassis Intrusion header - 1 x CPU Fan connector (4-pin) - 1 x Chassis Fan connector (4-pin) - 1 x Power Fan connector (3-pin) - 24 pin ATX power connector - 4 pin 12V power connector - Front panel audio connector - 2 x USB 2.0 headers (support 4 USB 2.0 ports) ASRock H61M-DG3/USB3 Motherboard - ASRock H61M-DG3/USB3 | Quick Installation Guide - Page 7
overclocking tools. Overclocking may affect your system's stability, or even cause damage to the components and devices of your system. It should be done at your own risk and expense. We are not responsible for possible damage caused by overclocking. English 7 ASRock H61M-DG3/USB3 Motherboard - ASRock H61M-DG3/USB3 | Quick Installation Guide - Page 8
usage under Windows® 7 / VistaTM / XP. For Windows® OS with 64-bit CPU, there is no such limitation. You can use ASRock XFast RAM to utilize the memory that Windows® cannot use. 2. ASRock XFast RAM is not supported by Microsoft® Windows® XP / XP 64-bit. 8 ASRock H61M-DG3/USB3 Motherboard English - ASRock H61M-DG3/USB3 | Quick Installation Guide - Page 9
USB flash drive, floppy disk or hard drive, then you can update your BIOS only in a few clicks without preparing an additional floppy diskette or other complicated flash utility. Please be noted that the USB flash drive or hard drive must use FAT32/16/12 file system. 9 ASRock H61M-DG3/USB3 Motherboard - ASRock H61M-DG3/USB3 | Quick Installation Guide - Page 10
visited websites, making web surfing faster than ever. And it also boosts the speed of Adobe Photoshop 5 times faster. Another advantage of ASRock XFast RAM is that it reduces the frequency of accessing your SSDs or HDDs in order to extend their lifespan. 10 ASRock H61M-DG3/USB3 Motherboard English - ASRock H61M-DG3/USB3 | Quick Installation Guide - Page 11
behavior. ASRock Combo Cooler Option (C.C.O.) Combo Cooler Option (C.C.O.) provides the flexible option to adopt three different CPU cooler types, Socket LGA 775, LGA 1155 and LGA 1156. Please be noticed that not all the 775 and 1156 CPU Fan can be used. 11 ASRock H61M-DG3/USB3 Motherboard English - ASRock H61M-DG3/USB3 | Quick Installation Guide - Page 12
you insert the 1155-Pin CPU into the socket, please check if the CPU surface is unclean or if there is any bent pin on the socket. Do not force to insert the CPU into the socket if above situation is found. Otherwise, the CPU will be seriously damaged. English 12 ASRock H61M-DG3/USB3 Motherboard - ASRock H61M-DG3/USB3 | Quick Installation Guide - Page 13
motherboard for after service. Step 3. Insert the 1155-Pin CPU: Step 3-1. Hold the CPU 1155-Pin CPU alignment key 1155-Pin Socket For proper inserting, please ensure to match the two orientation key notches of the CPU with the two alignment keys of the socket. 13 ASRock H61M-DG3/USB3 Motherboard - ASRock H61M-DG3/USB3 | Quick Installation Guide - Page 14
Please be noticed that this motherboard supports Combo Cooler Option (C.C.O.), which provides the flexible option to adopt three different CPU cooler types, Socket LGA 775, LGA 1155 and LGA 1156. The white throughholes are for Socket LGA 1155/1156 CPU fan. 14 ASRock H61M-DG3/USB3 Motherboard English - ASRock H61M-DG3/USB3 | Quick Installation Guide - Page 15
permanent damage to the motherboard and the DIMM if you force the DIMM into the slot at incorrect orientation. Step 3. Firmly insert the DIMM into the slot until the retaining clips at both ends fully snap back in place and the DIMM is properly seated. 15 ASRock H61M-DG3/USB3 Motherboard English - ASRock H61M-DG3/USB3 | Quick Installation Guide - Page 16
that you intend to use. Keep the screws for later use. Step 4. Align the card connector with the slot and press firmly until the card is completely seated on the slot. Step 5. Fasten the card to the chassis with screws. Step 6. Replace the system cover. 16 ASRock H61M-DG3/USB3 Motherboard English - ASRock H61M-DG3/USB3 | Quick Installation Guide - Page 17
default profile, 1394 GUID and MAC address will be cleared only if the CMOS battery is removed. If you clear the CMOS, the case open may be detected. Please adjust the BIOS option "Clear Status" to clear the record of previous chassis intrusion status. English 17 ASRock H61M-DG3/USB3 Motherboard - ASRock H61M-DG3/USB3 | Quick Installation Guide - Page 18
are two USB 2.0 headers on this motherboard. Each USB 2.0 header can support two USB 2.0 ports. Besides two default USB 3.0 ports on the I/O panel, there is one USB 3.0 header on this motherboard. This USB 3.0 header can support two USB 3.0 ports. English 1 18 ASRock H61M-DG3/USB3 Motherboard - ASRock H61M-DG3/USB3 | Quick Installation Guide - Page 19
header according to the pin assignments below. Note the positive and negative pins before connecting the cables. PWRBTN (Power Switch): Connect to the power switch on the chassis front panel. You may configure the way to turn off your system using the power switch. 19 ASRock H61M-DG3/USB3 Motherboard - ASRock H61M-DG3/USB3 | Quick Installation Guide - Page 20
Fan) support, the 3-Pin CPU fan still can work successfully even without the fan speed control function. If you plan to connect the 3-Pin CPU fan to the CPU fan connector on this motherboard, please connect it to Pin 1-3. Pin 1-3 Connected 3-Pin Fan Installation English 20 ASRock H61M-DG3/USB3 - ASRock H61M-DG3/USB3 | Quick Installation Guide - Page 21
. Chassis Intrusion Header (2-pin CI1) (see p.2, No. 22) 1 GND Signal This motherboard supports CASE OPEN detection feature that detects if the chassis cover has been removed. This feature requires a chassis with chassis intrusion detection design. English 21 ASRock H61M-DG3/USB3 Motherboard - ASRock H61M-DG3/USB3 | Quick Installation Guide - Page 22
NCQ function STEP 1: Set up UEFI. A. Enter UEFI SETUP UTILITY Advanced screen Storage Configuration. B. Set the option "SATA Mode Selection" to [IDE]. STEP 2: Install Windows® 7 / 7 64-bit / VistaTM / VistaTM 64-bit OS on your system. 22 ASRock H61M-DG3/USB3 Motherboard English - ASRock H61M-DG3/USB3 | Quick Installation Guide - Page 23
-ROM drive. It will display the Main Menu automatically if "AUTORUN" is enabled in your computer. If the Main Menu does not appear automatically, locate and double-click on the file "ASSETUP.EXE" from the BIN folder in the Support CD to display the menus. 23 ASRock H61M-DG3/USB3 Motherboard English - ASRock H61M-DG3/USB3 | Quick Installation Guide - Page 24
ASRock H61M-DG3/USB3 Motherboard (Micro ATX-Formfaktor: 22.6 cm x 17.3 cm; 8.9 Zoll x 6.8 Zoll) ASRock H61M-DG3/USB3 Schnellinstallationsanleitung ASRock H61M-DG3/USB3 Support-CD Zwei Serial ATA (SATA) -Datenkabel (optional) Ein I/O Shield ASRock erinnert... Zur besseren Leistung unter Windows - ASRock H61M-DG3/USB3 | Quick Installation Guide - Page 25
Intel® Sandy BridgeProzessor - Pixel Shader 5.0, DirectX 11 mit Intel® Ivy Bridge-Prozessor, Pixel Shader 4.1, DirectX 10.1 mit Intel® Sandy BridgeProzessor - Maximal gemeinsam genutzter Speicher 1760MB mit Intel® Ivy Bridge-Prozessor. Maximal gemeinsam genutzter 25 ASRock H61M-DG3/USB3 Motherboard - ASRock H61M-DG3/USB3 | Quick Installation Guide - Page 26
x1 Gigabit LAN 10/100/1000 Mb/s - Realtek SPEED LED) - HD Audiobuchse: Audioeingang / Lautsprecher vorne / Mikrofon - 2 x USB 3.0-Ports an der Rückseite durch Etron EJ188H, unterstützt USB 1.1/2.0/3.0 mit bis zu 5 Gb/s - 1 x USB 3.0-Header (unterstützt zwei USB ASRock H61M-DG3/USB3 Motherboard - ASRock H61M-DG3/USB3 | Quick Installation Guide - Page 27
USB 3.0-Anschlüsse) BIOS - 32Mb AMI BIOS - AMIs Legal BIOS UEFI mit GUI-Unterstützung - Unterstützung für "Plug and Play" - ACPI 1.1-Weckfunktionen - JumperFree-Übertaktungstechnologie - SMBIOS 2.3.1 - IGPU, DRAM, PCH, CPU : http://www.asrock.com Deutsch 27 ASRock H61M-DG3/USB3 Motherboard - ASRock H61M-DG3/USB3 | Quick Installation Guide - Page 28
das CMOS allerdings nicht direkt nach der BIOS-Aktualisierung löschen. Wenn Sie das CMOS nach Abschluss der BIOS-Aktualisierung löschen müssen, fahren Sie zuerst Profil, 1394 GUID und MAC-Adresse nur gelöscht werden, wenn die CMOS-Batterie entfernt wird. Deutsch 28 ASRock H61M-DG3/USB3 Motherboard - ASRock H61M-DG3/USB3 | Quick Installation Guide - Page 29
Motherboard unreparierbar beschädigt! Seriell-ATAII-Anschlüsse (SATA2_0: siehe S.2 - No. 10) USB 2.0-Ports an den I/O-Anschlüssen befinden sich zwei USB 2.0Anschlussleisten am Motherboard. Pro USB 2.0Anschlussleiste werden zwei USB 2.0-Ports unterstützt. Deutsch 29 ASRock H61M-DG3/USB3 Motherboard - ASRock H61M-DG3/USB3 | Quick Installation Guide - Page 30
auf „FrontMic" (Vorderes Mikrofon). Bei den Betriebssystemen Windows® 7 / 7 64 Bit / VistaTM / VistaTM 64 Bit: Wählen Sie im Realtek-Bedienfeld die „FrontMic" (Vorderes Mikrofon)Registerkarte. Passen Sie die „Recording Volume" (Aufnahmelautstärke) an. 30 ASRock H61M-DG3/USB3 Motherboard Deutsch - ASRock H61M-DG3/USB3 | Quick Installation Guide - Page 31
Kabel- und Pinbelegung korrekt übereinstimmen. Gehäuselautsprecher-Header (4-pin SPEAKER1) (siehe S.2 - No. 13) Schließen Sie den Gehäuselautsprecher an diesen Header an. Deutsch 31 ASRock H61M-DG3/USB3 Motherboard - ASRock H61M-DG3/USB3 | Quick Installation Guide - Page 32
werden; auch ohne Geschwindigkeitsregulierung. Wenn Sie einen dreipoligen CPU-Lüfter an den CPU-Lüferanschluss dieses Motherboards anschließen möchten, verbinden Sie ihn bitte mit Bitte schließen Sie an diesen Anschluss die ATX 12V Stromversorgung an. Deutsch 32 ASRock H61M-DG3/USB3 Motherboard - ASRock H61M-DG3/USB3 | Quick Installation Guide - Page 33
tzen. Dieses Motherboard unterstützt die GEHÄUSE OFFENErkennungsfunktion,die feststellt, ob dieGehäuseabdeckung entferntwurde. Für diese Funktion istein Gehäuse erforderlich, dasmit einem Design zur Erkennung von Gehäuseeindringversuchenausgestattet ist. Deutsch 33 ASRock H61M-DG3/USB3 Motherboard - ASRock H61M-DG3/USB3 | Quick Installation Guide - Page 34
der Support-CD, um die Menüs aufzurufen. Das Setup-Programm soll es Ihnen so leicht wie möglich machen. Es ist menügesteuert, d.h. Sie können in den verschiedenen Untermenüs Ihre Auswahl treffen und die Programme werden dann automatisch installiert. 34 ASRock H61M-DG3/USB3 Motherboard Deutsch - ASRock H61M-DG3/USB3 | Quick Installation Guide - Page 35
sous Windows® 7 / 7 64 bits / VistaTM / VistaTM 64 bits, il est recommandé de paramétrer l'option BIOS dans Configuration de stockage en mode AHCI. Pour plus de détails sur l'installation BIOS, référez-vous au "Mode d'emploi" sur votre CD de support. 35 ASRock H61M-DG3/USB3 Motherboard Fran - ASRock H61M-DG3/USB3 | Quick Installation Guide - Page 36
, Intel® Clear Video HD Technology, Intel® HD Graphics 2000/3000, Intel® Advanced Vector Extensions (AVX) avec processeur Intel® Sandy Bridge CPU - Pixel Shader 5.0, DirectX 11 avec CPU Intel® Ivy Bridge, Pixel Shader 4.1, DirectX 10.1 avec CPU Intel® Sandy 36 ASRock H61M-DG3/USB3 Motherboard Fran - ASRock H61M-DG3/USB3 | Quick Installation Guide - Page 37
charge 2 ports USB 3.0) par Etron EJ188H, prend en charge USB 1.1/2.0/3.0 jusqu'à 5 Gb/s - 4 x connecteurs SATA2, prennent en charge un taux de transfert de données pouvant aller jusqu'à 3.0Go/s, supporte NCQ, AHCI et « Hot Plug » (Branche ment à chaud) 37 ASRock H61M-DG3/USB3 Motherboard Français - ASRock H61M-DG3/USB3 | Quick Installation Guide - Page 38
USB 3.0 supplémentaires) BIOS - 32Mb BIOS AMI - AMI UEFI Legal BIOS avec support GUI - Support du "Plug and Play" - Compatible pour événements de réveil ACPI 1.1 - Gestion jumperless - Support SMBIOS 2.3.1 - IGPU, DRAM, PCH, CPU www.asrock.com Français 38 ASRock H61M-DG3/USB3 Motherboard - ASRock H61M-DG3/USB3 | Quick Installation Guide - Page 39
après avoir mis à jour le BIOS. Si vous avez besoin d'effacer le CMOS après avoir mis à jour le BIOS, vous devez allumer en premier le syst de l'utilisateur, 1394 GUID et l'adresse MAC seront effacés seulement si la batterie du CMOS est enlevée. Français 39 ASRock H61M-DG3/USB3 Motherboard - ASRock H61M-DG3/USB3 | Quick Installation Guide - Page 40
) Toute cote du cable de data SATA peut etre connecte au disque 10 P-10 USB_PWR A côté des quatre ports USB 2.0 par défaut sur le panneau E/S, il y a deux embases USB 2.0 sur cette carte mère. Chaque embase USB 2.0 peut prendre en charge 2 ports USB 2.0. Français 40 ASRock H61M-DG3/USB3 Motherboard - ASRock H61M-DG3/USB3 | Quick Installation Guide - Page 41
correctement. Veuillez suivre les instructions dans notre manuel et le manuel Windows® 7 / 7 64 bits / VistaTM / VistaTM 64 bits : Allez sur l'onglet "FrontMic" (Micro avant) sur le Panneau de contrôle Realtek. Ajustez "Recording Volume" (Volume d'enregistrement). 41 ASRock H61M-DG3/USB3 Motherboard - ASRock H61M-DG3/USB3 | Quick Installation Guide - Page 42
haut-parleur de châssis (SPEAKER1 br. 4) (voir p.2 No. 13) Veuillez connecter le haut-parleur de châssis sur cet en-tête. Français 42 ASRock H61M-DG3/USB3 Motherboard - ASRock H61M-DG3/USB3 | Quick Installation Guide - Page 43
de terre. Bien que cette carte mère offre un support de (Ventilateur silencieux ventilateur de CPU à 4 broches , le ventilateur de CPU à 3 broches peut bien fonctionner même sans la fonction unité d'alimentation électrique ATX 12V sur ce connecteur. Français 43 ASRock H61M-DG3/USB3 Motherboard - ASRock H61M-DG3/USB3 | Quick Installation Guide - Page 44
tout retrait du capot duchâssis. Cette fonctionnécessite un châssis qui a étéconçu pour la détectiond'intrusion dans le châssis. Français 44 ASRock H61M-DG3/USB3 Motherboard - ASRock H61M-DG3/USB3 | Quick Installation Guide - Page 45
le BIOS, veuillez consulter le Guide de l'utilisateur (fichier PDF) dans le CD technique. 3. Informations sur le CD de support Cette carte mère supporte divers systèmes d'exploitation Microsoft® Windows®: 7 et doublecliquez dessus pour afficher les menus. 45 ASRock H61M-DG3/USB3 Motherboard Français - ASRock H61M-DG3/USB3 | Quick Installation Guide - Page 46
/ VistaTM 64-bit, si consiglia di impostare l'opzione BIOS in Storage Configuration (Configurazione di archiviazione) sulla modalità AHCI. Per l'impostazione BIOS, fare riferimento a "User Manual" (Manuale dell'utente) nel CD di supporto per dettagli. 46 ASRock H61M-DG3/USB3 Motherboard Italiano - ASRock H61M-DG3/USB3 | Quick Installation Guide - Page 47
CPU Intel® Ivy Bridge, Pixel Shader 4.1, DirectX 10.1 con CPU Intel® Sandy Bridge - Memoria massima condivisa 1760MB con CPU Intel® Ivy Bridge. Memoria massima condivisa 1759MB con CPU Intel® Sandy Bridge. - Uscita VGA Doppia: supporto porte DVI-D e D-Sub tramite 47 ASRock H61M-DG3/USB3 Motherboard - ASRock H61M-DG3/USB3 | Quick Installation Guide - Page 48
Codec) - PCIE x1 Gigabit LAN 10/100/1000 Mb/s - Realtek RTL8111E - Supporta Wake- CPU ventola (4-pin) - 1 x Connettore Chassis ventola (4-pin) - 1 x Connettore Alimentazione ventola (3-pin) - 24-pin collettore alimentazione ATX - 4-pin connettore ATX 12V Italiano 48 ASRock H61M-DG3/USB3 Motherboard - ASRock H61M-DG3/USB3 | Quick Installation Guide - Page 49
- FCC, CE, WHQL - Predisposto ErP/EuP (è necessaria l'alimentazione predisposta per il sistema ErP/EuP) * Per ulteriori informazioni, prego visitare il nostro sito internet: http://www.asrock.com Italiano 49 ASRock H61M-DG3/USB3 Motherboard - ASRock H61M-DG3/USB3 | Quick Installation Guide - Page 50
CMOS subito dopo avere aggiornato il BIOS. Se si deve azzerare la CMOS quando si è completato l'aggiornamento del BIOS, è necessario per prima cosa avviare predefinito, 1394 GUID e indirizzo MAC saranno cancellati solo se è rimossa la batteria della CMOS. Italiano 50 ASRock H61M-DG3/USB3 Motherboard - ASRock H61M-DG3/USB3 | Quick Installation Guide - Page 51
madre! Connettori Serial ATAII (SATA2_0: vedi p.2 Nr. 10) (SATA2_1: vedi p.2 Nr. 8) (SATA2_2: vedi USB 2.0 predefinite nel pannello I/O, la scheda madre dispone di due intestazioni USB 2.0. Ciascuna intestazione USB 2.0 supporta due porte USB 2.0. Italiano 51 ASRock H61M-DG3/USB3 Motherboard - ASRock H61M-DG3/USB3 | Quick Installation Guide - Page 52
istruzioni del nostro manuale e del manuale del telaio per Windows® 7 / 7 64-bit / VistaTM / VistaTM 64-bit: Andare alla scheda "FrontMic" (Microfono frontale) del pannello di controllo Realtek. Regolare la voce "Recording Volume" (Volume registrazione). 52 ASRock H61M-DG3/USB3 Motherboard - ASRock H61M-DG3/USB3 | Quick Installation Guide - Page 53
e dei pin sia fatta corrispondere in modo appropriato. Collettore casse telaio (4-pin SPEAKER1) (vedi p.2 Nr. 13) Collegare le casse del telaio a questo collettore. Italiano 53 ASRock H61M-DG3/USB3 Motherboard - ASRock H61M-DG3/USB3 | Quick Installation Guide - Page 54
Sebbene la presente scheda madre disponga di un supporto per ventola CPU a 4 piedini (ventola silenziosa), la ventola CPU a 3 piedini è in grado di funzionare anche senza la funzione p.2 Nr. 1) Collegare un alimentatore ATX 12 V a questo connettore. Italiano 54 ASRock H61M-DG3/USB3 Motherboard - ASRock H61M-DG3/USB3 | Quick Installation Guide - Page 55
funzione di rilevamento del CASE APERTOche rileva che il coperchio dellochassis è stato rimosso.Questa funzione richiede unochassis con struttura dirilevamento di intrusione dellochassis. Italiano 55 ASRock H61M-DG3/USB3 Motherboard - ASRock H61M-DG3/USB3 | Quick Installation Guide - Page 56
BIOS, fare riferimento al Manuale dell'Utente (PDF file) contenuto nel cd di supporto. 3. Software di supporto e informazioni su CD Questa scheda madre supporta vari sistemi operativi Microsoft® Windows®: e cliccare due volte per visualizzare i menù. 56 ASRock H61M-DG3/USB3 Motherboard Italiano - ASRock H61M-DG3/USB3 | Quick Installation Guide - Page 57
ón rápida de ASRock H61M-DG3/USB3 CD de soporte de ASRock H61M-DG3/USB3 Dos cables de datos Serial ATA (SATA) (Opcional) Una protección I/O ASRock le recuerda... Para mejorar el rendimiento en Windows® 7 / 7 64 bits / VistaTM / VistaTM 64 bits, es recomendable establecer la opción del BIOS de la con - ASRock H61M-DG3/USB3 | Quick Installation Guide - Page 58
Intel® Sandy Bridge - 1760MB de Memoria máxima compartida con la CPU Intel® Ivy Bridge. 1759MB de Memoria máxima compartida con la CPU Intel® Sandy Bridge. - Salida de VGA dual: apoya los puertos de DVI-D y de D-Sub por los reguladores independientes de la exhibición ASRock H61M-DG3/USB3 Motherboard - ASRock H61M-DG3/USB3 | Quick Installation Guide - Page 59
PCIE x1 Gigabit LAN 10/100/1000 Mb/s - Realtek RTL8111E - Soporta Wake-On-LAN - Admite detección de conexión de cable LAN - Compatible con CPU (4-pin) - 1 x Conector de ventilador de chasis (4-pin) - 1 x Conector de ventilador de alimentacion (3-pin) Español 59 ASRock H61M-DG3/USB3 Motherboard - ASRock H61M-DG3/USB3 | Quick Installation Guide - Page 60
requiere una fuente de alimentación que cumpla con la directiva ErP/EuP) * Para más información sobre los productos, por favor visite nuestro sitio web: http://www.asrock.com Español 60 ASRock H61M-DG3/USB3 Motherboard - ASRock H61M-DG3/USB3 | Quick Installation Guide - Page 61
, apague el equipo y desenchufe el cable de alimentación de la toma de actualizar el BIOS. Si necesita borrar la memoria CMOS justamente después de actualizar el BIOS, debe GUID 1394 y la dirección MAC solamente se borrará si la batería CMOS se quita. Español 61 ASRock H61M-DG3/USB3 Motherboard - ASRock H61M-DG3/USB3 | Quick Installation Guide - Page 62
p.2, N. 16) USB_PWR P-9 P+9 GND DUMMY 1 GND P+8 P-8 USB_PWR Además de cuatro puertos USB 2.0 predeterminados en el panel de E/S, hay dos bases de conexiones USB 2.0 en esta placa base. Cada una de estas bases de conexiones admite dos puertos USB 2.0. Español 62 ASRock H61M-DG3/USB3 Motherboard - ASRock H61M-DG3/USB3 | Quick Installation Guide - Page 63
" (Micrófono frontal). En sistemas operativos Windows® 7 / 7 64-bit / VistaTM / VistaTM 64-bit: Acceda a la ficha "FrontMic" (Micrófono frontal) del panel de control Realtek. Ajuste la posición del control deslizante "Recording Volume" (Volumen de grabación). 63 ASRock H61M-DG3/USB3 Motherboard - ASRock H61M-DG3/USB3 | Quick Installation Guide - Page 64
panel frontal del chasis a esta cabecera, asegúrese de que las asignaciones de cables y las asignaciones de contactos coincidan correctamente. Cabezal del altavoz del chasis (4-pin SPEAKER1) (vea p.2, N. 13) Conecte el altavoz del chasis a su cabezal. 64 ASRock H61M-DG3/USB3 Motherboard Español - ASRock H61M-DG3/USB3 | Quick Installation Guide - Page 65
ventilador de la CPU (4-pin CPU_FAN1) (vea p.2, N. 3) 4 3 2 1 GND +12V CPU_FAN_SPEED FAN_SPEED_CONTROL Conecte el cable del ventilador de la CPU a este conector y haga coincidir el cable negro con el ón de una Fuente de Alimentación ATX de 20 Pins 1 13 Español 65 ASRock H61M-DG3/USB3 Motherboard - ASRock H61M-DG3/USB3 | Quick Installation Guide - Page 66
si se haretirado la cubierta del chasis. Dicha función requiere unchasis con diseño específicopara la detección de intrusiónen el chasis. Español 66 ASRock H61M-DG3/USB3 Motherboard - ASRock H61M-DG3/USB3 | Quick Installation Guide - Page 67
figurar la BIOS, por favor refiérase al Manual del Usuario (archivo PDF) contenido en el CD. 3. Información de Software Support CD Esta placa-base soporta diversos tipos de sistema operativo Windows®: 7 / el archivo "ASSETUP.EXE" para iniciar la instalación. 67 ASRock H61M-DG3/USB3 Motherboard Español - ASRock H61M-DG3/USB3 | Quick Installation Guide - Page 68
/index.asp 1.1 ASRock H61M-DG3/USB3 Micro ATX: 8,9 x 6,8 22,6 x 17,3 см) ASRock H61M-DG3/USB3 ASRock H61M-DG3/USB3 2 x Serial ATA (SATA 1 x I/O ASRock Windows® 7 / 7 64-bit / VistaTM / VistaTM 64-bit BIOS Storage Configuration AHCI BIOS 68 ASRock H61M-DG3/USB3 Motherboard - ASRock H61M-DG3/USB3 | Quick Installation Guide - Page 69
(AVX Intel® Sandy Bridge - Pixel Shader 5.0, DirectX 11 Intel® Ivy Bridge, Pixel Shader 4.1, DirectX 10.1 Intel® Sandy Bridge 1760 Intel® Ivy Bridge 1759 Intel® Sandy Bridge VGA DVI-D и D-Sub DVI 1920х1200 @ 60 D-Sub 2048х1536 @ 75 HDCP DVI 69 ASRock H61M-DG3/USB3 Motherboard - ASRock H61M-DG3/USB3 | Quick Installation Guide - Page 70
x CPU FAN (4 - 1 x Chassis FAN (4 - 1 x Power FAN (3 - 24 ATX - 4 ATX 12 В - 2 x USB 2.0 4 USB 2.0 - 1 x USB 3.0 2 USB 3.0) BIOS - 32Mb AMI BIOS - AMI UEFI Legal BIOS Plug and Play" - ACPI 1.1 SMBIOS 2.3.1 70 ASRock H61M-DG3/USB3 Motherboard - ASRock H61M-DG3/USB3 | Quick Installation Guide - Page 71
bit / VistaTM 64 VistaTM / XP / XP 64-bit - FCC, CE, WHQL ErP/EuP Ready ErP/EuP) http://www.asrock.com 1.3 short open 3 1 и 2 CMOS (CLRCMOS1, 3 2, п. 21) CMOS CLRCMOS1 CMOS 15 5 2 и 3 CLRCMOS1 71 ASRock H61M-DG3/USB3 Motherboard - ASRock H61M-DG3/USB3 | Quick Installation Guide - Page 72
Serial ATA (SATA SATA2_3 SATA2_1 SATA2_2 SATA2_0 Serial ATAII SATAII SATA 3,0 SATA / SATAII SATAII USB 2.0 (9 USB6_7 2, п. 15) (9 USB8_9 2, п. 16) 72 USB_PWR P-9 P+9 GND DUMMY 1 GND P+8 P-8 USB_PWR USB 2.0 USB 2.0 USB 2.0 USB 2.0. ASRock H61M-DG3/USB3 Motherboard - ASRock H61M-DG3/USB3 | Quick Installation Guide - Page 73
IntA_P1_SSRXIntA_P1_SSRX+ GND IntA_P1_SSTXIntA_P1_SSTX+ GND IntA_P1_DIntA_P1_D+ DUMMY USB 3.0 USB 3.0 USB 3.0 USB 3.0. 25 LPT1) (см. cтр. C Ground (GND Ground (GND). D MIC_RET и OUT_RET HD AC'97 E Windows® XP / XP 64 Mixer Recorder FrontMic 73 ASRock H61M-DG3/USB3 Motherboard - ASRock H61M-DG3/USB3 | Quick Installation Guide - Page 74
Для ОС Windows® 7 / 7 64-бита, VistaTM / VistaTM 64 FrontMic Realtek Recording Volume 9 PANEL1 2, п. 14) PWRBTN RESET PLED S1 S3 или S4 S5). HDLED 74 ASRock H61M-DG3/USB3 Motherboard - ASRock H61M-DG3/USB3 | Quick Installation Guide - Page 75
(3 PWR_FAN1 2, п. 25) 4 CPU_FAN1 2, п. 3) 4 3 2 1 GND +12V CPU_FAN_SPEED FAN_SPEED_CONTROL 4 3 3 1-3. 1-3 3 ATX (24 ATXPWR1 2, п. 4) 12 24 ATX. 1 13 12 ивает 24 ATX 20 ATX 20 ATX 1 13. 20 ATX 1 ASRock H61M-DG3/USB3 Motherboard 24 13 75 - ASRock H61M-DG3/USB3 | Quick Installation Guide - Page 76
12V-ATX (4 ATX12V1 2, п. 1) COM 9 COM1 2, п. 17) ATX 12 COM COM. 2 CI1 2, п. 22) 1 GND Signal 76 ASRock H61M-DG3/USB3 Motherboard - ASRock H61M-DG3/USB3 | Quick Installation Guide - Page 77
BIOS Setup F2> или + + - ASRock H61M-DG3/USB3 | Quick Installation Guide - Page 78
em Windows® 7 / 7 64-bit / VistaTM / VistaTM 64-bit, recomendamos que defina a opção Configuração de Armazenamento na BIOS para o modo AHCI. Para mais detalhes acerca da configuração da BIOS consulte o "Manual de utilizador" no nosso CD de suporte. 78 ASRock H61M-DG3/USB3 Motherboard Portugu - ASRock H61M-DG3/USB3 | Quick Installation Guide - Page 79
4.1, DirectX 10.1 com processadores Intel® Sandy Bridge CPU - Memória partilhada máxima 1760MB com CPU Ivy Bridge da Intel®. Memória partilhada máxima 1759MB com CPU Sandy Bridge da Intel®. - Porta de saída VGA dupla: suporta portas DVI-D e D-Sub 79 ASRock H61M-DG3/USB3 Motherboard Português - ASRock H61M-DG3/USB3 | Quick Installation Guide - Page 80
udio Realtek ALC662) - PCIE x1 Gigabit LAN 10/100/1000 Mb/s - Realtek RTL8111E - Suporta Wake-On-LAN CPU (4 pinos) - 1 x Conector do ventilador da chassis (4 pinos) - 1 x Conector do ventilador da energia (3 pinos) - Conector de força do ATX de 24 pinos Português 80 ASRock H61M-DG3/USB3 Motherboard - ASRock H61M-DG3/USB3 | Quick Installation Guide - Page 81
, WHQL - "ErP/EuP Ready" (é necessária alimentação eléctrica "ErP/ EuP Ready") * Para informações mais detalhadas por favor visite o nosso sítio Web: http://www.asrock.com Português 81 ASRock H61M-DG3/USB3 Motherboard - ASRock H61M-DG3/USB3 | Quick Installation Guide - Page 82
usando um jumper. Por favor lembrese de remover o jumper depois de limpar o COMS. Se precisar limpar o CMOS ao concluir a atualização do BIOS, deverá reiniciar o sistema primeiro e, em seguida, desligá-lo antes de executar a ação de limpeza o CMOS. Português 82 ASRock H61M-DG3/USB3 Motherboard - ASRock H61M-DG3/USB3 | Quick Installation Guide - Page 83
Conectores ATAII Serial (SATA2_0: veja a folha 2, No. 10) (SATA2_1: veja a folha 2, No. 8) (SATA2_2: USB 3.0 por defeito no painel de entrada/saída, há um ligações USB 3.0 nesta placa-mãe. Cada ligação USB 3.0 pode suportar dois portas USB 3.0. 1 Português 83 ASRock H61M-DG3/USB3 Motherboard - ASRock H61M-DG3/USB3 | Quick Installation Guide - Page 84
para funcionar correctamente. Siga s instruções que aparecem no manual e no manual do chassis para instalar o sistema. 2. Se utilizar o E. Para activar o microfone frontal. Para os Sistemas Operativos Windows® XP / XP 64 bits: Seleccione "Misturador". Seleccione " ASRock H61M-DG3/USB3 Motherboard - ASRock H61M-DG3/USB3 | Quick Installation Guide - Page 85
a folha 2, No. 25) Ligue o alto-falante do chassi neste conector. Ligue o cabo do ventilador neste conector, coincidindo o fio preto com o pino de aterramen to. Português 85 ASRock H61M-DG3/USB3 Motherboard - ASRock H61M-DG3/USB3 | Quick Installation Guide - Page 86
de controlo de velocidade da ventoinha. Se pretender ligar uma ventoinha de 3 pinos para CPU ao conector de ventoinha do CPU nesta placa-mãe, por favor, ligue-a aos pinos 1-3. Pinos 1-3 ligados Instalação de é usado para suportar um módulo de porta COM. Português 86 ASRock H61M-DG3/USB3 Motherboard - ASRock H61M-DG3/USB3 | Quick Installation Guide - Page 87
a função de detecção de ABERTURA da CAIXA quedetecta se a tampa do chassisfoi removida. Esta funçãorequer um chassis com designde detecção de intrusão. Português 87 ASRock H61M-DG3/USB3 Motherboard - ASRock H61M-DG3/USB3 | Quick Installation Guide - Page 88
de Configuração do BIOS, consulte o Manual do Usuário (arquivo PDF) no CD de suporte. 3. Informações do CD de Suporte Esta placa Mãe suporta vários sistemas operacionais: Microsoft® Windows®: 7 / 7 o CD e execute o "ASSETUP.EXE" localizado na pasta BIN. 88 ASRock H61M-DG3/USB3 Motherboard Português - ASRock H61M-DG3/USB3 | Quick Installation Guide - Page 89
ASRock H61M-DG3/USB3 Hızlı Takma Kılavuzu ASRock H61M-DG3/USB3 Destek CD'si 2 x Seri ATA (SATA) Veri Kablosu (İsteğe Bağlı) 1 x G/Ç Panel Kalkanı ASRock Size Şunu Hatırlatır... Windows® 7 / 7 64-bit / VistaTM / VistaTM 64-bit ile daha iyi performans elde etmek için, Depolama Konfigürasyonundaki BIOS - ASRock H61M-DG3/USB3 | Quick Installation Guide - Page 90
ile Maks. paylaюэlan bellek 1760 MB. Intel® Sandy Bridge İşlemci ile Maks. paylaюэlan bellek 1759 MB. - Çift VGA Çıkış: desteği DVI-D ve bağımsız görüntü denetleyiciler tarafından D-Sub bağlantı noktaları - 60Hz'de 1920x1200'e kadar maks. зцzьnьrlьkle DVI'yэ ASRock H61M-DG3/USB3 Motherboard Türkçe - ASRock H61M-DG3/USB3 | Quick Installation Guide - Page 91
pinos) - 24 pin ATX güç konektörü - 4 pin 12V güç konektörü - Ön panel ses konektörü - 2 x USB 2.0 fiş (4 USB 2.0 portu destekler) - 1 x USB 3.0 fiş (2 USB 3.0 portu destekler) - 32 Mb AMI BIOS - GUI destekli AMI UEFI Geçerli BIOS - "Tak Çalıştır"ı destekler 91 ASRock H61M-DG3/USB3 Motherboard Türkçe - ASRock H61M-DG3/USB3 | Quick Installation Guide - Page 92
- CPU/Kasa Fan Çoklu-Hız Kontrolü - KASA AÇIK algılaması - Voltaj İzleme: +12V, +5V, +3,3V, CPU Vcore İS - Microsoft® Windows® 7 BIOS'u güncelledikten hemen sonra lütfen CMOS'u temizlemeyin. BIOS'u güncellemeyi tamamladığınızda CMOS'u temizlemeniz gerekirse, 92 ASRock H61M-DG3/USB3 Motherboard - ASRock H61M-DG3/USB3 | Quick Installation Guide - Page 93
profili, 1394 GUID ve MAC adresinin yaln (SATA2_0: bkz. s.2, No. 10) (SATA2_1: bkz. s.2, No USB 3.0 bağlantı noktasının yanı sıra, bu ana kart üzerinde bir adet USB 3.0 bağlantısı bulunur. Bu USB 3.0 bağlantısı iki adet USB 3.0 bağlantı noktasını destekleyebilir. 93 ASRock H61M-DG3/USB3 Motherboard - ASRock H61M-DG3/USB3 | Quick Installation Guide - Page 94
/ XP 64-bit İS için: "Karıştırıcı"yı seçin. "Kaydedici"yi seçin. Sonra "Ön Mikrofon"u tıklatın. Windows® 7 / 7 64-bit / VistaTM / VistaTM 64-bit İS için: Realtek Kontrol panelinde "Ön Mikrofon" Sekmesine gidin. ğlamadan önce pozitif ve negatif pinlere dikkat edin. 94 ASRock H61M-DG3/USB3 Motherboard - ASRock H61M-DG3/USB3 | Quick Installation Guide - Page 95
re bağlayın ve siyah kabloyu toprak pinine bağlayın. CPU Fan Konektörü (4-pinli CPU_FAN1) (bkz. s.2 No. 3) 4 3 2 1 GND +12V CPU_FAN_SPEED FAN_SPEED_CONTROL Lütfen fan kablolarını CPU fanına bu konektöre bağlayın ve siyah kabloyu toprak pinine bağlayın. Türkçe 95 ASRock H61M-DG3/USB3 Motherboard - ASRock H61M-DG3/USB3 | Quick Installation Guide - Page 96
hızı kontrol işlevi olmadan bile hala başarılı bir şekilde çalışabilir. 3-Pinli CPU fanı bu konektördeki CPU fan konektörüne bağlamayı planlıyorsanız, lütfen Pin 1-3'e bağlayın. Pin 1-3 Bağlı 3-Pinli , kasaya yetkisiz erişim tasarımına sahip bir kasa gerektirir. 96 ASRock H61M-DG3/USB3 Motherboard - ASRock H61M-DG3/USB3 | Quick Installation Guide - Page 97
Flash Bellek BIOS Ayarları Yardımcı Programını içerir. Bilgisayarı başlattığınızda, lütfen Otomatik Güç Sınaması (POST) sırasında BIOS Ayarları yardımcı programına girmek için veya tuşuna basın; aksi halde, POST test rutinlerine devam eder. BIOS 97 ASRock H61M-DG3/USB3 Motherboard Türkçe - ASRock H61M-DG3/USB3 | Quick Installation Guide - Page 98
카드와 CPU ASRock http://www.asrock.com www.asrock.com/support/index.asp 1.1 ASRock H61M-DG3/USB3 Micro ATX 8.9" x 6.8", 22.6 x 17.3 cm) ASRock H61M-DG3/USB3 ASRock H61M-DG3/USB3 지원 CD 시리얼 ATA (SATA 2 I/O 차폐 1 개 ASRock Windows® 7 / 7 64-비트 / VistaTM / VistaTM 64 Storage Configuration BIOS - ASRock H61M-DG3/USB3 | Quick Installation Guide - Page 99
5.0. Intel® Sandy Bridge CPU DirectX 10.1, Pixel Shader 4.1 - Intel® Ivy Bridge CPU 1760MB. Intel® Sandy Bridge CPU 1759MB. - 더블 VGA 수출 : DVI-D 와 D-Sub 1920x1200 @ 60Hz 까지 DVI 2048x1536 @ 75Hz 까지 D-Sub 지원 - DVI HDCP DVI 1080p Blu-ray (BD) / HD-DVD 99 ASRock H61M-DG3/USB3 Motherboard 한국어 - ASRock H61M-DG3/USB3 | Quick Installation Guide - Page 100
2 5Gb/s 의 USB 1.1/2.0/3.0 지원 - 4 개 의 SATA2 3.0Gb/s NCQ, AHCI 1 개 - COM 1 1 개 - CPU 1 개 (4 1 개 (4 1 개 (3 핀 ) - 24 핀 ATX 4 핀 ATX 12V USB 2.0 헤더 2 개 (4 USB 2.0 2개 ) - USB 3.0 헤더 1 개 (2 USB 3.0 2개 ) - 32Mb AMI BIOS - GUI AMI UEFI 적합형 BIOS ACPI 1.1 ASRock H61M-DG3/USB3 Motherboard - ASRock H61M-DG3/USB3 | Quick Installation Guide - Page 101
/XP 64 인증서 - FCC, CE, WHQL - ErP/EuP 지원 (ErP/EuP http://www.asrock.com 1.3 3 1-2 점퍼 세팅 CMOS 초기화 (CLRCMOS1, 3 2 21 CMOS 삭제 참고 : CLRCMOS1 CMOS 15 CLRCMOS1 의 핀 2 와 핀 3 을 5 BIOS CMOS BIOS CMOS CMOS CMOS 1394 GUID, MAC 101 ASRock H61M-DG3/USB3 Motherboard 한국어 - ASRock H61M-DG3/USB3 | Quick Installation Guide - Page 102
2 10 SATA2_1: 2 8 SATA2_2: 2 12 SATA2_3: 2 11 그림 SATA2_3 SATA2_2 SATA2_1 SATA2_0 설명 4 ATAII (SATA SATA SATA SATAII 3.0 Gb/s 시리얼 ATA(SATA SATA SATA / SATAII SATAII USB USB 3.0 1 개의 USB 3.0 USB 3.0 헤더는 2 개 의 USB 3.0 한 국 어 1 102 ASRock H61M-DG3/USB3 Motherboard - ASRock H61M-DG3/USB3 | Quick Installation Guide - Page 103
) 을 Ground (GND D. MIC_RET 및 OUT_RET 는 HD 이들을 AC'97 E. Windows® XP / XP 64 비트 OS "Mixer Recorder FrontMic Windows® 7 / 7 64 비트 / VistaTM / VistaTM 64 비트 OS 의 경우 : Realtek FrontMic Recording Volume (9 핀 PANEL1) (2 14 한국어 103 ASRock H61M-DG3/USB3 Motherboard - ASRock H61M-DG3/USB3 | Quick Installation Guide - Page 104
LED LED (4 핀 SPEAKER 1) (2 13 (4 핀 CHA_FAN1) (2 9 (3 핀 PWR_FAN1) (2 25 한 국 어 CPU (4 핀 CPU_FAN1) (2 3 4 3 2 1 GND +12V CPU_FAN_SPEED FAN_SPEED_CONTROL CPU 4 핀 CPU 3 핀 CPU CPU 3 핀 CPU 1-3 1-3 3 104 ASRock H61M-DG3/USB3 Motherboard - ASRock H61M-DG3/USB3 | Quick Installation Guide - Page 105
핀 ATX 12 24 종래의 20 핀 ATX 20 핀 ATX Pin 1 과 Pin 13 ATX 12V (4 핀 ATX12V1) (2 1 20 핀 ATX 1 13 ATX 12V (9 핀 COM1) (2 17 (2 핀 CI1) (2 22 1 GND Signal 한국어 105 ASRock H61M-DG3/USB3 Motherboard - ASRock H61M-DG3/USB3 | Quick Installation Guide - Page 106
2 POST F2> 또는 ++ - ASRock H61M-DG3/USB3 | Quick Installation Guide - Page 107
com/support/index.asp 1.1 ASRock H61M-DG3/USB3 Micro ATX 8.9-in x 6.8-in, 22.6 cm x 17.3 cm) ASRock H61M-DG3/USB3 ASRock H61M-DG3/USB3 CD 2 x ATA (SATA 1 x I/O ASRock Windows® 7 / 7 64-bit / VistaTM / VistaTM 64-bit BIOS AHCI B I O S C D 日本語 107 ASRock H61M-DG3/USB3 Motherboard - ASRock H61M-DG3/USB3 | Quick Installation Guide - Page 108
、 Intel® InTruTM 3D、Intel® Clear Video HD Technology、 Intel® HD Graphics 2000/3000、Intel® Advanced Vector Extensions (AVX) - Intel® Ivy Bridge CPU DirectX 11、Pixel Shader 5.0。Intel® Sandy Bridge CPU DirectX 10.1、Pixel Shader 4.1。 - Intel® Ivy Bridge CPU 1760MB。 ASRock H61M-DG3/USB3 Motherboard - ASRock H61M-DG3/USB3 | Quick Installation Guide - Page 109
/s 1 x USB 3.0 ヘッダ (USB 3.0 ポート 2 基対応 ) (Etron EJ188H)、USB 1.1/2.0/3.0 に最高 5Gb/s 4 x SATA2 3.0Gb NCQ、AHCI および "Hot Plug x 1 - COM x 1 x 1 - CPU x 1 (4 x 1 (4 x 1 (3 ピン ) - 24 ピン ATX 4 ピン 12V USB 2.0 USB 2.0 用 4 x 2 - USB 3.0 USB 3.0 用 2 x 1 109 ASRock H61M-DG3/USB3 Motherboard 日本語 - ASRock H61M-DG3/USB3 | Quick Installation Guide - Page 110
認証 - FCC, CE, Microsoft® WHQL - ErP/EuP 対応(ErP/EuP http://www.asrock.com 1.3 1-2 CMOS CLRCMOS1 21 参照) 設定 説明 CMOS の消去 注 : CLRCMOS1 CMOS 15 CLRCMOS1 のピン 2 とピン 3 を 5 BIOS CMOS BIOS CMOS CMOS 1394 GUID と MAC CMOS 110 ASRock H61M-DG3/USB3 Motherboard 日本語 - ASRock H61M-DG3/USB3 | Quick Installation Guide - Page 111
10 を参照 SATA2_1: ページ 2 8 を参照 SATA2_2: ページ 2 12 を参照 SATA2_3: ページ 2 11 を参照 SATA2_3 SATA2_2 SATA2_1 SATA2_0 これら 4 ATAII (SATAII SATA SATAII 3.0 Gb/s です。 ATA(SATA SATA SATA /SATAII SATAII USB USB 3.0 1 つの USB 3.0 USB 3.0 2 つの USB 3.0 1 日本語 111 ASRock H61M-DG3/USB3 Motherboard - ASRock H61M-DG3/USB3 | Quick Installation Guide - Page 112
GND す。 D. MIC_RET と OUT_RET AC'97 E. Windows® XP / XP 64-bit OS の場合 : "Mixer Recorder FrontMic Windows® 7 / 7 64-bit / VistaTM / VistaTM 64-bit OS の場合 : Realtek FrontMic Recording Volume 9 ピン PANEL1 14 を参照 日本語 112 ASRock H61M-DG3/USB3 Motherboard - ASRock H61M-DG3/USB3 | Quick Installation Guide - Page 113
RESET PLED LED LED LED S1 S3 または S4 S5 LED HDLED LED LED LED LED LED 4 ピン SPEAKER1 13 を参照 4 ピン CHA_FAN1 9 を参照 (3 ピン PWR_FAN1 25 を参照 日本語 CPU 4 ピン CPU_FAN1 3 を参照 4 3 2 1 GND +12V CPU_FAN_SPEED FAN_SPEED_CONTROL CPU ASRock H61M-DG3/USB3 Motherboard 113 - ASRock H61M-DG3/USB3 | Quick Installation Guide - Page 114
3 ATX 24 ピン ATXPWR1 4 を参照 12 24 ATX 1 13 24 ピン ATX 従来の 20 ピン ATX 12 24 20 ピン ATX 1 13 ATX 12V 4 ピン ATX12V1 1 を参照 9 ピン COM1 17 を参照 20 ピン ATX 1 13 CPU に Vcore ATX 12V この COM1 日本語 2 ピン CI1 22 を参照 1 GND Signal 114 ASRock H61M-DG3/USB3 Motherboard - ASRock H61M-DG3/USB3 | Quick Installation Guide - Page 115
2.BIOS 情報 BIOS POST F2 Del BIOS POST BIOS POST Ctrl〉+〈Alt〉+〈Delete BIOS BIOS CD PDF 3 CD 情報 Microsoft® Windows® 7 / 7 64-bit / VistaTM / VistaTM 64bit / XP / XP 64-bit CD CD CDROM CD AUTORUN AUTORUN CD 内の BIN ASSETUP.EXE 115 ASRock H61M-DG3/USB3 Motherboard 日本語 - ASRock H61M-DG3/USB3 | Quick Installation Guide - Page 116
1.1 華擎 H61M-DG3/USB3 主板 (Micro ATX 規格 : 8.9 英吋 X 6.8 英吋 , 22.6 厘米 X 17.3 厘米 ) 華擎 H61M-DG3/USB3 H61M-DG3/USB3 Serial ATA(SATA I/O 擋板 ASRock 為了在 Windows® 7 / 7 64-bit / VistaTM / VistaTM 64-bit BIOS中將Storage Configuration AHCI BIOS User Manual 116 ASRock H61M-DG3/USB3 Motherboard 簡體中文 - ASRock H61M-DG3/USB3 | Quick Installation Guide - Page 117
Bridge CPU 支持 Pixel Shader 5.0、DirectX 11 技術。Intel® Sandy Bridge CPU 支持 Pixel Shader 4.1、 DirectX 10.1 Intel® Ivy Bridge CPU 1760MB。通 過 Intel® Sandy Bridge CPU 1759MB。 - 雙 VGA DVI-D 和 D-Sub DVI 1920x1200 @ 60Hz - 支持 D-Sub 2048x1536 @ 75Hz - 通過 DVI HDCP 功能 117 ASRock H61M-DG3/USB3 Motherboard - ASRock H61M-DG3/USB3 | Quick Installation Guide - Page 118
能 - 1 x 1 x 1 x 1 x CPU 4 針 ) - 1 x 4 針 ) - 1 x 3 針 ) - 24 針 ATX 4 針 12V 2 x USB 2.0 4 USB 2.0 接口 ) - 1 x USB 3.0 2 USB 3.0 接口 ) - 32Mb AMI BIOS - AMI UEFI Legal BIOS,支持 GUI Plug and Play,PnP) - ACPI 1.1 jumperfree IGPU、DRAM、PCH、CPU PLL、VTT、VCCSA ASRock H61M-DG3/USB3 Motherboard - ASRock H61M-DG3/USB3 | Quick Installation Guide - Page 119
ErP/EuP ErP/EuP http://www.asrock.com 1.3 3 1 和針腳 2 CMOS (CLRCMOS1, 3 2 頁第 21 項 ) 設定 默認設置 清除 CMOS 注意: C L R C M O S1 C M O S 15 C L R C M O S1 2 和插針 3 短接 5 B I O S C M O S B I O S C M O S C M O S C M O S 1394 GUID 和 MAC 簡體中文 119 ASRock H61M-DG3/USB3 Motherboard - ASRock H61M-DG3/USB3 | Quick Installation Guide - Page 120
DUMMY 1 GND P+8 P-8 USB_PWR Vbus IntA_P0_SSRXIntA_P0_SSRX+ GND IntA_P0_SSTXIntA_P0_SSTX+ GND IntA_P0_DIntA_P0_D+ Vbus IntA_P1_SSRXIntA_P1_SSRX+ GND IntA_P1_SSTXIntA_P1_SSTX+ GND IntA_P1_DIntA_P1_D+ DUMMY I/O USB 3.0 USB 3.0 USB 3.0 USB 3.0 接 口。 簡體中文 1 120 ASRock H61M-DG3/USB3 Motherboard - ASRock H61M-DG3/USB3 | Quick Installation Guide - Page 121
MIC_RET 和 OUT_RET 僅用于 HD AC'97 E 在 Windows® XP / XP 64 選擇"Mixer"。選擇"Recorder" FrontMic"。 在 Windows® 7 / 7 64 位元 / VistaTM / VistaTM 64 統中 : 在 Realtek FrontMic"。調節"Recording Volume"。 (9 針 PANEL1) ( 見第 2 頁第 14 項 ) 簡體中文 PWRBTN ASRock H61M-DG3/USB3 Motherboard 121 - ASRock H61M-DG3/USB3 | Quick Installation Guide - Page 122
項 ) CPU (4 針 CPU_FAN1) ( 見第 2 頁第 3 項 ) 4 3 2 1 GND +12V CPU_FAN_SPEED FAN_SPEED_CONTROL 請將 CPU 4-Pin CPU 風扇 (Quiet Fan 3-Pin CPU 3-Pin CPU CPU Pin 1-3。 Pin 1-3 連接 3-Pin 簡體中文 ATX (24 針 ATXPWR1) ( 見第 2 頁第 4 項 ) 122 12 24 請將 ATX 1 13 ASRock H61M-DG3/USB3 Motherboard - ASRock H61M-DG3/USB3 | Quick Installation Guide - Page 123
( 見第 2 頁第 22 項 ) 1 GND Signal 2. BIOS 信息 Flash Memory 存儲了 BIOS POST F2> 或 < D e l B I O S P O S T P O S T B I O S Ctrl>++ - ASRock H61M-DG3/USB3 | Quick Installation Guide - Page 124
SJ/T 11364-2006 10 年。 圖一 部件名稱 鉛 (Pb) 鎘 (Cd) 汞 (Hg Cr(VI PBB PBDE) X O O O O O X O O O O O O SJ/T 11363-2006 X SJ/T 11363-2006 2002/95/EC 簡體中文 124 ASRock H61M-DG3/USB3 Motherboard - ASRock H61M-DG3/USB3 | Quick Installation Guide - Page 125
asrock.com www.asrock.com/support/index.asp 1.1 華擎 H61M-DG3/USB3 主機板 (Micro ATX 規格 : 8.9 英吋 x 6.8 英吋 , 22.6 公分 x 17.3 公分 ) 華擎 H61M-DG3/USB3 H61M-DG3/USB3 Serial ATA(SATA I/O 擋板 ASRock提醒您... 若要在Windows® 7 / 7 64位元 / VistaTM / VistaTM 64 BIOS選項設為AHCI BIOS 125 ASRock H61M-DG3/USB3 Motherboard - ASRock H61M-DG3/USB3 | Quick Installation Guide - Page 126
2000/3000、Intel® Advanced Vector Extensions (AVX) - Intel® Ivy Bridge CPU 支援 Pixel Shader 5.0、DirectX 11 技術。Intel® Sandy Bridge CPU 支援 Pixel Shader 4.1、 DirectX 10.1 Intel® Ivy Bridge CPU 1760MB。 透過 Intel® Sandy Bridge CPU 1759MB。 - 雙 VGA DVI-D 和 D-Sub 接口 ASRock H61M-DG3/USB3 Motherboard 繁體中文 - ASRock H61M-DG3/USB3 | Quick Installation Guide - Page 127
到 5Gb/s - 4 x SATA2 3.0Gb/s NCQ, AHCI 1 x 1 x 1 x 1 x CPU 4 針 ) - 1 x 4 針 ) - 1 x 3 針 ) - 24 針 ATX 4 針 12V 2 x USB 2.0 4 USB 2.0 接口 ) - 1 x USB 3.0 2 USB 3.0 接口 ) - 32Mb AMI BIOS - AMI UEFI Legal BIOS ( 支援 GUI Plug and Play,PnP) - ACPI 1.1 127 ASRock H61M-DG3/USB3 Motherboard 繁體中文 - ASRock H61M-DG3/USB3 | Quick Installation Guide - Page 128
, CE, WHQL - 支援 ErP/EuP ErP/EuP http://www.asrock.com 1.3 3 1 和針腳 2 CMOS (CLRCMOS1, 3 2 頁第 21 項 ) 設定 默認設置 清除 CMOS 註: C L R C M O S1 C M O S 15 CLRCMOS1 的 pin2 及 pin3 短路 5 BIOS CMOS BIOS CMOS CMOS C M O S 1394 GUID 及 MAC 繁體中文 128 ASRock H61M-DG3/USB3 Motherboard - ASRock H61M-DG3/USB3 | Quick Installation Guide - Page 129
DUMMY 1 GND P+8 P-8 USB_PWR Vbus IntA_P0_SSRXIntA_P0_SSRX+ GND IntA_P0_SSTXIntA_P0_SSTX+ GND IntA_P0_DIntA_P0_D+ Vbus IntA_P1_SSRXIntA_P1_SSRX+ GND IntA_P1_SSTXIntA_P1_SSTX+ GND IntA_P1_DIntA_P1_D+ DUMMY I/O USB 3.0 USB 3.0 USB 3.0 USB 3.0 接 口。 1 繁體中文 129 ASRock H61M-DG3/USB3 Motherboard - ASRock H61M-DG3/USB3 | Quick Installation Guide - Page 130
連接到 Ground(GND)。 D. MIC_RET 和 OUT_RET 僅用於 HD AC'97 E 在 Windows® XP / XP 64 選擇"Mixer Recorder" FrontMic"。 在 Windows® 7 / 7 64 位元 / VistaTM / VistaTM 64 統中 : 在 Realtek FrontMic Recording Volume"。 (9 針 PANEL1) ( 見第 2 頁第 14 項 ) 繁體中文 130 ASRock H61M-DG3/USB3 Motherboard - ASRock H61M-DG3/USB3 | Quick Installation Guide - Page 131
) (4 針 CHA_FAN1) ( 見第 2 頁第 9 項 ) (3 針 PWR_FAN1) ( 見第 2 頁第 25 項 ) CPU (4 針 CPU_FAN1) ( 見第 2 頁第 3 項 ) 4 3 2 1 GND +12V CPU_FAN_SPEED FAN_SPEED_CONTROL 請將 CPU 4-Pin CPU 風扇 (Quiet Fan 3-Pin CPU 3-Pin CPU CPU Pin 1-3。 Pin 1-3 連接 3-Pin 131 ASRock H61M-DG3/USB3 Motherboard 繁體中文 - ASRock H61M-DG3/USB3 | Quick Installation Guide - Page 132
-pin ATX 20-pin ATX 著 Pin 1 和 Pin 13 ATX 12V (4 針 ATX12V1) ( 見第 2 頁第 1 項 ) 序列埠 (9 針 COM1) ( 見第 2 頁第 17 項 ) 20-Pin ATX 1 13 ATX 12V COM1 (2 針 CI1) ( 見第 2 頁第 22 項 ) 1 GND Signal 繁體中文 132 ASRock H61M-DG3/USB3 Motherboard - ASRock H61M-DG3/USB3 | Quick Installation Guide - Page 133
2. BIOS 訊息 Flash Memory BIOS POST F2> 或 + + - ASRock H61M-DG3/USB3 | Quick Installation Guide - Page 134
Papan Induk H61M-DG3/USB3 ASRock (Faktor Form Mikro ATX: 8.9-in x 6.8-in, 22.6 cm x 17.3 cm) Pemimpin Instalasi Cepat H61M-DG3/USB3 ASRock Support CD H61M-DG3/USB3 ASRock 2 x Kabel satu serial Data ATA (SATA) (bebas-pilih) 1 x Satu Pelindung I/O 134 ASRock H61M-DG3/USB3 Motherboard Bahasa Indonesia - ASRock H61M-DG3/USB3 | Quick Installation Guide - Page 135
Intel® Sandy Bridge CPU - Pixel Shader 5.0, DirectX 11 dengan Intel® Ivy Bridge CPU, Pixel Shader 4.1, DirectX 10.1 dengan Intel® Sandy Bridge CPU - Ingatan sama Max. 1760MB dengan Intel® Ivy Bridge CPU. Ingatan sama Max. 1759MB dengan Intel® Sandy Bridge CPU. 135 ASRock H61M-DG3/USB3 Motherboard - ASRock H61M-DG3/USB3 | Quick Installation Guide - Page 136
10/100/1000 Mb/s CPU (4 pin) - 1 x Penghubung KIPAS casis (4 pin) - 1 x Penghubung KIPAS Power (3 pin) - Penghubung power 24 pin ATX - Penghubung power 4 pin 12V - Penghubung audio panel dapan - 2 x USB 2.0 header (menggunakan 4 port USB 2.0) Bahasa Indonesia 136 ASRock H61M-DG3/USB3 Motherboard - ASRock H61M-DG3/USB3 | Quick Installation Guide - Page 137
Microsoft® Windows® 7 / 7 64-bit / VistaTM / VistaTM 64-bit / XP / XP 64-bit Sertifikasi - FCC, CE, WHQL - ErP/EuP Ready (memerlukan catu daya ErP/EuP ready) * Untuk informasi rinci, silakan kunjungi website kami: http://www.asrock.com Bahasa Indonesia 137 ASRock H61M-DG3/USB3 Motherboard - ASRock H61M-DG3/USB3 | Quick Installation Guide - Page 138
POST and choose the item "UEFI:xxx" to boot. 4. Start Windows® installation. 5. If you install Windows® 7 64-bit OS, OS will be formatted by GPT (GUID Partition Table). Please install the hotfix file from Microsoft®: http://support.microsoft.com/kb/979903 138 ASRock H61M-DG3/USB3 Motherboard English
-
 1
1 -
 2
2 -
 3
3 -
 4
4 -
 5
5 -
 6
6 -
 7
7 -
8
-
9
-
10
-
11
-
12
-
13
-
14
-
15
-
16
-
17
-
18
-
19
-
20
-
21
-
22
-
23
-
24
-
25
-
26
-
27
-
28
-
29
-
30
-
31
-
32
-
33
-
34
-
35
-
36
-
37
-
38
-
39
-
40
-
41
-
42
-
43
-
44
-
45
-
46
-
47
-
48
-
49
-
50
-
51
-
52
-
53
-
54
-
55
-
56
-
57
-
58
-
59
-
60
-
61
-
62
-
63
-
64
-
65
-
66
-
67
-
68
-
69
-
70
-
71
-
72
-
73
-
74
-
75
-
76
-
77
-
78
-
79
-
80
-
81
-
82
-
83
-
84
-
85
-
86
-
87
-
88
-
89
-
90
-
91
-
92
-
93
-
94
-
95
-
96
-
97
-
98
-
99
-
100
-
101
-
102
-
103
-
104
-
105
-
106
-
107
-
108
-
109
-
110
-
111
-
112
-
113
-
114
-
115
-
116
-
117
-
118
-
119
-
120
-
121
-
122
-
123
-
124
-
125
-
126
-
127
-
128
-
129
-
130
-
131
-
132
-
133
-
134
-
135
-
136
-
137
-
138
 |
 |
1
ASRock
H61M-DG3/USB3
Motherboard
English
Copyright Notice:
No part of this installation guide may be reproduced, transcribed, transmitted, or trans-
lated in any language, in any form or by any means, except duplication of documentation
by the purchaser for backup purpose, without written consent of ASRock Inc.
Products and corporate names appearing in this guide may or may not be registered
trademarks or copyrights of their respective companies, and are used only for identi
fi
ca-
tion or explanation and to the owners’ bene
fi
t, without intent to infringe.
Disclaimer:
Speci
fi
cations and information contained in this guide are furnished for informational use
only and subject to change without notice, and should not be constructed as a commit-
ment by ASRock. ASRock assumes no responsibility for any errors or omissions that may
appear in this guide.
With respect to the contents of this guide, ASRock does not provide warranty of any kind,
either expressed or implied, including but not limited to the implied warranties or condi-
tions of merchantability or
fi
tness for a particular purpose. In no event shall ASRock, its
directors, of
fi
cers, employees, or agents be liable for any indirect, special, incidental, or
consequential damages (including damages for loss of pro
fi
ts, loss of business, loss of
data, interruption of business and the like), even if ASRock has been advised of the pos-
sibility of such damages arising from any defect or error in the guide or product.
This device complies with Part 15 of the FCC Rules. Operation is subject to the following
two conditions:
(1) this device may not cause harmful interference, and
(2) this device must accept any interference received, including interference that
may cause undesired operation.
CALIFORNIA, USA ONLY
The Lithium battery adopted on this motherboard contains Perchlorate, a toxic substance
controlled in Perchlorate Best Management Practices (BMP) regulations passed by the
California Legislature. When you discard the Lithium battery in California, USA, please
follow the related regulations in advance.
“Perchlorate Material-special handling may apply, see
www.dtsc.ca.gov/hazardouswaste/perchlorate”
ASRock Website: http://www.asrock.com
Published September 2012
Copyright
©
2012 ASRock INC. All rights reserved.