ASRock K8N68PV-GLAN Quick Installation Guide
ASRock K8N68PV-GLAN Manual
 |
View all ASRock K8N68PV-GLAN manuals
Add to My Manuals
Save this manual to your list of manuals |
ASRock K8N68PV-GLAN manual content summary:
- ASRock K8N68PV-GLAN | Quick Installation Guide - Page 1
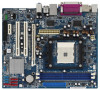
for backup purpose, without written consent of ASRock Inc. Products and corporate names appearing in this guide may or may not be registered trademarks or ASRock Website: http://www.asrock.com Published April 2008 Copyright©2008 ASRock INC. All rights reserved. 1 ASRock K8N68PV-GLAN Motherboard - ASRock K8N68PV-GLAN | Quick Installation Guide - Page 2
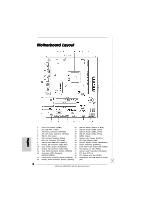
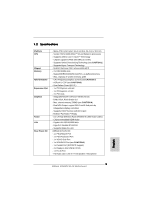
(ATX12V1) 19 USB 2.0 Header (USB4_5, Blue) 5 754-Pin CPU Socket 20 NVIDIA Chipset 6 CPU Heatsink Retention Module 21 System Panel PCIE2) 12 Third SATAII Connector (SATAII_3 (PORT2)) 27 Internal Audio Connector: CD1 (Black) 13 Secondary SATAII Connector 28 PCI ASRock K8N68PV-GLAN Motherboard - ASRock K8N68PV-GLAN | Quick Installation Guide - Page 3
Audio 2nd output" to use front panel audio. Then reboot your system. For Windows® VistaTM: After restarting your computer, please double-click "Realtek HD Audio playbacks two different audio streams simultaneously", and click "ok". Then reboot your system. 3 ASRock K8N68PV-GLAN Motherboard English - ASRock K8N68PV-GLAN | Quick Installation Guide - Page 4
about the model you are using. www.asrock.com/support/index.asp 1.1 Package Contents 1 x ASRock K8N68PV-GLAN Motherboard (Micro ATX Form Factor: 9.6-in x 8.0-in, 24.4 cm x 20.3 cm) 1 x ASRock K8N68PV-GLAN Quick Installation Guide 2 x ASRock K8N68PV-GLAN Support CD 1 x Ultra ATA 66/100/133 IDE - ASRock K8N68PV-GLAN | Quick Installation Guide - Page 5
I/O - 1 x PS/2 Mouse Port - 1 x PS/2 Keyboard Port - 1 x VGA/D-Sub Port - 1 x VGA/DVI-D Port (see CAUTION 5) - 1 x Parallel Port (ECP/EPP Support) - 4 x Ready-to-Use USB 2.0 Ports - 1 x RJ-45 Port - HD Audio Jack: Line in / Front Speaker / Microphone English 5 ASRock K8N68PV-GLAN Motherboard - ASRock K8N68PV-GLAN | Quick Installation Guide - Page 6
audio header - 4 x USB 2.0 headers (support 8 USB 2.0 ports) (see CAUTION 7) BIOS Feature - 4Mb AMI BIOS - AMI Legal BIOS - Supports "Plug and Play" - ACPI 1.1 Compliance Wake Up Events - Supports jumperfree - SMBIOS 2.3.1 Support Support CD - Drivers 6 ASRock K8N68PV-GLAN Motherboard - ASRock K8N68PV-GLAN | Quick Installation Guide - Page 7
support CD to adjust your SATAII hard disk drive to SATAII mode. You can also connect SATA hard disk to SATAII connector directly. 7. Power Management for USB 2.0 works fine under Microsoft® Windows® VistaTM 64-bit / VistaTM / XP 64-bit / XP SP1 or SP2 / 2000 SP4. 7 ASRock K8N68PV-GLAN Motherboard - ASRock K8N68PV-GLAN | Quick Installation Guide - Page 8
wall socket before touching any component. 2. To avoid damaging the motherboard components due to static electricity, NEVER place your motherboard the motherboard to the chassis, please do not over-tighten the screws! Doing so may damage the motherboard. 8 ASRock K8N68PV-GLAN Motherboard English - ASRock K8N68PV-GLAN | Quick Installation Guide - Page 9
above the socket such that the CPU corner with the golden triangle matches the socket corner with a small triangle. Step 3. Carefully insert the CPU into the socket until it , please kindly refer to the instruction manuals of the CPU fan and the heatsink. English 9 ASRock K8N68PV-GLAN Motherboard - ASRock K8N68PV-GLAN | Quick Installation Guide - Page 10
will cause permanent damage to the motherboard and the DIMM if you force the DIMM into the slot at incorrect orientation. Step 3. Firmly insert the DIMM into the slot until the retaining clips at both ends fully snap back in place and the DIMM is properly seated. 10 ASRock K8N68PV-GLAN Motherboard - ASRock K8N68PV-GLAN | Quick Installation Guide - Page 11
this motherboard can support DVI/HDCP and HDMI format signal. You may use the DVI to HDMI adapter to convert the DVI-D port to HDMI interface. Please refer to page 18 of "User Manual" in the support CD to enable HDMI audio function according to the OS you install. 11 ASRock K8N68PV-GLAN Motherboard - ASRock K8N68PV-GLAN | Quick Installation Guide - Page 12
for 5 seconds. However, please do not clear the CMOS right after you update the BIOS. If you need to clear the CMOS when you just finish updating the BIOS, you must boot up the system first, and then shut it down before you do the clearCMOS action. English 12 ASRock K8N68PV-GLAN Motherboard - ASRock K8N68PV-GLAN | Quick Installation Guide - Page 13
HDD power connector connect to the power connect the white end of SATA power cable to the power supply connector of the power supply. 13 ASRock K8N68PV-GLAN Motherboard - ASRock K8N68PV-GLAN | Quick Installation Guide - Page 14
DeskExpress. This connector allows you to receive stereo audio input CD1 from sound sources such as a CD-ROM, DVD-ROM, TV tuner card, or MPEG card. This is an interface for the front panel audio cable that allows convenient connection and control of audio devices. 14 ASRock K8N68PV-GLAN Motherboard - ASRock K8N68PV-GLAN | Quick Installation Guide - Page 15
support HDA to function correctly. Please follow the instruction in our manual and chassis manual to install your system. 2. If you use AC'97 audio panel, please install it to the front panel audio to this connector and match the black wire to the ground pin. 15 ASRock K8N68PV-GLAN Motherboard - ASRock K8N68PV-GLAN | Quick Installation Guide - Page 16
is necessary to connect a power supply with ATX 12V plug to this connector. Failing to do so will cause power up failure. This COM1 header supports a serial module. English 16 ASRock K8N68PV-GLAN Motherboard - ASRock K8N68PV-GLAN | Quick Installation Guide - Page 17
that supports Serial ATA (SATA) / Serial ATAII (SATAII) hard disks and RAID functions. You may install SATA / SATAII hard disks on this motherboard for internal storage devices. This section will guide you is still power-on and in working condition. English 17 ASRock K8N68PV-GLAN Motherboard - ASRock K8N68PV-GLAN | Quick Installation Guide - Page 18
at the beginning of system boot-up, press key, and then a window for boot devices selection appears. Please select CD-ROM as the boot device. C. When you see the message on the screen, "Generate Serial ATA driver diskette [YN]?", press . 18 ASRock K8N68PV-GLAN Motherboard English - ASRock K8N68PV-GLAN | Quick Installation Guide - Page 19
HDDs without NCQ and Hot Plug functions STEP 1: Set Up BIOS. A. Enter BIOS SETUP UTILITY Advanced screen IDE Configuration. B. Set the "SATA Operation Mode" option to [non-RAID]. STEP 2: Install Windows® 2000 / XP / XP 64-bit OS on your system. English 19 ASRock K8N68PV-GLAN Motherboard - ASRock K8N68PV-GLAN | Quick Installation Guide - Page 20
If you want to install Windows® 2000 / XP / XP 64-bit / VistaTM / VistaTM 64-bit on your SATA / SATAII HDDs with RAID functions, please refer to the document at the following path in the Support CD for detailed procedures: ..\ RAID Installation Guide English 20 ASRock K8N68PV-GLAN Motherboard - ASRock K8N68PV-GLAN | Quick Installation Guide - Page 21
your computer. If the Main Menu does not appear automatically, locate and double-click on the file "ASSETUP.EXE" from the "BIN" folder in the Support CD to display the menus. 21 ASRock K8N68PV-GLAN Motherboard English - ASRock K8N68PV-GLAN | Quick Installation Guide - Page 22
tigen, besuchen Sie bitte unsere Webseite: www.asrock.com/support/index.asp 1.1 Kartoninhalt ASRock K8N68PV-GLAN Motherboard (Micro ATX-Formfaktor: 24.4 cm x 20.3 cm; 9.6 Zoll x 8.0 Zoll) ASRock K8N68PV-GLAN Schnellinstallationsanleitung ASRock K8N68PV-GLAN Support-CD Ein 80-adriges Ultra-ATA 66/100 - ASRock K8N68PV-GLAN | Quick Installation Guide - Page 23
ützt Wake-On-LAN ASRock 6CH_DVI I/O - 1 x PS/2-Mausanschluss - 1 x PS/2-Tastaturanschluss - 1 x VGA/D-Sub port - 1 x VGA/DVI-D port (siehe VORSICHT 5) - 1 x Paralleler port: Unterstützung für ECP / EPP - 4 x Standard-USB 2.0-Anschlüsse - 1 x RJ-45 port 23 ASRock K8N68PV-GLAN Motherboard Deutsch - ASRock K8N68PV-GLAN | Quick Installation Guide - Page 24
+5V, +3.3V, Vcore Betriebssysteme - Unterstützt Microsoft® Windows® 2000 / XP / XP 64-Bit / VistaTM / VistaTM 64-Bit Zertifizierungen - FCC, CE, WHQL * Für die ausführliche Produktinformation, besuchen Sie bitte unsere Website: http://www.asrock.com Deutsch 24 ASRock K8N68PV-GLAN Motherboard - ASRock K8N68PV-GLAN | Quick Installation Guide - Page 25
einschließlich der Einstellung im BIOS, Anwenden der Untied Overclocking- " auf Seite 24 der "Bedienungsanleitung" auf der Support-CD, um Ihre SATAII-Festplatte dem SATAII-Modus Windows® VistaTM 64-Bit / VistaTM / XP 64-Bit / XP SP1 oder SP2/2000 SP4 einwandfrei. 25 ASRock K8N68PV-GLAN Motherboard - ASRock K8N68PV-GLAN | Quick Installation Guide - Page 26
Unterlage, oder zurück in die Tüte, mit der die Komponente geliefert wurde. 5. Wenn Sie das Motherboard mit den Schrauben an dem Computergehäuse befestigen, überziehen Sie bitte die Schrauben nicht! Das Motherboard kann sonst beschädigt werden. Deutsch 26 ASRock K8N68PV-GLAN Motherboard - ASRock K8N68PV-GLAN | Quick Installation Guide - Page 27
ihn ein 2.2 Installation des CPU-Lüfters und des Kühlkörpers Nachdem Sie die CPU auf diesem Motherboard installiert haben, müssen Sie einen größeren Kühlkörper und Lüfter installieren, um Wärme abzuleiten die Handbücher des CPULüfters und des Kühlkörpers. Deutsch 27 ASRock K8N68PV-GLAN Motherboard - ASRock K8N68PV-GLAN | Quick Installation Guide - Page 28
2.3 Installation der Speichermodule (DIMM) Das K8N68PV-GLAN Motherboard bietet zwei 184polige DDR (Double Data Rate) DIMM-Steckplätze. Achten Sie darauf, das Netzteil abzustecken, beiden Enden des Moduls einschnappen und das DIMM-Modul fest an Ort und Stelle sitzt. 28 ASRock K8N68PV-GLAN Motherboard - ASRock K8N68PV-GLAN | Quick Installation Guide - Page 29
ützen. Mithilfe des DVI-zu-HDMIAdapters können Sie den DVI-D-Anschluss zur HDMI-Schnittstelle umfunktionieren. Siehe Seite 18 der "Bedienungsanleitung" auf der Support-CD, um die HDMIAudiofunktion gemäß des installierten Betriebssystems zu aktivieren. 29 ASRock K8N68PV-GLAN Motherboard Deutsch - ASRock K8N68PV-GLAN | Quick Installation Guide - Page 30
Sie nicht, den Jumper wieder zu entfernen, nachdem das CMOS gelöscht wurde. Wenn Sie den CMOSInhalt gleich nach dem Aktualisieren des BIOS löschen müssen, müssen Sie zuerst das System starten und dann wieder ausschalten, bevor Sie den CMOS-Inhalt löschen. Deutsch 30 ASRock K8N68PV-GLAN Motherboard - ASRock K8N68PV-GLAN | Quick Installation Guide - Page 31
der Anschlussleisten. Wenn Sie die Jumperkappen auf die Anschlüsse setzen, wird das Motherboard permanent beschädigt! Anschluss Anschluss für das Floppy-Laufwerk (33-Pin FLOPPY1) (siehe der SATA / SATAIIFestplatte oder dem SATAII-Anschluss am Mainboard verbinden. 31 ASRock K8N68PV-GLAN Motherboard - ASRock K8N68PV-GLAN | Quick Installation Guide - Page 32
heiße Stecker Untersuchungsfunktion für ASRock DeskExpress. Interne Audio-Anschlüsse (4-Pin CD1) (CD1: siehe S.2, No. 27) Diese ermöglichen Ihnen Stereo- CD1 Signalquellen, wie z. B. CD-ROM, DVD-ROM, TV-Tuner oder MPEG-Karten mit Ihrem System zu verbinden. 32 ASRock K8N68PV-GLAN Motherboard - ASRock K8N68PV-GLAN | Quick Installation Guide - Page 33
'97-Audioleiste angeschlossen werden. E. Rufen Sie das BIOS-Setup-Dienstprogramm auf. Wechseln Sie zu Erweiterte Einstellungen Realtek HD Audio-Manager aufzurufen. Für Windows® 2000 / XP / XP 64-Bit Betriebssystem: Klicken Sie auf "Audio-E/A", wählen Header an. 33 ASRock K8N68PV-GLAN Motherboard - ASRock K8N68PV-GLAN | Quick Installation Guide - Page 34
S.2, Punkt 3) 12 24 Verbinden Sie die ATXStromversorgung mit diesem Header. 1 13 Obwohl dieses Motherboard einen 24-pol. ATX-Stromanschluss 12 24 bietet, kann es auch mit einem modifizierten traditionellen reicht der Strom nicht aus, das System zu starten. 34 ASRock K8N68PV-GLAN Motherboard - ASRock K8N68PV-GLAN | Quick Installation Guide - Page 35
-Festplatte an. 2 . 1 0 Hot-Plug- und Hot-Swap-Funktion für SATA / SATAIIFestplatten Das K8N68PV-GLAN-Motherboard unterstützt Hot Plug- und Hot Swap-Funktionen für SATA- / SATAII- Geräte im RAID- während das System in Betrieb ist und einwandfrei läuft. 35 ASRock K8N68PV-GLAN Motherboard Deutsch - ASRock K8N68PV-GLAN | Quick Installation Guide - Page 36
/ SATAII-Festplatten mit NCQ und Hot-PlugFunktionen SCHRITT 1: Konfigurieren Sie BIOS. A. Rufen Sie im BIOS-DIENSTPROGRAMM den Bildschirm „Erweitert" und „IDE-Konfiguration" auf. B. Setzen Sie die Option "SATA Operation Mode" (SATA-Betriebsmodus) auf [AHCI]. 36 ASRock K8N68PV-GLAN Motherboard - ASRock K8N68PV-GLAN | Quick Installation Guide - Page 37
zur Verfügung: A. NVIDIA nForce Storage Controller (required) Windows XP/2000 B. NVIDIA nForce Storage Controller (required) Windows XP64 Für Windows® 2000 / XP im AHCI-Modus wählen Sie bitte A. Für Windows® XP 64bit im AHCI-Modus wählen Sie bitte B. 37 ASRock K8N68PV-GLAN Motherboard Deutsch - ASRock K8N68PV-GLAN | Quick Installation Guide - Page 38
\ AHCI_Vista (Für Windows® VistaTM-Benutzer) .. \ AMD64 \ AHCI_Vista64 (Für Windows® VistaTM 64-Bit Benutzer) Legen Sie danach noch einmal die Windows® VistaTM / VistaTM 64-Bit optische Disc in das optische Laufwerk, um die Installation fortzusetzen. Deutsch 38 ASRock K8N68PV-GLAN Motherboard - ASRock K8N68PV-GLAN | Quick Installation Guide - Page 39
BIOS. A. Rufen Sie im BIOS-DIENSTPROGRAMM den Bildschirm „Erweitert" und „IDE-Konfiguration" auf. B. Setzen Sie die Option "SATA Operation Mode" (SATA-Betriebsmodus) auf [non-RAID]. SCHRITT 2: Installieren Sie Windows -Technologie anwenden. Deutsch 39 ASRock K8N68PV-GLAN Motherboard - ASRock K8N68PV-GLAN | Quick Installation Guide - Page 40
der Support-CD, um die Menüs aufzurufen. Das SetupProgramm soll es Ihnen so leicht wie möglich machen. Es ist menügesteuert, d.h. Sie können in den verschiedenen Untermenüs Ihre Auswahl treffen und die Programme werden dann automatisch installiert. 40 ASRock K8N68PV-GLAN Motherboard Deutsch - ASRock K8N68PV-GLAN | Quick Installation Guide - Page 41
au modèle que vous utilisez. www.asrock.com/support/index.asp 1.1 Contenu du paquet Carte mère ASRock K8N68PV-GLAN (Facteur de forme Micro ATX: 9.6 pouces x 8.0 pouces, 24.4 cm x 20.3 cm) Guide d'installation rapide ASRock K8N68PV-GLAN CD de soutien ASRock K8N68PV-GLAN Un câble ruban IDE Ultra ATA - ASRock K8N68PV-GLAN | Quick Installation Guide - Page 42
- Gigabit LAN 10/100/1000 Mb/s - Giga PHY Realtek RTL8211B - Support du Wake-On-LAN ASRock 6CH_DVI I/O - 1 x port souris PS/2 - 1 x port clavier PS/2 - 1 x port VGA/D-Sub - 1 x port VGA/DVI-D (voir ATTENTION 5) - 1 x port parallèle: Support ECP/EPP 42 ASRock K8N68PV-GLAN Motherboard Français - ASRock K8N68PV-GLAN | Quick Installation Guide - Page 43
: +12V, +5V, +3.3V, Vcore OS - Microsoft® Windows® 2000 / XP / XP 64-bit / VistaTM / VistaTM 64-bit Certifications - FCC, CE, WHQL * Pour de plus amples informations sur les produits, s'il vous plaît visitez notre site web: http://www.asrock.com Français 43 ASRock K8N68PV-GLAN Motherboard - ASRock K8N68PV-GLAN | Quick Installation Guide - Page 44
compris ajuster les réglages du BIOS, appliquer la technologie Untied Guide « Installation du disque dur SATAII » à la page 24 du « Manuel de l'utilisateur » qui se trouve sur le CD de support Windows® VistaTM 64-bit/ VistaTM / XP 64-bit / XP SP1; SP2/ 2000 SP4. 44 ASRock K8N68PV-GLAN Motherboard Fran - ASRock K8N68PV-GLAN | Quick Installation Guide - Page 45
composant, placez-le sur un support antistatique ou dans son sachet d'origine. 5. Lorsque vous placez les vis dans les orifices pour vis pour fixer la carte mère sur le châssis, ne serrez pas trop les vis ! Vous risquez sinon d'endommager la carte mère. 45 ASRock K8N68PV-GLAN Motherboard Français - ASRock K8N68PV-GLAN | Quick Installation Guide - Page 46
coin de la prise. Etape 3. Insérez avec précaution le CPU dans le support jusqu'à ce qu'il soit bien en place. Le CPU ne peut être inséré bonne installation, veuillez vous référer aux manuels d'instruction sur le ventilateur du CPU et le dissipateur. Français 46 ASRock K8N68PV-GLAN Motherboard - ASRock K8N68PV-GLAN | Quick Installation Guide - Page 47
2.3 Installation des modules mémoire (DIMM) La carte mère K8N68PV-GLAN propose deux emplacements DIMM DDR (Double Débit de données) à 184 broches. Ayez bien le soin de dé aux deux extrémités se ferment complètement et que le module DIMM soit inséré correctement. 47 ASRock K8N68PV-GLAN Motherboard - ASRock K8N68PV-GLAN | Quick Installation Guide - Page 48
instructions détaillées, référez-vous au document au chemin d'accès suivant sur le CD de support: ..\ Surround Display Information 2.6 Guide d'operation de Fonction Audio le CD de support pour activer la fonction audio HDMI selon le SE que vous installez. 48 ASRock K8N68PV-GLAN Motherboard Français - ASRock K8N68PV-GLAN | Quick Installation Guide - Page 49
après avoir mis le BIOS à jour. Si vous avez besoin d'effacer la CMOS lorsque vous avez fini de mettre le BIOS à jour, vous devez d'abord initialiser le système, puis le mettre hors tension avant de procéder à l'opération d'effacement de la CMOS. Français 49 ASRock K8N68PV-GLAN Motherboard - ASRock K8N68PV-GLAN | Quick Installation Guide - Page 50
mère vers le disque dur Câble ATA 66/100/133 80 conducteurs Note: Veuillez vous reporter aux instructions du fabricant de votre IDE périphérique pour les détails. Connecteurs Série ATAII (SATAII_1 (PORT 0): au connecteur SATAII sur la carte mère. Français 50 ASRock K8N68PV-GLAN Motherboard - ASRock K8N68PV-GLAN | Quick Installation Guide - Page 51
fonction de detection de HotPlug pour ASRock DeskExpress. Connecteurs audio internes Ils vous permettent de gérer des (CD1 br. 4) (CD1: voir p.2 fig. 27) entrées audio à partir de sources CD1 stéréo comme un CD-ROM, DVD-ROM, un tuner TV ou une carte MPEG. 51 ASRock K8N68PV-GLAN Motherboard - ASRock K8N68PV-GLAN | Quick Installation Guide - Page 52
audio AC'97. E. Entrer dans l'utilitaire de configuration du BIOS. Saisir les Paramètres avancés puis sélectionner Configuration du jeu de puces. Définir l'option panneau de commande de [Auto] à [Activé]. F. Entrer dans le système Windows châssis sur ce connecteur. 52 ASRock K8N68PV-GLAN Motherboard - ASRock K8N68PV-GLAN | Quick Installation Guide - Page 53
ce connecteur et brancher le fil noir sur la broche de terre. ien que cette carte mère offre un support de (Ventilateur silencieux) ventilateur de CPU à 4 broches , le ventilateur de CPU à 3 broches peut bien ne sera pas possible de mettre sous tension. Français 53 ASRock K8N68PV-GLAN Motherboard - ASRock K8N68PV-GLAN | Quick Installation Guide - Page 54
-GLAN gère les fonctions Hot Plug et Hot Swap pour les périphériques SATA / SATAII en mode RAID / AHCI. Le jeu de puces de pont sud NVIDIA® GeForce 7050 / nForce 630A MCP offre un support ème est sous tension et en fonctionnement s'appelle le "Hot Plug". 54 ASRock K8N68PV-GLAN Motherboard Français - ASRock K8N68PV-GLAN | Quick Installation Guide - Page 55
SATA / SATAII avec NCQ et les fonctions de connexion à chaud ETAP 1: Configurez le BIOS. A. Entrez dans UTILITAIRE DE CONFIGURATION BIOS écran Avancé Configuration IDE. B. Réglez l'option "SATA Operation Mode"« Mode de fonctionnement SATA » sur [AHCI]. 55 ASRock K8N68PV-GLAN Motherboard Français - ASRock K8N68PV-GLAN | Quick Installation Guide - Page 56
message "Generate Serial ATA driver diskette [Y/N]?" (Voulez-vous Windows XP/2000 B. NVIDIA nForce Storage Controller (required) Windows XP64 Veuillez sélectionner A pour Windows® 2000 / XP en mode AHCI. Veuillez sélectionner B pour Windows® XP 64 bits en mode AHCI. 56 ASRock K8N68PV-GLAN Motherboard - ASRock K8N68PV-GLAN | Quick Installation Guide - Page 57
utilisateurs de Windows® VistaTM) .. \ AMD64 \ AHCI_Vista64 (Pour les utilisateurs de Windows® VistaTM 64-bits) Ensuite, veuillez insérer le disque optique de Windows® VistaTM / VistaTM 64-bits dans le lecteur optique de nouveau pour continuer l'installation. 57 ASRock K8N68PV-GLAN Motherboard Fran - ASRock K8N68PV-GLAN | Quick Installation Guide - Page 58
surcadençage plus stable. Veuillez vous reporter à l'avertissement en page 44 pour connaître les risques liés à l'overclocking avant d'appliquer la technologie Untied Overclocking. 58 ASRock K8N68PV-GLAN Motherboard Français - ASRock K8N68PV-GLAN | Quick Installation Guide - Page 59
le BIOS, veuillez consulter le Guide de l'utilisateur (fichier PDF) dans le CD technique. 4. Informations sur le CD de support Cette carte mère supporte divers systèmes d'exploitation Microsoft® Windows®: double-cliquez dessus pour afficher les menus. 59 ASRock K8N68PV-GLAN Motherboard Français - ASRock K8N68PV-GLAN | Quick Installation Guide - Page 60
rapida ASRock K8N68PV-GLAN CD di supporto ASRock K8N68PV-GLAN Un cavo IDE 80-pin Ultra ATA 66/100/133 Un cavo per floppy drive a 1,44 Mb Un cavo dati Serial ATA (SATA) (Opzionale) Un cavo alimentatore HDD Serial ATA (SATA) (Opzionale) Un ASRock 6CH_DVI I/O Shield 60 ASRock K8N68PV-GLAN Motherboard - ASRock K8N68PV-GLAN | Quick Installation Guide - Page 61
scheda Audio LAN Pannello posteriore I/O - Micro ATX Form Factor: 9.6-in x 8.0-in, 24.4 cm x 20.3 cm - Presa 754 che supporto ECP/EPP - 4 x Porte USB 2.0 già integrate - 1 x Porta RJ-45 - Connettore HD Audio: ingresso linea / cassa frontale / microfono 61 ASRock K8N68PV-GLAN Motherboard Italiano - ASRock K8N68PV-GLAN | Quick Installation Guide - Page 62
periferiche del sistema. La procedura è eseguita a proprio rischio ed a proprie spese. Noi non possiamo essere ritenuti responsabili per possibili danni provocati dall'overclocking. Italiano 62 ASRock K8N68PV-GLAN Motherboard - ASRock K8N68PV-GLAN | Quick Installation Guide - Page 63
dipendere dal driver fornito da NVIDIA® e può essere aggiornata in futuro. Al momento, il driver per Hybrid disco rigido SATAII" a pagina 24 del "Manuale utente" nel CD in dotazione in modo da Windows® VistaTM 64-bit / VistaTM / XP 64 bit / XP SP1; SP2/ 2000 SP4. 63 ASRock K8N68PV-GLAN Motherboard - ASRock K8N68PV-GLAN | Quick Installation Guide - Page 64
componente. 5. Nell'usare i giraviti per fissare la scheda madre al telaio non serrare eccessivamente le viti! Altrimenti si rischia di danneggiare la scheda madre. 64 ASRock K8N68PV-GLAN Motherboard Italiano - ASRock K8N68PV-GLAN | Quick Installation Guide - Page 65
Levetta sollevata di 90° Triangolino angolo socket Triangolo dorato CPU FASE 1: Sollevare la levetta socket FASE 2 / FASE 3: Far corrispondere appropriata, fare riferimento al manuale d'istruzioni della ventolina CPU e del dispersore di calore. Italiano 65 ASRock K8N68PV-GLAN Motherboard - ASRock K8N68PV-GLAN | Quick Installation Guide - Page 66
2.3 Installazione dei moduli di memoria (DIMM) La motherboard K8N68PV-GLAN mette a disposizione due slot DIMM DDR (Double Data Rate) da 184 pin. Scollegare l'alimentazione elettrica alle due estremità e fino ad installare correttamente la DIMM nella sua sede. 66 ASRock K8N68PV-GLAN Motherboard - ASRock K8N68PV-GLAN | Quick Installation Guide - Page 67
utilizzare l'adattatore da DVI a HDMI per convertire la porta DVI-D per l'interfaccia HDMI. Consultare la pagina 18 del "Manuale utente" nel CD in dotazione per attivare la funzione audio HDMI compatibile con il sistema operativo di cui si dispone. 67 ASRock K8N68PV-GLAN Motherboard Italiano - ASRock K8N68PV-GLAN | Quick Installation Guide - Page 68
. Non cancellare la CMOS subito dopo aver aggiornato il BIOS. Se è necessario cancellare la CMOS una volta completato l'aggiornamento del BIOS, è necessario riavviare prima il sistema, e poi spegnerlo prima di procedere alla cancellazione della CMOS. Italiano 68 ASRock K8N68PV-GLAN Motherboard - ASRock K8N68PV-GLAN | Quick Installation Guide - Page 69
Serial ATA (SATA) Entrambe le estremità del cavo (Opzionale) dati SATA possono collegarsi all'hard disk SATA / SATAII o al connettore SATAII sulla scheda madre. 69 ASRock K8N68PV-GLAN Motherboard - ASRock K8N68PV-GLAN | Quick Installation Guide - Page 70
sostiene la funzione di rilevazione di Hot Plug per ASRock DeskExpress. Connettori audio interni Permettono di ricevere input (4-pin CD1) (CD1: vedi p.2 item 27) stereo audio da fonti di CD1 suono come CD-ROM, DVD - ROM,TV tuner, o schede MPEG. 70 ASRock K8N68PV-GLAN Motherboard Italiano - ASRock K8N68PV-GLAN | Quick Installation Guide - Page 71
audio AC'97. E. Entrare nel programma di impostazione BIOS. Entrare su Impostazioni avanzate, quindi selezionare Configurazione chipset. Impostare l'opzione Comando pannello anteriore da [Auto] a [Attivato]. F. Entrare nel sistema di Windows item 23) 71 ASRock K8N68PV-GLAN Motherboard Italiano - ASRock K8N68PV-GLAN | Quick Installation Guide - Page 72
che possa fornire energia sufficiente. In caso contrario l'unità non si avvia. Questo collettore porta COM è utilizzato per supportare il modulo porta COM. Italiano 72 ASRock K8N68PV-GLAN Motherboard - ASRock K8N68PV-GLAN | Quick Installation Guide - Page 73
RAID 1 / RAID 5 allora è detta "scambio a caldo" l'azione d'inserimento e rimozione dei dischi rigidi SATA / SATAII mentre il sistema è ancora acceso ed in condizione di funzionamento. 73 ASRock K8N68PV-GLAN Motherboard Italiano - ASRock K8N68PV-GLAN | Quick Installation Guide - Page 74
driver installati funzioneranno correttamente. 2.12 Installazione di Windows® 2000 / XP / XP 64 bit / VistaTM / VistaTM 64 bit senza funzioni RAID Se si desidera installare Windows® 2000, Windows® XP, Windows® XP 64 bit, Windows® VistaTM, Windows di boot. 74 ASRock K8N68PV-GLAN Motherboard Italiano - ASRock K8N68PV-GLAN | Quick Installation Guide - Page 75
Plug 1° PASSO: Configurare il BIOS. A. Entrare in UTILIT BIOS SETUP Avanzate Configurazione IDE. B. Impostare l'opzione "SATA Operation Mode" (Modalità operativa SATA) su [non-RAID]. 2° PASSO: Installazione di Windows® 2000 / XP / XP 64-bit sul sistema. Italiano 75 ASRock K8N68PV-GLAN Motherboard - ASRock K8N68PV-GLAN | Quick Installation Guide - Page 76
il sistema operativo Windows® 2000 / XP / XP 64-bit / VistaTM / VistaTM 64-bit, fare riferimento al documento che si trova sul seguente percorso del CD di supporto, per le relative procedure: ...\ RAID Installation Guide (Guida all'installazione RAID) 76 ASRock K8N68PV-GLAN Motherboard Italiano - ASRock K8N68PV-GLAN | Quick Installation Guide - Page 77
. Se il Menù principale non appare automaticamente, posizionarsi sul file ASSETUP.EXE nel CESTINO del CD di supporto e cliccare due volte per visualizzare i menù. 77 ASRock K8N68PV-GLAN Motherboard Italiano - ASRock K8N68PV-GLAN | Quick Installation Guide - Page 78
modelo específico de su placa. www.asrock.com/support/index.asp 1.1 Contenido de la caja Placa base ASRock K8N68PV-GLAN (Factor forma Micro ATX: 24,4 cm x 20,3 cm, 9,6" x 8,0") Guía de instalación rápida de ASRock K8N68PV-GLAN CD de soporte de ASRock K8N68PV-GLAN Una cinta de datos IDE de conducci - ASRock K8N68PV-GLAN | Quick Installation Guide - Page 79
- Soporta Wake-On-LAN ASRock 6CH_DVI I/O - 1 x puerto de ratón PS/2 - 1 x puerto de teclado PS/2 - 1 x puerto VGA/D-Sub - 1 x puerto VGA/DVI-D (ver ATENCIÓN 5) - 1 x puerto paralelo: soporta ECP/EPP - 4 x puertos USB 2.0 predeterminados - 1 x puerto RJ-45 79 ASRock K8N68PV-GLAN Motherboard Español - ASRock K8N68PV-GLAN | Quick Installation Guide - Page 80
, +5V, +3.3V, Vcore OS - En conformidad con Microsoft® Windows® 2000 / XP / XP 64 bits / VistaTM / VistaTM 64 bits Certificaciones - FCC, CE, WHQL * Para más información sobre los productos, por favor visite nuestro sitio web: http://www.asrock.com Español 80 ASRock K8N68PV-GLAN Motherboard - ASRock K8N68PV-GLAN | Quick Installation Guide - Page 81
velocidad del reloj, incluido el ajuste del BIOS, aplicando la tecnología de aumento de de discos duros SATAII" en la página 24 del "Manual de usuario" que se incluye en el CD de soporte Windows® VistaTM 64 bits / VistaTM / XP 64 bits / XP SP1; SP2/2000 SP4. 81 ASRock K8N68PV-GLAN Motherboard Espa - ASRock K8N68PV-GLAN | Quick Installation Guide - Page 82
los tornillos en sus agujeros para fijar la placa madre en el chasis, no los apriete demasiado. Eso podría dañar la placa madre. 82 ASRock K8N68PV-GLAN Motherboard Español - ASRock K8N68PV-GLAN | Quick Installation Guide - Page 83
y hacen buen contacto entre sí. Conecte entonces el ventilador de la CPU al conector CPU FAN (CPU_FAN1, consulte Página 2, N. 7). Para realizar la instalación correctamente, consulte el manual de instrucciones del ventilador de la CPU y el radiador. Español 83 ASRock K8N68PV-GLAN Motherboard - ASRock K8N68PV-GLAN | Quick Installation Guide - Page 84
2.3 Instalación de Memoria La placa base K8N68PV-GLAN proporciona dos zócalos DIMM DDR (Doble velocidad de datos) de 184 contactos Asegúrese de desconectar ambos lados queden completamente introducidos en su sitio y la DIMM se haya asentado apropiadamente. 84 ASRock K8N68PV-GLAN Motherboard Español - ASRock K8N68PV-GLAN | Quick Installation Guide - Page 85
Display Information 2.6 Guía de la Operación de la Función de Audio de HDMI El puerto DVI-D del conjunto de chips utilizado en esta placa Manual de usuario" en el CD de soporte para activar la función de sonido HDMI de acuerdo con el sistema operativo que instale. 85 ASRock K8N68PV-GLAN Motherboard - ASRock K8N68PV-GLAN | Quick Installation Guide - Page 86
acuérdase de quitar el jumper cap después de limpiar el COMS. Si necesita borrar la CMOS cuando acabe de finalizar la actualización de la BIOS, debe arrancar primero el sistema y, a continuación, apagarlo antes de realizar la acción de borrado de CMOS. Español 86 ASRock K8N68PV-GLAN Motherboard - ASRock K8N68PV-GLAN | Quick Installation Guide - Page 87
de datos de serie ATA (SATA) (Opcional) Ambos extremos del cable pueden conectarse al disco duro SATA / SATAII o la conexión de la placa base. 87 ASRock K8N68PV-GLAN Motherboard - ASRock K8N68PV-GLAN | Quick Installation Guide - Page 88
30) Este jefe apoya la función de la detección del Enchufe Caliente para ASRock DeskExpress. Conector de Audio Interno Permite recepción de input (4-pin CD1) (CD1: vea p.2, No. 27) CD1 audio de fuente sónica como CD-ROM, DVD-ROM, TV tuner, o tarjeta MPEG. 88 ASRock K8N68PV-GLAN Motherboard - ASRock K8N68PV-GLAN | Quick Installation Guide - Page 89
AC'97. E. Entre en la Utilidad de configuración del BIOS Entre en Configuración avanzada y, a continuación, seleccione Configuración del Administrador de audio HD Realtek. Para Windows® 2000 / XP / XP 64-bit OS: Haga clic en "E/S de audio", seleccione " ASRock K8N68PV-GLAN Motherboard Español - ASRock K8N68PV-GLAN | Quick Installation Guide - Page 90
a una toma de corriente con el enchufe ATX 12V, de modo que proporcione suficiente electricidad. De lo contrario no se podrá encender. Español 90 ASRock K8N68PV-GLAN Motherboard - ASRock K8N68PV-GLAN | Quick Installation Guide - Page 91
2.10 Función de conexión y cambio en caliente para HDDs SATA / SATAII La placa base K8N68PV-GLAN soporta las funciones Hot Plug y Hot Swap para dispositivos SATA / SATAII en modo RAID / AHCI el sistema está conectado y en condiciones de funcionamiento. 91 ASRock K8N68PV-GLAN Motherboard Español - ASRock K8N68PV-GLAN | Quick Installation Guide - Page 92
SATA / SATAII con funciones NCQ y de Conexión en Caliente PASO 1: Configure BIOS. A. Entre a la Utilidad de configuración de BIOS pantalla de Avanzada Configuración IDE. B. Establezca la opción "SATA Operation Mode"(Modo de funcionamiento SATA) en [AHCI]. 92 ASRock K8N68PV-GLAN Motherboard Español - ASRock K8N68PV-GLAN | Quick Installation Guide - Page 93
son los siguientes: A. NVIDIA nForce Storage Controller (required) Windows XP/2000 B. NVIDIA nForce Storage Controller (required) Windows XP64 Seleccione A para Windows® 2000 / XP en modo AHCI. Seleccione B para Windows® XP 64 bits en modo AHCI. Español 93 ASRock K8N68PV-GLAN Motherboard - ASRock K8N68PV-GLAN | Quick Installation Guide - Page 94
(para usuarios de Windows® VistaTM) .. \ AMD64 \ AHCI_Vista64 (para usuarios de Windows® VistaTM 64 bits) A continuación, vuelva a insertar el disco óptico de Windows® VistaTM / VistaTM 64 bits en la unidad óptica para continuar con la instalación. 94 ASRock K8N68PV-GLAN Motherboard Español - ASRock K8N68PV-GLAN | Quick Installation Guide - Page 95
BIOS. A. Entre a la Utilidad de configuración de BIOS pantalla de Avanzada Configuración IDE. B. Establezca la opción "SATA Operation Mode"(Modo de funcionamiento SATA) en [non-RAID]. PASO 2: Instale el sistema operativo Windows RAID Installation Guide 2 . 1 ASRock K8N68PV-GLAN Motherboard Español - ASRock K8N68PV-GLAN | Quick Installation Guide - Page 96
la BIOS, por favor refiérase al Manual del Usuario (archivo PDF) contenido en el CD. 4.Información de Software Support CD Esta placa-base soporta diversos tipos de sistema operativo Windows®: 2000 pulse en el archivo ASSETUP.EXE para iniciar la instalación. 96 ASRock K8N68PV-GLAN Motherboard Español - ASRock K8N68PV-GLAN | Quick Installation Guide - Page 97
do modelo que está a utilizar. www.asrock.com/support/index.asp 1.1 Este pacote contém Placa-mãe ASRock K8N68PV-GLAN (Formato Micro ATX: 9,6 pol. x 8,0 pol., 24,4 cm x 20,3 cm) Guia de instalação rápida da ASRock K8N68PV-GLAN CD de suporte da placa ASRock K8N68PV-GLAN Um cabo-fita IDE Ultra ATA 66 - ASRock K8N68PV-GLAN | Quick Installation Guide - Page 98
20,3 cm - Soquete de 754 compatível com processador AMD ASRock 6CH_DVI I/O - 1 x porta para mouse PS/2 - 1 x porta para teclado PS/2 - 1 x porta VGA/D-Sub - 1 x porta VGA/DVI-D (veja o AVISO 5) - 1 x porta paralela (com suporte ECP/EPP) - 4 x portas USB 2.0 padrão 98 ASRock K8N68PV-GLAN Motherboard - ASRock K8N68PV-GLAN | Quick Installation Guide - Page 99
o AVISO 7) BIOS - 4Mb BIOS AMI - BIOS AMI - Suporta Windows® 2000 / XP / XP 64-bit / VistaTM / VistaTM 64-bit Operacional Certificações - FCC, CE, WHQL * Para informações mais detalhadas por favor visite o nosso sítio Web: http://www.asrock.com Português 99 ASRock K8N68PV-GLAN Motherboard - ASRock K8N68PV-GLAN | Quick Installation Guide - Page 100
ao ajuste das definições do BIOS, à aplicação da tecnologia Untied ção do Dico Rígido SATAII" na página 24 do "Manual do Utilizador" no CD de suporte para ajustar a unidade Windows® VistaTM de 64 bits / VistaTM / XP de 64 bits / XP SP1; SP2/2000 SP4. Português 100 ASRock K8N68PV-GLAN Motherboard - ASRock K8N68PV-GLAN | Quick Installation Guide - Page 101
2. Instalação K8N68PV-GLAN é uma Micro ATX forma factor (9.6-in x 8.0-in, 24.4 cm x 20.3 cm) tábua principal. Antes de instalar a parafusos nos furos para fixar a placa-mãe ao chassi, não os aperte excessivamente para não danificar a placa-mãe. Português ASRock K8N68PV-GLAN Motherboard 101 - ASRock K8N68PV-GLAN | Quick Installation Guide - Page 102
e heatsink são apertados firmemente e no bom contacto com cada um. E depois ligue o ventilador de CPU e o ligador de CPU_FAN (CPU_FAN1, veja p.2 No.7). Para a instalação apropriada, Refera ao manual da instrução de CPU ventilador e heatsink. Português 102 ASRock K8N68PV-GLAN Motherboard - ASRock K8N68PV-GLAN | Quick Installation Guide - Page 103
2.3 Instalação dos Módulos de Memória (DIMM) A placa mãe K8N68PV-GLAN fornece 2 slots de DDR (Taxa Dupla de Dados) DIMM tem 184 pinos. Certifique-se de ambos os lados se encaixem totalmente em seus locais e a DIMM esteja encaixada de modo apropriado. ASRock K8N68PV-GLAN Motherboard 103 Português - ASRock K8N68PV-GLAN | Quick Installation Guide - Page 104
de sinal DVI/HDCP e HDMI. Pode utilizar o adaptador DVI para HDMI para converter a porta DVI-D numa interface HDMI. Por favor consulte a página 18 do "Manual do utilizador" no CD de suporte para activar a função áudio HDMI consoante o SO que instalar. Português 104 ASRock K8N68PV-GLAN Motherboard - ASRock K8N68PV-GLAN | Quick Installation Guide - Page 105
usando um jumper. Por favor lembrese de remover o jumper depois de limpar o COMS. Se precisar limpar o CMOS ao concluir a atualização do BIOS, deverá reiniciar o sistema primeiro e, em seguida, desligá-lo antes de executar a ação de limpeza o CMOS. Português ASRock K8N68PV-GLAN Motherboard 105 - ASRock K8N68PV-GLAN | Quick Installation Guide - Page 106
(SATA) (opcional) Tanto a saída do cabo de Serial dados SATA pode ser conectado ao disco rígido SATA / SATAII quanto o conector SATAII na placa mãe. 106 ASRock K8N68PV-GLAN Motherboard Português - ASRock K8N68PV-GLAN | Quick Installation Guide - Page 107
ção Automática de Periféricos DeskExpress (IR1 de 5 pinos) (veja a folha 2, No. 30) Este suporte suporta a função de detecção automática de Periféricos para ASRock DeskExpress. ASRock K8N68PV-GLAN Motherboard 107 - ASRock K8N68PV-GLAN | Quick Installation Guide - Page 108
s instruções que aparecem no manual e no manual do chassis para instalar o sistema. AC'97. E. Entre no utilitário de configuração do BIOS. Vá até à opção Definições avançadas e direito para aceder ao Realtek HD Audio Manager. Para Windows® 2000 / XP / XP ASRock K8N68PV-GLAN Motherboard Português - ASRock K8N68PV-GLAN | Quick Installation Guide - Page 109
que é necessário ligar uma fonte de alimentação com conector ATX 12V neste conector para fornecer alimentação suficiente. Do contrário, haverá falhas de funcionamento. ASRock K8N68PV-GLAN Motherboard 109 - ASRock K8N68PV-GLAN | Quick Installation Guide - Page 110
e funcionando. Note, no entanto, que não essa função não pode ser usada se o sistema operacional estiver instalado na própria unidade de disco rígido SATA / SATAII. 110 ASRock K8N68PV-GLAN Motherboard Português - ASRock K8N68PV-GLAN | Quick Installation Guide - Page 111
Plug funções ETAPA 1: Aceda à BIOS. A. Vá até BIOS SETUP UTILITY Advanced screen IDE Configuration (Utilitário de configuração da BIOS - Ecrã avançado - Configuração IDE). B. Defina a opção "SATA Operation Mode" (Modo de funcionamento SATA) para [AHCI]. ASRock K8N68PV-GLAN Motherboard 111 - ASRock K8N68PV-GLAN | Quick Installation Guide - Page 112
Seguem abaixo os drivers: A. NVIDIA nForce Storage Controller (required) Windows XP/2000 B. NVIDIA nForce Storage Controller (required) Windows XP64 Selecione A para Windows® 2000 / XP no AHCI modo. Selecione B para Windows® XP 64-bit no AHCI modo. Português 112 ASRock K8N68PV-GLAN Motherboard - ASRock K8N68PV-GLAN | Quick Installation Guide - Page 113
utilizadores do Windows® VistaTM) .. \ AMD64 \ AHCI_Vista64 (para os utilizadores do Windows® VistaTM de 64 bits) Depois disto, introduza novamente o CD do Windows® VistaTM / VistaTM de 64 bits na unidade óptica para prosseguir com a instalação. ASRock K8N68PV-GLAN Motherboard 113 Português - ASRock K8N68PV-GLAN | Quick Installation Guide - Page 114
BIOS - Ecrã avançado - Configuração IDE). B. Defina a opção "SATA Operation Mode" (Modo de funcionamento SATA) para [non-RAID]. ETAPA 2: Instalar o Windows para os procedimentos detalhados: ..\ RAID Installation Guide 2.14 A tecnologia Untied Overclocking Esta ASRock K8N68PV-GLAN Motherboard - ASRock K8N68PV-GLAN | Quick Installation Guide - Page 115
do computador. Automaticamente iniciará o menu principal, casa o "AUTORUN" esteja ativado. Se o menu principal não aparecer automaticamente, explore o CD e execute o "ASSETUP.EXE" localizado na pasta "BIN". Português ASRock K8N68PV-GLAN Motherboard 115 - ASRock K8N68PV-GLAN | Quick Installation Guide - Page 116
- ASRock K8N68PV-GLAN | Quick Installation Guide - Page 117
- ASRock K8N68PV-GLAN | Quick Installation Guide - Page 118
- ASRock K8N68PV-GLAN | Quick Installation Guide - Page 119
- ASRock K8N68PV-GLAN | Quick Installation Guide - Page 120
- ASRock K8N68PV-GLAN | Quick Installation Guide - Page 121
- ASRock K8N68PV-GLAN | Quick Installation Guide - Page 122
- ASRock K8N68PV-GLAN | Quick Installation Guide - Page 123
- ASRock K8N68PV-GLAN | Quick Installation Guide - Page 124
- ASRock K8N68PV-GLAN | Quick Installation Guide - Page 125
- ASRock K8N68PV-GLAN | Quick Installation Guide - Page 126
- ASRock K8N68PV-GLAN | Quick Installation Guide - Page 127
- ASRock K8N68PV-GLAN | Quick Installation Guide - Page 128
-
 1
1 -
 2
2 -
 3
3 -
 4
4 -
 5
5 -
 6
6 -
 7
7 -
8
-
9
-
10
-
11
-
12
-
13
-
14
-
15
-
16
-
17
-
18
-
19
-
20
-
21
-
22
-
23
-
24
-
25
-
26
-
27
-
28
-
29
-
30
-
31
-
32
-
33
-
34
-
35
-
36
-
37
-
38
-
39
-
40
-
41
-
42
-
43
-
44
-
45
-
46
-
47
-
48
-
49
-
50
-
51
-
52
-
53
-
54
-
55
-
56
-
57
-
58
-
59
-
60
-
61
-
62
-
63
-
64
-
65
-
66
-
67
-
68
-
69
-
70
-
71
-
72
-
73
-
74
-
75
-
76
-
77
-
78
-
79
-
80
-
81
-
82
-
83
-
84
-
85
-
86
-
87
-
88
-
89
-
90
-
91
-
92
-
93
-
94
-
95
-
96
-
97
-
98
-
99
-
100
-
101
-
102
-
103
-
104
-
105
-
106
-
107
-
108
-
109
-
110
-
111
-
112
-
113
-
114
-
115
-
116
-
117
-
118
-
119
-
120
-
121
-
122
-
123
-
124
-
125
-
126
-
127
-
128
 |
 |
1
ASRock
K8N68PV-GLAN
Motherboard
English
English
English
English
English
Copyright Notice:
Copyright Notice:
Copyright Notice:
Copyright Notice:
Copyright Notice:
No part of this installation guide may be reproduced, transcribed, transmitted, or trans-
lated in any language, in any form or by any means, except duplication of documen-
tation by the purchaser for backup purpose, without written consent of ASRock Inc.
Products and corporate names appearing in this guide may or may not be registered
trademarks or copyrights of their respective companies, and are used only for identifica-
tion or explanation and to the owners’ benefit, without intent to infringe.
Disclaimer:
Disclaimer:
Disclaimer:
Disclaimer:
Disclaimer:
Specifications and information contained in this guide are furnished for informational
use only and subject to change without notice, and should not be constructed as a
commitment by ASRock. ASRock assumes no responsibility for any errors or omissions
that may appear in this guide.
With respect to the contents of this guide, ASRock does not provide warranty of any kind,
either expressed or implied, including but not limited to the implied warranties or
conditions of merchantability or fitness for a particular purpose. In no event shall
ASRock, its directors, officers, employees, or agents be liable for any indirect, special,
incidental, or consequential damages (including damages for loss of profits, loss of
business, loss of data, interruption of business and the like), even if ASRock has been
advised of the possibility of such damages arising from any defect or error in the guide
or product.
This device complies with Part 15 of the FCC Rules. Operation is subject to the
following two conditions:
(1)
this device may not cause harmful interference, and
(2)
this device must accept any interference received, including interference that
may cause undesired operation.
Published April 2008
Copyright
©
2008 ASRock INC. All rights reserved.
CALIFORNIA, USA ONLY
The Lithium battery adopted on this motherboard contains Perchlorate, a toxic
substance controlled in Perchlorate Best Management Practices (BMP) regulations
passed by the California Legislature. When you discard the Lithium battery in
California, USA, please follow the related regulations in advance.
“Perchlorate Material-special handling may apply, see
www
.dtsc.ca.gov/hazardouswa
ste/perchlorate”
ASRock Website: http://www.asrock.com