ASRock P4VT8 User Manual - Page 19
Guide to Con RAID 0 - bios
 |
View all ASRock P4VT8 manuals
Add to My Manuals
Save this manual to your list of manuals |
Page 19 highlights
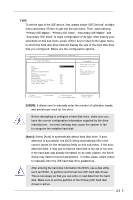
2.9.2.1 Guide to Configure RAID 0 Please enter "VIA Tech RAID BIOS Utility" to set RAID 0 configuration. STEP 1: Boot-up your computer. STEP 2: During POST press key to enter "VIA Tech RAID BIOS Utility". STEP 3: Start the configuration from the option Create Array. Select the option Create Array, then press key. STEP 4: Select the option Array Mode, then press key to display the pop-up menu of RAID system setting. STEP 5: Select RAID 0 for performance from the menu and press . From this point, you may choose to auto-configure the RAID array by selecting Auto Setup for Performance or manually configure the RAID array for striped sets. Please continue with the next step if you want to manually configure the RAID array, otherwise, proceed to step #5.3. 5.1 Select the option Select Disk Drives, then press . Use arrow keys to select disk drive(s), then press to mark selected drive. An asterisk is placed before the selected drive. 5.2 Select the option Block Size, then press to set array block size. A list of valid array block sizes are displayed on a pop-up menu. Use arrow keys to move selection bar on items and press to select. 5.3 Select the option Start Create Process and press to setup hard disk for RAID system. Then the confirmation message appears: The data on the selected disks will be destroyed. Continue? (Y/N) Press to confirm or to return to the configuration options. 19
-
 1
1 -
2
-
3
-
4
-
5
-
6
-
7
-
8
-
9
-
10
-
11
-
12
-
13
-
 14
14 -
 15
15 -
 16
16 -
 17
17 -
 18
18 -
 19
19 -
 20
20 -
 21
21 -
 22
22 -
 23
23 -
 24
24 -
25
-
26
-
27
-
28
-
29
-
30
-
31
-
32
-
33
 |
 |
