ASRock P75 Pro3 Quick Installation Guide
ASRock P75 Pro3 Manual
 |
View all ASRock P75 Pro3 manuals
Add to My Manuals
Save this manual to your list of manuals |
ASRock P75 Pro3 manual content summary:
- ASRock P75 Pro3 | Quick Installation Guide - Page 1
of ASRock Inc. Products and corporate names appearing in this guide profits, loss of business, loss of data, interruption of business and the like), even if ASRock ASRock Website: http://www.asrock.com Published August 2012 Copyright©2012 ASRock INC. All rights reserved. 1 ASRock P75 Pro3 Motherboard - ASRock P75 Pro3 | Quick Installation Guide - Page 2
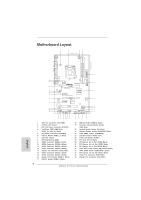
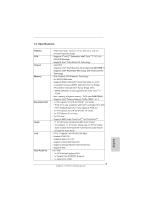
20 1918 17 16 15 14 13 1 CPU Fan Connector (CPU_FAN1) 2 1155-Pin CPU Socket 3 ATX 12V Power Connector (ATX12V1) 4 2 x 240-pin DDR3 DIMM Slots (DDR3_A1, DDR3_B1, Black) 5 ATX Power Connector (ATXPWR1) 6 USB 3.0 Header (USB3_2_3, Black) 7 Intel B75 Chipset 8 SPI Flash Memory (64Mb) 9 SATA3 Connector - ASRock P75 Pro3 | Quick Installation Guide - Page 3
connection LAN Port ** If you enable Multi-Streaming function, this motherboard can support up to 5.1 CH audio only. To enable Multi-Streaming function, 5) 2 V 4 V 6 V 8 V Line In (No. 4) -V V V Microphone (No. 6) --V V ASRock P75 Pro3 Motherboard Front Panel Headphone ---V 3 English - ASRock P75 Pro3 | Quick Installation Guide - Page 4
Shield ASRock Reminds You... To get better performance in Windows® 7 / 7 64-bit / VistaTM / VistaTM 64bit, it is recommended to set the BIOS option in Storage Configuration to AHCI mode. For the BIOS setup, please refer to the "User Manual" in our support CD for details. 4 ASRock P75 Pro3 Motherboard - ASRock P75 Pro3 | Quick Installation Guide - Page 5
LAN 10/100/1000 Mb/s - Realtek RTL8111E - Supports Wake-On-LAN - Supports LAN Cable Detection - Supports Energy Efficient Ethernet 802.3az - Supports PXE I/O Panel - 1 x PS/2 Mouse/Keyboard Port - 1 x Parallel Port (ECP/EPP Support) - 1 x Serial Port: COM1 5 ASRock P75 Pro3 Motherboard English - ASRock P75 Pro3 | Quick Installation Guide - Page 6
Software (Trial Version), CyberLink MediaEspresso 6.5 Trial, ASRock MAGIX Multimedia Suite - OEM - CPU Temperature Sensing - Chassis Temperature Sensing - CPU/Chassis/Power Fan Tachometer - CPU/Chassis Quiet Fan (Allows Chassis Fan Speed AutoAdjust by CPU Temperature) ASRock P75 Pro3 Motherboard - ASRock P75 Pro3 | Quick Installation Guide - Page 7
the memory that Windows® cannot use. 3. ASRock XFast RAM is not supported by Microsoft® Windows® XP / XP 64-bit. Intel® Smart Connect Technology and Intel® USB 3.0 ports are not supported by Microsoft® Windows® VistaTM / VistaTM 64-bit / XP / XP 64-bit. English 7 ASRock P75 Pro3 Motherboard - ASRock P75 Pro3 | Quick Installation Guide - Page 8
USB flash drive, floppy disk or hard drive, then you can update your BIOS only in a few clicks without preparing an additional floppy diskette or other complicated flash utility. Please be noted that the USB flash drive or hard drive must use FAT32/16/12 file system. 8 ASRock P75 Pro3 Motherboard English - ASRock P75 Pro3 | Quick Installation Guide - Page 9
visited websites, making web surfing faster than ever. And it also boosts the speed of Adobe Photoshop 5 times faster. Another advantage of ASRock XFast RAM is that it reduces the frequency of accessing your SSDs or HDDs in order to extend their lifespan. 9 ASRock P75 Pro3 Motherboard English - ASRock P75 Pro3 | Quick Installation Guide - Page 10
Browser ASRock UEFI system browser is a useful tool included in graphical UEFI. It can detect the devices and configurations that users are currently using in their PC. With the UEFI system browser, you can easily examine the current system configuration in UEFI setup. 10 ASRock P75 Pro3 Motherboard - ASRock P75 Pro3 | Quick Installation Guide - Page 11
types, Socket LGA 775, LGA 1155 and LGA 1156. Please be noticed that not all the 775 and 1156 CPU Fan can be used. ASRock Good Night LED ASRock Good Night LED technology can offer you a better environment by extinguishing the unessential LED. By enabling Good Night LED in BIOS, the Power / HDD - ASRock P75 Pro3 | Quick Installation Guide - Page 12
so may damage the motherboard. Before you install or remove any component, ensure that the power is switched off or the power cord is detached from the power supply. Failure to do so may cause severe damage to the motherboard, peripherals, and/or components. 12 ASRock P75 Pro3 Motherboard English - ASRock P75 Pro3 | Quick Installation Guide - Page 13
135 degrees in order to flip up the load plate. Step 2. Remove the PnP Cap (Pick and Place Cap). English 1. It is recommended to use the cap tab to handle and avoid kicking off the PnP cap. 2. This cap must be placed if returning the motherboard for after service. 13 ASRock P75 Pro3 Motherboard - ASRock P75 Pro3 | Quick Installation Guide - Page 14
3-4. Verify that the CPU is within the socket and properly mated to the orient keys. Step 4. Close the socket: Step 4-1. Flip the load plate onto the IHS. Step 4-2. Press down the load lever, and secure it with the load plate tab under the retention tab. English 14 ASRock P75 Pro3 Motherboard - ASRock P75 Pro3 | Quick Installation Guide - Page 15
components. Please be noticed that this motherboard supports Combo Cooler Option (C.C.O.), which provides flexible options to adopt three different CPU cooler types, Socket LGA 775, LGA 1155 and LGA 1156. The white throughholes are for Socket LGA 1155/1156 CPU fan. 15 ASRock P75 Pro3 Motherboard - ASRock P75 Pro3 | Quick Installation Guide - Page 16
. It will cause permanent damage to the motherboard and the DIMM if you force the DIMM into the slot at incorrect orientation. Step 3. Firmly insert the DIMM into the slot until the retaining clips at both ends fully snap back in place and the DIMM is properly seated. 16 ASRock P75 Pro3 Motherboard - ASRock P75 Pro3 | Quick Installation Guide - Page 17
firmly until the card is completely seated on the slot. Step 5. Fasten the card to the chassis with screws. Step 6. Replace the system cover 17 ASRock P75 Pro3 Motherboard English - ASRock P75 Pro3 | Quick Installation Guide - Page 18
in the future, please refer to AMD graphics card manuals for detailed installation guide. Step 1. Insert one Radeon graphics card into PCIE1 slot and the other Radeon graphics card to PCIE3 slot. Make sure that the cards are properly seated on the slots. English 18 ASRock P75 Pro3 Motherboard - ASRock P75 Pro3 | Quick Installation Guide - Page 19
. (The CrossFire Bridge is provided with the graphics card you purchase, not bundled with this motherboard. Please refer to your graphics card vendor for details.) CrossFire Bridge or Step 3. Connect the D-Sub monitor cable to the DVI to D-Sub adapter.) English 19 ASRock P75 Pro3 Motherboard - ASRock P75 Pro3 | Quick Installation Guide - Page 20
drivers prior to installation. Please check AMD's website for AMD driver updates. Step 3. Step 4. Step 5. Install the required drivers to your system. For Windows® XP OS: A. AMD recommends Windows® XP Service CrossFireXTM". Select "2 GPUs" and click "Apply". English 20 ASRock P75 Pro3 Motherboard - ASRock P75 Pro3 | Quick Installation Guide - Page 21
only for identification or explanation and to the owners' benefit, without intent to infringe. * For further information of AMD CrossFireXTM technology, please check AMD's website for updates and details. 21 ASRock P75 Pro3 Motherboard English - ASRock P75 Pro3 | Quick Installation Guide - Page 22
default setup, profile, 1394 GUID and MAC address will be cleared only if the CMOS battery is removed. If you clear the CMOS, the case open may be detected. Please adjust the BIOS option "Clear Status" to clear the record of previous chassis intrusion status. English 22 ASRock P75 Pro3 Motherboard - ASRock P75 Pro3 | Quick Installation Guide - Page 23
be connected to the SATA / SATA2 / SATA3 hard disk or the SATA2 / SATA3 connector on this motherboard. Besides four default USB 2.0 ports on the I/O panel, there are two USB 2.0 headers on this motherboard. Each USB 2.0 header can support two USB 2.0 ports. English 23 ASRock P75 Pro3 Motherboard - ASRock P75 Pro3 | Quick Installation Guide - Page 24
Audio supports Jack Sensing, but the panel wire on the chassis must support HDA to function correctly. Please follow the instruction in our manual and chassis manual to OS: Go to the "FrontMic" Tab in the Realtek Control panel. Adjust "Recording Volume". English 24 ASRock P75 Pro3 Motherboard - ASRock P75 Pro3 | Quick Installation Guide - Page 25
the system is operating. The LED keeps blinking in S1/S3 state. The LED is off in S4 state or S5 state (power off). 25 ASRock P75 Pro3 Motherboard English - ASRock P75 Pro3 | Quick Installation Guide - Page 26
to the ground pin. Though this motherboard provides 4-Pin CPU fan (Quiet Fan) support, the 3-Pin CPU fan still can work successfully even without the fan speed control function. If you plan to connect the 3-Pin CPU fan to the CPU fan connector on this motherboard, please connect it to Pin 1-3. Pin - ASRock P75 Pro3 | Quick Installation Guide - Page 27
30) 1 GND SPDIFOUT Please connect an ATX 12V power supply to this connector. This motherboard supports CASE OPEN detection feature that detects if the chassis cover has been removed. This feature HDMI_SPDIF connector of HDMI VGA card to this header. English 27 ASRock P75 Pro3 Motherboard - ASRock P75 Pro3 | Quick Installation Guide - Page 28
XP 64-bit. Using SATA / SATA2 / SATA3 HDDs without NCQ function STEP 1: Set Up UEFI. A. Enter UEFI SETUP UTILITY Advanced screen Storage Configuration. B. Set the option "SATA Mode Selection" to [IDE]. STEP 2: Install Windows® XP / XP 64-bit OS on your system. 28 ASRock P75 Pro3 Motherboard English - ASRock P75 Pro3 | Quick Installation Guide - Page 29
/ SATA2 / SATA3 HDDs with NCQ function STEP 1: Set Up UEFI. A. Enter UEFI SETUP UTILITY Advanced screen Storage Configuration. B. Set the option "SATA Mode Selection" to [AHCI]. STEP 2: Install Windows® 7 / 7 64-bit / VistaTM / VistaTM 64-bit OS on your system. 29 ASRock P75 Pro3 Motherboard English - ASRock P75 Pro3 | Quick Installation Guide - Page 30
your computer. If the Main Menu does not appear automatically, locate and double-click on the file "ASSETUP.EXE" from the BIN folder in the Support CD to display the menus. 30 ASRock P75 Pro3 Motherboard English - ASRock P75 Pro3 | Quick Installation Guide - Page 31
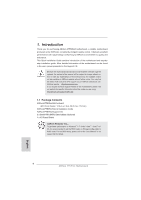
benötigen, besuchen Sie bitte unsere Webseite: www.asrock.com/support/index.asp 1.1 Kartoninhalt ASRock P75 Pro3 Motherboard (ATX-Formfaktor: 30.5 cm x 17.8 cm; 12.0 Zoll x 7.0 Zoll) ASRock P75 Pro3 Schnellinstallationsanleitung ASRock P75 Pro3 Support-CD Zwei Serial ATA (SATA) -Datenkabel (optional - ASRock P75 Pro3 | Quick Installation Guide - Page 32
LAN 10/100/1000 Mb/s - Realtek RTL8111E - Unterstützt Wake-On-LAN - Unterstützt LAN-Kabelerkennung - Unterstützt energieeffizientes Ethernet 802.3az - Unterstützt PXE I/O Panel - 1 x PS/2-Tastaturanschluss/Mausanschluss - 1 x Parallel Port (ECP/EPP Support) 32 ASRock P75 Pro3 Motherboard Deutsch - ASRock P75 Pro3 | Quick Installation Guide - Page 33
SATA3 USB3.0 Anschlüsse BIOS - 1 x Serieller port: COM 1 - 1 x BIOS UEFI mit GUI-Unterstützung - Unterstützung für "Plug and Play" - ACPI 1.1-Weckfunktionen - JumperFree-Modus - SMBIOS 2.3.1 - CPU Core, DRAM, 1.8V PLL, VTT, VCCSA Stromspannung Multianpassung Deutsch 33 ASRock P75 Pro3 Motherboard - ASRock P75 Pro3 | Quick Installation Guide - Page 34
au tomatische Anpassung der Gehäuselüftergeschwindigkeit durch CPU-Temperatur) - Mehrstufige Geschwindigkeitssteuerung für CPU/Gehäuse lüfter - GEHÄUSE OFFEN-Erkennung die ausführliche Produktinformation, besuchen Sie bitte unsere Website: http://www.asrock.com 34 ASRock P75 Pro3 Motherboard Deutsch - ASRock P75 Pro3 | Quick Installation Guide - Page 35
BIOS-Aktualisierung löschen müssen, fahren Sie zuerst das System hoch. Fahren Sie es dann vor der CMOS-Löschung herunter. Bitte beachten Sie, dass Kennwort, Datum, Uhrzeit, benutzerdefiniertes Profil, 1394 GUID die BIOS-Option "Status leeren" ein. Deutsch 35 ASRock P75 Pro3 Motherboard - ASRock P75 Pro3 | Quick Installation Guide - Page 36
Anschlüsse. Wenn Sie Jumperkappen auf Header und Anschlüsse setzen, wird das Motherboard unreparierbar beschädigt! Seriell-ATA2-Anschlüsse (SATA2_1: siehe S.2 - No. USB 2.0- Anschlussleisten am Motherboard. Pro USB 2.0Anschlussleiste werden zwei USB 2.0-Ports unterstützt. ASRock P75 Pro3 Motherboard - ASRock P75 Pro3 | Quick Installation Guide - Page 37
Neben zwei Standard-USB 3.0-Ports am E/A-Panel befindet sich ein USB 3.0Header an diesem Motherboard. Dieser USB 3.0Header kann zwei USB 3.0Ports unterstützen. Infrarot-Modul-Header (5-pin IR1) an OUT2_L an. C. Schließen Sie Ground (GND) an Ground (GND) an. 37 ASRock P75 Pro3 Motherboard Deutsch - ASRock P75 Pro3 | Quick Installation Guide - Page 38
-LED, Lautsprechern, etc. Stellen Sie beim Anschließen des Frontblendenmoduls Ihres Gehäuses an diesem Header sicher, dass die Kabel- und Pinbelegung korrekt übereinstimmen. 38 ASRock P75 Pro3 Motherboard Deutsch - ASRock P75 Pro3 | Quick Installation Guide - Page 39
auch ohne Geschwindigkeitsregulierung. Wenn Sie einen dreipoligen CPU-Lüfter an den CPU-Lüferanschluss dieses Motherboards anschließen möchten, verbinden Sie ihn bitte mit den Pins 1 - 3. Pins 1-3 anschließen Lüfter mit dreipoligem Anschluss installieren Deutsch 39 ASRock P75 Pro3 Motherboard - ASRock P75 Pro3 | Quick Installation Guide - Page 40
- No. 5) 12 24 Verbinden Sie die ATXStromversorgung mit diesem Header. 1 13 Obwohl dieses Motherboard einen 24-pol. ATX- 12 2424 Stromanschluss bietet, kann es auch mit einem modifizierten traditionellen -Anschluss der HDMI-VGA-Karte mit diesem Anschluss. 40 ASRock P75 Pro3 Motherboard - ASRock P75 Pro3 | Quick Installation Guide - Page 41
der Support-CD, um die Menüs aufzurufen. Das Setup-Programm soll es Ihnen so leicht wie möglich machen. Es ist menügesteuert, d.h. Sie können in den verschiedenen Untermenüs Ihre Auswahl treffen und die Programme werden dann automatisch installiert. 41 ASRock P75 Pro3 Motherboard Deutsch - ASRock P75 Pro3 | Quick Installation Guide - Page 42
sous Windows® 7 / 7 64 bits / VistaTM / VistaTM 64 bits, il est recommandé de paramétrer l'option BIOS dans Configuration de stockage en mode AHCI. Pour plus de détails sur l'installation BIOS, référez-vous au "Mode d'emploi" sur votre CD de support. 42 ASRock P75 Pro3 Motherboard Français - ASRock P75 Pro3 | Quick Installation Guide - Page 43
multicanal via le pilote audio. - PCIE x1 Gigabit LAN 10/100/1000 Mb/s - Realtek RTL8111E - Support du Wake-On-LAN - Prise en charge de la détection de câble LAN - Prend en charge la norme Energy Efficient Ethernet (Ethernet à efficacité énergétique) 802.3az 43 ASRock P75 Pro3 Motherboard Français - ASRock P75 Pro3 | Quick Installation Guide - Page 44
LED d'alimentation - 1 x Embase d'intrusion châssis - 1 x Connecteur pour ventilateur de CPU (br. 4) - 2 x Connecteur pour ventilateur de Châssis (1 x br. 4, USB 3.0 supplémentaires) - 64Mb AMI UEFI Legal BIOS avec support GUI - Support du "Plug and Play" Français 44 ASRock P75 Pro3 Motherboard - ASRock P75 Pro3 | Quick Installation Guide - Page 45
Support SMBIOS 2.3.1 - CPU Core, DRAM, 1.8V PLL, VTT, VCCSA Tension Multi-ajustement CD d'assistance - Pilotes, utilitaires, logiciel anti-virus (version d'évaluation), CyberLink MediaEspresso 6.5 Trial, Suite multimédia ASRock : http://www.asrock.com Français 45 ASRock P75 Pro3 Motherboard - ASRock P75 Pro3 | Quick Installation Guide - Page 46
batterie du CMOS est enlevée. Si vous effacez la CMOS, il se peut qu'une ouverture du boîtier soitdétectée. Veuillez ajuster l'option du BIOS "Clear Status" (Effacerl'état) pour effacer la mention d'état d'intrusion dans le châssis. Français 46 ASRock P75 Pro3 Motherboard - ASRock P75 Pro3 | Quick Installation Guide - Page 47
2.0 par défaut sur le panneau E/S, il y a deux embases USB 2.0 sur cette carte mère. Chaque embase USB 2.0 peut prendre en charge 2 ports USB 2.0. Français 47 ASRock P75 Pro3 Motherboard - ASRock P75 Pro3 | Quick Installation Guide - Page 48
20) IRTX +5VSB DUMMY 1 GND IRRX Cet en-tête supporte un module infrarouge optionnel de transfert et de réception sans fil. le HDA pour fonctionner correctement. Veuillez suivre les instructions dans notre manuel et le manuel de châssis afin Ground (GND). 48 ASRock P75 Pro3 Motherboard Français - ASRock P75 Pro3 | Quick Installation Guide - Page 49
avant peut varier en fonction du châssis. Un module de panneau avant consiste principalement en : interrupteur d'alimentation, interrupteur de réinitialisation, voyant DEL d'alimentation, 49 ASRock P75 Pro3 Motherboard Français - ASRock P75 Pro3 | Quick Installation Guide - Page 50
un support de (Ventilateur silencieux ventilateur de CPU à 4 broches , le ventilateur de CPU à CPU à 3 broches au connecteur du ventilateur de CPU sur cette carte mère, veuillez le connecter aux broches 1-3. Installation de ventilateur à 3 broches Broches 1-3 connectées 50 ASRock P75 Pro3 Motherboard - ASRock P75 Pro3 | Quick Installation Guide - Page 51
numérique HDMI /un projecteur / un périphérique LCD. Veuillez brancher le connecteur HDMI_SPDIF de la carte VGA HDMI sur ce connecteur. Français 51 ASRock P75 Pro3 Motherboard - ASRock P75 Pro3 | Quick Installation Guide - Page 52
Setup du BIOS. Lorsque vous démarrez l'ordinateur, veuillez presser ou pendant le POST (Power-OnSelf-Test) pour entrer dans le BIOS; sinon, le POST continue ses tests de routine. Si vous désirez entrer dans le BIOS dessus pour afficher les menus. 52 ASRock P75 Pro3 Motherboard Français - ASRock P75 Pro3 | Quick Installation Guide - Page 53
/ VistaTM / VistaTM 64-bit, si consiglia di impostare l'opzione BIOS in Storage Configuration (Configurazione di archiviazione) sulla modalità AHCI. Per l'impostazione BIOS, fare riferimento a "User Manual" (Manuale dell'utente) nel CD di supporto per dettagli. 53 ASRock P75 Pro3 Motherboard Italiano - ASRock P75 Pro3 | Quick Installation Guide - Page 54
x1 Gigabit LAN 10/100/1000 Mb/s - Realtek RTL8111E - Supporta Wake-On-LAN - Supporta il rilevamento cavo LAN - Supporto di Energy Efficient Ethernet 802.3az - Supporta PXE I/O Panel - 1 x porta PS/2 per tastiera/mouse - 1 x porta parallela: supporto ECP/EPP 54 ASRock P75 Pro3 Motherboard Italiano - ASRock P75 Pro3 | Quick Installation Guide - Page 55
wake up events - Supporta jumperfree - Supporta SMBIOS 2.3.1 - Regolazione multi-voltaggio CPU Core, DRAM, 1.8V PLL, VTT, VCCSA - Driver, Utilità, Software AntiVirus (versione di prova), CyberLink MediaEspresso 6.5 Trial, Suite multimediale ASRock MAGIX - OEM 55 ASRock P75 Pro3 Motherboard Italiano - ASRock P75 Pro3 | Quick Installation Guide - Page 56
- Indicatore di velocità per la ventola del CPU/Chassis/potenza Alimentazione - Ventola CPU/Chassis silenziosa (permette la regolazione automatica della ventola * Per ulteriori informazioni, prego visitare il nostro sito internet: http://www.asrock.com Italiano 56 ASRock P75 Pro3 Motherboard - ASRock P75 Pro3 | Quick Installation Guide - Page 57
cancellati solo se è rimossa la batteria della CMOS. Se si cancella la CMOS, potrebbe essere rilevata l'apertura del case.Regolare l'opzione del BIOS "Clear Status" (Cancella stato) per cancellarela registrazione del precedente stato d'intrusione chassis. Italiano 57 ASRock P75 Pro3 Motherboard - ASRock P75 Pro3 | Quick Installation Guide - Page 58
alle quattro porte USB 2.0 predefinite nel pannello I/O, la scheda madre dispone di due intestazioni USB 2.0. Ciascuna intestazione USB 2.0 supporta due porte USB 2.0. Italiano 58 ASRock P75 Pro3 Motherboard - ASRock P75 Pro3 | Quick Installation Guide - Page 59
sì che questa operi in modo corretto. Attenersi alle istruzioni del nostro manuale e del manuale del telaio per installare il sistema. 2. Se si utilizza un pannello pannello di controllo Realtek. Regolare la voce "Recording Volume" (Volume registrazione). 59 ASRock P75 Pro3 Motherboard Italiano - ASRock P75 Pro3 | Quick Installation Guide - Page 60
e dei pin sia fatta corrispondere in modo appropriato. Collettore casse telaio (4-pin SPEAKER1) (vedi p.2 Nr. 21) Collegare le casse del telaio a questo collettore. Italiano 60 ASRock P75 Pro3 Motherboard - ASRock P75 Pro3 | Quick Installation Guide - Page 61
CPU su questa scheda madre, collegarla ai piedini 1-3. Piedini 1-3 collegati Installazione della ventola a 3 piedini Connettore alimentazione ATX 12 24 (24-pin ATXPWR1) (vedi p.2 Nr. 5) 1 13 Collegare la sorgente d'alimentazione ATX a questo connettore. Italiano 61 ASRock P75 Pro3 Motherboard - ASRock P75 Pro3 | Quick Installation Guide - Page 62
VGA, consente al sistema di collegare dispositivi per TV digitale HDMI/proiettori/ LCD . Collegare il connettore HDMI_SPDIF della scheda VGA HDMI a questo header. Italiano 62 ASRock P75 Pro3 Motherboard - ASRock P75 Pro3 | Quick Installation Guide - Page 63
test di routine. Per entrare il BIOS Setup dopo il POST, riavvia il sistema premendo + + , o premi il tasto di reset sullo chassis del sistema. Per informazioni più dettagliate circa il Setup del BIOS, fare riferimento al Manuale i menù. 63 ASRock P75 Pro3 Motherboard Italiano - ASRock P75 Pro3 | Quick Installation Guide - Page 64
/ VistaTM / VistaTM 64 bits, es recomendable establecer la opción del BIOS de la configuración de almacenamiento en el modo AHCI. Para obtener detalles sobre la configuración del BIOS, consulte el "Manual del usuario" que se encuentra en nuestro CD de soporte. 64 ASRock P75 Pro3 Motherboard Español - ASRock P75 Pro3 | Quick Installation Guide - Page 65
/1000 Mb/s - Realtek RTL8111E - Soporta Wake-On-LAN - Admite detección de conexión de cable LAN - Compatible con Ethernet 802.3az de bajo consumo energético - Compatible con PXE I/O Panel - 1 x puerto de teclado/ratón PS/2 - 1 x puerto paralelo: soporta ECP/EPP 65 ASRock P75 Pro3 Motherboard Espa - ASRock P75 Pro3 | Quick Installation Guide - Page 66
2 puertos USB 3.0 adicionales) - 64Mb AMI BIOS legal UEFI AMI compatible con GUI - Soporta "Plug and Play" - ACPI 1.1 compliance wake up events - Soporta "jumper free" - Soporta SMBIOS 2.3.1 - Múltiple ajuste de CPU Core, DRAM, 1.8V PLL, VTT, VCCSA Voltage Español 66 ASRock P75 Pro3 Motherboard - ASRock P75 Pro3 | Quick Installation Guide - Page 67
en función de la temperatura del procesador) - Control de ajuste de la velocidad del ventilador de la CPU / chasis - Control de APERTURA DE CARCASA - Monitor de Voltaje: +12V, +5V, +3.3V, , por favor visite nuestro sitio web: http://www.asrock.com Español 67 ASRock P75 Pro3 Motherboard - ASRock P75 Pro3 | Quick Installation Guide - Page 68
solamente se borrará si la batería CMOS se quita. Si borra la memoria CMOS, se puede detectar un caso de abertura.Ajuste la opción del BIOS "Clear Status" (Borrar estado) para borrar elregistro del estado de intrusión anterior del chasis. Español 68 ASRock P75 Pro3 Motherboard - ASRock P75 Pro3 | Quick Installation Guide - Page 69
de E/S, hay dos bases de conexiones USB 2.0 en esta placa base. Cada una de estas bases de conexiones admite dos puertos USB 2.0. Español 69 ASRock P75 Pro3 Motherboard - ASRock P75 Pro3 | Quick Installation Guide - Page 70
el chasis debe soportar HDA para operar correctamente. Por favor, siga las instrucciones en nuestro manual y en el manual de chasis para instalar su sistema. 2. Si utiliza el panel de sonido AC'97, A continuación, haga clic en "FrontMic" (Micrófono frontal). Español 70 ASRock P75 Pro3 Motherboard - ASRock P75 Pro3 | Quick Installation Guide - Page 71
módulo del panel frontal del chasis a esta cabecera, asegúrese de que las asignaciones de cables y las asignaciones de contactos coincidan correctamente. Español 71 ASRock P75 Pro3 Motherboard - ASRock P75 Pro3 | Quick Installation Guide - Page 72
masa. Conector del ventilador de la CPU (4-pin CPU_FAN1) (vea p.2, N. 1) 4 3 2 1 GND +12V CPU_FAN_SPEED FAN_SPEED_CONTROL Conecte el cable del ventilador de la CPU a este conector y haga coincidir el 1-3 conectado Instalación del ventilador de 3 contactos Español 72 ASRock P75 Pro3 Motherboard - ASRock P75 Pro3 | Quick Installation Guide - Page 73
al sistema conectarse a dispositivos de TV Digital HDMI / proyectores / Dispositivos LCD. Conecte el conector HDMI_SPDIF de la tarjeta VGA HDMI a esta cabecera. Español 73 ASRock P75 Pro3 Motherboard - ASRock P75 Pro3 | Quick Installation Guide - Page 74
información detallada sobre como configurar la BIOS, por favor refiérase al Manual del Usuario (archivo PDF) contenido en el CD. 3. Información de Software Support CD Esta placa-base soporta diversos tipos de el archivo "ASSETUP.EXE" para iniciar la instalación. 74 ASRock P75 Pro3 Motherboard Español - ASRock P75 Pro3 | Quick Installation Guide - Page 75
.com www.asrock.com/support/index.asp 1.1 ASRock P75 Pro3 ATX: 12,0 x 7,0 30,5 x 17,8 см) ASRock P75 Pro3 ASRock P75 Pro3 2 x Serial ATA (SATA 1 x I/O ASRock Windows® 7 / 7 64-bit / VistaTM / VistaTM 64-bit BIOS Storage Configuration AHCI BIOS 75 ASRock P75 Pro3 Motherboard - ASRock P75 Pro3 | Quick Installation Guide - Page 76
x 1 Gigabit LAN 10/100/1000 Mb/s - Realtek RTL8111E Wake-On-LAN Ethernet 802.3az PXE I/O Panel 1 x PS/2 панели - 1 x ECP/EPP - 1 x порт COM1 - 1 x порт Coaxial SPDIF Out - 4 x порта USB 2.0 - 2 x порта USB 3.0 - 1 x RJ-45 LAN 76 ASRock P75 Pro3 Motherboard - ASRock P75 Pro3 | Quick Installation Guide - Page 77
USB 2.0 4 USB 2.0 - 1 x USB 3.0 2 USB 3.0) - 64Mb AMI UEFI Legal BIOS rpaфичеckoro интеpфeйca Plug and Play" - ACPI 1.1 SMBIOS 2.3.1 CPU Core, DRAM, 1.8V PLL, VTT, VCCSA CyberLink MediaEspresso 6.5, ASRock MAGIX Multimedia Suite CPU/Chassis/Power FAN 77 ASRock P75 Pro3 Motherboard - ASRock P75 Pro3 | Quick Installation Guide - Page 78
Ready ErP/EuP) http://www.asrock.com 1.3 short open 3 1 и 2 CMOS (CLRCMOS1, 3 2, п. 22) CMOS CLRCMOS1 CMOS 15 5 2 и 3 CLRCMOS1 CMOS BIOS CMOS BIOS CMOS 1394 GUID и MAC CMOS. CMOS Clear Status» в BIOS 78 ASRock P75 Pro3 Motherboard - ASRock P75 Pro3 | Quick Installation Guide - Page 79
ATA (SATA USB 2.0 (9 USB4_5 2, п. 18) (9 USB6_7 2, п. 17) Serial ATA2 SATA2 SATA 3,0 Serial ATA3 SATA3 SATA 6,0 SATA / SATA2 / SATA3 SATA2 / SATA3 USB 2.0 USB 2.0 USB 2.0 USB 2.0. 79 ASRock P75 Pro3 Motherboard - ASRock P75 Pro3 | Quick Installation Guide - Page 80
'97 A Mic_IN (MIC MIC2_L. B Audio_R (RIN OUT2_R Audio_L (LIN OUT2_L. C Ground (GND Ground (GND). D MIC_RET и OUT_RET HD AC'97 E Windows® XP / XP 64-бита: 80 ASRock P75 Pro3 Motherboard - ASRock P75 Pro3 | Quick Installation Guide - Page 81
Mixer Recorder FrontMic Windows® 7 / 7 64-бита, VistaTM / VistaTM 64 FrontMic Realtek Recording Volume 9 PANEL1 2, п. 16) PWRBTN RESET PLED S1/S3 S4 S5). HDLED 81 ASRock P75 Pro3 Motherboard - ASRock P75 Pro3 | Quick Installation Guide - Page 82
Power LED (3 PLED1 2, п. 24) 1 PLEDPLED+ PLED+ Chassis и Power Fan (4 CHA_FAN1 2, п. 33) FAN_SPEED_CONTROL CHA_FAN_SPEED +12V GND (3 CHA_FAN2 2, п. CPU_FAN1 2, п. 1) 4 3 2 1 GND +12V CPU_FAN_SPEED FAN_SPEED_CONTROL 4 3 3 1-3. 1-3 3 82 ASRock P75 Pro3 Motherboard - ASRock P75 Pro3 | Quick Installation Guide - Page 83
1 13 12V-ATX (4 ATX12V1 2, п. 3) ATX 12V. 2 CI1 2, п. 23) 1 GND Signal HDMI_SPDIF (2 HDMI_SPDIF1 2, п. 30) 1 GND SPDIFOUT HDMI_SPDIF VGA-карту HDMI HDMI HDMI_SPDIF на VGAкарте HDMI. 83 ASRock P75 Pro3 Motherboard - ASRock P75 Pro3 | Quick Installation Guide - Page 84
BIOS (BIOS Setup BIOS Setup F2> или + + - ASRock P75 Pro3 | Quick Installation Guide - Page 85
desempenho em Windows® 7 / 7 64-bit / VistaTM / VistaTM 64-bit, recomendamos que defina a opção Configuração de Armazenamento na BIOS para o modo AHCI. Para mais detalhes acerca da configuração da BIOS consulte o "Manual de utilizador" no nosso CD de suporte. 85 ASRock P75 Pro3 Motherboard Português - ASRock P75 Pro3 | Quick Installation Guide - Page 86
painel frontal e active a função de áudio de multicanal no controlador de áudio. - PCIE x1 Gigabit LAN 10/100/1000 Mb/s - Realtek RTL8111E - Suporta Wake-On-LAN - Suporta Detecção de cabo LAN - Suporta Ethernet com Eficiência Energética 802.3az - Suporta PXE Português 86 ASRock P75 Pro3 Motherboard - ASRock P75 Pro3 | Quick Installation Guide - Page 87
CPU BIOS UEFI oficial da AMI com suporte para GUI - Suporta dispositivos "Plug and Play" - ACPI 1.1 atendendo a eventos de "wake up" - Suporta dispositivos sem jumper - Suporte para SMBIOS 2.3.1 - CPU Core, DRAM, 1.8V PLL, VTT, VCCSA Voltage Multi-adjustment Português 87 ASRock P75 Pro3 Motherboard - ASRock P75 Pro3 | Quick Installation Guide - Page 88
energia - Ventoinha silenciosa para a CPU/chassis (Permitir velocidade Chassis Auto-Ajuste de temperatura da CPU) - CPU/Chassis Fan Controle Multi-Velocidade - Detecção de ções mais detalhadas por favor visite o nosso sítio Web: http://www.asrock.com Português 88 ASRock P75 Pro3 Motherboard - ASRock P75 Pro3 | Quick Installation Guide - Page 89
GUID e endereço MAC apenas serão limpos se a bateria do CMOS for retirada. Se limpar o CMOS, poderá ser detectada a abertura da caixa. Ajuste aopção do BIOS "Clear Status" (Limpar estado) para limpar o registo anterior de estado de intrusão no chassis. Português 89 ASRock P75 Pro3 Motherboard - ASRock P75 Pro3 | Quick Installation Guide - Page 90
USB 2.0 por defeito no painel de entrada/saída, há dois ligações USB 2.0 nesta placa-mãe. Cada ligação USB 2.0 pode suportar dois portas USB 2.0. Português 90 ASRock P75 Pro3 Motherboard - ASRock P75 Pro3 | Quick Installation Guide - Page 91
no chassis tem de suportar HDA para funcionar correctamente. Siga s instruções que aparecem no manual e no manual do chassis para instalar o sistema. 2. Se utilizar o painel de áudio AC'97, " no painel de Controlo Realtek. Ajuste o "Volume de gravação". 91 ASRock P75 Pro3 Motherboard Português - ASRock P75 Pro3 | Quick Installation Guide - Page 92
correspondência exacta. Conector do alto-falante do chassi (SPEAKER1 de 4 pinos) (veja a folha 2, No. 21) Ligue o alto-falante do chassi neste conector. Português 92 ASRock P75 Pro3 Motherboard - ASRock P75 Pro3 | Quick Installation Guide - Page 93
ventoinha do CPU nesta placa-mãe, por favor, ligue-a aos pinos 1-3. Pinos 1-3 ligados Instalação de Ventoinha de 3 pinos Conector de força do ATX (ATXPWR1 de 24 pinos) (veja a folha 2, No. 5) 12 24 Ligue a fonte de alimentação ATX neste conector. 1 13 Português 93 ASRock P75 Pro3 Motherboard - ASRock P75 Pro3 | Quick Installation Guide - Page 94
placas VGA HDMI, permite ligar televisores digitais/ projectores/LCD com entrada HDMI ao sistema. Ligue o conector HDMI_SPDIF da placa VGA HDMI a este conector. Português 94 ASRock P75 Pro3 Motherboard - ASRock P75 Pro3 | Quick Installation Guide - Page 95
do computador. Automaticamente iniciará o menu principal, casa o AUTORUN esteja ativado. Se o menu principal não aparecer automaticamente, explore o CD e execute o "ASSETUP.EXE" localizado na pasta BIN. 95 ASRock P75 Pro3 Motherboard Português - ASRock P75 Pro3 | Quick Installation Guide - Page 96
/ 7 64-bit / VistaTM / VistaTM 64-bit ile daha iyi performans elde etmek için, Depolama Konfigürasyonundaki BIOS seçeneğini AHCI moduna ayarlamanız tavsiye edilir. BIOS ayarı için, ayrıntıları öğrenmek üzere lütfen destek CD'mizdeki "Kullanıcı Kılavuzu"na bakın. 96 ASRock P75 Pro3 Motherboard Türkçe - ASRock P75 Pro3 | Quick Installation Guide - Page 97
/100/1000 Mb/sn - Realtek RTL8111E - LAN'da Uyan özelliğini destekler - LAN Kablo Algılama'yı destekler - Enerji Verimli Ethernet 802.3az desteği - PXE'yi destekler G/З Paneli - 1 x PS/2 Klavye/Fare Portu - 1 x Paralel Port (ECP / EPP Desteği) - 1 x COM1 Portu 97 ASRock P75 Pro3 Motherboard Türkçe - ASRock P75 Pro3 | Quick Installation Guide - Page 98
x USB 3.0 fiş (2 USB 3.0 portu destekler) - 64 Mb GUI destekli AMI UEFI Geçerli BIOS - "Tak Çalıştır"ı destekler - ACPI 1.1 Uyumlu Uyandırma ASRock MAGIX Multimedya Seti - OEM - CPU Sıcaklık Duyarlılığı - Kasa Sıcaklık Duyarlılığı - CPU/Kasa/Güç Fan Takometresi Türkçe 98 ASRock P75 Pro3 Motherboard - ASRock P75 Pro3 | Quick Installation Guide - Page 99
lemci sıcaklığı ile Otomatik Ayar'ına izin verir) - CPU/Kasa Fan Çoklu-Hız Kontrolü - KASA AÇIK algılaması - Voltaj İzleme: +12V, +5V, +3,3V, CPU Vcore İS - Microsoft® Windows® 7 / 7 64 için lütfen web sitemizi ziyaret edin: http://www.asrock.com Türkçe 99 ASRock P75 Pro3 Motherboard - ASRock P75 Pro3 | Quick Installation Guide - Page 100
1394 GUID ve MAC adresinin yalnızca CMOS pili çıkarıldığında temizleneceğini lütfen aklınızda bulundurunuz. CMOS'u temizlerseniz, kasa açma algılanabilir. Lütfen "Temizleme Durumu" BIOS seçeneğini önceki kasaya yetkisiz erişim durumunun kaydı için ayarlayın. Türkçe 100 ASRock P75 Pro3 Motherboard - ASRock P75 Pro3 | Quick Installation Guide - Page 101
USB6_7) (bkz. s.2 No. 17) G/Ç panelindeki varsayılan dört USB 2.0 portundan başka, bu anakartta iki USB 2.0 fişi bulunur. Her USB 2.0 fişi iki USB 2.0 portunu destekler. Türkçe 101 ASRock P75 Pro3 Motherboard - ASRock P75 Pro3 | Quick Installation Guide - Page 102
çin. Sonra "Ön Mikrofon"u tıklatın. Windows® 7 / 7 64-bit / VistaTM / VistaTM 64-bit İS için: Realtek Kontrol panelinde "Ön Mikrofon" Sekmesine gidin. "Kayıt Ses Seviyesi"ni ayarlayın. Türkçe 102 ASRock P75 Pro3 Motherboard - ASRock P75 Pro3 | Quick Installation Guide - Page 103
ğlayın. Sistem çalışırken LED açıktır. LED S1/ S3 durumunda yanıp sönmeye devam eder. LED S3/S4 durumunda veya S5 durumun da (güç kapalı) kapalıdır. 103 ASRock P75 Pro3 Motherboard Türkçe - ASRock P75 Pro3 | Quick Installation Guide - Page 104
anakart 4-Pinli CPU fan (Sessiz Fan) desteği sağlasa da, 3-Pinli CPU fan hızı kontrol işlevi olmadan bile hala başarılı bir şekilde çalışabilir. 3-Pinli CPU fanı bu konektördeki CPU fan konektörüne 13'le birlikte takın. 20-Pinli ATX Güç Kaynağını Takma 1 13 Türkçe 104 ASRock P75 Pro3 Motherboard - ASRock P75 Pro3 | Quick Installation Guide - Page 105
sağlar, sistemin HDMI Dijital TV/projektör/LCD cihazlarını bağlamasına izin verir. Lütfen HDMI VGA kartının HDMI_SPDIF konektörünü bu fişe bağlayın. Türkçe 105 ASRock P75 Pro3 Motherboard - ASRock P75 Pro3 | Quick Installation Guide - Page 106
Güç Sınaması (POST) sırasında BIOS Ayarları yardımcı programına girmek için veya tuşuna basın; aksi halde, POST test rutinlerine devam eder. BIOS Ayarlarına POST'tan sonra girmek istiyorsanız, öründeki "ASSETUP.EXE" dosyasını bulun ve çift tıklatın. 106 ASRock P75 Pro3 Motherboard Türkçe - ASRock P75 Pro3 | Quick Installation Guide - Page 107
www.asrock.com/support/index.asp 1.1 ASRock P75 Pro3 ATX 12.0" x 7.0", 30.5 x 17.8 cm) ASRock P75 Pro3 ASRock P75 Pro3 지원 CD 시리얼 ATA (SATA 2 I/O 차폐 1 개 ASRock Windows® 7 / 7 64-비트 / VistaTM / VistaTM 64 Storage Configuration BIOS 옵션을 AHCI BIOS CD 107 ASRock P75 Pro3 Motherboard 한국어 - ASRock P75 Pro3 | Quick Installation Guide - Page 108
슬롯 - 2 x PCI 슬롯 - AMD Quad CrossFireXTM 및 CrossFireXTM 지원 - 7.1 CH HD Audio (Realtek ALC887 Audio Codec) * 7.1 CH HD - PCIE x1 Gigabit LAN 10/100/1000 Mb/s - Realtek RTL8111E LAN 802.3az 지원 - PXE 지원 I/O Panel - 1 개 PS/2 1 ECP/EPP 1 개의 COM1 - 1 개동축 SPDIF ASRock P75 Pro3 Motherboard 한 국 어 - ASRock P75 Pro3 | Quick Installation Guide - Page 109
4 핀 ATX 12V USB 2.0 헤더 2 개 (4 USB 2.0 2개 ) - USB 3.0 헤더 1 개 (2 USB 3.0 2개 ) - 64Mb GUI AMI UEFI 적합형 BIOS ACPI 1.1 SMBIOS 2.3.1 지원 - CPU Core, DRAM, 1.8V PLL, VTT, VCCSA 전압 멀 CyberLink MediaEspresso 6.5 ASRock MAGIX Multimedia Suite - OEM - CPU 한 국 어 109 ASRock P75 Pro3 Motherboard - ASRock P75 Pro3 | Quick Installation Guide - Page 110
WHQL - ErP/EuP 지원 (ErP/EuP http://www.asrock.com 1.3 3 1-2 점퍼 CMOS 초기화 (CLRCMOS1, 3 2 22 세팅 CMOS 삭제 참고 : CLRCMOS1 CMOS 15 CLRCMOS1 의 핀 2 와 핀 3 을 5 BIOS CMOS BIOS CMOS CMOS CMOS 1394 GUID, MAC CMOS BIOS 옵션 Clear Status 한 국 어 110 ASRock P75 Pro3 Motherboard - ASRock P75 Pro3 | Quick Installation Guide - Page 111
/s 시리얼 ATA3 커넥터 (SATA3_0: 2 9 SATA3_0 1 ATA3 (SATA3 SATA SATA SATA3 6.0 Gb/s 시리얼 ATA(SATA SATA SATA / SATA2 / SATA3 SATA2 / SATA3 한국어 USB 2.0 헤더 (9 핀 USB4_5) (2 18 I/O 4 USB 2.0 USB 2.0 헤더가 2 USB 2.0 헤더는 2 개의 USB 2.0 111 ASRock P75 Pro3 Motherboard - ASRock P75 Pro3 | Quick Installation Guide - Page 112
112 1. High Definition Audio HAD 2. AC'97 A. Mic_IN (MIC) 을 MIC2_L B. Audio_R (RIN) 을 OUT2_R Audio_L (LIN) 을 OUT2_L C. Ground (GND) 을 Ground (GND D. MIC_RET 및 OUT_RET 는 HD 이들을 AC'97 ASRock P75 Pro3 Motherboard 한 국 어 - ASRock P75 Pro3 | Quick Installation Guide - Page 113
비트 OS Realtek FrontMic Recording Volume PWRBTN RESET PLED LED LED S1/S3 LED S4 S5 LED HDLED LED LED LED LED LED (4 핀 SPEAKER 1) (2 21 113 ASRock P75 Pro3 Motherboard 한국어 - ASRock P75 Pro3 | Quick Installation Guide - Page 114
GND (3 핀 PWR_FAN1) (2 32 PWR_FAN_SPEED +12V GND CPU (4 핀 CPU_FAN1) (2 1 4 3 2 1 GND +12V CPU_FAN_SPEED FAN_SPEED_CONTROL CPU 4 핀 CPU 3 핀 CPU CPU 3 핀 CPU 1-3 1-3 3 ATX (24 핀 ATXPWR1) (2 5 12 24 1 13 ATX 한 국 어 114 ASRock P75 Pro3 Motherboard - ASRock P75 Pro3 | Quick Installation Guide - Page 115
) (2 3 20 핀 ATX 1 13 ATX 12V (2 핀 CI1) (2 23 1 GND Signal HDMI_SPDIF 헤더 (2 핀 HDMI_SPDIF1) (2 30 1 GND SPDIFOUT HDMI VGA 카드에 SPDIF HDMI_SPDIF HDMI 디지털 TV LCD HDMI VGA 카드의 HDMI_SPDIF 한국어 115 ASRock P75 Pro3 Motherboard - ASRock P75 Pro3 | Quick Installation Guide - Page 116
2 POST F2> 또는 ++ - ASRock P75 Pro3 | Quick Installation Guide - Page 117
www.asrock.com Web www.asrock.com/support/index.asp 1.1 ASRock P75 Pro3 ATX 12.0-in x 7.0-in, 30.5 cm x 17.8 cm) ASRock P75 Pro3 ASRock P75 Pro3 CD 2 x ATA (SATA 1 x I/O ASRock Windows® 7 / 7 64-bit / VistaTM / VistaTM 64-bit BIOS AHCI B I O S C D 117 ASRock P75 Pro3 Motherboard - ASRock P75 Pro3 | Quick Installation Guide - Page 118
- 1 x PCI Express 2.0 x16 PCIE3 : x4 2 x PCI Express 2.0 x1 2 x PCI AMD Quad CrossFireXTM および CrossFireXTM 7.1 CH HD Realtek ALC887 Codec) * 7.1 - PCIE x1 Gigabit LAN 10/100/1000 Mb/s - Realtek RTL8111E - Wake-On-LAN LAN Energy Efficient Ethernet 802.3az PXE ASRock P75 Pro3 Motherboard - ASRock P75 Pro3 | Quick Installation Guide - Page 119
- 24 ピン ATX 4 ピン 12V USB 2.0 USB 2.0 用 4 x 2 - USB 3.0 USB 3.0 用 2 x 1 - 64Mb AMI UEFI Legal BIOS(GUI ACPI 1.1 jumperfree SMBIOS 2.3.1 CPU Core, DRAM, 1.8V PLL, VTT, VCCSA AntiVirus CyberLink MediaEspresso 6.5 ASRock MAGIX Multimedia Suite - OEM 119 ASRock P75 Pro3 Motherboard 日本語 - ASRock P75 Pro3 | Quick Installation Guide - Page 120
- CPU - CPU - CPU CPU - CPU 12V, +5V, +3.3V, Vcore OS - Microsoft® Windows® 7 / 7 64-bit / VistaTM / VistaTM 64-bit / XP / XP 64-bit compliant 認証 - FCC, CE, Microsoft® WHQL - ErP/EuP 対応(ErP/EuP http://www.asrock.com 日本語 120 ASRock P75 Pro3 Motherboard - ASRock P75 Pro3 | Quick Installation Guide - Page 121
1.3 1-2 CMOS CLRCMOS1 2 22 参照) 設定 説明 CMOS の消去 注 : CLRCMOS1 CMOS 15 CLRCMOS1 のピン 2 とピン 3 を 5 BIOS CMOS BIOS CMOS CMOS 1394 GUID と MAC CMOS CMOS BIOS Clear Status 日本語 121 ASRock P75 Pro3 Motherboard - ASRock P75 Pro3 | Quick Installation Guide - Page 122
SATA3_0: ページ 2 9 を参照 SATA3_0 これら 1 ATA3 (SATA3 SATA SATA3 6.0Gb/s で す。 ATA(SATA USB 2.0 ヘッダ (9 ピン USB4_5) ページ 2 18 を参照 (9 ピン USB6_7) ページ 2 17 を参照 SATA SATA / SATA2 / SATA3 SATA2 / SATA3 I/O 4 つの USB 2.0 2 つの USB 2.0 USB 2.0 2 つの USB 2.0 日本語 122 ASRock P75 Pro3 Motherboard - ASRock P75 Pro3 | Quick Installation Guide - Page 123
) を MIC2_L B. Audio_R (RIN) を OUT2_R に、Audio_L (LIN) を OUT2_L C. Ground (GND) を Ground (GND D. MIC_RET と OUT_RET AC'97 E. Windows® XP / XP 64-bit OS の場合 : "Mixer Recorder FrontMic 日本語 123 ASRock P75 Pro3 Motherboard - ASRock P75 Pro3 | Quick Installation Guide - Page 124
OS Realtek FrontMic Recording Volume PWRBTN RESET PLED LED LED LED S1/S3 S4 S5 LED HDLED LED LED LED LED LED 4 ピン SPEAKER1) ページ 2 21 を参照 124 ASRock P75 Pro3 Motherboard 日本語 - ASRock P75 Pro3 | Quick Installation Guide - Page 125
4 3 2 1 GND +12V CPU_FAN_SPEED FAN_SPEED_CONTROL CPU 4 ピン CPU 3 ピン CPU 3 ピン CPU CPU 1-3 1-3 3 ATX 24 ピン ATXPWR1) ページ 2 5 を参照 12 24 ATX 日本語 1 13 24 ピン ATX 12 24 20 ピン ATX ます。20 ピン ATX 1 13 と 20 ピン ATX 1 ASRock P75 Pro3 Motherboard 13 125 - ASRock P75 Pro3 | Quick Installation Guide - Page 126
ATX 12V 4 ピン ATX12V1) ページ 2 3 を参照 2 ピン CI1 23 を参照 HDMI_SPDIF ヘッダ (2- ピン HDMI_SPDIF1 30 を参照 ATX 電 12V 1 GND Signal 1 GND SPDIFOUT HDMI_SPDIF SPDIF HDMI VGA HDMI TV LCD HDMI VGA HDMI_SPDIF 日本語 126 ASRock P75 Pro3 Motherboard - ASRock P75 Pro3 | Quick Installation Guide - Page 127
2. BIOS 情報 BIOS POST F2 Del BIOS POST BIOS POST Ctrl〉+〈Alt〉+〈Delete BIOS BIOS CD PDF 3 CD 情報 Microsoft® Windows® 7 / 7 64-bit / VistaTM / VistaTM 64bit / XP / XP 64-bit CD CD CDROM CD AUTORUN AUTORUN CD 内の BIN ASSETUP.EXE 127 ASRock P75 Pro3 Motherboard 日本語 - ASRock P75 Pro3 | Quick Installation Guide - Page 128
www.asrock.com/support/index.asp 1.1 華擎 P75 Pro3 主板 (ATX 規格 : 12.0 英吋 X 7.0 英吋 , 30.5 厘米 X 17.8 厘米 ) 華擎 P75 Pro3 P75 Pro3 Serial ATA(SATA I/O 擋板 ASRock 為了在 Windows® 7 / 7 64-bit / VistaTM / VistaTM 64-bit BIOS中將Storage Configuration AHCI BIOS User Manual 128 ASRock P75 Pro3 Motherboard - ASRock P75 Pro3 | Quick Installation Guide - Page 129
Quad CrossFireXTM 和 CrossFireXTM 技術 - 7.1 Realtek ALC887 7.1 PCIE x1 Gigabit LAN 10/100/1000 Mb/s - Realtek RTL8111E Wake-On-LAN Energy Efficient Ethernet 802.3az - 支持 PXE I/O 界面 - 1 個 PS/2 1 ECP/EPP) - 1 1 個同軸 SPDIF 4 USB 2.0 接口 - 2 USB 3.0 接口 129 ASRock P75 Pro3 Motherboard 簡體中文 - ASRock P75 Pro3 | Quick Installation Guide - Page 130
, 支持 GUI Plug and Play,PnP) - ACPI 1.1 jumperfree SMBIOS 2.3.1 - CPU Core, DRAM, 1.8V PLL, VTT, VCCSA CyberLink MediaEspresso 6.5 MAGIX OEM - CPU CPU CPU CPU 度) - CPU 12V, +5V, +3.3V Microsoft® Windows® 7/7 64 位元 /VistaTM/VistaTM 64 位元 / XP/XP 64 簡體中文 130 ASRock P75 Pro3 Motherboard - ASRock P75 Pro3 | Quick Installation Guide - Page 131
.asrock.com 1.3 3 1 和針腳 2 CMOS (CLRCMOS1, 3 2 頁第 22 項 ) 設定 默認設置 清除 CMOS 注意: C L R C M O S1 C M O S 15 C L R C M O S1 2 和插針 3 短接 5 B I O S C M O S B I O S C M O S C M O S C M O S 1394 GUID 和 MAC C M O S B I O S 選 項"Clear Status 簡體中文 131 ASRock P75 Pro3 Motherboard - ASRock P75 Pro3 | Quick Installation Guide - Page 132
ATA3 (SATA3 Serial (SATA SATA3 6.0Gb/s Serial ATA (SATA SATA SATA/SATA2/SATA3 SATA2/SATA3 接口。 USB 2.0 (9 針 USB4_5) ( 見第 2 頁第 18 項 ) (9 針 USB6_7) ( 見第 2 頁第 17 項 ) I/O USB 2.0 USB 2.0 USB 2.0 USB 2.0 接 口。 簡體中文 132 ASRock P75 Pro3 Motherboard - ASRock P75 Pro3 | Quick Installation Guide - Page 133
(GND) 連接到 Ground(GND)。 D. MIC_RET 和 OUT_RET 僅用于 HD AC'97 E Windows® XP / XP 64 Mixer"。選擇"Recorder FrontMic"。 在 Windows® 7 / 7 64 位元 / VistaTM / VistaTM 64 Realtek FrontMic"。調節"Recording Volume"。 簡體中文 133 ASRock P75 Pro3 Motherboard - ASRock P75 Pro3 | Quick Installation Guide - Page 134
LED (4 針 SPEAKER1) ( 見第 2 頁第 21 項 ) (3 針 PLED1) ( 見第 2 頁第 24 項 ) (4 針 CHA_FAN1) ( 見第 2 頁第 33 項 ) (3 針 CHA_FAN2) ( 見第 2 頁第 13 項 ) 134 1 PLED- PLED+ PLED+ FAN_SPEED_CONTROL CHA_FAN_SPEED +12V GND LED S1/S3 LED S3/S4 或 S5 LED ASRock P75 Pro3 Motherboard 簡體中文 - ASRock P75 Pro3 | Quick Installation Guide - Page 135
PWR_FAN_SPEED +12V GND CPU (4 針 CPU_FAN1) ( 見第 2 頁第 1 項 ) 4 3 2 1 GND +12V CPU_FAN_SPEED FAN_SPEED_CONTROL 請將 CPU 4-Pin CPU 風扇 (Quiet Fan 3-Pin CPU 3-Pin CPU CPU Pin 1-3。 Pin ) ( 見第 2 頁第 23 項 ) 20-Pin ATX 1 13 ATX 12V 1 GND Signal 簡體中文 135 ASRock P75 Pro3 Motherboard - ASRock P75 Pro3 | Quick Installation Guide - Page 136
HDMI HDMI HDMI 顯卡的 HDMI_SPDIF 2. BIOS 信息 Flash Memory 存儲了 BIOS POST F2> 或 < D e l B I O S P O S T P O S T B I O S Ctrl>++ - ASRock P75 Pro3 | Quick Installation Guide - Page 137
SJ/T 11364-2006 10 年。 圖一 部件名稱 鉛 (Pb) 鎘 (Cd) 汞 (Hg Cr(VI PBB PBDE) X O O O O O X O O O O O O SJ/T 11363-2006 X SJ/T 11363-2006 2002/95/EC 簡體中文 137 ASRock P75 Pro3 Motherboard - ASRock P75 Pro3 | Quick Installation Guide - Page 138
BIOS CPU http://www.asrock.com www.asrock.com/support/index.asp 1.1 華擎 P75 Pro3 主機板 (ATX 規格 : 12.0 英吋 x 7.0 英吋 , 30.5 公分 x 17.8 公分 ) 華擎 P75 Pro3 P75 Pro3 Serial ATA(SATA I/O 擋板 ASRock提醒您... 若要在Windows® 7 / 7 64位元 / VistaTM / VistaTM 64 BIOS選項設為AHCI BIOS 138 ASRock P75 Pro3 Motherboard - ASRock P75 Pro3 | Quick Installation Guide - Page 139
CrossFireXTM 和 CrossFireXTM 技術 - 7.1 Realtek ALC887 * 要啟動 7.1 - PCIE x1 Gigabit LAN 10/100/1000 Mb/s - Realtek RTL8111E Wake-On-LAN Energy Efficient Ethernet 802.3az - 支援 PXE I/O 界面 - 1 個 PS/2 1 ECP/EPP) - 1 1 個同軸 SPDIF 4 USB 2.0 接口 - 2 USB 3.0 接口 139 ASRock P75 Pro3 Motherboard 繁體中文 - ASRock P75 Pro3 | Quick Installation Guide - Page 140
BIOS ( 支援 GUI Plug and Play,PnP) - ACPI 1.1 jumperfree SMBIOS 2.3.1 - CPU Core, DRAM, 1.8V PLL, VTT, VCCSA CyberLink MediaEspresso 6.5 MAGIX OEM - CPU CPU CPU CPU 度) - CPU 12V, +5V, +3.3V Microsoft® Windows® 7/7 64 位元 /VistaTM/VistaTM 64 位元 / XP/XP 64 位元 ASRock P75 Pro3 Motherboard - ASRock P75 Pro3 | Quick Installation Guide - Page 141
http://www.asrock.com 1.3 3 1 和針腳 2 CMOS (CLRCMOS1, 3 2 頁第 22 項 ) 設定 默認設置 清除 CMOS 註: C L R C M O S1 C M O S 15 CLRCMOS1 的 pin2 及 pin3 短路 5 BIOS CMOS BIOS CMOS CMOS C M O S 1394 GUID 及 MAC C M O S B I O S 選 項"Clear Status 繁體中文 141 ASRock P75 Pro3 Motherboard - ASRock P75 Pro3 | Quick Installation Guide - Page 142
Serial ATA3 (SATA3 SATA SATA3 6.0Gb/s Serial ATA (SATA) 數據線 ( 選配 ) USB 2.0 (9 針 USB4_5) ( 見第 2 頁第 18 項 ) (9 針 USB6_7) ( 見第 2 頁第 17 項 ) SATA SATA/SATA2/SATA3 SATA2/SATA3 接口。 I/O USB 2.0 USB 2.0 USB 2.0 USB 2.0 接 口。 繁體中文 142 ASRock P75 Pro3 Motherboard - ASRock P75 Pro3 | Quick Installation Guide - Page 143
(GND) 連接到 Ground(GND)。 D. MIC_RET 和 OUT_RET 僅用於 HD AC'97 E Windows® XP / XP 64 Mixer Recorder FrontMic"。 在 Windows® 7 / 7 64 位元 / VistaTM / VistaTM 64 Realtek FrontMic Recording Volume"。 繁體中文 143 ASRock P75 Pro3 Motherboard - ASRock P75 Pro3 | Quick Installation Guide - Page 144
S5 HD LED (4 針 SPEAKER1) ( 見第 2 頁第 21 項 ) (3 針 PLED1) ( 見第 2 頁第 24 項 ) 1 PLEDPLED+ PLED+ LED S1/S3 LED S4 或 S5 LED (4 針 CHA_FAN1) ( 見第 2 頁第 33 項 ) (3 針 CHA_FAN2) ( 見第 2 頁第 13 項 ) 144 FAN_SPEED_CONTROL CHA_FAN_SPEED +12V GND ASRock P75 Pro3 Motherboard 繁體中文 - ASRock P75 Pro3 | Quick Installation Guide - Page 145
PWR_FAN_SPEED +12V GND CPU (4 針 CPU_FAN1) ( 見第 2 頁第 1 項 ) 4 3 2 1 GND +12V CPU_FAN_SPEED FAN_SPEED_CONTROL 請將 CPU 4-Pin CPU 風扇 (Quiet Fan 3-Pin CPU 3-Pin CPU CPU Pin 1-3。 Pin 1-3 ( 見第 2 頁第 23 項 ) 20-Pin ATX 1 13 請將 ATX 12V 1 GND Signal 繁體中文 145 ASRock P75 Pro3 Motherboard - ASRock P75 Pro3 | Quick Installation Guide - Page 146
HDMI_SPDIF SPDIF HDMI HDMI HDMI HDMI_SPDIF 2. BIOS 訊息 Flash Memory BIOS POST F2> 或 + + - ASRock P75 Pro3 | Quick Installation Guide - Page 147
yang paling baru dan daftar bantuan CPU pada website ASRock. Website ASRock http://www.asrock.com 1.1 Isi Paket Papan Induk P75 Pro3 ASRock (Faktor Form ATX: 12.0-in x 7.0-in, 30.5 cm x 17.8 cm) Pemimpin Instalasi Cepat P75 Pro3 ASRock Support CD P75 Pro3 ASRock 2 x Kabel satu serial Data ATA (SATA - ASRock P75 Pro3 | Quick Installation Guide - Page 148
driver audio. - PCIE x1 Gigabit LAN 10/100/1000 Mb/s - Realtek RTL8111E - Menggunakan Wake-On-LAN - Mendukung Deteksi Kabel LAN - Mendukung Energy Efficient Ethernet 802.3az - Mendukung PXE I/O Panel - 1 x Port Keyboard/Mouse PS/2 - 1 x Paralel Port (ECP / EPP Support) ASRock P75 Pro3 Motherboard - ASRock P75 Pro3 | Quick Installation Guide - Page 149
tegangan CPU Core, DRAM, 1.8V PLL, VTT, VCCSA - Driver, Utilitas, Perangkat Lunak Antivirus (Versi Percobaan), CyberLink MediaEspresso 6.5 Versi Percobaan, ASRock MAGIX Multimedia Suite - OEM - Perasa Suhu CPU - Perasa Suhu Casis - Pengukur Kipas CPU/casis/power 149 ASRock P75 Pro3 Motherboard - ASRock P75 Pro3 | Quick Installation Guide - Page 150
Sasis Senyap (Kecepatan Kipas Sasis Otomatis Disesuaikan Berdasarkan Temperatur CPU) - Kontrol Multi-Kecepatan Kipas CPU/casis - Deteksi CASING TERBUKA - Penjagaan voltasi: +12V rinci, silakan kunjungi website kami: http://www.asrock.com Bahasa Indonesia 150 ASRock P75 Pro3 Motherboard - ASRock P75 Pro3 | Quick Installation Guide - Page 151
Than 2TB in AHCI Mode This motherboard adopts UEFI BIOS that allows Windows® OS to be Set AHCI Mode in UEFI Setup Utility > Advanced > Storage Configuration > SATA Mode. 3. Choose the item "UEFI:xxx" to boot in UEFI Setup Utility > Boot > Boot Option . 151 ASRock P75 Pro3 Motherboard English
-
 1
1 -
 2
2 -
 3
3 -
 4
4 -
 5
5 -
 6
6 -
 7
7 -
8
-
9
-
10
-
11
-
12
-
13
-
14
-
15
-
16
-
17
-
18
-
19
-
20
-
21
-
22
-
23
-
24
-
25
-
26
-
27
-
28
-
29
-
30
-
31
-
32
-
33
-
34
-
35
-
36
-
37
-
38
-
39
-
40
-
41
-
42
-
43
-
44
-
45
-
46
-
47
-
48
-
49
-
50
-
51
-
52
-
53
-
54
-
55
-
56
-
57
-
58
-
59
-
60
-
61
-
62
-
63
-
64
-
65
-
66
-
67
-
68
-
69
-
70
-
71
-
72
-
73
-
74
-
75
-
76
-
77
-
78
-
79
-
80
-
81
-
82
-
83
-
84
-
85
-
86
-
87
-
88
-
89
-
90
-
91
-
92
-
93
-
94
-
95
-
96
-
97
-
98
-
99
-
100
-
101
-
102
-
103
-
104
-
105
-
106
-
107
-
108
-
109
-
110
-
111
-
112
-
113
-
114
-
115
-
116
-
117
-
118
-
119
-
120
-
121
-
122
-
123
-
124
-
125
-
126
-
127
-
128
-
129
-
130
-
131
-
132
-
133
-
134
-
135
-
136
-
137
-
138
-
139
-
140
-
141
-
142
-
143
-
144
-
145
-
146
-
147
-
148
-
149
-
150
-
151
 |
 |
1
ASRock
P75 Pro3
Motherboard
English
Copyright Notice:
No part of this installation guide may be reproduced, transcribed, transmitted, or trans-
lated in any language, in any form or by any means, except duplication of documentation
by the purchaser for backup purpose, without written consent of ASRock Inc.
Products and corporate names appearing in this guide may or may not be registered
trademarks or copyrights of their respective companies, and are used only for identi
fi
ca-
tion or explanation and to the owners’ bene
fi
t, without intent to infringe.
Disclaimer:
Speci
fi
cations and information contained in this guide are furnished for informational use
only and subject to change without notice, and should not be constructed as a commit-
ment by ASRock. ASRock assumes no responsibility for any errors or omissions that may
appear in this guide.
With respect to the contents of this guide, ASRock does not provide warranty of any kind,
either expressed or implied, including but not limited to the implied warranties or condi-
tions of merchantability or
fi
tness for a particular purpose. In no event shall ASRock, its
directors, of
fi
cers, employees, or agents be liable for any indirect, special, incidental, or
consequential damages (including damages for loss of pro
fi
ts, loss of business, loss of
data, interruption of business and the like), even if ASRock has been advised of the pos-
sibility of such damages arising from any defect or error in the guide or product.
This device complies with Part 15 of the FCC Rules. Operation is subject to the following
two conditions:
(1) this device may not cause harmful interference, and
(2) this device must accept any interference received, including interference that
may cause undesired operation.
CALIFORNIA, USA ONLY
The Lithium battery adopted on this motherboard contains Perchlorate, a toxic substance
controlled in Perchlorate Best Management Practices (BMP) regulations passed by the
California Legislature. When you discard the Lithium battery in California, USA, please
follow the related regulations in advance.
“Perchlorate Material-special handling may apply, see
www.dtsc.ca.gov/hazardouswaste/perchlorate”
ASRock Website: http://www.asrock.com
Published August 2012
Copyright
©
2012 ASRock INC. All rights reserved.