ASRock Z68M-ITX/HT Quick Installation Guide
ASRock Z68M-ITX/HT Manual
 |
View all ASRock Z68M-ITX/HT manuals
Add to My Manuals
Save this manual to your list of manuals |
ASRock Z68M-ITX/HT manual content summary:
- ASRock Z68M-ITX/HT | Quick Installation Guide - Page 1
for backup purpose, without written consent of ASRock Inc. Products and corporate names appearing in this guide may or may not be registered trademarks or ASRock Website: http://www.asrock.com Published July 2011 Copyright©2011 ASRock INC. All rights reserved. 1 ASRock Z68M-ITX/HT Motherboard - ASRock Z68M-ITX/HT | Quick Installation Guide - Page 2
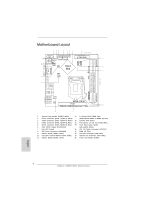
ATX Power Connector (ATXPWR1) 17 64Mb SPI Flash 9 USB 2.0 Header (USB8_9, Blue) 18 CPU Fan Connector (CPU_FAN1) 10 Consumer Infrared Module Header (CIR1) 19 Chassis Fan Connector (CHA_FAN1) 11 USB 2.0 Header (USB6_7, Blue) 20 Power LED Header (PLED1) English 2 ASRock Z68M-ITX/HT Motherboard - ASRock Z68M-ITX/HT | Quick Installation Guide - Page 3
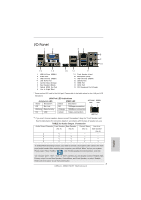
"Realtek HDA Primary output" to use Rear Speaker, Central/Bass, and Front Speaker, or select "Realtek HDA Audio 2nd output" to use front panel audio. 3 ASRock Z68M-ITX/HT Motherboard English - ASRock Z68M-ITX/HT | Quick Installation Guide - Page 4
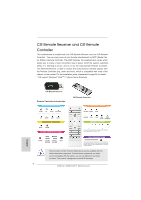
with most of the chassis on the market. For the installation guide, please refe to page 20 for details. * OS support: Windows® VistaTM / 7 (above Home Premium) CIR Remote Receiver Remote use these functions. This product is designed to meet MCE standards. 4 ASRock Z68M-ITX/HT Motherboard English - ASRock Z68M-ITX/HT | Quick Installation Guide - Page 5
) ASRock Reminds You... To get better performance in Windows® 7 / 7 64-bit / VistaTM / VistaTM 64bit, it is recommended to set the BIOS option in Storage Configuration to AHCI mode. For the BIOS setup, please refer to the "User Manual" in our support CD for details. 5 ASRock Z68M-ITX/HT Motherboard - ASRock Z68M-ITX/HT | Quick Installation Guide - Page 6
is required) (see CAUTION 6) - Supports HDCP function with DVI and HDMI ports - Supports Full HD 1080p Blu-ray (BD) / HD-DVD playback with DVI and HDMI ports - 7.1 CH HD Audio with Content Protection (Realtek ALC892 Audio Codec) - Premium Blu-ray audio support ASRock Z68M-ITX/HT Motherboard English - ASRock Z68M-ITX/HT | Quick Installation Guide - Page 7
- 1 x Power LED header - CPU/Chassis FAN connector - 24 pin ATX power connector - 4 pin 12V power connector - Front panel audio connector - 2 x USB 2.0 headers (support 4 USB 2.0 ports) - 64Mb AMI BIOS - AMI UEFI Legal BIOS with GUI support - Supports "Plug and Play" 7 ASRock Z68M-ITX/HT Motherboard - ASRock Z68M-ITX/HT | Quick Installation Guide - Page 8
-party overclocking tools. Overclocking may affect your system stability, or even cause damage to the components and devices of your system. It should be done at your own risk and expense. We are not responsible for possible damage caused by overclocking. English 8 ASRock Z68M-ITX/HT Motherboard - ASRock Z68M-ITX/HT | Quick Installation Guide - Page 9
the number of output phases to improve efficiency when the CPU cores are idle without sacrificing computing performance. Please visit our website for the operation procedures of ASRock Extreme Tuning Utility (AXTU). ASRock website: http://www.asrock.com 9 ASRock Z68M-ITX/HT Motherboard English - ASRock Z68M-ITX/HT | Quick Installation Guide - Page 10
Data: With the status window, you can easily recognize which data streams you are currently transferring. 14. With Lucid Virtu technology, you can enjoy benefits from both 3D performance of the discrete GPU and advanced media features of Intel® HD graphics. 10 ASRock Z68M-ITX/HT Motherboard English - ASRock Z68M-ITX/HT | Quick Installation Guide - Page 11
, the EuP ready power supply must meet the standard of 5v standby power efficiency is higher than 50% under 100 mA current consumption. For EuP ready power supply selection, we recommend you checking with the power supply manufacturer for more details. 11 ASRock Z68M-ITX/HT Motherboard English - ASRock Z68M-ITX/HT | Quick Installation Guide - Page 12
you insert the 1155-Pin CPU into the socket, please check if the CPU surface is unclean or if there is any bent pin on the socket. Do not force to insert the CPU into the socket if above situation is found. Otherwise, the CPU will be seriously damaged. English 12 ASRock Z68M-ITX/HT Motherboard - ASRock Z68M-ITX/HT | Quick Installation Guide - Page 13
motherboard for after service. Step 3. Insert the 1155-Pin CPU: Step 3-1. Hold the CPU 1155-Pin CPU alignment key 1155-Pin Socket For proper inserting, please ensure to match the two orientation key notches of the CPU with the two alignment keys of the socket. 13 ASRock Z68M-ITX/HT Motherboard - ASRock Z68M-ITX/HT | Quick Installation Guide - Page 14
, the heatsink cannot be secured on the motherboard. Step 5. Step 6. Connect fan header with the CPU fan connector on the motherboard. Secure excess cable with tie-wrap to ensure cable does not interfere with fan operation or contact other components. English 14 ASRock Z68M-ITX/HT Motherboard - ASRock Z68M-ITX/HT | Quick Installation Guide - Page 15
permanent damage to the motherboard and the DIMM if you force the DIMM into the slot at incorrect orientation. Step 3. Firmly insert the DIMM into the slot until the retaining clips at both ends fully snap back in place and the DIMM is properly seated. 15 ASRock Z68M-ITX/HT Motherboard English - ASRock Z68M-ITX/HT | Quick Installation Guide - Page 16
power supply is switched off or the power cord is unplugged. Please read the documentation of the expansion card and make necessary hardware settings for the card before you start the installation. Step 2. Remove the system unit cover (if your motherboard . 16 ASRock Z68M-ITX/HT Motherboard English - ASRock Z68M-ITX/HT | Quick Installation Guide - Page 17
yet, please install onboard VGA driver from our support CD to your system and restart your computer. D-Sub, DVI-D and HDMI monitors cannot be enabled at the same time. You can only choose the combination: DVI-D + HDMI, DVI-D + D-Sub, or HDMI + D-Sub. English 17 ASRock Z68M-ITX/HT Motherboard - ASRock Z68M-ITX/HT | Quick Installation Guide - Page 18
motherboard. 4. Install the onboard VGA driver and the add-on PCI Express VGA card driver to your system. If you have installed the drivers already, there is no need to install them again. 5. Set up a multi-monitor display. For Windows , two, three and four. 18 ASRock Z68M-ITX/HT Motherboard English - ASRock Z68M-ITX/HT | Quick Installation Guide - Page 19
to the increase in manufacturers employing HDCP in their equipment, it is highly recommended that the HDTV or LCD monitor you purchase is compatible. 19 ASRock Z68M-ITX/HT Motherboard English - ASRock Z68M-ITX/HT | Quick Installation Guide - Page 20
Multi-Angle CIR Receiver does not support Hot-Plug function. Please install it before you boot the system. * ASRock Smart Remote is only supported by some of ASRock motherboards. Please refer to ASRock website for the motherboard support list: http://www.asrock.com 20 ASRock Z68M-ITX/HT Motherboard - ASRock Z68M-ITX/HT | Quick Installation Guide - Page 21
4): see p.2, No. 4) (SATA_3 (PORT 3): see p.2, No. 5) SATA_2 (PORT 4) SATA_3 (PORT 3) These two Serial ATAII (SATAII) connectors support SATA data cables for internal storage devices. The current SATAII interface allows up to 3.0 Gb/s data transfer rate. English 21 ASRock Z68M-ITX/HT Motherboard - ASRock Z68M-ITX/HT | Quick Installation Guide - Page 22
0) SATA_1 (PORT 1) Serial ATA (SATA) Data Cable (Optional) These two Serial ATA3 (SATA3) connectors support SATA data cables for internal storage devices. The current SATA3 interface allows up to 6.0 Gb/s data transfer connection and control of audio devices. 22 ASRock Z68M-ITX/HT Motherboard - ASRock Z68M-ITX/HT | Quick Installation Guide - Page 23
panel module mainly consists of power switch, reset switch, power LED, hard drive activity LED, speaker and etc. When connecting your chassis front panel module to this header, make sure the wire assignments and the pin assign-ments are matched correctly. 23 ASRock Z68M-ITX/HT Motherboard English - ASRock Z68M-ITX/HT | Quick Installation Guide - Page 24
20-pin ATX power supply, please plug your power supply along with Pin 1 and Pin 13. 24 13 ATX 12V Power Connector (4-pin ATX12V1) (see p.2 No. 16) 20-Pin ATX Power Supply Installation 12 1 Please connect an ATX 12V power supply to this connector. English 24 ASRock Z68M-ITX/HT Motherboard - ASRock Z68M-ITX/HT | Quick Installation Guide - Page 25
Windows® XP / XP 64-bit OS. Using SATA / SATAII / SATA3 HDDs without NCQ function STEP 1: Set up UEFI. A. Enter UEFI SETUP UTILITY Advanced screen SATA Configuration. B. Set the option "SATA Mode" to [IDE]. STEP 2: Install Windows® XP / XP 64-bit OS on your system. 25 ASRock Z68M-ITX/HT Motherboard - ASRock Z68M-ITX/HT | Quick Installation Guide - Page 26
screen SATA Configuration. B. Set the option "SATA Mode" to [IDE]. STEP 2: Install Windows® 7 / 7 64-bit / VistaTM / VistaTM 64-bit OS on your system. Using SATA [AHCI]. STEP 2: Install Windows® 7 / 7 64-bit / VistaTM / VistaTM 64-bit OS on your system. 26 ASRock Z68M-ITX/HT Motherboard English - ASRock Z68M-ITX/HT | Quick Installation Guide - Page 27
your computer. If the Main Menu does not appear automatically, locate and double-click on the file "ASSETUP.EXE" from the BIN folder in the Support CD to display the menus. 27 ASRock Z68M-ITX/HT Motherboard English - ASRock Z68M-ITX/HT | Quick Installation Guide - Page 28
Zur besseren Leistung unter Windows® 7 / 7, 64 Bit / VistaTM / VistaTM 64 Bit empfehlen wir, die Speicherkonfiguration im BIOS auf den AHCIModus einzustellen. Hinweise zu den BIOS-Einstellungen finden Sie in der Bedienungsanleitung auf der mitgelieferten CD. 28 ASRock Z68M-ITX/HT Motherboard Deutsch - ASRock Z68M-ITX/HT | Quick Installation Guide - Page 29
Unterstützt freigegebene CPU der K-Serie - Unterstützt Hyper-Threading-Technologie (siehe VORSICHT 1) - Intel® Z68 - Unterstützung 4.1, DirectX 11 mit Intel® Ivy Bridge-Prozessor, DirectX 10.1 mit Intel® Sandy Bridge-Prozessor - Maximal gemeinsam genutzter 29 ASRock Z68M-ITX/HT Motherboard Deutsch - ASRock Z68M-ITX/HT | Quick Installation Guide - Page 30
ützung - Unterstützt THX TruStudioTM - PCIE x1 Gigabit LAN 10/100/1000 Mb/s - Realtek RTL8111E - Unterstützt Wake-On-LAN - Unterstützt LAN-Kabelerkennung 1 x Consumer Infrared-Modul-Header - 1 x Betriebs-LED-Header - CPU/Gehäuselüfter-Anschluss - 24-pin ATX-Netz-Header ASRock Z68M-ITX/HT Motherboard - ASRock Z68M-ITX/HT | Quick Installation Guide - Page 31
AMI BIOS - AMIs Legal BIOS UEFI CPU- oder Temperatur) - Mehrstufige Geschwindigkeitsteuerung für CPU-/ Gehäuselüfter - Spannungsüberwachung: +12V, +5V, +3.3V, Vcore - Unterstützt Microsoft® Windows® 7 / 7 64-Bit / VistaTM / VistaTM 64-Bit / XP / XP 64-Bit Deutsch 31 ASRock Z68M-ITX/HT Motherboard - ASRock Z68M-ITX/HT | Quick Installation Guide - Page 32
asrock.com WARNUNG Beachten Sie bitte, dass Overclocking, einschließlich der Einstellung im BIOS, Anwenden der Untied Overclocking Windows® 7 / Vista™ / XP etwas Speicher zur Nutzung durch das System reserviert wird. Unter Windows® OS mit 64-Bit-CPU 32 ASRock Z68M-ITX/HT Motherboard Deutsch - ASRock Z68M-ITX/HT | Quick Installation Guide - Page 33
der Spannungsregulator bei Inaktivität der CPU-Kerne die Anzahl an Ausgangsphasen zur Windows®-Betriebssystemen 7 / 7, 64 Bit / VistaTM / VistaTM 64 Bit und dem Internet Explorer ab Version 8 nutzen. ASRock-Website: http:// www.asrock.com/Feature/SmartView/index.asp 33 ASRock Z68M-ITX/HT Motherboard - ASRock Z68M-ITX/HT | Quick Installation Guide - Page 34
Overclocking nicht empfohlen. Frequenzen, die über den für den jeweiligen Prozessor vorgesehenen liegen, können das System instabil werden lassen oder die CPU beschädigen. 17. Wird eine Überhitzung der CPU beim Hersteller der Stromversorgung abzufragen. 34 ASRock Z68M-ITX/HT Motherboard Deutsch - ASRock Z68M-ITX/HT | Quick Installation Guide - Page 35
Sie sollten das CMOS allerdings nicht direkt nach der BIOS-Aktualisierung löschen. Wenn Sie das CMOS nach Abschluss der BIOS-Aktualisierung löschen müssen, fahren Sie zuerst das SATA-Datenkabel für interne Massenspeichergeräte. Die aktuelle SATAII-Schnittstelle 35 ASRock Z68M-ITX/HT Motherboard - ASRock Z68M-ITX/HT | Quick Installation Guide - Page 36
S.2 - No. 9) USB_PWR P-9 P+9 GND DUMMY 1 GND P+8 P-8 USB_PWR Zusätzlich zu den vier üblichen USB 2.0-Ports an den I/O-Anschlüssen befinden sich zwei USB 2.0Anschlussleisten am Motherboard. Pro USB 2.0Anschlussleiste werden zwei USB 2.0-Ports unterstützt. Deutsch 36 ASRock Z68M-ITX/HT Motherboard - ASRock Z68M-ITX/HT | Quick Installation Guide - Page 37
AC'97-Audioleiste angeschlossen werden. E. So aktivieren Sie das Mikrofon an der Vorderseite. Bei den Betriebssystemen Windows® XP / XP 64 Bit: Wählen Sie „Mixer". Wählen Sie „Recorder" (Rekorder). Klicken und negativen Pins, bevor Sie die Kabel anschließen. 37 ASRock Z68M-ITX/HT Motherboard - ASRock Z68M-ITX/HT | Quick Installation Guide - Page 38
-Zustand (ausgeschaltet) leuchtet die LED nicht. Verbinden Sie die Lüfterkabel mit den Lüfteranschlüssen, wobei der schwarze Draht an den Schutzleiterstift angeschlossen wird. Deutsch 38 ASRock Z68M-ITX/HT Motherboard - ASRock Z68M-ITX/HT | Quick Installation Guide - Page 39
werden; auch ohne Geschwindigkeitsregulierung. Wenn Sie einen dreipoligen CPU-Lüfter an den CPU-Lüferanschluss dieses Motherboards anschließen möchten, verbinden Sie ihn bitte mit Bitte schließen Sie an diesen Anschluss die ATX 12V Stromversorgung an. Deutsch 39 ASRock Z68M-ITX/HT Motherboard - ASRock Z68M-ITX/HT | Quick Installation Guide - Page 40
der Support-CD, um die Menüs aufzurufen. Das Setup-Programm soll es Ihnen so leicht wie möglich machen. Es ist menügesteuert, d.h. Sie können in den verschiedenen Untermenüs Ihre Auswahl treffen und die Programme werden dann automatisch installiert. 40 ASRock Z68M-ITX/HT Motherboard Deutsch - ASRock Z68M-ITX/HT | Quick Installation Guide - Page 41
sous Windows® 7 / 7 64 bits / VistaTM / VistaTM 64 bits, il est recommandé de paramétrer l'option BIOS dans Configuration de stockage en mode AHCI. Pour plus de détails sur l'installation BIOS, référez-vous au "Mode d'emploi" sur votre CD de support. 41 ASRock Z68M-ITX/HT Motherboard Fran - ASRock Z68M-ITX/HT | Quick Installation Guide - Page 42
Intel® Z68 - Compatible avec la Technologie de Mémoire à Canal Double (voir ATTENTION 2) - 2 x slots DIMM DDR3 - Supporter DDR3 Pixel Shader 4.1, DirectX 11 avec CPU Intel® Ivy Bridge, DirectX 10.1 avec CPU Intel® Sandy Bridge - mémoire partagée max 1759MB ASRock Z68M-ITX/HT Motherboard Français - ASRock Z68M-ITX/HT | Quick Installation Guide - Page 43
0Go/s, supporte RAID (RAID 0, RAID 1, RAID 10, RAID 5, Intel Rapid Storage et Intel Smart Response), NCQ, AHCI et « Hot Plug » (Branche ment à chaud) - 2 x connecteurs SATA3, prennent en charge un taux de transfert de données pouvant aller jusqu'à 6.0Go/s 43 ASRock Z68M-ITX/HT Motherboard Français - ASRock Z68M-ITX/HT | Quick Installation Guide - Page 44
USB 2.0 (prendre en charge 4 ports USB 2.0 supplémentaires) - 64Mb BIOS AMI - AMI UEFI Legal BIOS avec support GUI - Support du "Plug and Play" - Compatible pour événements de réveil ACPI de l'unité centrale) - Commande de ventilateur CPU/châssis à plusieurs vitesses ASRock Z68M-ITX/HT Motherboard - ASRock Z68M-ITX/HT | Quick Installation Guide - Page 45
2-canaux, 4-canaux, 6-canaux et 8-canaux. Veuillez vous référer au tableau en page 3 pour effectuer la bonne connexion. 8. ASRock Extreme Tuning Utility (AXTU) est un utilitaire tout-en-un qui permet de régler précisément différentes fonctions du système, 45 ASRock Z68M-ITX/HT Motherboard Français - ASRock Z68M-ITX/HT | Quick Installation Guide - Page 46
ée pour une expérience de l'Internet encore plus personnelle. Les cartes mères ASRock sont équipées en exclusivité de l'utilitaire SmartView, ce qui vous permet de garder le contact avec vos amis itinérants. Pour utiliser la fonction SmartView, veuillez 46 ASRock Z68M-ITX/HT Motherboard Français - ASRock Z68M-ITX/HT | Quick Installation Guide - Page 47
Windows® 7 / 7 64 bits / VistaTM / VistaTM 64 bits, et que vous utilisez le navigateur IE8. Site Internet ASRock : http://www.asrock.com/Feature/SmartView/ index.asp 12. ASRock mettre de la pâte thermique entre le CPU le dissipateur lors de l'installation du PC ASRock Z68M-ITX/HT Motherboard Français - ASRock Z68M-ITX/HT | Quick Installation Guide - Page 48
pas effacer le CMOS immédiatement après avoir mis à jour le BIOS. Si vous avez besoin d'effacer le CMOS après avoir mis à jour le BIOS, vous devez allumer en premier le système, puis l'éteindre avant des taux transferts de données pouvant aller jusqu'à 3,0 Gb/s. 48 ASRock Z68M-ITX/HT Motherboard - ASRock Z68M-ITX/HT | Quick Installation Guide - Page 49
2.0 sur cette carte mère. Chaque embase USB 2.0 peut prendre en charge 2 ports USB 2.0. Cette barrette peut être utilisée pour connecter des récepteur Français 49 ASRock Z68M-ITX/HT Motherboard - ASRock Z68M-ITX/HT | Quick Installation Guide - Page 50
en charge le HDA pour fonctionner correctement. Veuillez suivre les instructions dans notre manuel et le manuel de châssis afin installer votre Pour activer le micro avant. Pour les systèmes d'exploitation Windows® XP / XP 64 bits : Sélectionnez "Mixer". Sélectionnez ASRock Z68M-ITX/HT Motherboard - ASRock Z68M-ITX/HT | Quick Installation Guide - Page 51
de commande de vitesse du ventilateur. Si vous prévoyez de connecter le ventilateur de CPU à 3 broches au connecteur du ventilateur de CPU sur cette carte mère, veuillez le connecter aux broches 1-3. Installation de ventilateur à 3 broches Broches 1-3 connectées 51 ASRock Z68M-ITX/HT Motherboard - ASRock Z68M-ITX/HT | Quick Installation Guide - Page 52
électrique ATX 12 1 Connecteur ATX 12V (ATX12V1 br.4) (voir p.2 No. 16) Veuillez connecter une unité d'alimentation électrique ATX 12V sur ce connecteur. Français 52 ASRock Z68M-ITX/HT Motherboard - ASRock Z68M-ITX/HT | Quick Installation Guide - Page 53
sur le BIOS, veuillez consulter le Guide de l'utilisateur (fichier PDF) dans le CD technique. 3. Informations sur le CD de support Cette carte mère supporte divers systèmes d'exploitation Microsoft® Windows®: 7 et doublecliquez dessus pour afficher les menus. 53 ASRock Z68M-ITX/HT Motherboard Français - ASRock Z68M-ITX/HT | Quick Installation Guide - Page 54
/ VistaTM 64-bit, si consiglia di impostare l'opzione BIOS in Storage Configuration (Configurazione di archiviazione) sulla modalità AHCI. Per l'impostazione BIOS, fare riferimento a "User Manual" (Manuale dell'utente) nel CD di supporto per dettagli. 54 ASRock Z68M-ITX/HT Motherboard Italiano - ASRock Z68M-ITX/HT | Quick Installation Guide - Page 55
CPU unlocked serie K - Supporto tecnologia Hyper Threading (vedi ATTENZIONE 1) - Intel® Z68 - Supporto tecnologia Dual Channel Memory Shader 4.1, DirectX 11 con CPU Intel® Ivy Bridge, DirectX 10.1 con CPU Intel® Sandy Bridge - Memoria massima condivisa 1759MB ASRock Z68M-ITX/HT Motherboard Italiano - ASRock Z68M-ITX/HT | Quick Installation Guide - Page 56
accensione - Connettore ventolina CPU/telaio - 24-pin collettore alimentazione ATX - 4-pin connettore ATX 12V - Connettore audio sul pannello frontale - 2 x Collettore USB 2.0 (supporta 4 porte USB 2.0) - 64Mb AMI BIOS - AMI UEFI Legal BIOS con interfaccia di supporto ASRock Z68M-ITX/HT Motherboard - ASRock Z68M-ITX/HT | Quick Installation Guide - Page 57
in base alla temperatura della CPU madre) - Ventola CPU/Chassis con controllo di varie velocità Compatibi- - Voltaggio: +12V, +5V, +3.3V, Vcore - Microsoft® Windows® 7 / 7 64 bit , prego visitare il nostro sito internet: http://www.asrock.com Italiano 57 ASRock Z68M-ITX/HT Motherboard - ASRock Z68M-ITX/HT | Quick Installation Guide - Page 58
Manuale dell'utente all'interno del CD di supporto. 2. Questa scheda madre supporta la tecnologia Dual Channel Memory. Prima di implementare la tecnologia Dual Channel Memory . Overclocking permette di eseguire l'overclocking della frequenza della CPU per ASRock Z68M-ITX/HT Motherboard Italiano - ASRock Z68M-ITX/HT | Quick Installation Guide - Page 59
ASRock: http://www.asrock.com 9. ASRock Instant Flash è una utilità Flash BIOS integrata nella Flash ROM. Questo comodo strumento d'aggiornamento del BIOS permette di aggiornare il sistema BIOS senza accedere a sistemi operativi come MS-DOS or Windows . 59 ASRock Z68M-ITX/HT Motherboard Italiano - ASRock Z68M-ITX/HT | Quick Installation Guide - Page 60
un consumo di corrente di 100 mA. Per la scelta di un'alimentatore predisposto EuP consigliamo di verificare ulteriori dettagli con il produttore. 60 ASRock Z68M-ITX/HT Motherboard Italiano - ASRock Z68M-ITX/HT | Quick Installation Guide - Page 61
di non cancellare la CMOS subito dopo avere aggiornato il BIOS. Se si deve azzerare la CMOS quando si è completato l'aggiornamento del BIOS, è necessario per prima cosa avviare il sistema e SATAII attuale permette velocità di trasferimento dati fino a 3.0 Gb/s. 61 ASRock Z68M-ITX/HT Motherboard - ASRock Z68M-ITX/HT | Quick Installation Guide - Page 62
alle quattro porte USB 2.0 predefinite nel pannello I/O, la scheda madre dispone di due intestazioni USB 2.0. Ciascuna intestazione USB 2.0 supporta due porte USB 2.0. Italiano 62 ASRock Z68M-ITX/HT Motherboard - ASRock Z68M-ITX/HT | Quick Installation Guide - Page 63
operi in modo corretto. Attenersi alle istruzioni del nostro manuale e del manuale del telaio per installare il sistema. 2. Se si audio AC'97. E. Per attivare il microfono frontale. Sistema operativo Windows® XP / XP 64-bit: Selezionare "Mixer". Selezionare "Recorder ASRock Z68M-ITX/HT Motherboard - ASRock Z68M-ITX/HT | Quick Installation Guide - Page 64
combaciare il cavo nero col pin di terra. Connettore ventolina CPU (4-pin CPU_FAN1) (vedi p.2 Nr. 18) 4 3 2 1 GND +12V CPU_FAN_SPEED FAN_SPEED_CONTROL Collegare il cavo della ventolina CPU a questo connettore e far combaciare il filo nero al pin terra. Italiano 64 ASRock Z68M-ITX/HT Motherboard - ASRock Z68M-ITX/HT | Quick Installation Guide - Page 65
velocità della ventola. Se si intende collegare la ventola CPU a 3 piedini al connettore della ventola CPU su questa scheda madre, collegarla ai piedini 1-3. Piedini 1-3 ATX a 20 pin 12 1 Collegare un alimentatore ATX 12 V a questo connettore. Italiano 65 ASRock Z68M-ITX/HT Motherboard - ASRock Z68M-ITX/HT | Quick Installation Guide - Page 66
BIOS La Flash Memory sulla scheda madre contiene le Setup Utility. Quando si avvia il computer, premi o durante il Power-On-Self-Test (POST) della Setup utility del BIOS; altrimenti, POST continua con i suoi test di routine. Per entrare il BIOS 66 ASRock Z68M-ITX/HT Motherboard Italiano - ASRock Z68M-ITX/HT | Quick Installation Guide - Page 67
VistaTM / VistaTM 64 bits, es recomendable establecer la opción del BIOS de la configuración de almacenamiento en el modo AHCI. Para obtener detalles sobre la configuración del BIOS, consulte el "Manual del usuario" que se encuentra en nuestro CD de soporte. 67 ASRock Z68M-ITX/HT Motherboard Español - ASRock Z68M-ITX/HT | Quick Installation Guide - Page 68
Threading (ver ATENCIÓN 1) - Intel® Z68 - Soporte de Tecnología de Memoria de Doble (vea ATENCIÓN 3) - Compatible con Intel® Extreme Memory Profile (XMP) - 1 x ranura PCI Express 11 con CPU Intel® Ivy Bridge, DirectX 10.1 con CPU Intel® Sandy Bridge - 1759MB ASRock Z68M-ITX/HT Motherboard Español - ASRock Z68M-ITX/HT | Quick Installation Guide - Page 69
Blu-ray de alta calidad - Compatible con THX TruStudioTM - PCIE x1 Gigabit LAN 10/100/1000 Mb/s - Realtek RTL8111E - Soporta Wake-On-LAN - Admite detección de conexión de cable LAN - /s - 1 x Base de conexiones del módulo de infrarrojos para el consumidor 69 ASRock Z68M-ITX/HT Motherboard Español - ASRock Z68M-ITX/HT | Quick Installation Guide - Page 70
del procesador y del CPU / chasis - Ventilador silencioso del procesador y el chasis (ajuste automático de la velocidad del ventilador del chasis en función de la temperatura del procesador) - Control de ajuste de la velocidad del ventilador de la CPU / chasis ASRock Z68M-ITX/HT Motherboard - ASRock Z68M-ITX/HT | Quick Installation Guide - Page 71
del reloj, incluido el ajuste del BIOS, aplicando la tecnología de aumento 1. Por favor consulte página 41 del Manual del Usuario en el soporte CD sobre la sistema pueda funcionar bajo Windows® 7 / VistaTM / XP. Para equipos con Windows® OS con CPU de 64-bit, no ASRock Z68M-ITX/HT Motherboard Español - ASRock Z68M-ITX/HT | Quick Installation Guide - Page 72
fantástica carga sin precedentes. Sitio web de ASRock: http://www.asrock.com/Feature/AppCharger/index. asp 11. SmartView, una nueva función el explorador de Internet, es la página de inicio inteligente para IE que combina los sitios Web más visitados, su 72 ASRock Z68M-ITX/HT Motherboard Español - ASRock Z68M-ITX/HT | Quick Installation Guide - Page 73
Windows® 7 / 7 64 bits / VistaTM / VistaTM 64 bits y que la versión de su explorador es IE8. Sitio Web de ASRock: http://www.asrock.com/Feature/SmartView/index.asp 12. ASRock , compruebe si el ventilador de la CPU de la placa base funciona apropiadamente y ASRock Z68M-ITX/HT Motherboard Español - ASRock Z68M-ITX/HT | Quick Installation Guide - Page 74
. No borre la memoria CMOS justamente después de actualizar el BIOS. Si necesita borrar la memoria CMOS justamente después de actualizar el BIOS, debe iniciar primero el sistema y, a continuación, cerrarlo antes á un daño permanente en la placa base. Español 74 ASRock Z68M-ITX/HT Motherboard - ASRock Z68M-ITX/HT | Quick Installation Guide - Page 75
de E/S, hay dos bases de conexiones USB 2.0 en esta placa base. Cada una de estas bases de conexiones admite dos puertos USB 2.0. Español 75 ASRock Z68M-ITX/HT Motherboard - ASRock Z68M-ITX/HT | Quick Installation Guide - Page 76
operar correctamente. Por favor, siga las instrucciones en nuestro manual y en el manual de chasis para instalar su sistema. 2. Si utiliza el 97. E. Activación del micrófono frontal. En sistemas operativos Windows® XP / XP 64-bit: Seleccione "Mixer" (Mezclador). ASRock Z68M-ITX/HT Motherboard - ASRock Z68M-ITX/HT | Quick Installation Guide - Page 77
(apagado). Por favor, conecte los cables del ventilador a los conectores de ventilador, haciendo coincidir el cable negro con la patilla de masa. Español 77 ASRock Z68M-ITX/HT Motherboard - ASRock Z68M-ITX/HT | Quick Installation Guide - Page 78
de la CPU a este power (4-pin ATX12V1) (vea p.2, N. 16) Tenga en cuenta que es necesario conectar este conector a una toma de corriente con el enchufe ATX 12V, de modo que proporcione suficiente electricidad. De lo contrario no se podrá encender. Español 78 ASRock Z68M-ITX/HT Motherboard - ASRock Z68M-ITX/HT | Quick Installation Guide - Page 79
figurar la BIOS, por favor refiérase al Manual del Usuario (archivo PDF) contenido en el CD. 3. Información de Software Support CD Esta placa-base soporta diversos tipos de sistema operativo Windows®: 7 / el archivo "ASSETUP.EXE" para iniciar la instalación. 79 ASRock Z68M-ITX/HT Motherboard Español - ASRock Z68M-ITX/HT | Quick Installation Guide - Page 80
1.1 ASRock Z68M-ITX/HT Mini-ITX: 6,7 x 6,7 17,0 x 17,0 см) ASRock Z68M-ITX/HT ASRock Z68M-ITX/HT 2 x Serial ATA (SATA 1 x 3,5 1 x I/O 1 x 1 x ASRock Windows® 7 / 7 64-bit / VistaTM / VistaTM 64-bit BIOS Storage Configuration AHCI BIOS 80 ASRock Z68M-ITX/HT Motherboard - ASRock Z68M-ITX/HT | Quick Installation Guide - Page 81
Memory Profile (XMP) - 1 x PCI Express 2.0 x16 x16) Intel® HD: Intel® Quick Sync Video, Intel® InTruTM 3D Intel® Clear Video HD, Intel® HD Graphics 2000/3000, Intel® Advanced Vector Extensions (AVX) - Pixel Shader 4.1, DirectX 11 Intel® Ivy Bridge 81 ASRock Z68M-ITX/HT Motherboard - ASRock Z68M-ITX/HT | Quick Installation Guide - Page 82
x 1 Gigabit LAN 10/100/1000 Mb/s - Realtek RTL8111E Wake-On-LAN Power LED CPU/Chassis FAN - 24 ATX - 4 ATX 12 В - 2 x USB 2.0 4 USB 2.0 BIOS - 64Mb AMI BIOS - AMI UEFI Legal BIOS Plug and Play" - ACPI 1.1 SMBIOS 2.3.1 82 ASRock Z68M-ITX/HT Motherboard - ASRock Z68M-ITX/HT | Quick Installation Guide - Page 83
/Chassis FAN 12V, +5V, +3.3V, Vcore Microsoft® Windows® 7 / 7 64-bit / VistaTM 64 VistaTM / XP / XP 64-bit ные - FCC, CE, WHQL ErP/EuP Ready ErP/EuP 18) ты http://www.asrock.com BIOS Untied Overclocking 83 ASRock Z68M-ITX/HT Motherboard - ASRock Z68M-ITX/HT | Quick Installation Guide - Page 84
/ VistaTM. 7 2-, 4-, 6- и 8 3. 8 ASRock Extreme Tuning Utility (AXTU Hardware Monitor Fan Control Overclocking OC DNA and IES Hardware Monitor Fan Control Overclocking OC DNA IES ASRock Extreme Tuning Utility (AXTU ASRock: http://www.asrock.com 84 ASRock Z68M-ITX/HT Motherboard - ASRock Z68M-ITX/HT | Quick Installation Guide - Page 85
/Feature/AppCharger/index.asp 11. SmartView IE Facebook ASRock SmartView SmartView Windows® 7 / 7 64 bit / VistaTM / VistaTM 64 bit IE8 ASRock: http://www.asrock. com/Feature/SmartView/index.asp 12 ASRock XFast USB USB 13. ASRock XFast LAN Youtube 85 ASRock Z68M-ITX/HT Motherboard - ASRock Z68M-ITX/HT | Quick Installation Guide - Page 86
14 Lucid Virtu 3D HD Intel®. 15 ASRock MP3 ACPI S5 3,5 16 17 18. EuP Energy Using Product EuP 1 EuP Intel EuP 50 5V 100 EuP. 86 ASRock Z68M-ITX/HT Motherboard - ASRock Z68M-ITX/HT | Quick Installation Guide - Page 87
2, п. 6) CMOS CLRCMOS1 CMOS 15 5 2 и 3 CLRCMOS1 CMOS BIOS CMOS BIOS CMOS CMOS. 1.4 Serial ATAII (SATA_2 (PORT 4 2, п. 4) (SATA_3 (PORT 3 2, п. 5) SATA_2 (PORT 4) SATA_3 (PORT 3) Serial ATAII SATAII SATA 3,0 87 ASRock Z68M-ITX/HT Motherboard - ASRock Z68M-ITX/HT | Quick Installation Guide - Page 88
DUMMY 1 GND P+8 P-8 USB_PWR (4 CIR1 2, п. 10) 1 GND IRTX IRRX ATX+5VSB Serial ATA3 SATA3 SATA 6,0 SATA / SATAII / SATA3 SATAII / SATA3 3,5 MP3 USB 2.0 USB 2.0 USB 2.0 USB 2.0. 88 ASRock Z68M-ITX/HT Motherboard - ASRock Z68M-ITX/HT | Quick Installation Guide - Page 89
Audio_L (LIN OUT2_L. C Ground (GND Ground (GND). D MIC_RET и OUT_RET HD AC'97 E Windows® XP / XP 64 Mixer Recorder FrontMic Windows® 7 / 7 64-бита, VistaTM / VistaTM 64 FrontMic Realtek Recording Volume 9 PANEL1 2, п. 1) PWRBTN 89 ASRock Z68M-ITX/HT Motherboard - ASRock Z68M-ITX/HT | Quick Installation Guide - Page 90
RESET PLED S1 S3 или S4 S5). HDLED Power LED (3 PLED1 2, п. 20) 1 PLEDPLED+ PLED+ Chassis Fan 3 CHA_FAN1 2, п. 19) 4 CPU_FAN1 2, п. 18) 4 3 2 1 GND +12V CPU_FAN_SPEED FAN_SPEED_CONTROL Power LED S1 S3/S4 или S5 90 ASRock Z68M-ITX/HT Motherboard - ASRock Z68M-ITX/HT | Quick Installation Guide - Page 91
4 3 3 1-3. 1-3 3 ATX 24 (24 ATXPWR1) 2, п. 8) 12 13 ATX. 1 24 ATX 20 ATX 20 ATX 1 13. 24 13 20 ATX 12 1 12V-ATX (4 ATX12V1 2, п. 16) ATX 12 91 ASRock Z68M-ITX/HT Motherboard - ASRock Z68M-ITX/HT | Quick Installation Guide - Page 92
POST Ctrl> + + - ASRock Z68M-ITX/HT | Quick Installation Guide - Page 93
64-bit / VistaTM / VistaTM 64-bit ile daha iyi performans elde etmek için, Depolama Konfigürasyonundaki BIOS seçeneğini AHCI moduna ayarlamanız tavsiye edilir. BIOS ayarı için, ayrıntıları öğrenmek üzere lütfen destek CD'mizdeki "Kullanıcı Kılavuzu"na bakın. 93 ASRock Z68M-ITX/HT Motherboard Türkçe - ASRock Z68M-ITX/HT | Quick Installation Guide - Page 94
CPU Yonga seti Bellek Genişletme Yuvası Grafikler Ses 94 - Mini-ITX (bkz. DİKKAT 1) - Intel® Z68 - Çift Kanallı DDR3 Belleği Teknolojisi Ivy Bridge işlemciye sahip DirectX 11, Intel® Sandy Bridge işlemciye sahip DirectX 10.1 - Maks. paylaюэlan bellek 1759 MB ASRock Z68M-ITX/HT Motherboard Türkçe - ASRock Z68M-ITX/HT | Quick Installation Guide - Page 95
ıcı Kızılötesi Modül Bağlantısı - 1 x Güç LED'i fişi - CPU/Kasa FAN konektörü - 24 pin ATX güç konektörü - 4 pin 12V Mb AMI BIOS - GUI destekli AMI UEFI Geçerli BIOS - "Tak Çalıştır"ı destekler - ACPI 1.1 Uyumlu Uyandırma Olayları - Jumpersız ayarlamayı destekler 95 ASRock Z68M-ITX/HT Motherboard - ASRock Z68M-ITX/HT | Quick Installation Guide - Page 96
Ayar'ına izin verir) - CPU/Kasa Fan Çoklu-Hız Kontrolü - Voltaj İzleme: +12V, +5V, +3,3V, CPU Vcore İS - Microsoft® Windows® 7 / 7 64-bit ziyaret edin: http://www.asrock.com UYARI Lütfen, ayarı BIOS'da ayarlama, Untied Overclocking Teknolojisi'ni uygulama veya üçü ASRock Z68M-ITX/HT Motherboard - ASRock Z68M-ITX/HT | Quick Installation Guide - Page 97
64-bit CPU'lu Windows® OS BIOS'unuzu yalnızca birkaç tıklatma ile ek bir disket veya diğer karmaşık flash yardımcı programlarını hazırlamadan güncelleyebilirsiniz. Lütfen USB flash sürücünün veya sabit diskin FAT32/16/12 dosya sistemi kullanması gerektiğini unutmayın. 97 ASRock Z68M-ITX/HT Motherboard - ASRock Z68M-ITX/HT | Quick Installation Guide - Page 98
ses kablosu (isteğe bağlı) sağlamaktadır. 16. Bu anakart adımsız kontrole izin verse de aşırı hızlandırma uygulamanız önerilmez. Önerilen CPU veri yolu frekansları dışındaki frekanslar sistemin dengesiz olmasına veya CPU'nun zarar görmesine neden olabilir. 98 ASRock Z68M-ITX/HT Motherboard Türkçe - ASRock Z68M-ITX/HT | Quick Installation Guide - Page 99
çıkarın, sonra geri takın. Isı geçişini artırmak için, PC sistemini yüklediğinizde CPU ile ısı emici arasına ısı macunu sürmeyi unutmayın. 18. Enerji Kullanan Ürün anlamına gelen daha fazla ayrıntı için güç kaynağı üreticisine başvurmanızı öneririz. 99 ASRock Z68M-ITX/HT Motherboard Türkçe - ASRock Z68M-ITX/HT | Quick Installation Guide - Page 100
kısaltmak için bir atlatıcı şapkası kullanın. Ancak, BIOS'u güncelledikten hemen sonra lütfen CMOS'u temizlemeyin. BIOS'u güncellemeyi tamamladığınızda CMOS'u temizlemeniz gerekirse, ilk olarak SATAII arayüzü 3,0 Gb/sn veri aktarım hızına izin verir. Türkçe 100 ASRock Z68M-ITX/HT Motherboard - ASRock Z68M-ITX/HT | Quick Installation Guide - Page 101
varsayılan dört USB 2.0 portundan başka, bu anakartta iki USB 2.0 fişi bulunur. Her USB 2.0 fişi iki USB 2.0 portunu destekler. Bu fiş, uzaktan kumanda alıcısı destekler. Türkçe 101 ASRock Z68M-ITX/HT Motherboard - ASRock Z68M-ITX/HT | Quick Installation Guide - Page 102
XP / XP 64-bit İS için: "Karıştırıcı"yı seçin. "Kaydedici"yi seçin. Sonra "Ön Mikrofon"u tıklatın. Windows® 7 / 7 64-bit / VistaTM / VistaTM 64-bit İS için: Realtek Kontrol panelinde "Ön Mikrofon" Sekmesine gidin. S3/S4 uyku modunda veya kapalı (S5) iken LED söner. ASRock Z68M-ITX/HT Motherboard - ASRock Z68M-ITX/HT | Quick Installation Guide - Page 103
CPU CPU fanı bu konektördeki CPU fan konektörüne bağlamayı planlıyorsanız, lütfen Pin 1-3'e bağlayın. Pin 1-3 Bağlı 3-Pinli Fanı Takma ATX Güç Konektörü 24 (24-pinli ATXPWR1) (bkz. s.2 No. 8) 12 Lütfen bir ATX güç kaynağını 13 bu konektöre bağlayın. 1 Türkçe 103 ASRock Z68M-ITX/HT Motherboard - ASRock Z68M-ITX/HT | Quick Installation Guide - Page 104
-Pinli ATX Güç Kaynağını Takma 12 1 ATX 12V Güç Konektörü (4-pinli ATX12V1) (bkz. s.2 No. 16) Lütfen bir ATX 12V güç kaynağını bu konektöre bağlayın. Türkçe 104 ASRock Z68M-ITX/HT Motherboard - ASRock Z68M-ITX/HT | Quick Installation Guide - Page 105
BIOS Ayarları yardımcı programına girmek için veya tuşuna basın; aksi halde, POST test rutinlerine devam eder. BIOS Ayarlar 3. Yazılım Destek CD'si bilgileri Bu anakart çeşitli Microsoft® Windows® işletim sistemleri destekler: 7 / 7 64-bit / VistaTM ASRock Z68M-ITX/HT Motherboard Türkçe - ASRock Z68M-ITX/HT | Quick Installation Guide - Page 106
1.1 ASRock Z68M-ITX/HT Mini-ITX 6.7" x 6.7", 17.0 x 17.0 cm) ASRock Z68M-ITX/HT ASRock Z68M-ITX/HT 지원 CD 시리얼 ATA (SATA 2 3.5mm 1 I/O 차폐 1 1 1 ASRock Windows® 7 / 7 64-비트 / VistaTM / VistaTM 64 Storage Configuration BIOS 옵션을 AHCI BIOS CD 106 ASRock Z68M-ITX/HT Motherboard 한 국 어 - ASRock Z68M-ITX/HT | Quick Installation Guide - Page 107
ITX 6.7" x 6.7", 17.0 x 17.0 cm 100 덴서 ) - LGA1155 2 세대 Intel® CoreTM i7 / i5 / i3 지원 - Intel® Turbo Boost 2.0 K CPU 1 참조 ) - Intel® Z68 Shader 4.1, Intel® Ivy Bridge CPU DirectX 11, Intel® Sandy Bridge CPU DirectX 10.1 Mb/s - Realtek RTL8111E LAN 107 ASRock Z68M-ITX/HT Motherboard 한국어 - ASRock Z68M-ITX/HT | Quick Installation Guide - Page 108
RAID (RAID 0, RAID 1, RAID 10, RAID 5, Intel Rapid Storage 및 Intel Smart Response NCQ,AHCI 2 개 의 SATA3 6.0Gb/s 1 LED 헤더 1 개 - CPU 24 핀 ATX 4 핀 ATX 12V USB 2.0 헤더 2 개 (4 USB 2.0 2개 ) - Mb AMI BIOS - GUI AMI UEFI 적합형 BIOS ACPI 1.1 SMBIOS 2.3.1 지원 한 국 어 108 ASRock Z68M-ITX/HT Motherboard - ASRock Z68M-ITX/HT | Quick Installation Guide - Page 109
- CPU - CPU CPU 가능 ) - CPU 12V,+5V,+3.3V,Vcore OS Windows® 7/7 64 비트 /VistaTM/ VistaTM 64 비트 / XP/XP 64 인증서 - FCC, CE, WHQL - ErP/EuP 지원 (ErP/EuP ( 주의 18 참조 ) http://www.asrock.com BIOS Untied Overclocking Technology 한 국 어 109 ASRock Z68M-ITX/HT Motherboard - ASRock Z68M-ITX/HT | Quick Installation Guide - Page 110
에서는 OC OS OS IES (Intelligent Energy Saver CPU ASRock 의 AXTU (Extreme Tuning Utility ASRock http://www.asrock.com 9. ASRock Instant Flash ROM BIOS BIOS MS-DOS 나 Windows BIOS POST 중에 BIOS F6 F2 ASRock Instant Flash USB BIOS BIOS USB FAT32/16/12 ASRock Z68M-ITX/HT Motherboard - ASRock Z68M-ITX/HT | Quick Installation Guide - Page 111
asp 12. ASRock XFast USB 는 USB 13. ASRock XFast LAN LAN Youtube HD 14. Lucid Virtu GPU 의 3D 성능과 Intel® HD 15. ASRock On/Off Play MP3 PC PC ACPI S5 3.5 mm 16 CPU CPU 17 CPU PC CPU 18. EuP 는 Energy Using Product EuP AC 1.00W EuP ASRock Z68M-ITX/HT Motherboard 111 한 국 어 - ASRock Z68M-ITX/HT | Quick Installation Guide - Page 112
CLRCMOS1 CMOS 15 CLRCMOS1 의 핀 2 와 핀 3 을 5 BIOS CMOS BIOS CMOS CMOS CMOS 한 국 어 1.4 콘넥터 그림 설명 시리얼 ATAII 커넥터 (SATA_2 (PORT 4): SATA_2 (PORT 4) 2 ATAII (SATA 2 4 치용 SATA (SATA_3 (PORT 3): 2 5 SATA_3 (PORT 3) SATA SATAII 112 ASRock Z68M-ITX/HT Motherboard - ASRock Z68M-ITX/HT | Quick Installation Guide - Page 113
IRTX IRRX ATX+5VSB 3.0 Gb/s 2 ATA3 (SATA3 SATA SATA SATA3 6.0 Gb/s SATA SATA / SATAII / SATA3 SATAII / SATA3 3.5 mm MP3 PC I/O 4 USB 2.0 USB 2.0 헤더가 2 USB 2.0 헤더 는 2 개의 USB 2.0 한국어 113 ASRock Z68M-ITX/HT Motherboard - ASRock Z68M-ITX/HT | Quick Installation Guide - Page 114
D. MIC_RET 및 OUT_RET 는 HD 이들을 AC'97 E. Windows® XP / XP 64 비트 OS "Mixer Recorder FrontMic Windows® 7 / 7 64 비트 / VistaTM / VistaTM 64 비트 OS 의 경우 : Realtek FrontMic Recording Volume (9 핀 PANEL1) (2 1 한 국 어 114 PWRBTN RESET ASRock Z68M-ITX/HT Motherboard - ASRock Z68M-ITX/HT | Quick Installation Guide - Page 115
19 LED LED S1 LED S3/S4 S5 LED CPU (4 핀 CPU_FAN1) (2 18 4 3 2 1 GND +12V CPU_FAN_SPEED FAN_SPEED_CONTROL CPU 4 핀 CPU 3 핀 CPU CPU 3 핀 CPU 1-3 1-3 3 ATX 24 (24 핀 ATXPWR1) (2 8 12 13 ATX 1 한 국 어 115 ASRock Z68M-ITX/HT Motherboard - ASRock Z68M-ITX/HT | Quick Installation Guide - Page 116
24 핀 ATX 20 핀 ATX 20 핀 ATX Pin 1 과 Pin 13 24 13 ATX 12V (4 핀 ATX12V1) (2 16 20 핀 ATX 12 1 ATX 12V 한 국 어 116 ASRock Z68M-ITX/HT Motherboard - ASRock Z68M-ITX/HT | Quick Installation Guide - Page 117
2 POST F2> 또는 ++ - ASRock Z68M-ITX/HT | Quick Installation Guide - Page 118
index.asp 1.1 ASRock Z68M-ITX/HT Mini-ITX 6.7-in x 6.7-in, 17.0 cm x 17.0 cm) ASRock Z68M-ITX/HT ASRock Z68M-ITX/HT CD 2 x ATA (SATA 1 x 3.5mm 1 x I/O 1 x 1 x ASRock Windows® 7 / 7 64-bit / VistaTM / VistaTM 64-bit BIOS AHCI B I O S C D 日本語 118 ASRock Z68M-ITX/HT Motherboard - ASRock Z68M-ITX/HT | Quick Installation Guide - Page 119
Rate HDMI (HDMI 6 HDCP 機能、DVI HDMI 1080p Blu-ray (BD) / HD-DVD DVI HDMI 7.1 CH HD Realtek ALC892 Codec) - Premium Blu-ray THX TruStudioTM 119 ASRock Z68M-ITX/HT Motherboard 日本語 - ASRock Z68M-ITX/HT | Quick Installation Guide - Page 120
3.0Gb RAID (RAID 0, RAID 1, RAID 10, RAID 5, Intel Rapid Storage および Intel Smart Response NCQ, AHCI および "Hot Plug 2 x SATA3 6.0Gb x 1 - 電源 LED x 1 - CPU 24 ピン ATX 4 ピン 12V USB 2.0 USB 2.0 用 4 x 2 - Mb AMI BIOS - AMI UEFI Legal BIOS(GUI ACPI 1.1 jumperfree ASRock Z68M-ITX/HT Motherboard - ASRock Z68M-ITX/HT | Quick Installation Guide - Page 121
- CPU CPU - CPU 12V, +5V, +3.3V, Vcore OS - Microsoft® Windows® 7 / 7 64-bit / VistaTM / VistaTM 64-bit / XP / XP 64-bit compliant 認証 - FCC, CE, Microsoft® WHQL - ErP/EuP 対応(ErP/EuP ( 注意 18 を参照 ) http://www.asrock.com BIOS 日本語 121 ASRock Z68M-ITX/HT Motherboard - ASRock Z68M-ITX/HT | Quick Installation Guide - Page 122
は Windows® 7 64-bit / 7 HBR は Windows® 7 64-bit / 7 / VistaTM 64-bit / VistaTM 2 4 6 8 3 ASRock Extreme Tuning Utility (AXTU OC DNA、ES CPU OC DNA OC OC OC IES CPU ASRock Extreme Tuning Utility (AXTU Web ASRock Web サイト :http://www.asrock.com 日本語 122 ASRock Z68M-ITX/HT Motherboard - ASRock Z68M-ITX/HT | Quick Installation Guide - Page 123
7 64 bit / VistaTM / VistaTM 64 bit IE8 ASRock http://www.asrock.com/Feature/ SmartView/index.asp 12. ASRock XFast USB は USB 13. ASRock XFast LAN LAN Youtube HD ます。 14. Lucid Virtu Intel® HD GPU と最新 3D 日本語 123 ASRock Z68M-ITX/HT Motherboard - ASRock Z68M-ITX/HT | Quick Installation Guide - Page 124
PC ACPI S5 MP3 PC 3.5mm 16. CPU CPU 17. CPU CPU 冷 PC ル時に、CPU です。 18. Energy Using Product EuP EuP に従っ AC 1.00W EuP EuP EuP 対応 Intel EuP 5v 100 mA で 50 EuP 日本語 124 ASRock Z68M-ITX/HT Motherboard - ASRock Z68M-ITX/HT | Quick Installation Guide - Page 125
注 : CLRCMOS1 CMOS 15 CLRCMOS1 のピン 2 とピン 3 を 5 BIOS CMOS BIOS CMOS CMOS CMOS 1.4 ATAII SATA_2 (PORT 4 2 4 を参照 SATA_3 0 2 3 を参照 SATA_1 (PORT 1 2 2 を参照 SATA_0 (PORT 0) SATA_1 (PORT 1) これら 2 ATA3 (SATA3 SATA SATA3 6.0 Gb/s です。 ASRock Z68M-ITX/HT Motherboard 125 日本語 - ASRock Z68M-ITX/HT | Quick Installation Guide - Page 126
3.5mm USB 2.0 ヘッダ (9 ピン USB6_7 11 を参照 (9 ピン USB8_9 9 を参照 USB_PWR P-9 P+9 GND DUMMY 1 GND P+8 P-8 USB_PWR 4 ピン CIR1 10 を参照 1 GND IRTX IRRX ATX+5VSB 3.5mm MP3 PC I/O 4 つの USB 2.0 2 つの USB 2.0 USB 2.0 2 つの USB 2.0 日本語 126 ASRock Z68M-ITX/HT Motherboard - ASRock Z68M-ITX/HT | Quick Installation Guide - Page 127
D. MIC_RET と OUT_RET AC'97 E. Windows® XP / XP 64-bit OS の場合 : "Mixer Recorder FrontMic Windows® 7 / 7 64-bit / VistaTM / VistaTM 64-bit OS の場合 : Realtek FrontMic Recording Volume 9 ピン PANEL1 1 を参照 日本語 PWRBTN 127 ASRock Z68M-ITX/HT Motherboard - ASRock Z68M-ITX/HT | Quick Installation Guide - Page 128
LED 電源 LED 3 ピン PLED1 20 を参照 3 ピン CHA_FAN1 19 を参照 1 PLEDPLED+ PLED+ LED LED S1 LED S3/S4 S5 LED CPU 4 ピン CPU_FAN1 18 を参照 4 3 2 1 GND +12V CPU_FAN_SPEED FAN_SPEED_CONTROL CPU 4 ピン CPU 3 ピン CPU 3 ピン CPU CPU 1-3 1-3 3 日本語 128 ASRock Z68M-ITX/HT Motherboard - ASRock Z68M-ITX/HT | Quick Installation Guide - Page 129
ATX 24 (24 ピン ATXPWR1) 8 を参照 12 13 ATX 1 24 ピン ATX 20 ピン ATX 20 ピン ATX 1 13 24 13 20 ピン ATX 12 1 ATX 12V 4 ピン ATX12V1 16 を参照 CPU に Vcore ATX 12V 日本語 129 ASRock Z68M-ITX/HT Motherboard - ASRock Z68M-ITX/HT | Quick Installation Guide - Page 130
2.BIOS 情報 BIOS POST F2 Del BIOS POST BIOS POST Ctrl〉+〈Alt〉+〈Delete BIOS BIOS CD PDF 3 CD 情報 Microsoft® Windows® 7 / 7 64-bit / VistaTM / VistaTM 64bit / XP / XP 64-bit CD CD CDROM CD AUTORUN AUTORUN CD 内の BIN ASSETUP.EXE 130 ASRock Z68M-ITX/HT Motherboard 日本語 - ASRock Z68M-ITX/HT | Quick Installation Guide - Page 131
.asp 1.1 華擎 Z68M-ITX/HT 主板 (Mini-ITX 規格 : 6.7 英吋 X 6.7 英吋 , 17.0 厘米 X 17.0 厘米 ) 華擎 Z68M-ITX/HT Z68M-ITX/HT Serial ATA(SATA 3.5mm I/O ASRock 為了在 Windows® 7 / 7 64-bit / VistaTM / VistaTM 64-bit BIOS中將Storage Configuration AHCI BIOS User Manual 131 ASRock Z68M-ITX/HT Motherboard 簡體中文 - ASRock Z68M-ITX/HT | Quick Installation Guide - Page 132
Lip Sync、xvYCC 與 HBR HDMI 6 DVI 和 HDMI HDCP DVI 和 HDMI 10800 BD) / HD-DVD 光盤 - 7.1 Realtek ALC892 THX TruStudioTM - PCIE x1 Gigabit LAN 10/100/1000 Mb/s - Realtek RTL8111E Wake-On-LAN) ASRock Z68M-ITX/HT Motherboard 簡體中文 - ASRock Z68M-ITX/HT | Quick Installation Guide - Page 133
USB 3.0 連接頭 BIOS 支持光盤 Energy Efficient Ethernet CPU 24 針 ATX 4 針 12V 2 x USB 2.0 4 USB 2.0 接口 ) - Mb AMI BIOS - AMI UEFI Legal BIOS,支持 GUI Plug and Play,PnP) - ACPI 1.1 jumperfree CyberLink MediaEspresso 6.5 CyberLink DVD Suite - OEM MAGIX OEM) 簡體中文 133 ASRock Z68M-ITX/HT Motherboard - ASRock Z68M-ITX/HT | Quick Installation Guide - Page 134
Guard (B.F.G - CPU - CPU - CPU CPU 度) - CPU 12V, +5V, +3.3V 操作系統 - Microsoft® Windows® 7/7 64 位元 /VistaTM/VistaTM 64 位元 / XP/XP 64 認證 - FCC, CE, WHQL - 支持 ErP/EuP ErP/EuP 18) http://www.asrock.com BIOS 簡體中文 134 ASRock Z68M-ITX/HT Motherboard - ASRock Z68M-ITX/HT | Quick Installation Guide - Page 135
Flash Flash ROM 的 BIOS BIOS MS-DOS 或 Windows B I O S F6> 鍵或在 B I O S F2 Instant Flash B I O S U B I O S U FAT32/64 10 i P h o n e / i P a d / i P o d touch APP Charger APP Charger iPhone 40%。華擎 APP Charger S1 S3 S4 S5 APP Charger 135 ASRock Z68M-ITX/HT Motherboard 簡體中文 - ASRock Z68M-ITX/HT | Quick Installation Guide - Page 136
USB 13、華擎 XFast LAN Youtube 14、利用 Lucid Virtu GPU 的 3D 性能和 Intel® HD 15 M P3 P C P C ACPI S5 3.5mm 16 CPU CPU 17 CPU C P U PC CPU 18、EuP, 全稱 Energy Using Product E u P 1.00W EuP EuP EuP Intel EuP 100m A 5V s b 50 E u P 136 ASRock Z68M-ITX/HT Motherboard 簡體中文 - ASRock Z68M-ITX/HT | Quick Installation Guide - Page 137
0): 見第 2 頁第 3 項 ) (SATA_1 (PORT 1): 見第 2 頁第 2 項 ) SATA_2 (PORT 4) SATA_3 (PORT 3) SATA_0 (PORT 0) SATA_1 (PORT 1) Serial ATAII (SATAII Serial (SATA SATAII 3.0Gb/s Serial ATA3 (SATA3 Serial (SATA SATA3 6.0Gb/s 簡體中文 137 ASRock Z68M-ITX/HT Motherboard - ASRock Z68M-ITX/HT | Quick Installation Guide - Page 138
) ( 見第 2 頁第 10 項 ) USB_PWR P-9 P+9 GND DUMMY 1 GND P+8 P-8 USB_PWR 1 GND IRTX IRRX ATX+5VSB SATA SATA/SATAII/SATA3 SATAII/ SATA3 接口。 3.5mm MP3 PC I/O USB 2.0 USB 2.0 USB 2.0 USB 2.0 接口。 簡體中文 138 ASRock Z68M-ITX/HT Motherboard - ASRock Z68M-ITX/HT | Quick Installation Guide - Page 139
E 在 Windows® XP / XP 64 選擇"Mixer"。選擇"Recorder" FrontMic"。 在 Windows® 7 / 7 64 位元 / VistaTM / VistaTM 64 統中 : 在 Realtek FrontMic"。調節"Recording Volume"。 (9 針 PANEL1) ( 見第 2 頁第 1 項 ) 簡體中文 PWRBTN RESET PLED S1 S3/S4 S5 HD LED ASRock Z68M-ITX/HT Motherboard 139 - ASRock Z68M-ITX/HT | Quick Installation Guide - Page 140
CPU 3-Pin CPU CPU Pin 1-3。 Pin 1-3 連接 3-Pin ATX (24 針 ATXPWR1) ( 見第 2 頁第 8 項 ) 請將 ATX 24 13 個接頭。 12 1 24-pin ATX 20-pin ATX 20-pin ATX Pin 1 和 Pin 13 24 13 ATX 12V 接頭 (4 針 ATX12V1) ( 見第 2 頁第 16 項 ) 20-Pin ATX 12 1 ATX 12V 簡體中文 140 ASRock Z68M-ITX/HT Motherboard - ASRock Z68M-ITX/HT | Quick Installation Guide - Page 141
2. BIOS 信息 Flash Memory 存儲了 BIOS POST F2> 或 < D e l B I O S P O S T P O S T B I O S Ctrl>++ - ASRock Z68M-ITX/HT | Quick Installation Guide - Page 142
SJ/T 11364-2006 10 年。 圖一 部件名稱 鉛 (Pb) 鎘 (Cd) 汞 (Hg Cr(VI PBB PBDE) X O O O O O X O O O O O O SJ/T 11363-2006 X SJ/T 11363-2006 2002/95/EC 簡體中文 142 ASRock Z68M-ITX/HT Motherboard - ASRock Z68M-ITX/HT | Quick Installation Guide - Page 143
.asrock.com www.asrock.com/support/index.asp 1.1 華擎 Z68M-ITX/HT 主機板 (Mini-ITX 規格 : 6.7 英吋 x 6.7 英吋 , 17.0 公分 x 17.0 公分 ) 華擎 Z68M-ITX/HT Z68M-ITX/HT Serial ATA(SATA 3.5mm I/O ASRock提醒您... 若要在Windows® 7 / 7 64位元 / VistaTM / VistaTM 64 BIOS選項設為AHCI BIOS 143 ASRock Z68M-ITX/HT Motherboard - ASRock Z68M-ITX/HT | Quick Installation Guide - Page 144
Lip Sync、xvYCC 與 HBR HDMI 6) - DVI 和 HDMI HDCP 功能 - DVI 和 HDMI 1080p BD) / HD-DVD 光碟 - 7.1 Realtek ALC892 THX TruStudioTM - PCIE x1 Gigabit LAN 10/100/1000 Mb/s - Realtek RTL8111E Wake-On-LAN Energy Efficient Ethernet 802.3az - 支援 PXE ASRock Z68M-ITX/HT Motherboard 繁體中文 - ASRock Z68M-ITX/HT | Quick Installation Guide - Page 145
USB 2.0 4 USB 2.0 接口 ) - Mb AMI BIOS - AMI UEFI Legal BIOS ( 支援 GUI Plug and Play,PnP) - ACPI 1.1 jumperfree CyberLink MediaEspresso 6.5 CyberLink DVD Suite - OEM MAGIX OEM) - ASRock Extreme Tuning Utility (AXTU 8 Instant Flash 9 APP Charger 10) 145 ASRock Z68M-ITX/HT Motherboard 繁體中文 - ASRock Z68M-ITX/HT | Quick Installation Guide - Page 146
- 晚安 LED 指示燈 硬體監控 - CPU - CPU - CPU CPU 度) - CPU 12V, +5V, +3.3V 操作系統 - Microsoft® Windows® 7/7 64 位元 /VistaTM/VistaTM 64 位元 / XP/XP 64 位元 認證 - FCC, CE, WHQL - 支援 ErP/EuP ErP/EuP 18) http://www.asrock.com BIOS 繁體中文 146 ASRock Z68M-ITX/HT Motherboard - ASRock Z68M-ITX/HT | Quick Installation Guide - Page 147
.asrock.com 9、 華擎 Instant Flash Flash ROM 的 BIOS BIOS MS-DOS 或 Windows BIOS F6 BIOS F2 Instant Flash B I O S B I O S FAT32/64 10 i P h o n e / i P a d / i P o d touch APP Charger APP Charger iPhone 40%。華擎 APP Charger S1 S3 S4 S5 APP Charger 147 ASRock Z68M-ITX/HT Motherboard - ASRock Z68M-ITX/HT | Quick Installation Guide - Page 148
e b o o k ASRock SmartView SmartView Windows® 7 / 7 64 位元 / VistaTM / VistaTM 64 IE8。ASRock 網站:http://www.asrock.com/Feature/SmartView/ index.asp U PC CPU 18、EuP, 全稱 Energy Using Product EuP 1.00W EuP EuP EuP Intel EuP 100mA 5Vsb 50 EuP 148 ASRock Z68M-ITX/HT Motherboard 繁體中文 - ASRock Z68M-ITX/HT | Quick Installation Guide - Page 149
15 CLRCMOS1 的 pin2 及 pin3 短路 5 BIOS CMOS BIOS CMOS CMOS C M O S 1.4 接頭 接頭 圖示 Serial ATAII 接口 (SATA_2 (PORT 4): 見第 2 頁第 4 項 ) (SATA_3 (PORT 3): 見第 2 頁第 5 項 ) SATA_2 (PORT 4) SATA_3 (PORT 3) 說明 Serial ATAII (SATAII SATA SATAII 3.0Gb/s 繁體中文 149 ASRock Z68M-ITX/HT Motherboard - ASRock Z68M-ITX/HT | Quick Installation Guide - Page 150
2.0 (9 針 USB6_7) ( 見第 2 頁第 11 項 ) (9 針 USB8_9) ( 見第 2 頁第 9 項 ) (4 針 CIR1) ( 見第 2 頁第 10 項 ) USB_PWR P-9 P+9 GND DUMMY 1 GND P+8 P-8 USB_PWR 1 GND IRTX IRRX ATX+5VSB 3.5mm MP3 PC Line-in I/O USB 2.0 USB 2.0 USB 2.0 USB 2.0 接口。 繁體中文 150 ASRock Z68M-ITX/HT Motherboard - ASRock Z68M-ITX/HT | Quick Installation Guide - Page 151
AC'97 E 在 Windows® XP / XP 64 選擇"Mixer Recorder" FrontMic"。 在 Windows® 7 / 7 64 位元 / VistaTM / VistaTM 64 統中 : 在 Realtek FrontMic Recording Volume"。 (9 針 PANEL1) ( 見第 2 頁第 1 項 ) 繁體中文 PWRBTN RESET PLED S1 S3/S4 S5 HD LED ASRock Z68M-ITX/HT Motherboard 151 - ASRock Z68M-ITX/HT | Quick Installation Guide - Page 152
CPU 3-Pin CPU CPU Pin 1-3。 Pin 1-3 連接 3-Pin ATX (24 針 ATXPWR1) ( 見第 2 頁第 8 項 ) 請將 ATX 24 13 個接頭。 12 1 24-pin ATX 20-pin ATX 20-pin ATX Pin 1 和 Pin 13 24 13 繁體中文 ATX 12V (4 針 ATX12V1) ( 見第 2 頁第 16 項 ) 152 20-Pin ATX 12 1 ATX 12V ASRock Z68M-ITX/HT Motherboard - ASRock Z68M-ITX/HT | Quick Installation Guide - Page 153
2. BIOS 訊息 Flash Memory BIOS POST F2> 或 + + - ASRock Z68M-ITX/HT | Quick Installation Guide - Page 154
POST and choose the item "UEFI:xxx" to boot. 4. Start Windows® installation. 5. If you install Windows® 7 64-bit OS, OS will be formatted by GPT (GUID Partition Table). Please install the hotfix file from Microsoft®: http://support.microsoft.com/kb/979903 154 ASRock Z68M-ITX/HT Motherboard English
-
 1
1 -
 2
2 -
 3
3 -
 4
4 -
 5
5 -
 6
6 -
 7
7 -
8
-
9
-
10
-
11
-
12
-
13
-
14
-
15
-
16
-
17
-
18
-
19
-
20
-
21
-
22
-
23
-
24
-
25
-
26
-
27
-
28
-
29
-
30
-
31
-
32
-
33
-
34
-
35
-
36
-
37
-
38
-
39
-
40
-
41
-
42
-
43
-
44
-
45
-
46
-
47
-
48
-
49
-
50
-
51
-
52
-
53
-
54
-
55
-
56
-
57
-
58
-
59
-
60
-
61
-
62
-
63
-
64
-
65
-
66
-
67
-
68
-
69
-
70
-
71
-
72
-
73
-
74
-
75
-
76
-
77
-
78
-
79
-
80
-
81
-
82
-
83
-
84
-
85
-
86
-
87
-
88
-
89
-
90
-
91
-
92
-
93
-
94
-
95
-
96
-
97
-
98
-
99
-
100
-
101
-
102
-
103
-
104
-
105
-
106
-
107
-
108
-
109
-
110
-
111
-
112
-
113
-
114
-
115
-
116
-
117
-
118
-
119
-
120
-
121
-
122
-
123
-
124
-
125
-
126
-
127
-
128
-
129
-
130
-
131
-
132
-
133
-
134
-
135
-
136
-
137
-
138
-
139
-
140
-
141
-
142
-
143
-
144
-
145
-
146
-
147
-
148
-
149
-
150
-
151
-
152
-
153
-
154
 |
 |
1
ASRock
Z68M-ITX/HT
Motherboard
English
Copyright Notice:
No part of this installation guide may be reproduced, transcribed, transmitted, or trans-
lated in any language, in any form or by any means, except duplication of documentation
by the purchaser for backup purpose, without written consent of ASRock Inc.
Products and corporate names appearing in this guide may or may not be registered
trademarks or copyrights of their respective companies, and are used only for identi
fi
ca-
tion or explanation and to the owners’ bene
fi
t, without intent to infringe.
Disclaimer:
Speci
fi
cations and information contained in this guide are furnished for informational use
only and subject to change without notice, and should not be constructed as a commit-
ment by ASRock. ASRock assumes no responsibility for any errors or omissions that may
appear in this guide.
With respect to the contents of this guide, ASRock does not provide warranty of any kind,
either expressed or implied, including but not limited to the implied warranties or condi-
tions of merchantability or
fi
tness for a particular purpose. In no event shall ASRock, its
directors, of
fi
cers, employees, or agents be liable for any indirect, special, incidental, or
consequential damages (including damages for loss of pro
fi
ts, loss of business, loss of
data, interruption of business and the like), even if ASRock has been advised of the pos-
sibility of such damages arising from any defect or error in the guide or product.
This device complies with Part 15 of the FCC Rules. Operation is subject to the following
two conditions:
(1) this device may not cause harmful interference, and
(2) this device must accept any interference received, including interference that
may cause undesired operation.
CALIFORNIA, USA ONLY
The Lithium battery adopted on this motherboard contains Perchlorate, a toxic substance
controlled in Perchlorate Best Management Practices (BMP) regulations passed by the
California Legislature. When you discard the Lithium battery in California, USA, please
follow the related regulations in advance.
“Perchlorate Material-special handling may apply, see
www.dtsc.ca.gov/hazardouswaste/perchlorate”
ASRock Website: http://www.asrock.com
Published July 2011
Copyright
©
2011 ASRock INC. All rights reserved.